2011 Hyundai Santa Fe display
[x] Cancel search: displayPage 133 of 312
Features of your vehicle
58
4
LCD display warning (if equipped)
Key is not in vehicle
If the smart key is not in the vehicle and
if any door is opened or closed with the
ENGINE START/STOP button in the
ACC, ON, or START position, the warn-
ing illuminates on the LCD display. Also,
the chime sounds for 5 seconds when
the smart key is not in the vehicle and thedoor is closed.
Always have the smart key with you.
Key is not detected
If the smart key is not in the vehicle or is
not detected and you press the ENGINE
START/STOP button, the warning illumi-
nates on the LCD display for 10 seconds.
Also, the immobiliser indicator and the
key holder light blinks for 10 seconds.
Low key battery
If the ENGINE START/STOP button turns
to the OFF position when the smart key
in the vehicle discharges, the warning
illuminates on the LCD display for about
10 seconds. Also, the warning chime
sounds once.
Replace the battery with a new one. Press brake pedal to start engine
If the ENGINE START/STOP button turns
to the ACC position twice by pressing the
button repeatedly without depressing the
brake pedal, the warning illuminates on
the LCD display for about 10 seconds to
indicate that you should depress the
brake pedal to start the engine.
Shift to "P" position
If you try to turn off the engine without the
shift lever in the P (Park) position, the
ENGINE START/STOP button will turn to
the ACC position. If the button is pressed
once more it will turn to the ON position.
The warning illuminates on the LCD dis-
play for about 10 seconds to indicate that
you should press the ENGINE
START/STOP button with the shift lever
in the P (Park) position to turn off the
engine.
Also, the warning chime sounds for about
10 seconds. (if equipped)
Remove key
When you turn off the engine with the
smart key in the smart key holder, the
warning illuminates on the LCD display
for about 10 seconds. Also, the smart key
holder light blinks for about 10 seconds.
To remove the smart key push the smart
key once and pull it out from the smart
key holder.
Insert key
If you press the ENGINE START/STOP
button whilst "Key is not detected" illumi-
nates on the LCD display, the warning
“Insert key” illuminates for about 10 sec-
onds. Also, the immobiliser indicator and
the key holder light blinks for about 10
seconds.
Page 134 of 312
459
Features of your vehicle
Press start button again
If you can not operate the ENGINE
START/STOP button when there is a
problem with the ENGINE START/STOP
button system, the warning illuminates
for 10 seconds and the chime sounds
continuously to indicate that you could
start the engine by pressing the ENGINE
START/STOP button once more. The chime will stop if the ENGINE
START/STOP button system works nor-
mally or the theft alarm system is armed.
If the warning illuminates each time you
press the ENGINE START/STOP button,
take your vehicle to a HYUNDAI autho-
rised repairer and have the system
checked.
Shift to "P" or "N" to start engine
If you try to start the engine with the shift
lever not in the P(Park) or N(Neutral)
position, the warning illuminates for
about 10 seconds on the LCD display.
You can also start the engine with the
shift lever in the N(Neutral) position, but
for your safety start the engine with the
shift lever in the P(Park) position.Press start button whilst turn steering
If the steering wheel does not unlock nor-
mally when the ENGINE START/STOP
button is pressed, the warning illumi-
nates for 10 seconds on the LCD display.
Also, the warning chime sounds once
and the ENGINE START/STOP button
light blinks for 10 seconds.
When you are warned, press the
ENGINE START/STOP button whilst
turning the steering wheel right and left.
Check steering wheel lock
If the steering wheel does not lock nor-
mally when the ENGINE START/STOP
button turns to the OFF position, the
warning illuminates for 10 seconds on
the LCD display. Also, the warning chime
sounds for 3 seconds and the ENGINE
START/STOP button light blinks for 10
seconds.
Door open !
(if equipped)
This indicator illuminates when a door is
not closed securely.
The indicator displays which door is opened.
Front Left Low Tire pressure
(if equipped)
Front Right Low Tire pressure
Rear Left Low Tire pressure
Rear Right Low Tire pressure
(if equipped)
The low tyre pressure position telltale light will indicate which tyre is significant-ly under-inflated.
Low Fuel ! (if equipped)
This warning light indicates the fuel tank
is nearly empty.
Page 137 of 312
Features of your vehicle
62
4
✽✽
NOTICE
This system can only sense objects with-
in the range and location of the sensors;
It can not detect objects in other areas
where sensors are not installed. Also,
small or slim objects, such as poles or
objects located between sensors may not
be detected by the sensors.
Always visually check behind the vehi-
cle when backing up.
Be sure to inform any drivers of the
vehicle that may be unfamiliar with the
system regarding the systems capabili-
ties and limitations.D170400AFD
Self-diagnosis
If you don’t hear an audible warning
sound or if the buzzer sounds intermit-tently when shifting the gear to the R
(Reverse) position, this may indicate a
malfunction in the rear parking assist sys-
tem. If this occurs, have your vehicle
checked by a HYUNDAI authorised
repairer as soon as possible.
WARNING
Pay close attention when the vehi- cle is driven close to objects on theroad, particularly pedestrians, andespecially children. Be aware thatsome objects may not be detectedby the sensors, due to the object’sdistance, size or material, all ofwhich can limit the effectiveness ofthe sensor. Always perform a visu-al inspection to make sure the vehi-cle is clear of all obstructionsbefore moving the vehicle in anydirection.
WARNING
Your new vehicle warranty does not cover any accidents or damage tothe vehicle or injuries to its occu-pants due to a rear parking assistsystem malfunction. Always drivesafely and cautiously.
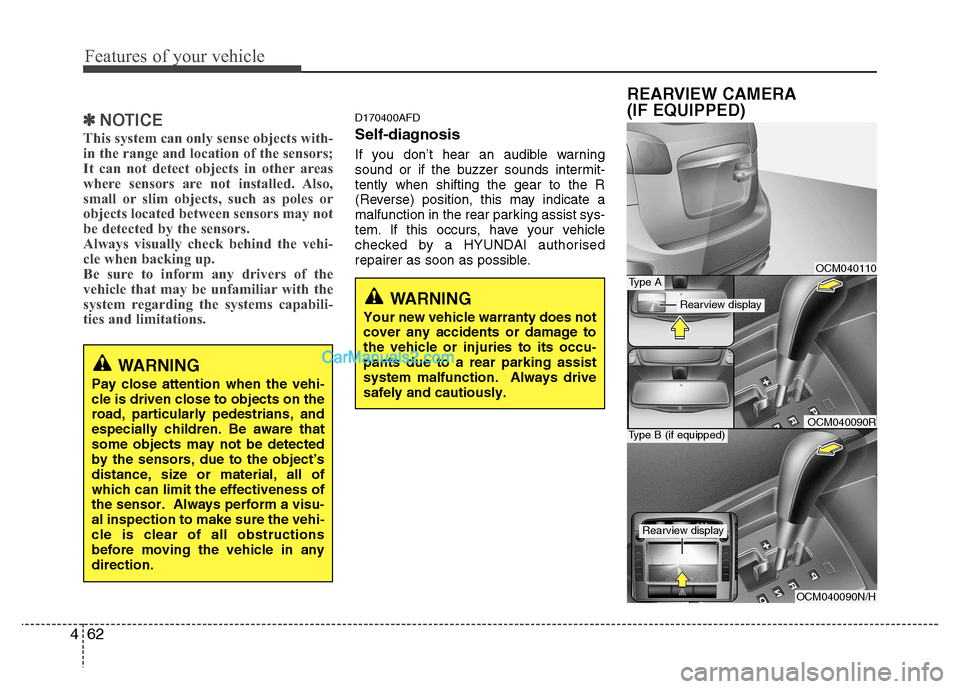
REARVIEW CAMERA
(IF EQUIPPED)
OCM040110
OCM040090N/H
Type B (if equipped)OCM040090R
Type A
Rearview display
Rearview display
Page 138 of 312
463
Features of your vehicle
The rearview camera will activate when
the back-up light is ON with the ignition
switch ON and the shift lever in the R
(Reverse) position. This system is a sup-
plemental system that shows behind the
vehicle through the rearview display mir-
ror whilst backing-up.
Type A
The rearview camera may be turned off
by pressing the ON/OFF button when the
rearview camera is activated. To turn the
camera on again, press the ON/OFF but-
ton again when the ignition switch is on
and the shift lever in R (Reverse). Also,
the camera will turn on automatically
whenever the ignition switch is turned offand on again.
Type B (if equipped)
If your vehicle is equipped with AVN
(Audio, Video and Navigation) system,
rearview display will show behind the
vehicle through the AVN monitor whilst
backing-up.D180000AUN
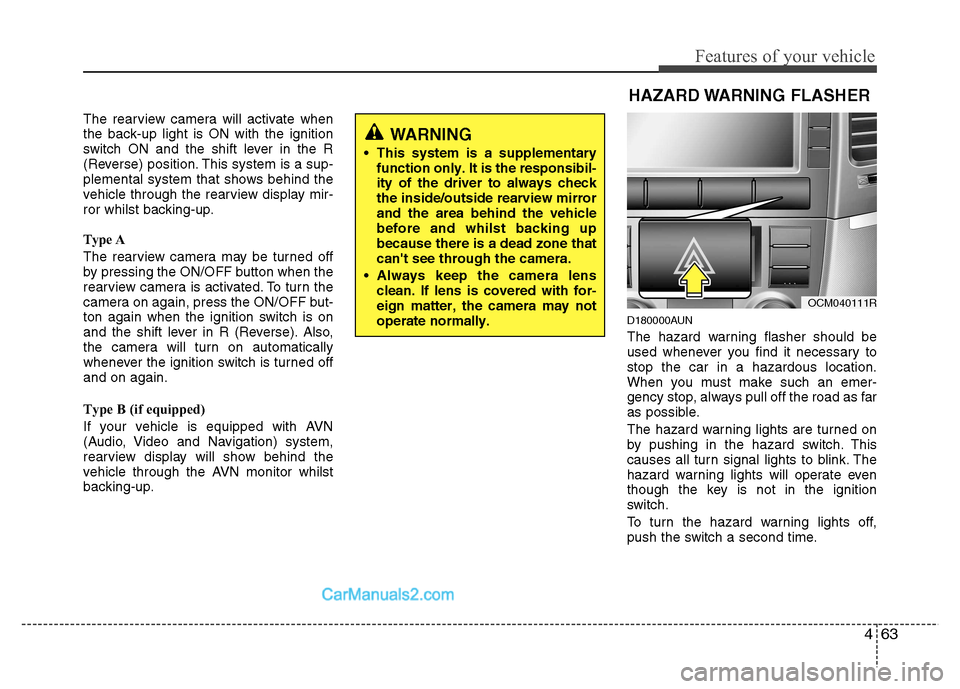
The hazard warning flasher should be
used whenever you find it necessary tostop the car in a hazardous location.
When you must make such an emer-
gency stop, always pull off the road as far
as possible.
The hazard warning lights are turned on
by pushing in the hazard switch. This
causes all turn signal lights to blink. The
hazard warning lights will operate even
though the key is not in the ignition
switch.
To turn the hazard warning lights off,
push the switch a second time.
WARNING
This system is a supplementary function only. It is the responsibil- ity of the driver to always checkthe inside/outside rearview mirrorand the area behind the vehiclebefore and whilst backing upbecause there is a dead zone thatcan't see through the camera.
Always keep the camera lens clean. If lens is covered with for-eign matter, the camera may notoperate normally.
OCM040111R
HAZARD WARNING FLASHER
Page 162 of 312
487
Features of your vehicle
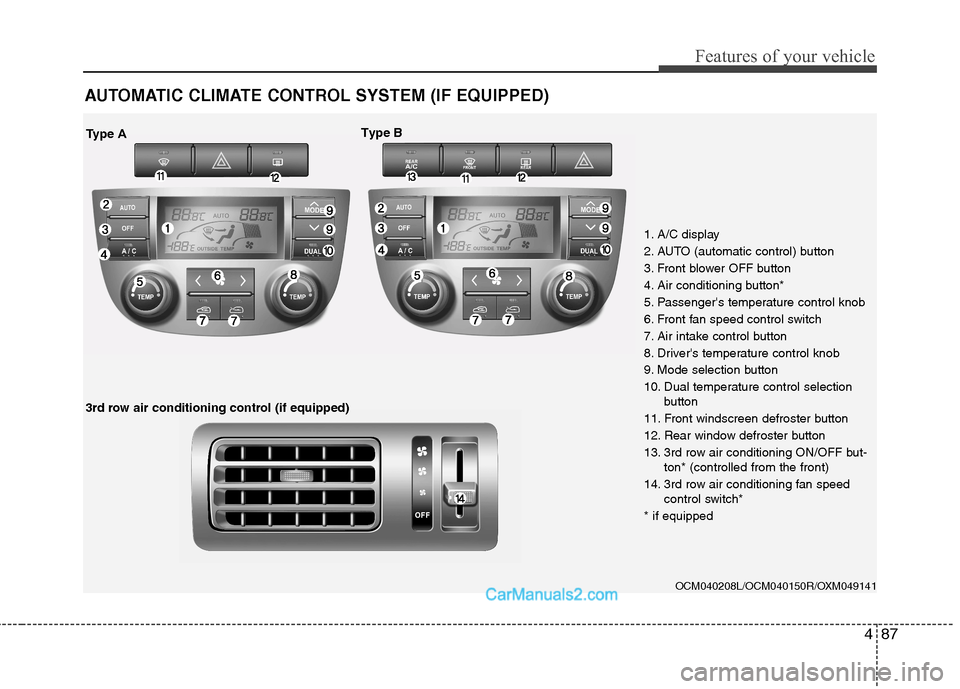
AUTOMATIC CLIMATE CONTROL SYSTEM (IF EQUIPPED)
OCM040208L/OCM040150R/OXM049141
1. A/C display
2. AUTO (automatic control) button
3. Front blower OFF button
4. Air conditioning button*
5. Passenger's temperature control knob
6. Front fan speed control switch
7. Air intake control button
8. Driver's temperature control knob
9. Mode selection button
10. Dual temperature control selection
button
11. Front windscreen defroster button
12. Rear window defroster button
13. 3rd row air conditioning ON/OFF but- ton* (controlled from the front)
14. 3rd row air conditioning fan speed control switch*
* if equipped
Type A Type B
3rd row air conditioning control (if equipped)
Page 166 of 312
491
Features of your vehicle
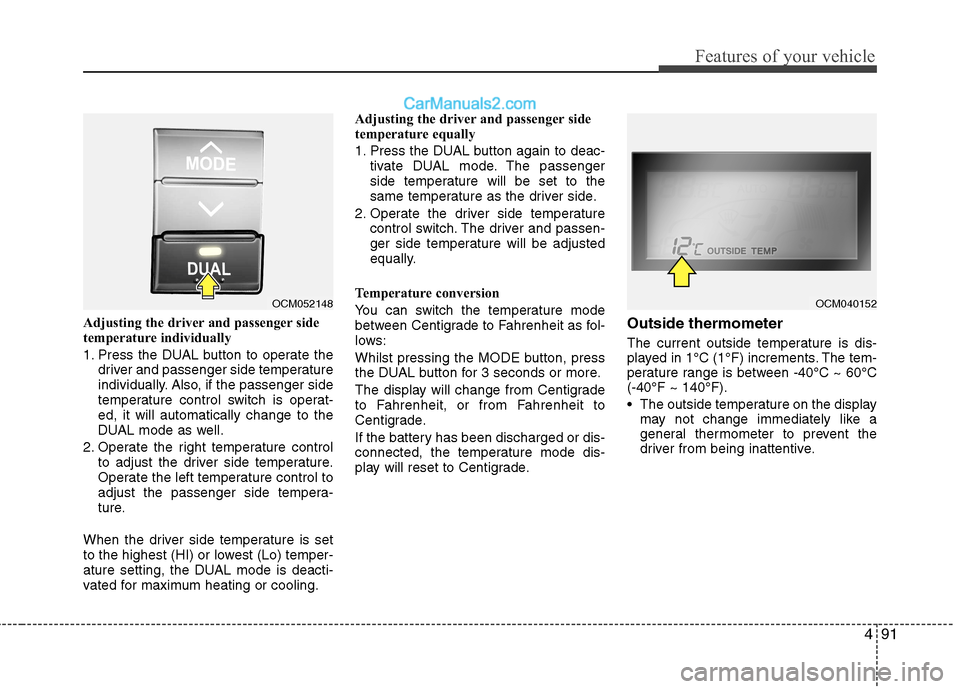
Adjusting the driver and passenger side
temperature individually
1. Press the DUAL button to operate thedriver and passenger side temperature
individually. Also, if the passenger side
temperature control switch is operat-ed, it will automatically change to the
DUAL mode as well.
2. Operate the right temperature control to adjust the driver side temperature.
Operate the left temperature control to
adjust the passenger side tempera-
ture.
When the driver side temperature is set
to the highest (HI) or lowest (Lo) temper-
ature setting, the DUAL mode is deacti-
vated for maximum heating or cooling. Adjusting the driver and passenger side
temperature equally
1. Press the DUAL button again to deac-
tivate DUAL mode. The passenger
side temperature will be set to the
same temperature as the driver side.
2. Operate the driver side temperature control switch. The driver and passen-
ger side temperature will be adjusted
equally.
Temperature conversion
You can switch the temperature mode
between Centigrade to Fahrenheit as fol-
lows:
Whilst pressing the MODE button, press
the DUAL button for 3 seconds or more.
The display will change from Centigrade
to Fahrenheit, or from Fahrenheit to
Centigrade.
If the battery has been discharged or dis-
connected, the temperature mode dis-
play will reset to Centigrade. Outside thermometer
The current outside temperature is dis-
played in 1°C (1°F) increments. The tem-
perature range is between -40°C ~ 60°C(-40°F ~ 140°F).
The outside temperature on the display
may not change immediately like a
general thermometer to prevent the
driver from being inattentive.
OCM052148OCM040152
Page 172 of 312
497
Features of your vehicle
Defogging logic
To reduce the possibility of fogging up the inside of the windscreen, the air
intake or air conditioning are controlled
automatically according to certain condi-
tions such as or position. To
cancel or return to the defogging logic,
do the following.
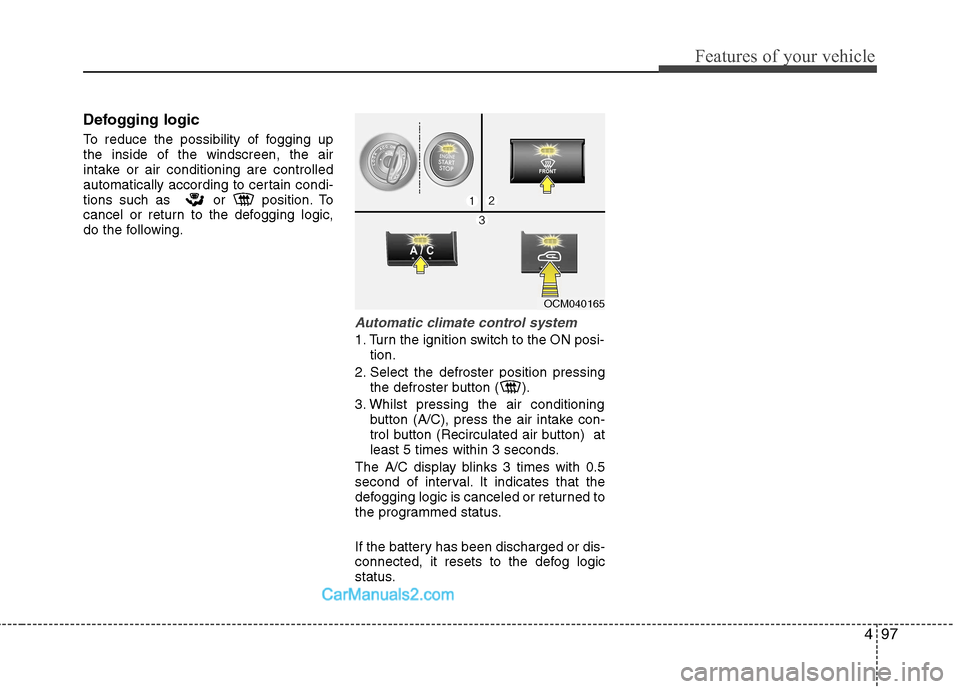
Automatic climate control system
1. Turn the ignition switch to the ON posi-tion.
2. Select the defroster position pressing the defroster button ( ).
3. Whilst pressing the air conditioning button (A/C), press the air intake con-
trol button (Recirculated air button) at
least 5 times within 3 seconds.
The A/C display blinks 3 times with 0.5
second of interval. It indicates that the
defogging logic is canceled or returned to
the programmed status.
If the battery has been discharged or dis-
connected, it resets to the defog logic
status.
OCM040165
Page 180 of 312
4105
Features of your vehicle
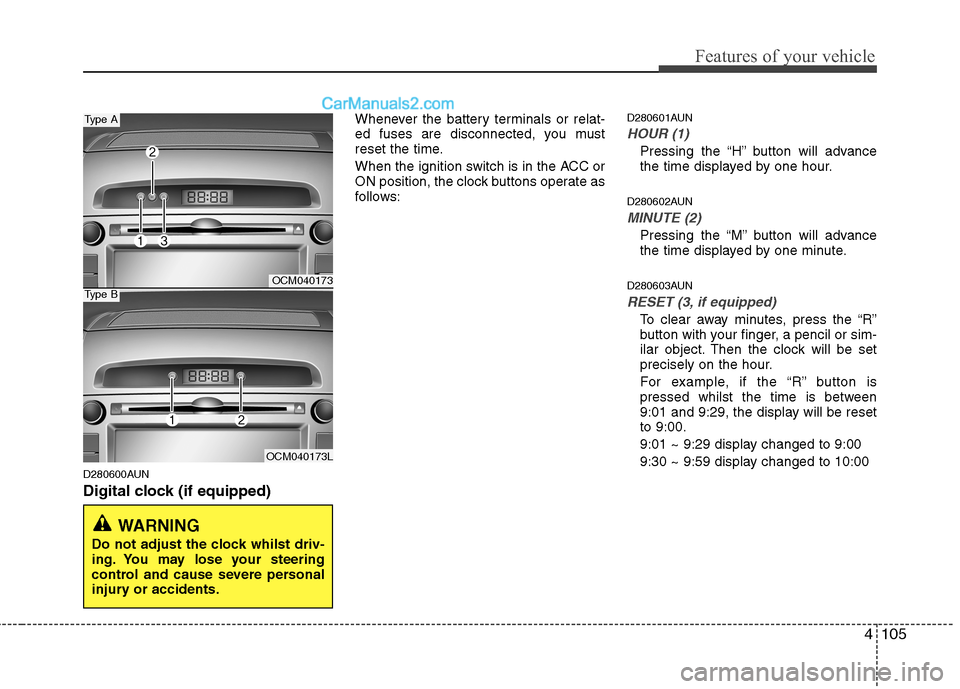
D280600AUN
Digital clock (if equipped)Whenever the battery terminals or relat-
ed fuses are disconnected, you must
reset the time.
When the ignition switch is in the ACC or
ON position, the clock buttons operate as
follows:
D280601AUN
HOUR (1)
Pressing the “H” button will advance
the time displayed by one hour.
D280602AUN
MINUTE (2)
Pressing the “M” button will advance
the time displayed by one minute.
D280603AUN
RESET (3, if equipped)
To clear away minutes, press the “R”
button with your finger, a pencil or sim-
ilar object. Then the clock will be set
precisely on the hour.
For example, if the “R” button is
pressed whilst the time is between
9:01 and 9:29, the display will be resetto 9:00.
9:01 ~ 9:29 display changed to 9:00
9:30 ~ 9:59 display changed to 10:00
WARNING
Do not adjust the clock whilst driv-
ing. You may lose your steering
control and cause severe personal
injury or accidents.
OCM040173
OCM040173L
Type A
Type B