2011 Hyundai Santa Fe clock
[x] Cancel search: clockPage 202 of 312
4127
Features of your vehicle
In case the iPod exclusive cable is con-
nected to the multiple terminal on the left
hand side of the driver's seat. When the
iPod is connected, the 'iPod' icon will be
displayed on the top left corner of the dis-
play screen.
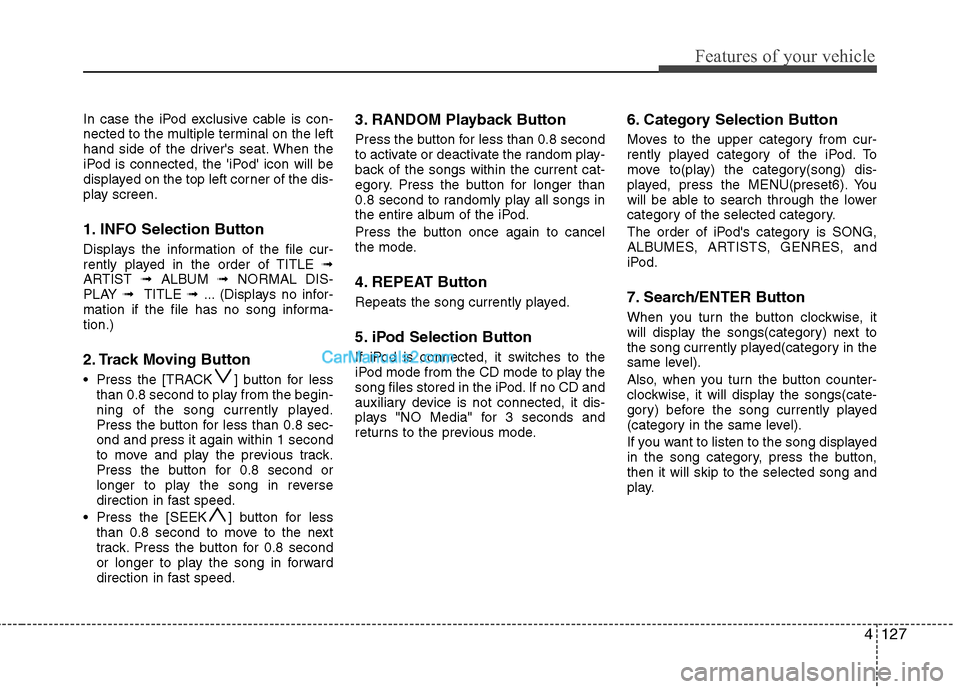
1. INFO Selection Button
Displays the information of the file cur-
rently played in the order of TITLE ➟
ARTIST ➟ ALBUM ➟ NORMAL DIS-
PLAY ➟ TITLE ➟ ... (Displays no infor-
mation if the file has no song informa-tion.)
2. Track Moving Button
Press the [TRACK ] button for less than 0.8 second to play from the begin-
ning of the song currently played.
Press the button for less than 0.8 sec-ond and press it again within 1 second
to move and play the previous track.
Press the button for 0.8 second or
longer to play the song in reverse
direction in fast speed.
Press the [SEEK ] button for less than 0.8 second to move to the next
track. Press the button for 0.8 second
or longer to play the song in forward
direction in fast speed. 3. RANDOM Playback Button
Press the button for less than 0.8 second
to activate or deactivate the random play-
back of the songs within the current cat-
egory. Press the button for longer than
0.8 second to randomly play all songs in
the entire album of the iPod.
Press the button once again to cancel
the mode.
4. REPEAT Button
Repeats the song currently played.
5. iPod Selection Button
If iPod is connected, it switches to the
iPod mode from the CD mode to play the
song files stored in the iPod. If no CD and
auxiliary device is not connected, it dis-
plays "NO Media" for 3 seconds and
returns to the previous mode.
6. Category Selection Button
Moves to the upper category from cur-
rently played category of the iPod. To
move to(play) the category(song) dis-
played, press the MENU(preset6). You
will be able to search through the lower
category of the selected category.
The order of iPod's category is SONG,
ALBUMES, ARTISTS, GENRES, and
iPod.
7. Search/ENTER Button
When you turn the button clockwise, it
will display the songs(category) next to
the song currently played(category in the
same level).
Also, when you turn the button counter-
clockwise, it will display the songs(cate-
gory) before the song currently played
(category in the same level).
If you want to listen to the song displayed
in the song category, press the button,then it will skip to the selected song and
play.
Page 282 of 312
What to do in an emergency
14
6
F070200AFD
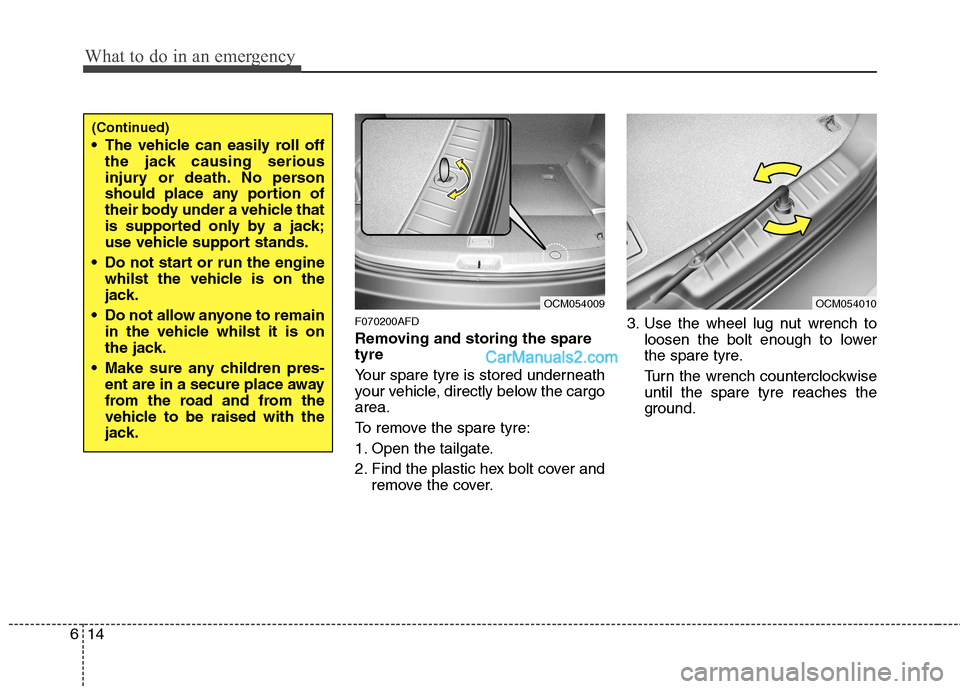
Removing and storing the spare tyre
Your spare tyre is stored underneath
your vehicle, directly below the cargoarea.
To remove the spare tyre:
1. Open the tailgate.
2. Find the plastic hex bolt cover and
remove the cover. 3. Use the wheel lug nut wrench to
loosen the bolt enough to lower
the spare tyre.
Turn the wrench counterclockwise until the spare tyre reaches the
ground.
OCM054009
(Continued)
The vehicle can easily roll offthe jack causing serious
injury or death. No person
should place any portion of
their body under a vehicle that
is supported only by a jack;
use vehicle support stands.
Do not start or run the engine whilst the vehicle is on the
jack.
Do not allow anyone to remain in the vehicle whilst it is on
the jack.
Make sure any children pres- ent are in a secure place away
from the road and from the
vehicle to be raised with the
jack.
OCM054010
Page 283 of 312
615
What to do in an emergency
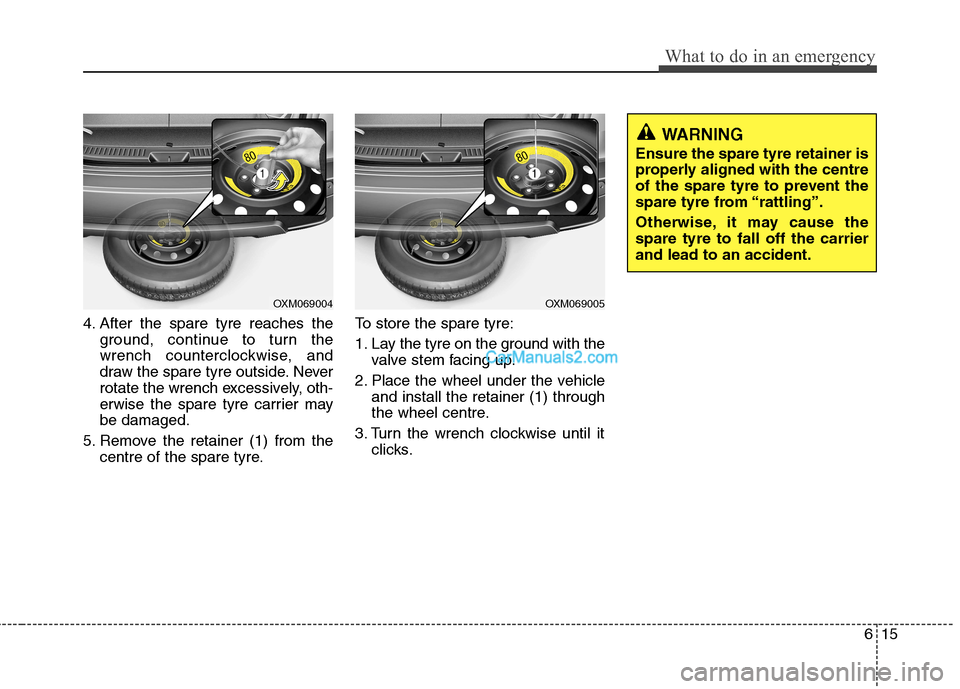
4. After the spare tyre reaches theground, continue to turn the
wrench counterclockwise, and
draw the spare tyre outside. Never
rotate the wrench excessively, oth-
erwise the spare tyre carrier maybe damaged.
5. Remove the retainer (1) from the centre of the spare tyre. To store the spare tyre:
1. Lay the tyre on the ground with the
valve stem facing up.
2. Place the wheel under the vehicle and install the retainer (1) through
the wheel centre.
3. Turn the wrench clockwise until it clicks.
OXM069005OXM069004
WARNING
Ensure the spare tyre retainer is
properly aligned with the centre
of the spare tyre to prevent the
spare tyre from “rattling”.
Otherwise, it may cause the spare tyre to fall off the carrierand lead to an accident.
Page 285 of 312
617
What to do in an emergency
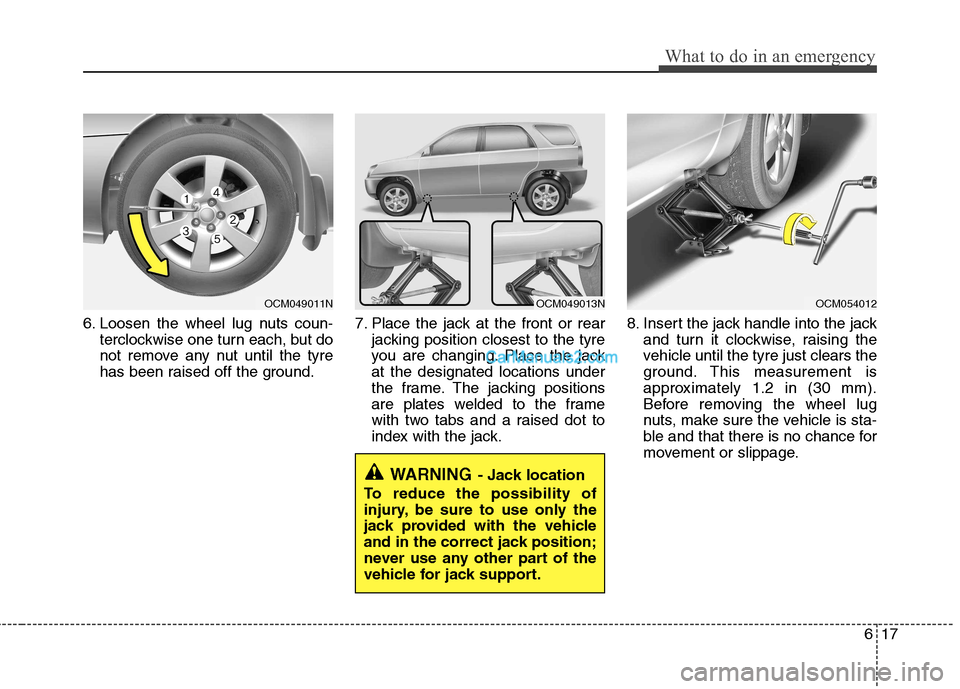
6. Loosen the wheel lug nuts coun-terclockwise one turn each, but do
not remove any nut until the tyre
has been raised off the ground. 7. Place the jack at the front or rear
jacking position closest to the tyre
you are changing. Place the jackat the designated locations under
the frame. The jacking positions
are plates welded to the frame
with two tabs and a raised dot to
index with the jack. 8. Insert the jack handle into the jack
and turn it clockwise, raising the
vehicle until the tyre just clears the
ground. This measurement is
approximately 1.2 in (30 mm).
Before removing the wheel lug
nuts, make sure the vehicle is sta-
ble and that there is no chance for
movement or slippage.
WARNING - Jack location
To reduce the possibility of
injury, be sure to use only the
jack provided with the vehicle
and in the correct jack position;
never use any other part of the
vehicle for jack support.
OCM049011NOCM049013NOCM054012
Page 286 of 312
What to do in an emergency
18
6
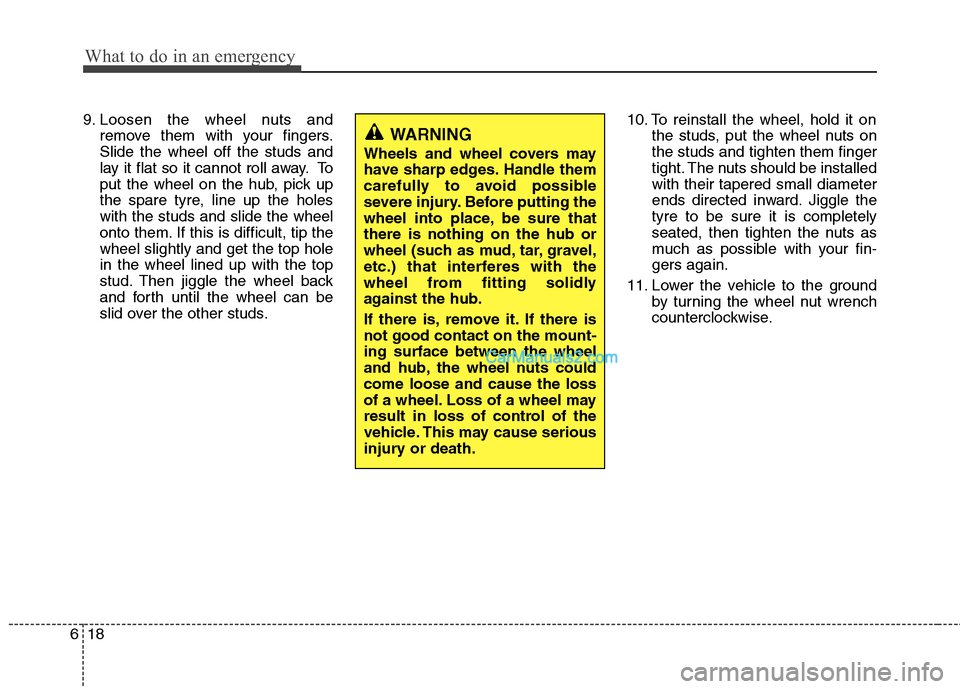
9. Loosen the wheel nuts and
remove them with your fingers. Slide the wheel off the studs and
lay it flat so it cannot roll away. To
put the wheel on the hub, pick up
the spare tyre, line up the holeswith the studs and slide the wheel
onto them. If this is difficult, tip thewheel slightly and get the top holein the wheel lined up with the top
stud. Then jiggle the wheel back
and forth until the wheel can be
slid over the other studs. 10. To reinstall the wheel, hold it on
the studs, put the wheel nuts onthe studs and tighten them finger
tight. The nuts should be installedwith their tapered small diameter
ends directed inward. Jiggle thetyre to be sure it is completely
seated, then tighten the nuts as
much as possible with your fin-gers again.
11. Lower the vehicle to the ground by turning the wheel nut wrench
counterclockwise.
WARNING
Wheels and wheel covers may
have sharp edges. Handle them
carefully to avoid possible
severe injury. Before putting the
wheel into place, be sure thatthere is nothing on the hub or
wheel (such as mud, tar, gravel,
etc.) that interferes with the
wheel from fitting solidly
against the hub.
If there is, remove it. If there is not good contact on the mount-ing surface between the wheel
and hub, the wheel nuts couldcome loose and cause the loss
of a wheel. Loss of a wheel may
result in loss of control of the
vehicle. This may cause serious
injury or death.
Page 292 of 312
What to do in an emergency
24
6
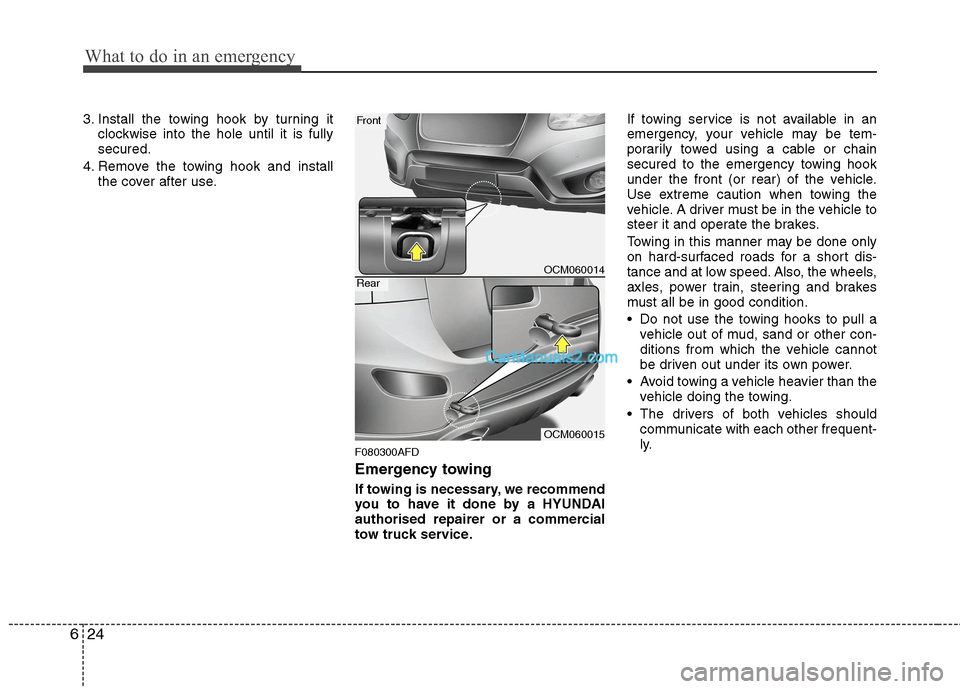
3. Install the towing hook by turning it
clockwise into the hole until it is fully secured.
4. Remove the towing hook and install the cover after use.
F080300AFD
Emergency towing
If towing is necessary, we recommend
you to have it done by a HYUNDAI
authorised repairer or a commercial
tow truck service. If towing service is not available in an
emergency, your vehicle may be tem-
porarily towed using a cable or chain
secured to the emergency towing hook
under the front (or rear) of the vehicle.
Use extreme caution when towing the
vehicle. A driver must be in the vehicle to
steer it and operate the brakes.
Towing in this manner may be done only
on hard-surfaced roads for a short dis-
tance and at low speed. Also, the wheels,
axles, power train, steering and brakes
must all be in good condition.
Do not use the towing hooks to pull a
vehicle out of mud, sand or other con-
ditions from which the vehicle cannot
be driven out under its own power.
Avoid towing a vehicle heavier than the vehicle doing the towing.
The drivers of both vehicles should communicate with each other frequent-
ly.
OCM060014
OCM060015
Front
Rear
Page 305 of 312
I3
Index
Position light bulb replacement ·······················7-51, 7-54
Rear combination light bulb replacement ·················7-55
Rear fog light bulb replacement································7-57
Side repeater light bulb replacement·························7-54
Turn signal light bulb replacement ···························7-55
Bulb wattage ·····································································8-2
Button start/stop, see engine start/stop button ··················5-8
Capacities (Lubricants) ·····················································8-4 Care Exterior care ······························································7-60
Interior care ·······························································7-65
Tyre care ····································································7-30
Cargo security screen ··············································4-108
Cargo weight ···································································5-65
Centre console storage ····················································4-98
Central door lock switch ·················································4-13
Changing tyres ································································6-16
Changing a tyre with TPMS ·············································6-8Chains Tyre chains ································································5-53
Checking tyre inflation pressure ·····································7-32
Child restraint system ·····················································3-29 Tether anchor system·················································3-33
ISOFIX system ·························································3-34
Child-protector rear door lock ·······································4-15 Climate control system (Automatic) ·····························4-87
Air conditioning ·······················································4-93Automatic heating and air conditioning ···················4-88
Manual heating and air conditioning ·······················4-89
Outside thermometer ·················································4-91
Climate control system (Manual) ··································4-78 Air conditioning ·······················································4-83
Heating and air conditioning ·····································4-79
Cigarette lighter ····························································4-101
Climate control air filter ········································4-85, 7-22
Clock (Digital) ·····························································4-105
Clothes hanger ······························································4-106
Combined instrument, see instrument cluster ···············4-38
Compact spare tyre ························································6-20Compact spare tyre replacement ····································7-35
Console box cooling ·······················································4-98Coolant ···········································································7-13
Cooling fluid, see engine coolant ··································7-13
Crankcase emission control system ·······························7-66
Cruise control system ····················································5-40
Cup holder ···································································4-102
Curtain air bag ·······························································3-47
Dashboard, see instrument cluster ·································4-38
Dashboard illumination, see instrument panel illumination ·······················································4-39
C
D
Page 306 of 312
Index
4
I
Defogging (Windscreen) ················································4-95
Defogging logic (Windscreen) ·······································4-97
Defroster (Rear window) ···············································4-77
Defrosting (Windscreen) ················································4-95
Digital clock ·································································4-105Dimensions ······································································8-2
Displays, see instrument cluster ····································4-38
Display illumination, see instrument panel
illumination··································································4-39
Door courtesy lamp bulb replacement ····························7-58
Door locks ·······································································4-12 Central door lock switch ··········································4-13
Child-protector rear door lock ·································4-15
Drinks holders, see cup holders ···································4-102
Driver's air bag ·······························································3-41
Driving at night ······························································5-49
Driving in flooded areas ················································5-50
Driving in the rain ··························································5-50
Dual carrigeway/Motorway driving ································5-51
Economical operation ····················································5-46
Electric chromic mirror (ECM) ·····································4-34
Electronic stability program (ESP) ·································5-35
Emergency starting ··························································6-5 Jump starting ······························································6-5
Push starting ·······························································6-6 Emergency towing ·························································6-24
Emergency whilst driving ················································6-3
Emission control system ················································7-66
Crankcase emission control system ·························7-66
Evaporative emission control system ·······················7-66
Exhaust emission control system ·····························7-67
Engine compartment ················································2-4, 7-2
Engine coolant ·······························································7-13
Engine number ·································································8-8
Engine oil ·······································································7-12
Engine overheats ······························································6-7
Engine start/stop button ···················································5-8
Engine temperature gauge ·············································4-40
Engine will not start ·························································6-4
Evaporative emission control system ····························7-66
Exhaust emission control system ···································7-66Explanation of scheduled maintenance items ··················7-9
Exterior care ···································································7-60
Exterior features ···························································4-110 Roof rack ································································4-110
Flat tyre ··········································································6-13 Changing tyres ·························································6-16
Compact spare tyre ··················································6-20
Jack and tools ···························································6-13
Removing and storing the spare tyre ·······················6-14
E
F