Page 1 of 560
1
How to use this manual / 1-2
Fuel requirements / 1-2
Vehicle handling instructions / 1-5
Vehicle run-in process / 1-5
Indicator symbols on the instrument cluster / 1-6
Introduction
EL UK 1.QXP 1/12/2010 2:51 PM Page 1
Page 6 of 560
Introduction
6
1
INDICATOR SYMBOLS ON THE INSTRUMENT CLUSTER
Engine oil pressure warning light
Seat belt warning light
Door and tailgate open position light
High beam indicator
Light on indicator*
Turn signal indicator
ABS warning light
Parking brake & Brake fluid
warning light
4WD system warning light* 4WD LOCK indicator*
Malfunction indicator*
Air bag warning light
Cruise SET indicator*
Low fuel level warning light
Charging system warning light
Door ajar warning light
Glow indicator (Diesel only)
Fuel filter warning light (Diesel only)
Cruise indicator*
ESP indicator*
ESP OFF indicator*
Immobiliser indicator*
Shift pattern indicator*
Front fog light indicator*
Rear fog light indicator*
Low beam indicator*
Electric power steering (EPS)
system warning light*
Key out warning*
KEY
OUT
DBC indicator*
Tailgate open warning light
Engine oil level warning light (Diesel engine*)
Low tyre pressure telltale*
Manual transaxle shift indicator*
EL UK 1.QXP 1/12/2010 2:51 PM Page 6
Page 7 of 560
17
Introduction
Passenger’s front air bag OFF indicator*Low tyre pressure position telltale*
ECO indicator*ECO
*: if equipped ❈
: For more detailed explanations, refer
to section 4, “Instrument cluster”. Engine coolant temperature
warning light
EL UK 1.QXP 1/12/2010 2:51 PM Page 7
Page 10 of 560

23
Your vehicle at a glance
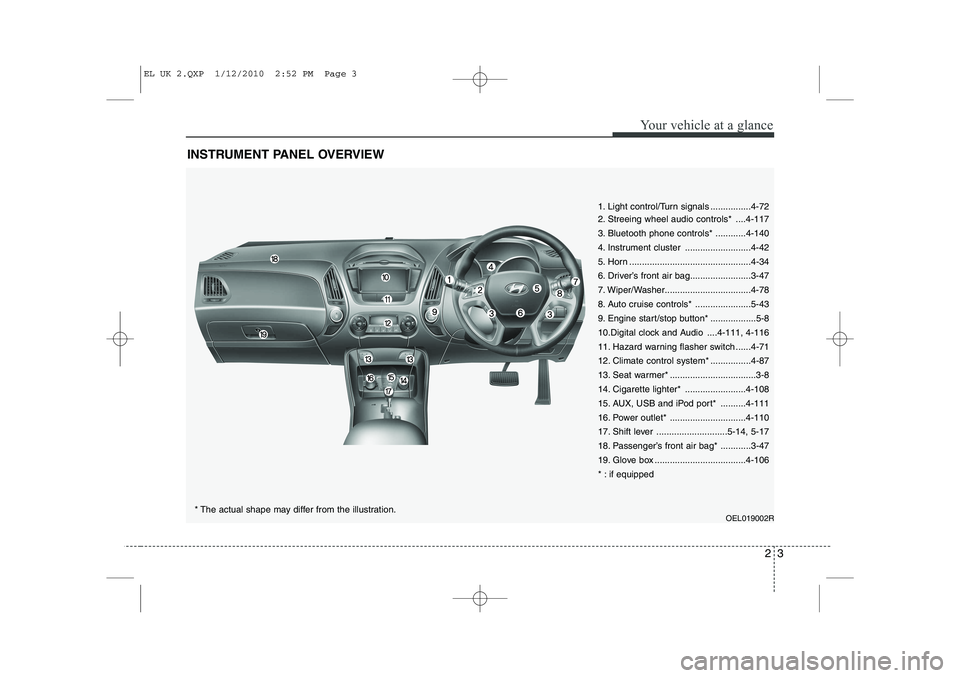
INSTRUMENT PANEL OVERVIEW
1. Light control/Turn signals ................4-72
2. Streeing wheel audio controls* ....4-117
3. Bluetooth phone controls* ............4-140
4. Instrument cluster ..........................4-42
5. Horn ................................................4-34
6. Driver’s front air bag........................3-47
7. Wiper/Washer..................................4-78
8. Auto cruise controls* ......................5-43
9. Engine start/stop button* ..................5-8
10.Digital clock and Audio ....4-111, 4-116
11. Hazard warning flasher switch ......4-71
12. Climate control system* ................4-87
13. Seat warmer* ..................................3-8
14. Cigarette lighter* ........................4-108
15. AUX, USB and iPod port* ..........4-111
16. Power outlet* ..............................4-110
17. Shift lever ............................5-14, 5-17
18. Passenger’s front air bag* ............3-47
19. Glove box ....................................4-106
* : if equippedOEL019002R
* The actual shape may differ from the illustration.
EL UK 2.QXP 1/12/2010 2:52 PM Page 3
Page 58 of 560

Safety system of your vehicle
46
3
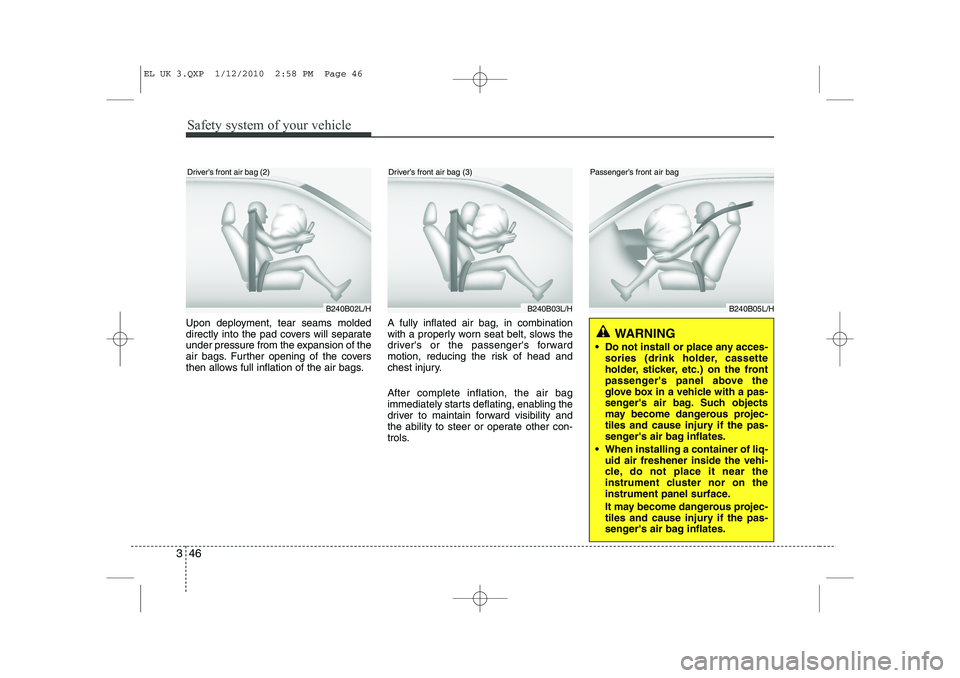
Upon deployment, tear seams molded
directly into the pad covers will separate
under pressure from the expansion of the
air bags. Further opening of the covers
then allows full inflation of the air bags. A fully inflated air bag, in combination
with a properly worn seat belt, slows the
driver's or the passenger's forward
motion, reducing the risk of head and
chest injury. After complete inflation, the air bag
immediately starts deflating, enabling the
driver to maintain forward visibility and
the ability to steer or operate other con-
trols.
B240B02L/HB240B03L/H
Driver’s front air bag (2)Driver’s front air bag (3)
B240B05L/H
Passenger’s front air bag
WARNING
Do not install or place any acces- sories (drink holder, cassette
holder, sticker, etc.) on the front
passenger's panel above the
glove box in a vehicle with a pas-
senger's air bag. Such objects
may become dangerous projec-
tiles and cause injury if the pas-
senger's air bag inflates.
When installing a container of liq- uid air freshener inside the vehi-
cle, do not place it near the
instrument cluster nor on the
instrument panel surface.
It may become dangerous projec-
tiles and cause injury if the pas-
senger's air bag inflates.
EL UK 3.QXP 1/12/2010 2:58 PM Page 46
Page 76 of 560
4
Keys / 4-2
Remote keyless entry / 4-5
Smart key / 4-8
Theft-alarm system / 4-11
Door locks / 4-13
Tailgate / 4-17
Windows / 4-19
Hood / 4-24
Fuel filler lid / 4-26
Panorama Sunroof / 4-29
Steering wheel / 4-33
Mirrors / 4-35
Instrument cluster / 4-42
Rear parking assist system / 4-67
Rearview camera / 4-71
Hazard warning flasher / 4-71
Lighting / 4-72
Wipers and washers / 4-78
Interior light / 4-82
Defroster / 4-85
Manual climate control system / 4-87
Automatic climate control system / 4-96
Windshield defrosting and defogging / 4-104
Storage compartment / 4-108
Interior features / 4-110
Exterior features / 4-117
Audio system / 4-118
Features of your vehicle
Page 117 of 560
Features of your vehicle
42
4
INSTRUMENT CLUSTER
1. Tachometer
2. Speedometer
3. Engine temperature gauge
4. Fuel gauge
5. Warning and indicator lights (if equipped)
6. Turn signal indicators
7. Odometer/Trip computer (if equipped)
OEL049304/OEL049300
* The actual cluster in the vehicle may differ
from the illustration.
For more details refer to the "Gauges" in
the next pages.
■■ Type A
■■Type B
Page 124 of 560

449
Features of your vehicle
Elapsed time
This mode indicates the total time trav-
eled since the last driving time reset.
Even if the vehicle is not in motion, the
driving time keeps going while the engine
is running.
The meter’s working range is from 0:00~99:59.
Pressing the TRIP button for more than 1
second, when the driving time is being
displayed, clears the driving time to zero(0:00).ECO ON/OFF mode
(Gasoline only, if equipped)
You can turn the ECO indicator on/off on
the instrument cluster in this mode.
If you push the TRIP button more than 1
second in the ECO ON mode, ECO OFF
is displayed in the screen and the ECO
indicator turns off while driving.
If you want to display the ECO indicator
again, press the TRIP button more than 1second in the ECO OFF mode and then
ECO ON mode is displayed in thescreen.
When you press the TRIP button less
than 1 second in the ECO mode, the
mode is changed to tripmeter.Warnings and indicators
All warning lights are checked by turning
the ignition switch ON (do not start the
engine). Any light that does not illuminate
should be checked by an authorized
HYUNDAI dealer.
After starting the engine, check to make
sure that all warning lights are off. If anyare still on, this indicates a situation that
needs attention. When releasing the
parking brake, the brake system warning
light should go off. The fuel warning light
will stay on if the fuel level is low.
OEL049327OEL049326