2011 HYUNDAI IX35 replace
[x] Cancel search: replacePage 356 of 560
Maintenance
36
7
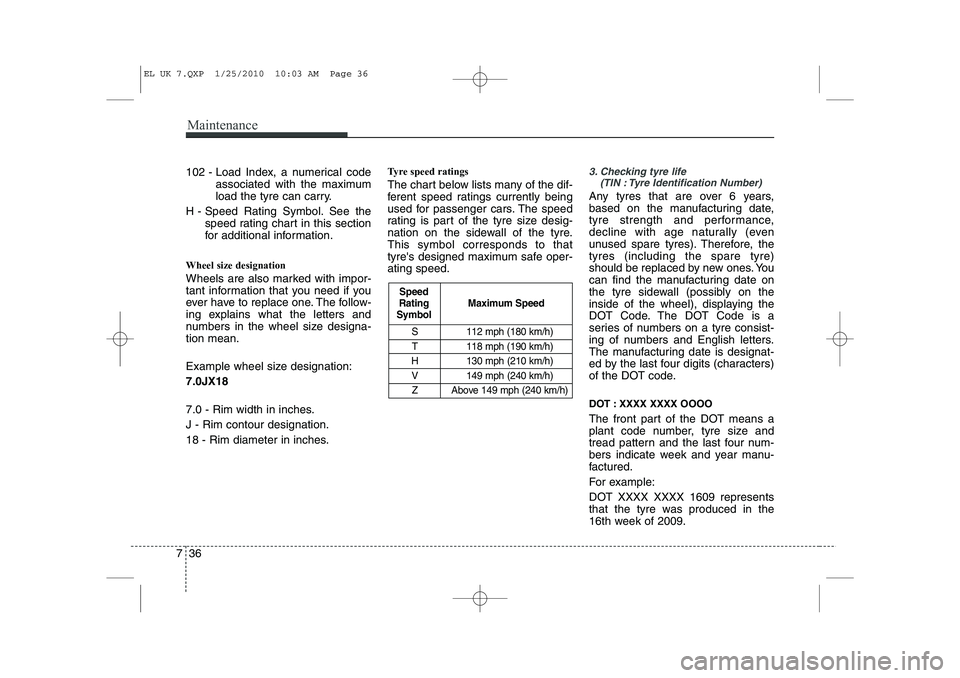
S 112 mph (180 km/h)
T 118 mph (190 km/h)
H 130 mph (210 km/h)
V 149 mph (240 km/h) Z Above 149 mph (240 km/h)
Maximum Speed
Speed
Rating
Symbol
102 - Load Index, a numerical code
associated with the maximum
load the tyre can carry.
H - Speed Rating Symbol. See the speed rating chart in this section
for additional information.
Wheel size designation
Wheels are also marked with impor-
tant information that you need if you
ever have to replace one. The follow-
ing explains what the letters and
numbers in the wheel size designa-tion mean.
Example wheel size designation: 7.0JX18
7.0 - Rim width in inches. J - Rim contour designation.
18 - Rim diameter in inches. Tyre speed ratings
The chart below lists many of the dif-
ferent speed ratings currently being
used for passenger cars. The speed
rating is part of the tyre size desig-
nation on the sidewall of the tyre.This symbol corresponds to that
tyre's designed maximum safe oper-ating speed.3. Checking tyre life
(TIN : Tyre Identification Number)
Any tyres that are over 6 years,
based on the manufacturing date,
tyre strength and performance,
decline with age naturally (even
unused spare tyres). Therefore, thetyres (including the spare tyre)
should be replaced by new ones. You
can find the manufacturing date on
the tyre sidewall (possibly on the
inside of the wheel), displaying the
DOT Code. The DOT Code is a
series of numbers on a tyre consist-
ing of numbers and English letters.
The manufacturing date is designat-
ed by the last four digits (characters)
of the DOT code.
DOT : XXXX XXXX OOOO
The front part of the DOT means a
plant code number, tyre size and
tread pattern and the last four num-
bers indicate week and year manu-
factured.
For example:
DOT XXXX XXXX 1609 represents
that the tyre was produced in the
16th week of 2009.
EL UK 7.QXP 1/25/2010 10:03 AM Page 36
Page 357 of 560
737
Maintenance
4. Tyre ply composition and material
The number of layers or plies of rub-
ber-coated fabric are in the tyre. Tyre
manufacturers also must indicate the
materials in the tyre, which include
steel, nylon, polyester, and others.
The letter "R" means radial ply con-
struction; the letter "D" means diago-
nal or bias ply construction; and theletter "B" means belted-bias ply con-
struction.
5. Maximum permissible inflationpressure
This number is the greatest amount of air pressure that should be put in
the tyre. Do not exceed the maximum
permissible inflation pressure. Refer
to the Tyre and Loading Information
label for recommended inflation
pressure.
6. Maximum load rating
This number indicates the maximum
load in kilograms and pounds that
can be carried by the tyre. When
replacing the tyres on the vehicle,
always use a tyre that has the same
load rating as the factory installed
tyre.
7. Uniform tyre quality grading
Quality grades can be found where
applicable on the tyre sidewall
between tread shoulder and maxi-
mum section width.
For example:
TREADWEAR 200
TRACTION AA
TEMPERATURE A Tread wear
The tread wear grade is a compara-
tive rating based on the wear rate ofthe tyre when tested under controlled
conditions on a specified govern-
ment test course. For example, a tyre
graded 150 would wear one-and-a-
half times (1½) as well on the gov-
ernment course as a tyre graded100.
The relative performance of tyres depends upon the actual conditions
of their use, however, and may
depart significantly from the norm
because of variations in driving
habits, service practices and differ-
ences in road characteristics and cli-
mate.
These grades are molded on the
side-walls of passenger vehicle
tyres. The tyres available as standard
or optional equipment on your vehi-
cles may vary with respect to grade.
WARNING - Tyre age
Tyres degrade over time, even
when they are not being used.
Regardless of the remaining
tread, it is recommended that
tyres generally be replaced
after six (6) years of normal
service. Heat caused by hot cli-mates or frequent high loadingconditions can accelerate the
aging process. Failure to follow
this Warning can result in sud-
den tyre failure, which could
lead to a loss of control and an
accident involving serious
injury or death.
EL UK 7.QXP 1/25/2010 10:03 AM Page 37
Page 359 of 560
739
Maintenance
FUSESA vehicle’s electrical system is protected
from electrical overload damage by
fuses.
This vehicle has 3 (or 4) fuse panels, one
located in the driver’s side panel bolster,
the other in the engine compartment
near the battery.
If any of your vehicle’s lights, acces-
sories, or controls do not work, check the
appropriate circuit fuse. If a fuse has
blown, the element inside the fuse will bemelted.
If the electrical system does not work,
first check the driver’s side fuse panel.
Always replace a blown fuse with one of
the same rating.
If the replacement fuse blows, this indi-
cates an electrical problem. Avoid using
the system involved and immediately
consult a HYUNDAI authorised repairer.
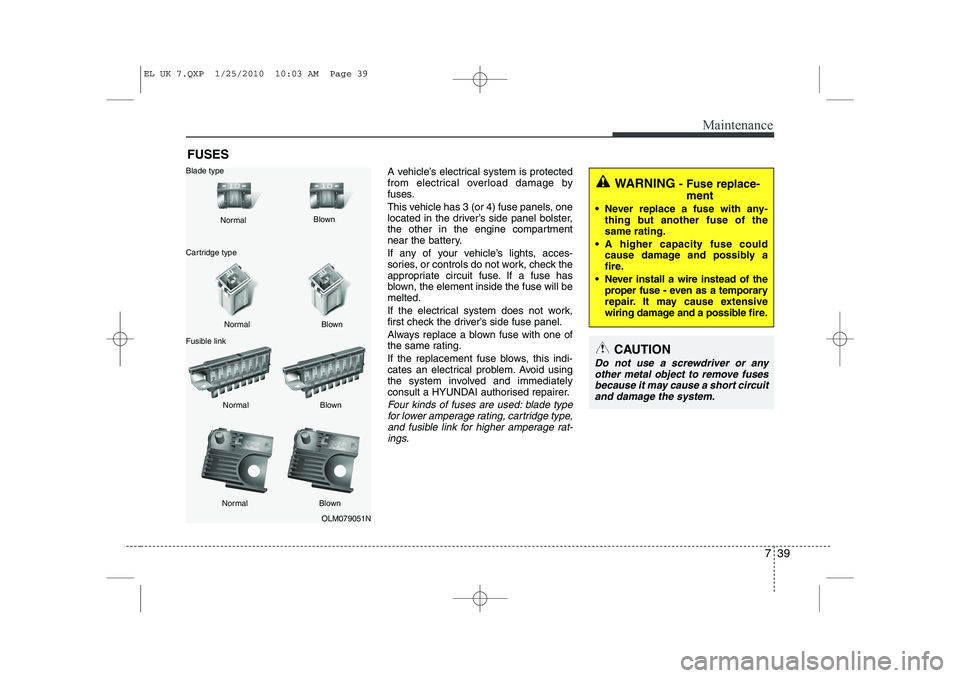
Four kinds of fuses are used: blade typefor lower amperage rating, cartridge type,
and fusible link for higher amperage rat- ings.
WARNING - Fuse replace-
ment
Never replace a fuse with any- thing but another fuse of the same rating.
A higher capacity fuse could cause damage and possibly a
fire.
Never install a wire instead of the proper fuse - even as a temporary
repair. It may cause extensive
wiring damage and a possible fire.
CAUTION
Do not use a screwdriver or any
other metal object to remove fusesbecause it may cause a short circuit and damage the system.
OLM079051N
Normal
Normal
Blade type
Cartridge type
Fusible link Blown
Blown
Normal Blown
Normal Blown
EL UK 7.QXP 1/25/2010 10:03 AM Page 39
Page 360 of 560
Maintenance
40
7
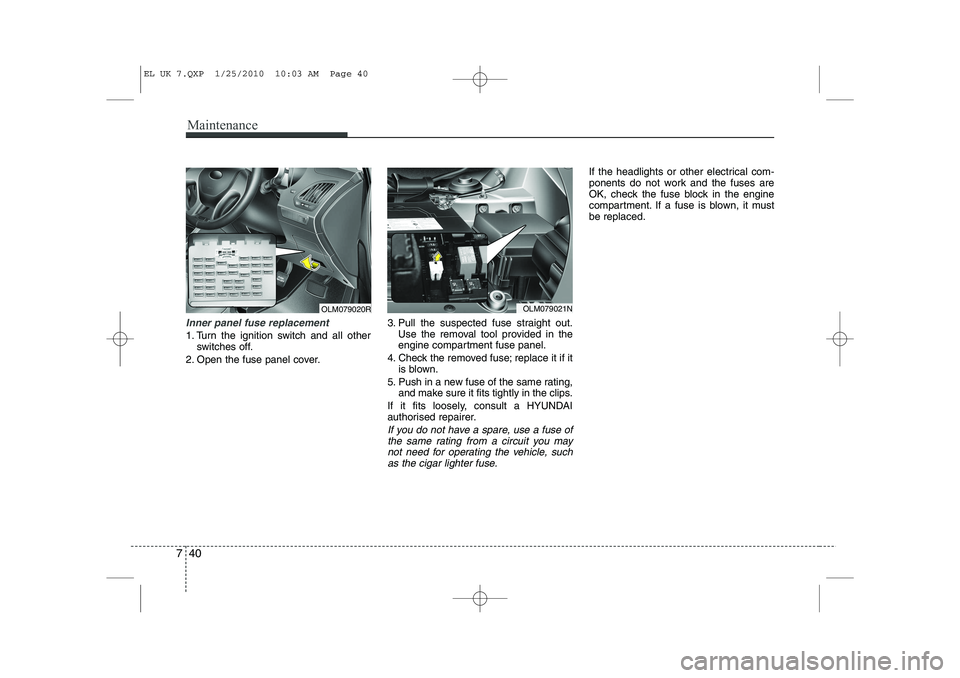
Inner panel fuse replacement
1. Turn the ignition switch and all other
switches off.
2. Open the fuse panel cover. 3. Pull the suspected fuse straight out.
Use the removal tool provided in the
engine compartment fuse panel.
4. Check the removed fuse; replace it if it is blown.
5. Push in a new fuse of the same rating, and make sure it fits tightly in the clips.
If it fits loosely, consult a HYUNDAI
authorised repairer.
If you do not have a spare, use a fuse of the same rating from a circuit you may
not need for operating the vehicle, such as the cigar lighter fuse.
If the headlights or other electrical com-
ponents do not work and the fuses are
OK, check the fuse block in the engine
compartment. If a fuse is blown, it mustbe replaced.
OLM079020ROLM079021N
EL UK 7.QXP 1/25/2010 10:03 AM Page 40
Page 362 of 560
Maintenance
42
7
3. Check the removed fuse; replace it if it
is blown. To remove or insert the fuse, use the fuse puller in the engine com-
partment fuse panel.
4. Push in a new fuse of the same rating, and make sure it fits tightly in the clips.
If it fits loosely, consult a HYUNDAI
authorised repairer.
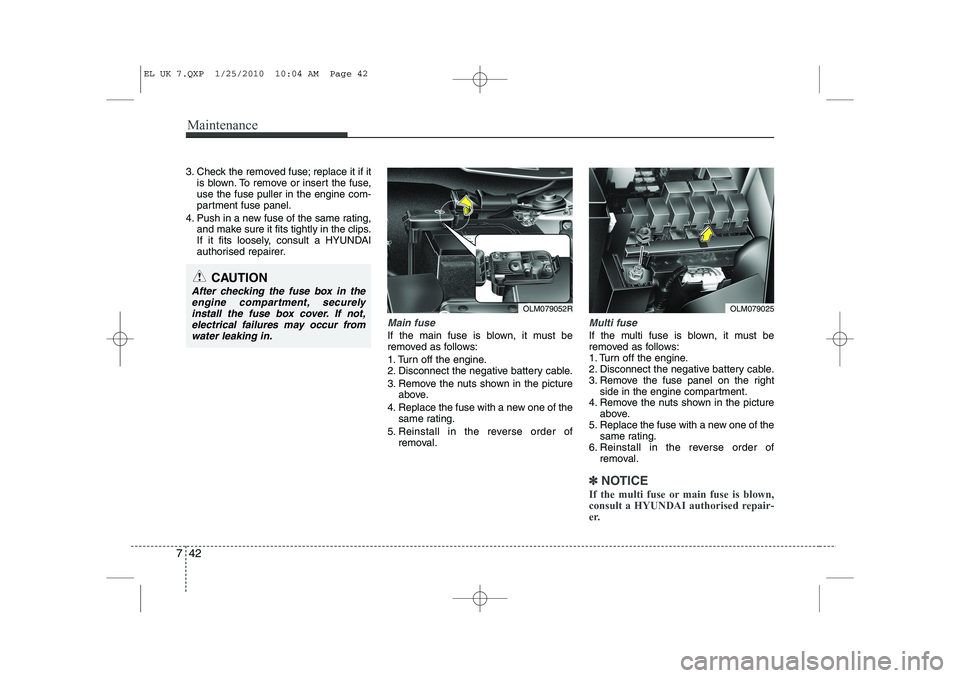
Main fuse
If the main fuse is blown, it must be
removed as follows:
1. Turn off the engine.
2. Disconnect the negative battery cable.
3. Remove the nuts shown in the pictureabove.
4. Replace the fuse with a new one of the same rating.
5. Reinstall in the reverse order of removal.
Multi fuse
If the multi fuse is blown, it must be
removed as follows:
1. Turn off the engine.
2. Disconnect the negative battery cable.
3. Remove the fuse panel on the right side in the engine compartment.
4. Remove the nuts shown in the picture above.
5. Replace the fuse with a new one of the
same rating.
6. Reinstall in the reverse order of removal.
✽✽ NOTICE
If the multi fuse or main fuse is blown,
consult a HYUNDAI authorised repair-
er.
CAUTION
After checking the fuse box in the engine compartment, securelyinstall the fuse box cover. If not, electrical failures may occur from
water leaking in.
OLM079025OLM079052R
EL UK 7.QXP 1/25/2010 10:04 AM Page 42
Page 369 of 560
749
Maintenance
LIGHT BULBS
Use only the bulbs of the specifiedwattage.
✽✽ NOTICE
After heavy, driving rain or washing, headlight and taillight lenses could
appear frosty. This condition is caused by
the temperature difference between the
lamp inside and outside. This is similar
to the condensation on your windows
inside your vehicle during the rain and
doesn’t indicate a problem with your
vehicle. If the water leaks into the lamp
bulb circuitry, have the vehicle checked
by a HYUNDAI authorised repairer.WARNING - Working on
the lights
Prior to working on the light, firmly
apply the parking brake, ensure
that the ignition switch is turned to
the “LOCK” position and turn off
the lights to avoid sudden move-
ment of the vehicle and burning
your fingers or receiving an electric
shock.
CAUTION
Be sure to replace the burned-out bulb with one of the same wattage rating. Otherwise, it may causedamage to the fuse or electricwiring system.
CAUTION
If you don’t have necessary tools, the correct bulbs and the expertise,
consult a HYUNDAI authorisedrepairer. In many cases, it is difficult to replace vehicle light bulbsbecause other parts of the vehicle
must be removed before you canget to the bulb. This is especially true if you have to remove the head-
light assembly to
get to the bulb(s).
Removing/installingthe headlight
assembly can result in damage to the vehicle.
EL UK 7.QXP 1/25/2010 10:05 AM Page 49
Page 370 of 560
Maintenance
50
7
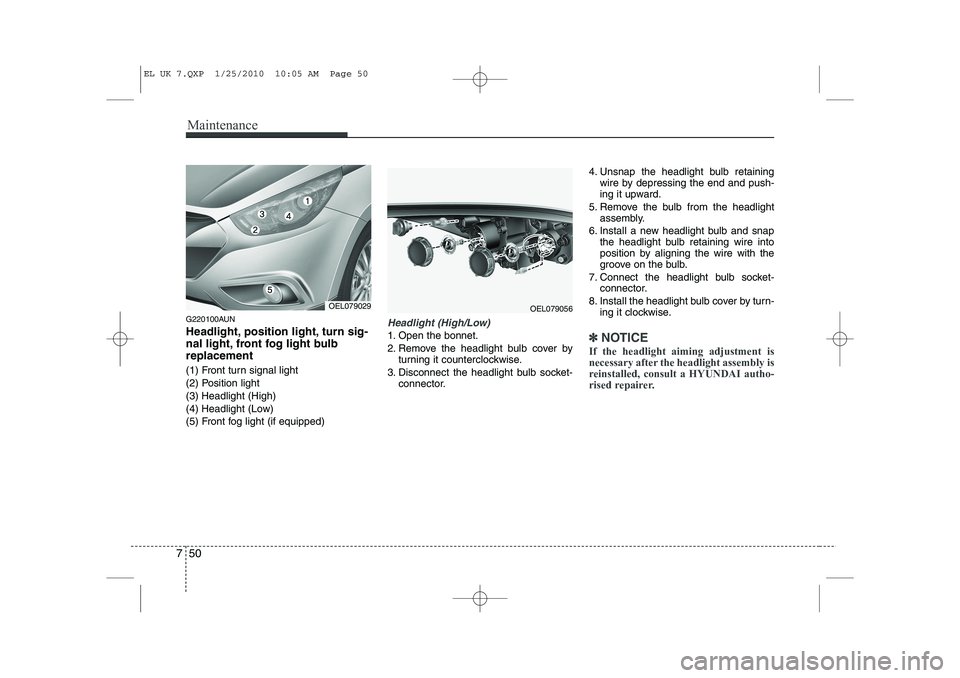
G220100AUN
Headlight, position light, turn sig-
nal light, front fog light bulbreplacement
(1) Front turn signal light
(2) Position light
(3) Headlight (High)
(4) Headlight (Low)
(5) Front fog light (if equipped)Headlight (High/Low)
1. Open the bonnet.
2. Remove the headlight bulb cover by
turning it counterclockwise.
3. Disconnect the headlight bulb socket- connector. 4. Unsnap the headlight bulb retaining
wire by depressing the end and push-
ing it upward.
5. Remove the bulb from the headlight assembly.
6. Install a new headlight bulb and snap the headlight bulb retaining wire into
position by aligning the wire with the
groove on the bulb.
7. Connect the headlight bulb socket- connector.
8. Install the headlight bulb cover by turn- ing it clockwise.✽✽ NOTICE
If the headlight aiming adjustment is
necessary after the headlight assembly is
reinstalled, consult a HYUNDAI autho-
rised repairer.
OEL079056OEL079029
EL UK 7.QXP 1/25/2010 10:05 AM Page 50
Page 371 of 560
751
Maintenance
Turn signal light/Position light
Turn signal light
1. Turn off the engine and open the bon-net.
2. Remove the socket from the assembly by turning the socket counterclockwise
until the tabs on the socket align with
the slots on the assembly.
3. Remove the bulb from the socket by pressing it in and rotating it counter-
clockwise until the tabs on the bulb
align with the slots in the socket. Pull
the bulb out of the socket.
4. Insert a new bulb by inserting it into the socket and rotating it until it locks
into place.
5. Install the socket in the assembly by aligning the tabs on the socket with the
slots in the assembly. Push the socket
into the assembly and turn the socket
clockwise.
OHD076046
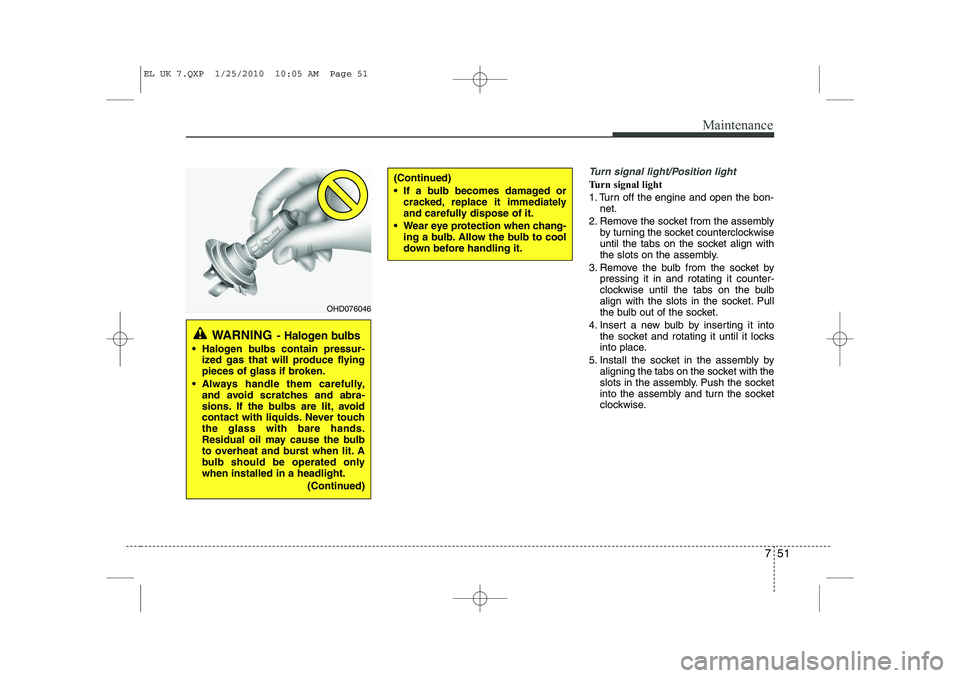
WARNING - Halogen bulbs
Halogen bulbs contain pressur-
ized gas that will produce flying
pieces of glass if broken.
Always handle them carefully, and avoid scratches and abra-
sions. If the bulbs are lit, avoid
contact with liquids. Never touchthe glass with bare hands.
Residual oil may cause the bulb
to overheat and burst when lit. A
bulb should be operated onlywhen installed in a headlight.
(Continued)
(Continued)
If a bulb becomes damaged orcracked, replace it immediately
and carefully dispose of it.
Wear eye protection when chang- ing a bulb. Allow the bulb to cool
down before handling it.
EL UK 7.QXP 1/25/2010 10:05 AM Page 51