2011 HYUNDAI IX20 headlight bulb
[x] Cancel search: headlight bulbPage 150 of 420

Features of your vehicle
72
4
To flash the headlights, pull the lever
towards you. It will return to the normal
(low beam) position when released. The
headlight switch does not need to be on
to use this flashing feature. Turn signals and lane change sig- nals
The ignition switch must be on for the
turn signals to function. To turn on the
turn signals, move the lever up or down
(A). The green arrow indicators on the
instrument panel indicate which turn sig-
nal is operating. They will self-cancel
after a turn is completed. If the indicator
continues to flash after a turn, manually
return the lever to the off position.To signal a lane change, move the turn
signal lever slightly and hold it in position
(B). The lever will return to the off positionwhen released.
If an indicator stays on and does not
flash or if it flashes abnormally, one of the
turn signal bulbs may be burned out andwill require replacement.
One-touch lane change function
(if equipped)
To activate an one-touch lane change
function, move the turn signal lever
slightly and then release it. The lane
change signals will blink 3 times.
✽✽ NOTICE
If an indicator flash is abnormally quick
or slow, a bulb may be burned out or
have a poor electrical connection in the
circuit.
OED040804OED040802
JC ENG 4A.QXP 9/7/2010 11:40 AM Page 72
procarmanuals.com
Page 384 of 420

771
Maintenance
LIGHT BULBS
Use only the bulbs of the specifiedwattage.
✽✽ NOTICE
After heavy, driving rain or washing, headlight and taillight lenses could
appear frosty. This condition is caused by
the temperature difference between the
lamp inside and outside. This is similar
to the condensation on your windows
inside your vehicle during the rain and
doesn’t indicate a problem with your
vehicle. If the water leaks into the lamp
bulb circuitry, have the vehicle checked
by an authorized HYUNDAI dealer.
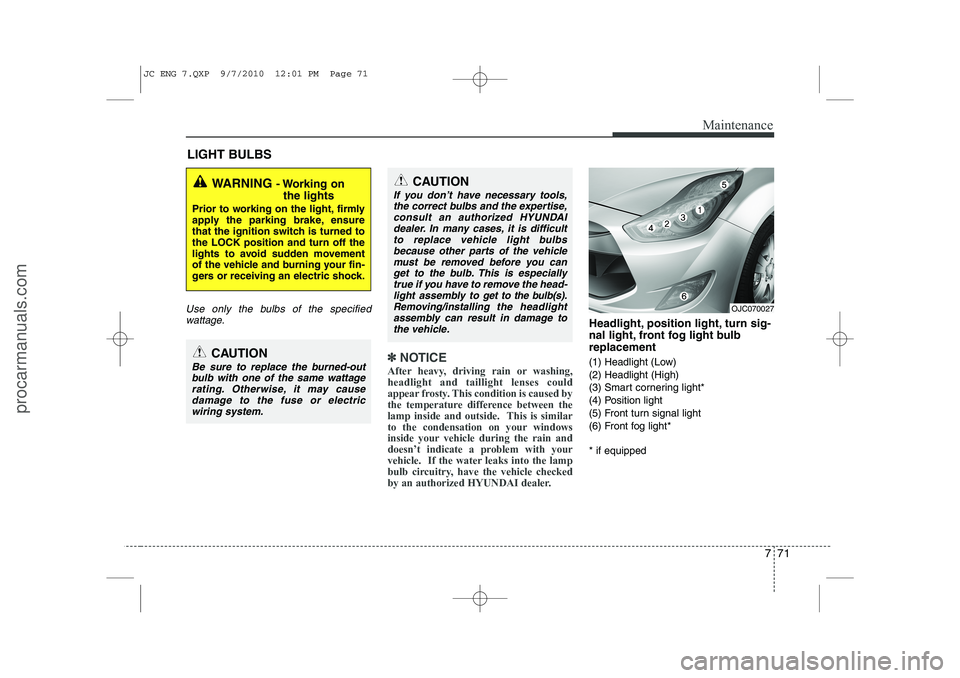
Headlight, position light, turn sig-
nal light, front fog light bulbreplacement
(1) Headlight (Low) (2) Headlight (High)
(3) Smart cornering light*
(4) Position light
(5) Front turn signal light
(6) Front fog light* * if equipped
WARNING - Working on
the lights
Prior to working on the light, firmly
apply the parking brake, ensure
that the ignition switch is turned tothe LOCK position and turn off the
lights to avoid sudden movement
of the vehicle and burning your fin-
gers or receiving an electric shock.
CAUTION
Be sure to replace the burned-out bulb with one of the same wattagerating. Otherwise, it may cause
damage to the fuse or electricwiring system.
CAUTION
If you don’t have necessary tools,the correct bulbs and the expertise,
consult an authorized HYUNDAIdealer. In many cases, it is difficult to replace vehicle light bulbsbecause other parts of the vehicle
must be removed before you canget to the bulb. This is especially true if you have to remove the head-
light assembly to
get to the bulb(s).
Removing/installingthe headlight
assembly can result in damage to the vehicle.OJC070027
JC ENG 7.QXP 9/7/2010 12:01 PM Page 71
procarmanuals.com
Page 385 of 420

Maintenance
72
7
Headlight bulb
1. Open the hood.
(Continued)
If a bulb becomes damaged or
cracked, replace it immediately
and carefully dispose of it.
Wear eye protection when chang- ing a bulb. Allow the bulb to cool
down before handling it.
G270A03O
WARNING - Halogen bulbs
Halogen bulbs contain pressur-
ized gas that will produce flying
pieces of glass if broken.
Always handle them carefully, and avoid scratches and abra-
sions. If the bulbs are lit, avoid
contact with liquids. Never touchthe glass with bare hands.
Residual oil may cause the bulb
to overheat and burst when lit. A
bulb should be operated onlywhen installed in a headlight.
(Continued)
OJC070028
OJC070031
OJC070030
■High beam
■Low beam
■ Smart cornering light
JC ENG 7.QXP 9/7/2010 12:01 PM Page 72
procarmanuals.com
Page 386 of 420

773
Maintenance
2. Remove the headlight bulb cover byturning it counterclockwise.
3. Disconnect the headlight bulb socket- connector.
4. Unsnap the headlight bulb retaining wire by depressing the end and push-
ing it upward.
5. Remove the bulb from the headlight assembly.
6. Install a new headlight bulb and snap the headlight bulb retaining wire into
position by aligning the wire with the
groove on the bulb.
7. Connect the headlight bulb socket connector.
8. Install the headlight bulb cover by turn- ing it clockwise. Position light
1. Remove the headlight bulb cover by
turning it counterclockwise.
2. Remove the socket from the assembly by pulling it out.
3. Remove the bulb by pulling it straight out.
4. Insert a new bulb into the socket.
5. Install the socket into the assembly by pushing it in.
Turn signal light
1. Remove the socket from the assembly by turning the socket counterclockwise
until the tabs on the socket align with
the slots on the assembly.
2. Remove the bulb from the socket by pressing it in and rotating it counter-
clockwise until the tabs on the bulb
align with the slots in the socket. Pull
the bulb out of the socket
3. Insert a new bulb by inserting it into the socket and rotating it until it locks
into place.
4. Install the socket in the assembly by aligning the tabs on the socket with the
slots in the assembly. Push the socket
into the assembly and turn the socket
clockwise.
OJC070032OJC070029
JC ENG 7.QXP 9/7/2010 12:02 PM Page 73
procarmanuals.com
Page 387 of 420

Maintenance
74
7
Front fog light bulbs (if equipped)
1. Reach your hand into the back of the
front bumper.
2. Disconnect the power connector from the socket.
3. Remove the bulb-socket from the housing by turning the socket counter
clockwise until the tabs on the socketalign with the slots on the housing.
4. Install the new bulb-socket into the housing by aligning the tabs on the
socket with the slots in the housing.
Push the socket into the housing and
turn the socket clockwise.
5. Connect the power connector to the socket.✽✽ NOTICE
If the headlight aiming adjustment is
necessary after the headlight assembly is
reinstalled, consult an authorized
HYUNDAI dealer.
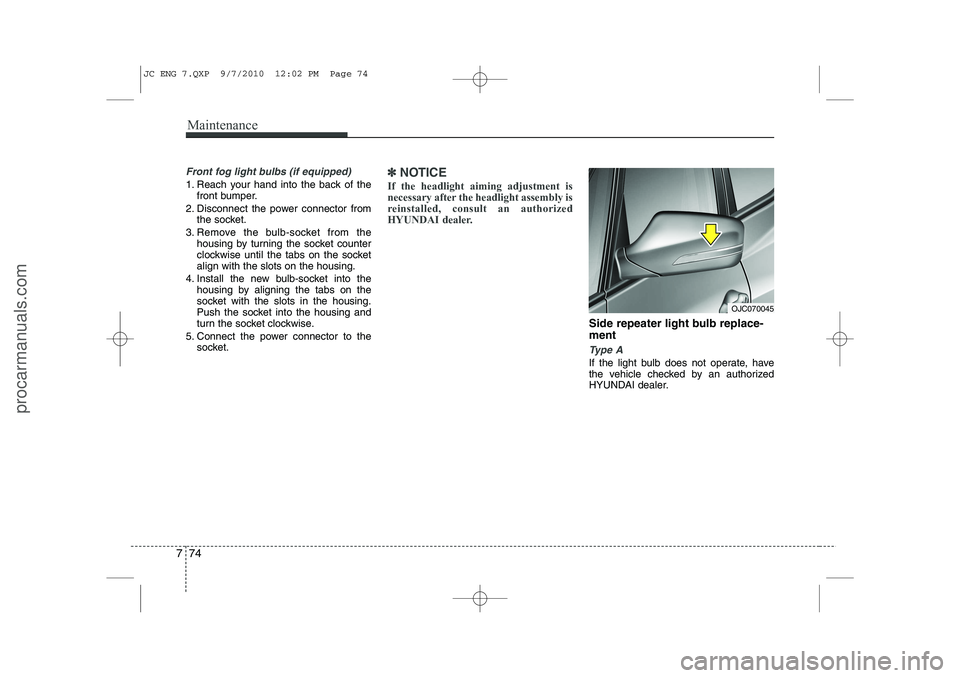
Side repeater light bulb replace- ment
Type A
If the light bulb does not operate, have
the vehicle checked by an authorized
HYUNDAI dealer.
OJC070045
JC ENG 7.QXP 9/7/2010 12:02 PM Page 74
procarmanuals.com
Page 403 of 420

Specifications & Consumer information
2
8
ENGINE DIMENSIONS
Item mm (in.)
Overall length 4100 (161.42)
Overall width 1765 (69.49)
Overall height 1600 (62.99)
Front tread 195/65R15 1553 (61.14)
205/55R16 1547 (60.91)
205/50R17 1541 (60.67)
Rear tread 195/65R15 1557 (61.30)
205/55R16 1551 (61.06)
205/50R17 1545 (60.83)
Wheelbase 2615 (102.95)
Item Gasoline 1.4 Gasoline 1.6
Diesel 1.4
Displacement cc (cu. in) 1396
(85.19) 1591
(97.09) 1396
(85.12)
Bore x Stroke mm (in.)77x74.99
(3.03x2.95) 77x85.44
(3.03x3.36) 75x79
(2.95x3.11)
Firing order 1-3-4-2 1-3-4-2 1-3-4-2
No. of cylinders 4, In-line 4, In-line 4, In-lineLight BulbWattageBulb type
HeadlightsHigh55H7
Low55H7
Smart cornering lights*55H7
Front turn signal lights21P21W
Position lights5W5W
Side repeater lights*5W5W
Front fog lights*27H27W
Stop and tail lights21/5P21/5W
Tail lights21/5P21/5W
Rear turn signal lights 21P21W
Back-up lights16W16W
Rear fog lights21P21W
High mounted stop lightLEDLED
License plate lights5W5W
Front map lamp10FEST00N
Side room lamp*5W5W
Center room lamp*8FEST00N
Vanity mirror lamp*5W5W
Luggage room lamp5W5W
Glove box lamp5W5W
BULB WATTAGE
* : If equipped
JC ENG 8.QXP 9/7/2010 1:43 PM Page 2
procarmanuals.com
Page 411 of 420

Index
2
I
Air bags ···········································································3-37
Air bag warning label................................................3-59
Air bag warning light ................................................3-40
Curtain air bag ..........................................................3-51
Driver's and passenger's front air bag ......................3-44
Passenger’s front air bag ON/OFF indicator ............3-41
Passenger’s front air bag ON/OFF switch ................3-47
Side impact air bag....................................................3-49
Air cleaner·······································································7-43
Alarm system ··································································4-11
Antenna ·········································································4-111
Anti-lock brake system (ABS) ·······································5-29
Appearance care······························································7-79 Exterior care ······························································7-79
Interior care ·······························································7-84
Armrest ····································································3-5, 3-13
Ashtray ··········································································4-104
Audio system ································································4-111 Antenna ···································································4-111
Aux, USB and iPod ·················································4-107
Audio remote control ·············································4-112
Automatic climate control system ··································4-90 Air conditioning ···············································4-86, 4-96
Automatic heating and air conditioning····················4-91
Manual heating and air conditioning ························4-92 Automatic transaxle ························································5-21
Shift lock system ·······················································5-24
Battery ·············································································7-47
Battery saver function ·····················································4-69
Before driving ···································································5-3
Bottle holders, see cup holders ·····································4-105
Brake/clutch fluid ···························································7-38
Brake system ···································································5-26 Anti-lock brake system (ABS) ··································5-29
Electronic stability program (ESP) ···························5-31
Hill-start assist control (HAC) ··································5-34
Parking brake ····························································5-27
Power brakes ·····························································5-26
Bulb replacement ····························································7-71 Front fog light bulb replacement ······························7-74
Headlight bulb replacement ······································7-72
High mounted stop light replacement ·······················7-77
Interior light bulb replacement··································7-78
License plate light bulb replacement ························7-77
Position light bulb replacement ································7-73
Rear combination light bulb replacement ·················7-75
Rear fog light bulb replacement································7-77Side repeater light bulb replacement·························7-74
Smart cornering light bulb replacement····················7-72
Turn signal light bulb replacement ···························7-73
A
B
JC ENG INDEX.QXP 9/7/2010 12:36 PM Page 2
procarmanuals.com
Page 414 of 420

I5
Index
Front seat adjustment ························································3-4
Fuel filler lid ··································································4-26
Fuel filter(for diesel) ······················································7-42
Fuel gauge ······································································4-43
Fuel requirements ····························································1-3Fuses ··············································································7-60
Fuse/relay panel description ····································7-64
Main fuse ··································································7-63
Memory fuse ·····························································7-62
Multi fuse ·································································7-60
Gauges·············································································4-41 Engine temperature gauge·········································4-42
Fuel gauge ································································4-43
Glassroof, see panorama sunroof····································4-29
Glove box ·····································································4-100
Glove box cooling·························································4-101 Hazard warning flasher ··········································4-68, 6-2
Hazardous driving conditions ········································5-45
Headlight bulb replacement ···········································7-72
Headlight escort function ···············································4-69
Headlight leveling device ··············································4-74
Headrest ··································································3-6, 3-12
Heating and air conditioning ·········································4-82High mounted stop light replacement ····························7-77
Highway driving ····························································5-49
Hill-start assist control (HAC)········································5-34Hood ···············································································4-24Horn ···············································································4-34
How to use this manual ···················································1-2
Immobilizer system ·························································4-3
Indicators and warnings ·················································4-47Indicator symbols on the instrument cluster ····················1-7
Instrument cluster ··························································4-40
Engine temperature gauge ········································4-42
Fuel gauge ································································4-43
Instrument panel illumination ··································4-41
LCD display ······························································4-58Odometer ··································································4-43Speedometer ·····························································4-41
G
H
I
JC ENG INDEX.QXP 9/7/2010 12:36 PM Page 5
procarmanuals.com