2011 HYUNDAI I40 bumper remove
[x] Cancel search: bumper removePage 169 of 534

Downloaded from www.Manualslib.com manuals search engine Features of your vehicle
82
4
✽
✽
NOTICE
1. The warning may not sound sequen-
tially depending on the speed and
shapes of the objects detected.
2. The parking assist system may mal- function if the vehicle bumper height
or sensor installation has been modi-
fied. Any non-factory installed equip-
ment or accessories may also interfere
with the sensor performance.
3. Sensor may not recognize objects less than 30 cm from the sensor, or it may
sense an incorrect distance. Use with
caution.
4. When the sensor is frozen or stained with snow or water, the sensor may be
inoperative until the stains are
removed using a soft cloth.
5. Do not push, scratch or strike the sen- sor with any hard objects that could
damage the surface of the sensor.
Sensor damage could occur.
✽ ✽NOTICE
This system can only sense objects with-
in the range and location of the sensors,
it can not detect objects in other areas
where sensors are not installed. Also,
small or slim objects, or objects located
between sensors may not be detected.
Always visually check in front and
behind the vehicle when driving.
Be sure to inform any drivers in the
vehicle that may be unfamiliar with the
system regarding the systems capabili-
ties and limitations.
Self-diagnosis
When you shift the gear to the R
(Reverse) position and if one or more of
the below occurs you may have a mal-
function in the rear parking assist sys-
tem.
You don't hear an audible warning
sound or if the buzzer sounds intermit-
tently.
If this occurs, have your vehicle checked
by an authorized HYUNDAI dealer as
soon as possible.
WARNING
Your new vehicle warranty does not
cover any accidents or damage to
the vehicle or injuries to its occu-
pants related to a parking assist
system. Always drive safely and
cautiously.
WARNING
Pay close attention when the vehi-
cle is driven close to objects on the
road, particularly pedestrians, and
especially children. Be aware that
some objects may not be detected
by the sensors, due to the objects
distance, size or material, all of
which can limit the effectiveness of
the sensor. Always perform a visual
inspection to make sure the vehicle
is clear of all obstructions before
moving the vehicle in any direction.
(blinks)
is displayed. (if equipped)
Page 367 of 534

Downloaded from www.Manualslib.com manuals search engine Driving your vehicle
74
5
✽
✽
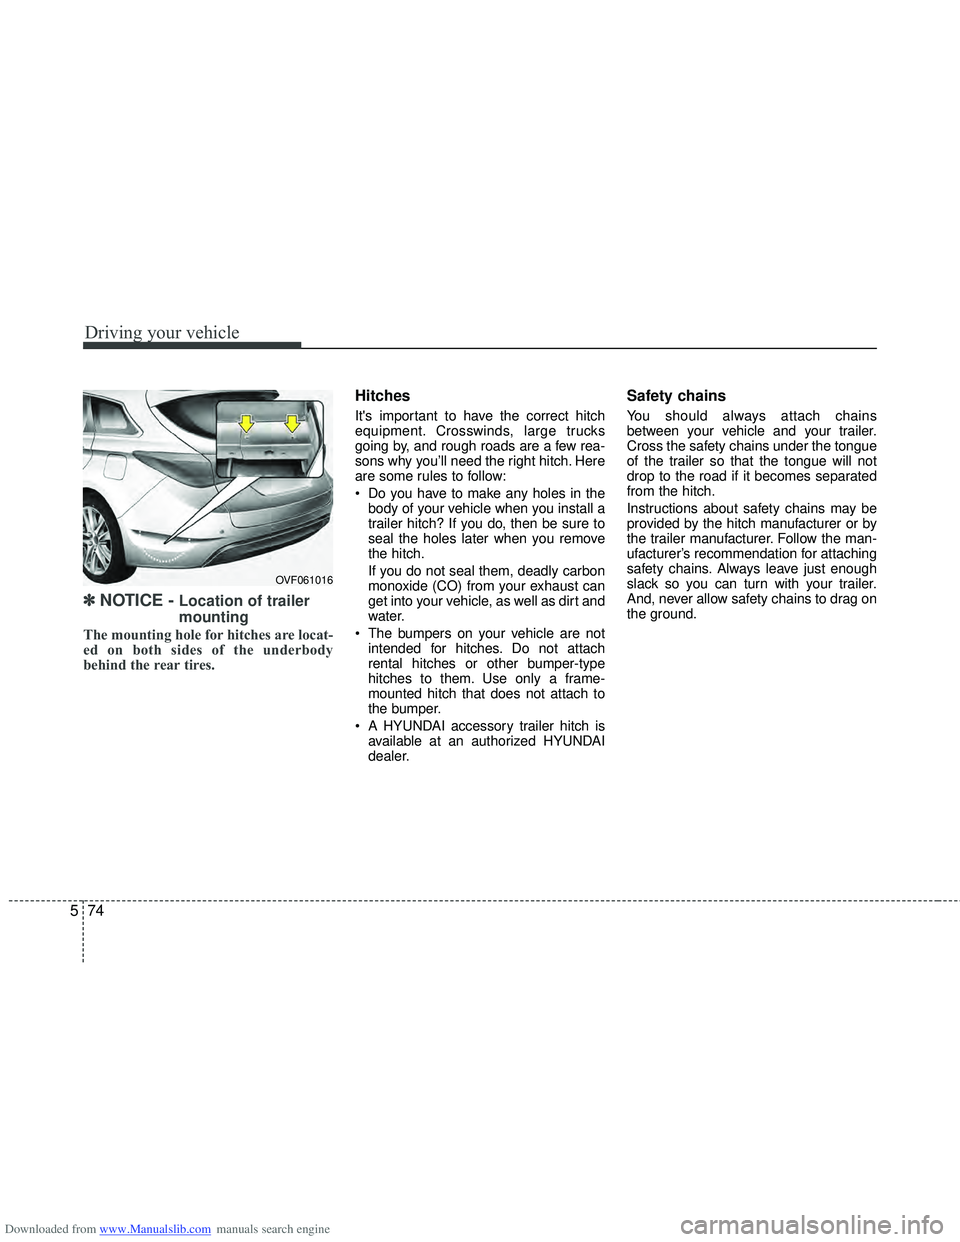
NOTICE - Location of trailer
mounting
The mounting hole for hitches are locat-
ed on both sides of the underbody
behind the rear tires.
Hitches
It's important to have the correct hitch
equipment. Crosswinds, large trucks
going by, and rough roads are a few rea-
sons why you’ll need the right hitch. Here
are some rules to follow:
Do you have to make any holes in the
body of your vehicle when you install a
trailer hitch? If you do, then be sure to
seal the holes later when you remove
the hitch.
If you do not seal them, deadly carbon
monoxide (CO) from your exhaust can
get into your vehicle, as well as dirt and
water.
The bumpers on your vehicle are not intended for hitches. Do not attach
rental hitches or other bumper-type
hitches to them. Use only a frame-
mounted hitch that does not attach to
the bumper.
A HYUNDAI accessory trailer hitch is available at an authorized HYUNDAI
dealer.
Safety chains
You should always attach chains
between your vehicle and your trailer.
Cross the safety chains under the tongue
of the trailer so that the tongue will not
drop to the road if it becomes separated
from the hitch.
Instructions about safety chains may be
provided by the hitch manufacturer or by
the trailer manufacturer. Follow the man-
ufacturer’s recommendation for attaching
safety chains. Always leave just enough
slack so you can turn with your trailer.
And, never allow safety chains to drag on
the ground.
OVF061016
Page 402 of 534

Downloaded from www.Manualslib.com manuals search engine 627
What to do in an emergency
When towing your vehicle in an emer-
gency without wheel dollies :
1. Set the ignition switch in the ACC posi-tion.
2. Place the transaxle shift lever in N (Neutral).
3. Release the parking brake.
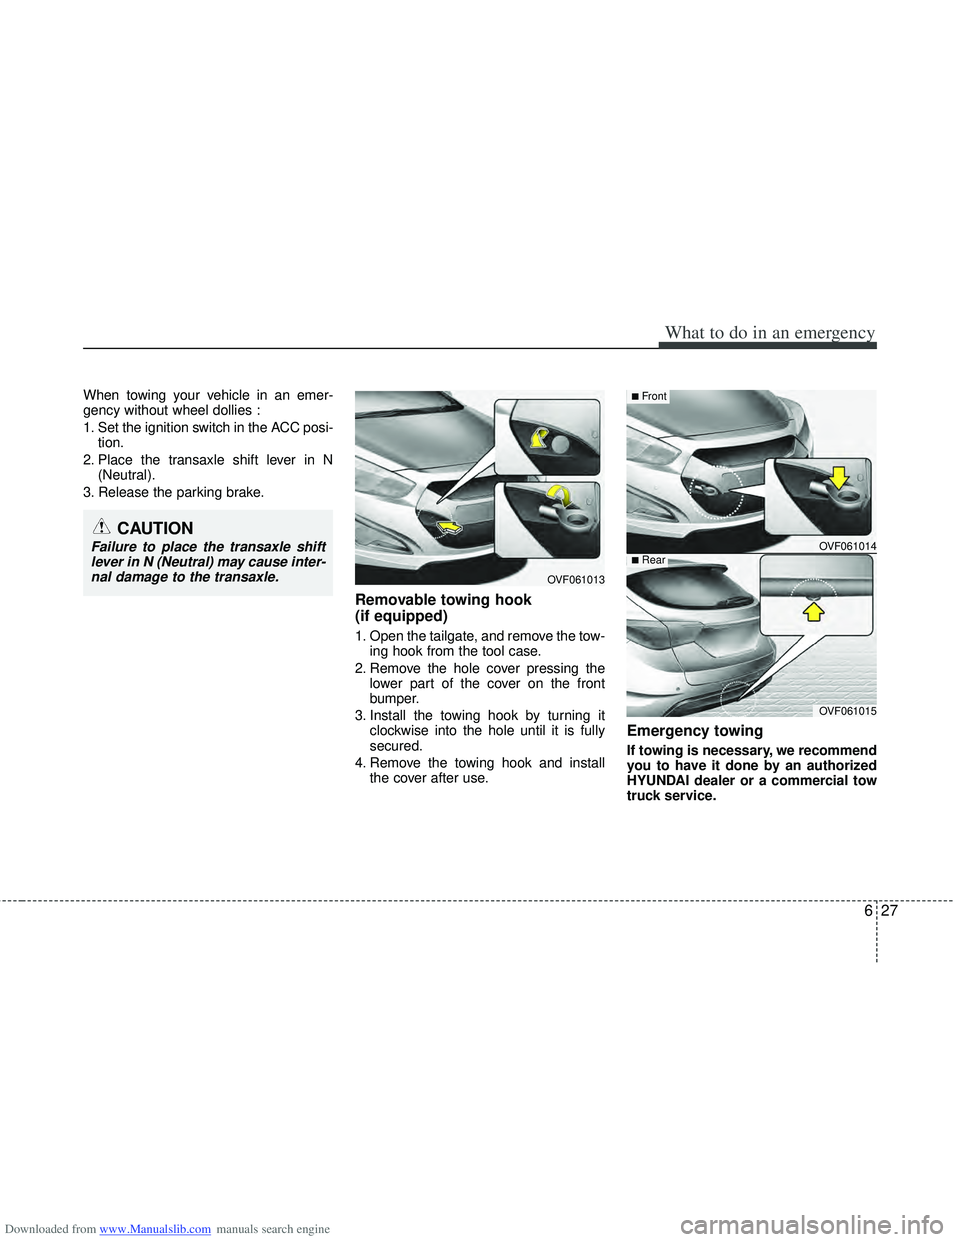
Removable towing hook
(if equipped)
1. Open the tailgate, and remove the tow- ing hook from the tool case.
2. Remove the hole cover pressing the lower part of the cover on the front
bumper.
3. Install the towing hook by turning it clockwise into the hole until it is fully
secured.
4. Remove the towing hook and install the cover after use.
Emergency towing
If towing is necessary, we recommend
you to have it done by an authorized
HYUNDAI dealer or a commercial tow
truck service.
CAUTION
Failure to place the transaxle shiftlever in N (Neutral) may cause inter- nal damage to the transaxle.
OVF061013
OVF061014
OVF061015
■Front
■Rear
Page 491 of 534

Downloaded from www.Manualslib.com manuals search engine Maintenance
86
7
Headlight (Low/High), smart corner-
ing light and turn signal light
1. Turn off the engine and open the hood.
2. Remove the front bumper.
3. Remove the headlight assembly from the body of the vehicle. If you can reach
the bulb without removing the headlight
assembly, you do not need to do step 2
and 3.
4. Disconnect the power connector(s) from the back of the headlight assem-
bly.
Headlight (Low/High) and
Smart cornering light
5. Remove the headlight bulb cover byturning it counterclockwise.
6. Disconnect the headlight bulb socket- connector.
7. Remove the socket from the assembly by turning the socket counterclockwise
until the tabs on the socket align with
the slots on the assembly.
8. Pull the bulb out of the socket.
9. Insert a new bulb into the socket.
10. Install the socket in the assembly by aligning the tabs on the socket with
the slots in the assembly. Push the
socket into the assembly and turn the
socket clockwise. 11. Connect the headlight bulb socket-
connector.
12. Install the headlight bulb cover by turning it clockwise.
✽ ✽NOTICE
If the headlight aiming adjustment is
necessary after the headlight assembly is
reinstalled, consult an authorized
HYUNDAI dealer.
OVF071056
Smart cornering Low
High
Page 492 of 534

Downloaded from www.Manualslib.com manuals search engine 787
Maintenance
Turn signal light
Follow the steps 1 to 4 from the previous
page.
5. Remove the socket from the assemblyby turning the socket counterclockwise
until the tabs on the socket align with
the slots on the assembly.
6. Remove the bulb from the socket by pressing it in and rotating it counter-
clockwise until the tabs on the bulb
align with the slots in the socket. Pull
the bulb out of the socket.
7. Insert a new bulb by inserting it into the socket and rotating it until it locks
into place.
8. Install the socket in the assembly by aligning the tabs on the socket with the
slots in the assembly. Push the socket
into the assembly and turn the socket
clockwise.Front fog light bulbs
1. Turn off the engine.
2. Remove the under cover by rotating
the screws.
3. Reach your hand into the back of the front bumper.
4. Disconnect the power connector from the socket.
5. Remove the bulb-socket from the housing by turning the socket counter
clockwise until the tabs on the socket
align with the slots on the housing.
6. Install a new bulb-socket into the hous- ing by aligning the tabs on the socket
with the slots in the housing. Push the
socket into the housing and turn the
socket clockwise.
7. Connect the power connector to the socket.
OHD076046
WARNING- Halogen bulbs
Halogen bulbs contain pressurizedgas that will produce flying pieces
of glass if broken.
Always handle them carefully, and avoid scratches and abrasions. If
the bulbs are lit, avoid contact with
liquids. Never touch the glass with
bare hands. Residual oil may cause
the bulb to overheat and burst
when lit. A bulb should be operated
only when installed in a headlight.
If a bulb is damaged or cracked, replace it immediately and carefully
dispose of it.
Wear eye protection when chang- ing a bulb. Allow the bulb to cool
down before handling it.
OVF071057OVF071058