2011 HYUNDAI I10 ESP
[x] Cancel search: ESPPage 253 of 354

615
What to do in an emergency
IF YOU HAVE A FLAT TIRE (WITH TIREMOBILITYKIT, IF EQUIPPED)
Please read the instructions before
using the TireMobilityKit. (1) Compressor(2) Sealant bottle Introduction
With the TireMobilityKit you stay
mobile even after experiencing a tire
puncture. The system of compressor
and sealing compound effectively
and comfortably seals most punc-tures in a passenger car tire caused
by nails or similar objects and rein-
flates the tire. After you ensured that
the tire is properly sealed you can
drive cautiously on the tire (up to 200
km (120 miles)) at a max. speed of80 km/h (50 mph) in order to reach a
vehicle or tire dealer to have the tire
replaced. It is possible that some
tires, especially with larger punctures
or damage to the sidewall, cannot be
sealed completely.Air pressure loss in the tire may
adversely affect tire performance.
For this reason, you should avoid
abrupt steering or other driving
maneuvers, especially if the vehicle
is heavily loaded or if a trailer is in
use. The TireMobilityKit is not
designed or intended as a perma-nent tire repair method and is to be
used for one tire only. This instruction
shows you step by step how to tem-
porarily seal the puncture simply and
reliably.
Read the section "Notes on the safe
use of the TireMobilityKit".
OYN069010OYN069018
WARNING
Do not use the TireMobilityKit if
a tire is severely damaged bydriving run flat or with insuffi-
cient air pressure.
Only punctured areas located within the tread region of thetire can be sealed using theTireMobilityKit.
Damage to the sidewall must
not be repaired due to safety rea-sons.
Page 256 of 354

What to do in an emergency
18
6
Distributing the sealant
Immediately drive approximately 3
km (2 miles) to evenly distribute the
sealant in the tire. Producing the tire inflation pres- sure
1) After driving approximately 3 km
(2 miles), stop at a suitable loca- tion.
2) Connect connection hose 9 of the compressor directly to the tire
valve.
3) Connect between compressor and the vehicle power outlet using
the cable and connectors.
4) Adjust the tire inflation pressure to 230 kPa (33 psi). With the ignition
switched on, proceed as follows.
- To increase the inflation pres- sure: Switch on the compressor,
position I. To check the current
inflation pressure setting, briefly
switch off the compressor. - To reduce the inflation pres-
sure: Press the button 8 on the
compressor.
WARNING
Do not let the compressor run for
more than 10 minutes, otherwise
the device will overheat and may
be damaged.
WARNING
The tire inflation pressure must
be at least 230 kPa (33 psi). If it is
not, do not continue driving. Call
for road side service or towing.
CAUTION
Do not exceed a speed of 60 km/h (35 mph). If possible, donot fall below a speed of 20 km/h (12 mph).
While driving, if you experienceany unusual vibration, ride dis-turbance or noise, reduce yourspeed and drive with caution until you can safely pull off ofthe side of the road.
Call for road side service or tow-ing.
CAUTION
If the inflation pressure is notmaintained, drive the vehicle asecond time, refer to Distributing the sealant. Then repeat steps 1to 4.
Use of the TireMobilityKit maybe ineffectual for tire damagelarger than approximately 4 mm (0.16 in).
Please contact the nearestHYUNDAI A/S center, or a work-shop that works according toHYUNDAI repair procedures with correspondingly trainedpersonnel if the tire cannot bemade roadworthy with the TireMobilityKit.
Page 262 of 354

What to do in an emergency
24
6
EMERGENCY COMMODITY (IF EQUIPPED)
F110000AUN There are some emergency commodities
in the vehicle to help you respond to theemergency situation.
F110100AUN
Fire extinguisher
If there is small fire and you know how to
use the fire extinguisher, take the follow-
ing steps carefully.
1. Pull the pin at the top of the extin- guisher that keeps the handle from being accidentally pressed.
2. Aim the nozzle toward the base of the fire.
3. Stand approximately 2.5 m (8 ft) away from the fire and squeeze the handle
to discharge the extinguisher. If you
release the handle, the discharge will
stop.
4. Sweep the nozzle back and forth at the base of the fire. After the fire appears
to be out, watch it carefully since it
may re-ignite. F110200AUN
First aid kit
There are some items such as scissors,
bandage and adhesive tape and etc. in
the kit to give first aid to an injured per-son.
F110300AUN
Triangle reflector
Place the triangle reflector on the road to
warn oncoming vehicles during emer-
gencies, such as when the vehicle is
parked by the roadside due to any prob-
lems.
F110400AUN
Tire pressure gauge (If equipped)
Tires normally lose some air in day-to-
day use, and you may have to add a few
pounds of air periodically and it is not
usually a sign of a leaking tire, but of nor-
mal wear. Always check tire pressurewhen the tires are cold because tire pres-
sure increases with temperature. To check the tire pressure, take the fol-
lowing steps;
1. Unscrew the inflation valve cap that is
located on the rim of the tire.
2. Press and hold the gauge against the tire valve. Some air will escape as you
begin and more will escape if you don't
press the gauge in firmly.
3. A firm non-leaking push will activate the gauge.
4. Read the tire pressure on the gauge to know whether the tire pressure is lowor high.
5. Adjust the tire pressures to the speci- fied pressure. Refer to “Tires and
wheels” in section 9.
6. Reinstall the inflation valve cap.
Page 267 of 354

75
Maintenance
MAINTENANCE SERVICES
G020000AEN
You should exercise the utmost care to
prevent damage to your vehicle and
injury to yourself whenever performing
any maintenance or inspection proce-
dures.
Should you have any doubts concerning
the inspection or servicing of your vehi-
cle, we strongly recommend that you
have an authorized HYUNDAI dealer
perform this work.
An authorized HYUNDAI dealer has fac-
tory-trained technicians and genuine
HYUNDAI parts to service your vehicle
properly. For expert advice and quality
service, see an authorized HYUNDAI
dealer.
Inadequate, incomplete or insufficient
servicing may result in operational prob-
lems with your vehicle that could lead to
vehicle damage, an accident, or person-
al injury. G020100AEN
Owner’s responsibility
✽✽
NOTICE
Maintenance Service and Record
Retention are the owner's responsibility.
You should retain documents that show
proper maintenance has been performed
on your vehicle in accordance with the
scheduled maintenance service charts
shown on the following pages. You need
this information to establish your compli-
ance with the servicing and maintenance
requirements of your vehicle warranties.
Detailed warranty information is provided
in your Service Passport. Repairs and adjustments required as a
result of improper maintenance or a lack
of required maintenance are not covered.
We recommend you have your vehicle
maintained and repaired by an author-
ized HYUNDAI dealer. An authorized
HYUNDAI dealer meets HYUNDAI’s high
service quality standards and receives
technical support from HYUNDAI in
order to provide you with a high level of
service satisfaction. G020200APA Owner maintenance precautions
Improper or incomplete service may
result in problems. This section gives
instructions only for the maintenance
items that are easy to perform.
As explained earlier in this section, sev-
eral procedures can be done only by an
authorized HYUNDAI dealer with special
tools.
✽✽
NOTICE
Improper owner maintenance during
the warranty period may affect warran-
ty coverage. For details, read the sepa-
rate Service Passport provided with the
vehicle. If you're unsure about any serv-
icing or maintenance procedure, have it
done by an authorized HYUNDAI deal-
er.
Page 268 of 354

Maintenance
6
7
WARNING - Maintenance
work
Performing maintenance work on a vehicle can be dangerous. You
can be seriously injured while
performing some maintenance
procedures. If you lack sufficient
knowledge and experience or the
proper tools and equipment to do
the work, have it done by an
authorized HYUNDAI dealer.
Working under the hood with the engine running is dangerous. It
becomes even more dangerous
when you wear jewelry or loose
clothing. These can become
entangled in moving parts and
result in injury. Therefore, if you
must run the engine while work-
ing under the hood, make certain
that you remove all jewelry (espe-
cially rings, bracelets, watches,
and necklaces) and all neckties,
scarves, and similar loose cloth-
ing before getting near theengine or cooling fans.
Page 307 of 354

745
Maintenance
G200600BEN Tire replacement
If the tire is worn evenly, a tread wear indicator will appear as a solid band
across the tread. This shows there isless than 1.6 mm (1/16 inch) of tread
left on the tire. Replace the tire when
this happens.
Do not wait for the band to appear
across the entire tread before replac-
ing the tire.
OEN076053
Tread wear indicatorWARNING - Replacing
tires
To reduce the chance or serious
or fatal injuries from an acci-
dent caused by tire failure or
loss of vehicle control:
Replace tires that are worn, show uneven wear, or are
damaged. Worn tires can
cause loss of braking effec-
tiveness, steering control, andtraction.
Do not drive your vehicle with too little or too much pressure
in your tires. This can lead to
uneven wear and tire failure.
When replacing tires, never mix radial and bias-ply tires
on the same car. You must
replace all tires (including the
spare) if moving from radial to
bias-ply tires.
(Continued)(Continued)
Using tires and wheel otherthan the recommended sizes
could cause unusual handling
characteristics and poor vehi-
cle control, resulting in a seri-ous accident.
Wheels that do not meet HYUNDAI’s specifications
may fit poorly and result in
damage to the vehicle or
unusual handling and poor
vehicle control.
The ABS works by comparing the speed of the wheels. Tire
size can affect wheel speed.
When replacing tires, all 4
tires must use the same size
originally supplied with the
vehicle. Using tires of a differ-
ent size can cause the ABS
(Anti-lock Brake System) and
ESP (Electronic Stability
Program) (if equipped) to
work irregularly.
Page 310 of 354

Maintenance
48
7
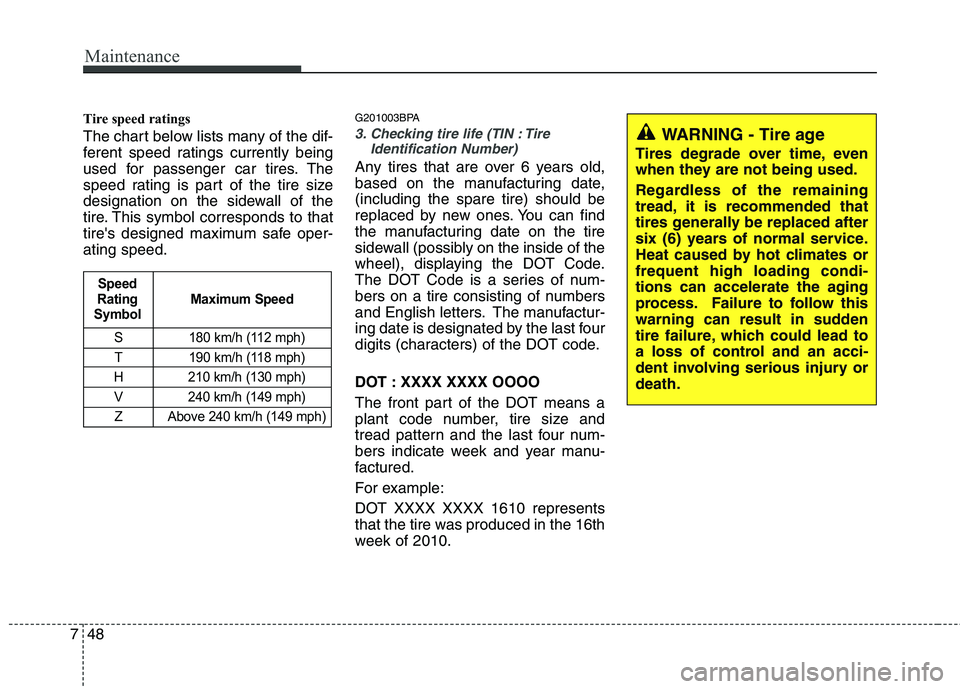
Tire speed ratings
The chart below lists many of the dif-
ferent speed ratings currently being
used for passenger car tires. The
speed rating is part of the tire size
designation on the sidewall of the
tire. This symbol corresponds to that
tire's designed maximum safe oper-ating speed. G201003BPA
3. Checking tire life (TIN : Tire
Identification Number)
Any tires that are over 6 years old,
based on the manufacturing date,(including the spare tire) should be
replaced by new ones. You can find
the manufacturing date on the tire
sidewall (possibly on the inside of the
wheel), displaying the DOT Code.
The DOT Code is a series of num-
bers on a tire consisting of numbers
and English letters. The manufactur-
ing date is designated by the last four
digits (characters) of the DOT code.
DOT : XXXX XXXX OOOO
The front part of the DOT means a
plant code number, tire size and
tread pattern and the last four num-
bers indicate week and year manu-
factured.
For example:
DOT XXXX XXXX 1610 represents
that the tire was produced in the 16th
week of 2010.
S 180 km/h (112 mph)
T 190 km/h (118 mph)
H 210 km/h (130 mph) V 240 km/h (149 mph)
Z Above 240 km/h (149 mph)
Maximum Speed
Speed
Rating
Symbol
WARNING - Tire age
Tires degrade over time, even
when they are not being used.
Regardless of the remaining
tread, it is recommended that
tires generally be replaced after
six (6) years of normal service.
Heat caused by hot climates orfrequent high loading condi-
tions can accelerate the aging
process. Failure to follow this
warning can result in sudden
tire failure, which could lead to
a loss of control and an acci-
dent involving serious injury ordeath.
Page 311 of 354

749
Maintenance
G201004AEN
4. Tire ply composition and material
The number of layers or plies of rub-
ber-coated fabric in the tire. Tire
manufacturers also must indicate the
materials in the tire, which include
steel, nylon, polyester, and others.
The letter "R" means radial ply con-
struction; the letter "D" means diago-
nal or bias ply construction; and theletter "B" means belted-bias ply con-
struction.
G201005AUN
5. Maximum permissible inflationpressure
This number is the greatest amount of air pressure that should be put in
the tire. Do not exceed the maximum
permissible inflation pressure. Refer
to the Tire and Loading Information
label for recommended inflation
pressure. G201006AUN
6. Maximum load rating
This number indicates the maximum
load in kilograms and pounds that
can be carried by the tire. When
replacing the tires on the vehicle,
always use a tire that has the same
load rating as the factory installed
tire. G2010007BEN
7. Uniform tire quality grading
Quality grades can be found where
applicable on the tire sidewall
between tread shoulder and maxi-
mum section width.
For example:
TREADWEAR 200
TRACTION AA
TEMPERATURE A
Tread wear
The tread wear grade is a compara-
tive rating based on the wear rate ofthe tire when tested under controlled
conditions on a specified govern-
ment test course. For example, a tire
graded 150 would wear one-and-a-
half times (1½) as well on the gov-
ernment course as a tire graded 100.
The relative performance of tires depends upon the actual conditions
of their use, however, and may
depart significantly from the norm
due to variations in driving habits,
service practices and differences in
road characteristics and climate.
These grades are molded on the
side-walls of passenger vehicle tires.
The tires available as standard or
optional equipment on your vehicle
may vary with respect to grade.