2011 Hyundai H-100 Truck oil temperature
[x] Cancel search: oil temperaturePage 14 of 211
1FEATURES OF YOUR HYUNDAI
2
!
FUEL RECOMMENDATIONS
B010A04HR-GAT Use Diesel
CAUTION:
o Do not let any gasoline or water enter the tank. This would make it necessary to drain it out and to bleed the lines to avoid jamming the injection pump and damag-ing the engine.
o In winter, in order to cut down
incidents due to freezing, paraf-fin oil may be added to the fuel if the temperature drops to below -10°C. Never use more than 20%paraffin oil.
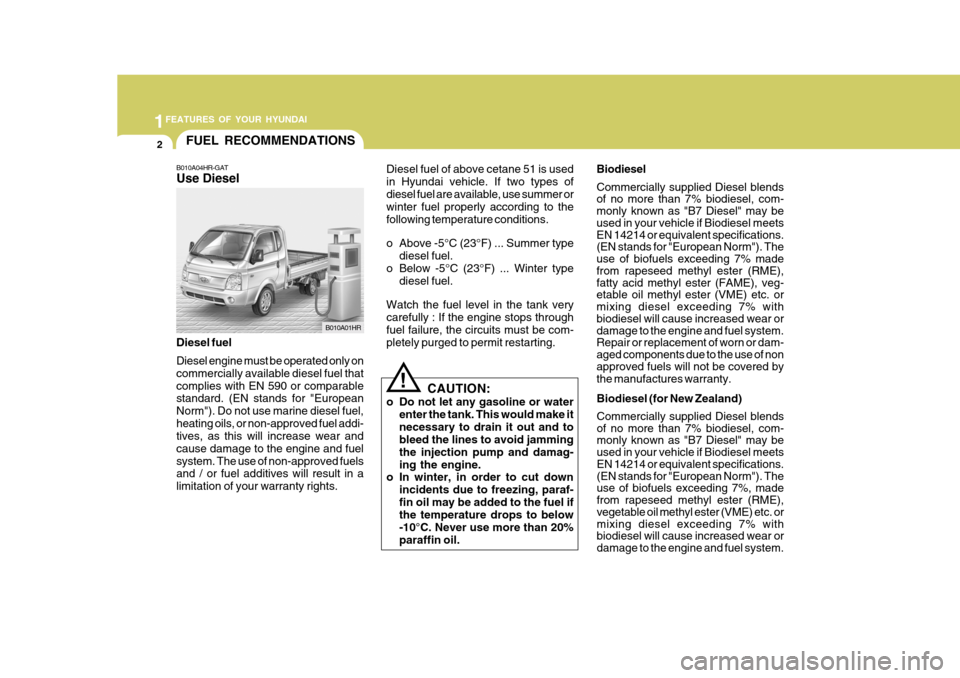
Diesel fuel Diesel engine must be operated only on commercially available diesel fuel thatcomplies with EN 590 or comparable standard. (EN stands for "European Norm"). Do not use marine diesel fuel,heating oils, or non-approved fuel addi- tives, as this will increase wear and cause damage to the engine and fuelsystem. The use of non-approved fuels and / or fuel additives will result in a limitation of your warranty rights.
B010A01HR
Diesel fuel of above cetane 51 is usedin Hyundai vehicle. If two types ofdiesel fuel are available, use summer or winter fuel properly according to the following temperature conditions.
o Above -5°C (23°F) ... Summer type
diesel fuel.
o Below -5°C (23°F) ... Winter type
diesel fuel.
Watch the fuel level in the tank very carefully : If the engine stops through fuel failure, the circuits must be com- pletely purged to permit restarting. Biodiesel Commercially supplied Diesel blends of no more than 7% biodiesel, com- monly known as "B7 Diesel" may be used in your vehicle if Biodiesel meets EN 14214 or equivalent specifications. (EN stands for "European Norm"). The use of biofuels exceeding 7% made from rapeseed methyl ester (RME), fatty acid methyl ester (FAME), veg- etable oil methyl ester (VME) etc. or mixing diesel exceeding 7% with biodiesel will cause increased wear or damage to the engine and fuel system. Repair or replacement of worn or dam- aged components due to the use of non approved fuels will not be covered by the manufactures warranty.
Biodiesel (for New Zealand) Commercially supplied Diesel blends of no more than 7% biodiesel, com- monly known as "B7 Diesel" may be used in your vehicle if Biodiesel meets EN 14214 or equivalent specifications. (EN stands for "European Norm"). The use of biofuels exceeding 7%, made from rapeseed methyl ester (RME), vegetable oil methyl ester (VME) etc. or mixing diesel exceeding 7% with biodiesel will cause increased wear or damage to the engine and fuel system.
Page 35 of 211
1
FEATURES OF YOUR HYUNDAI
23
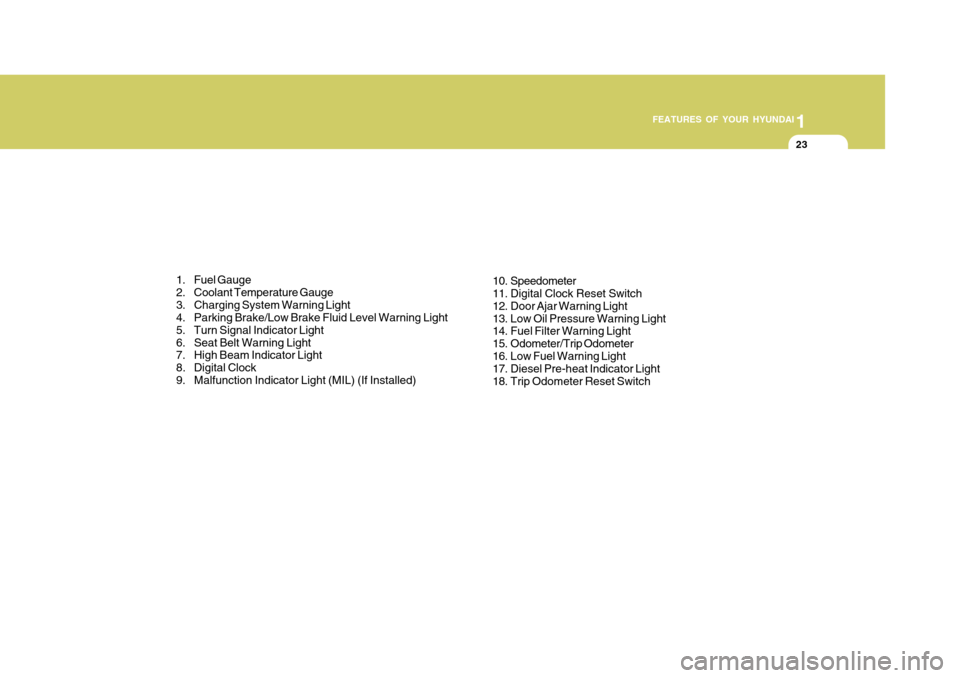
1. Fuel Gauge
2. Coolant Temperature Gauge
3. Charging System Warning Light
4. Parking Brake/Low Brake Fluid Level Warning Light
5. Turn Signal Indicator Light
6. Seat Belt Warning Light
7. High Beam Indicator Light
8. Digital Clock
9. Malfunction Indicator Light (MIL) (If Installed) 10. Speedometer
11. Digital Clock Reset Switch
12. Door Ajar Warning Light
13. Low Oil Pressure Warning Light
14. Fuel Filter Warning Light
15. Odometer/Trip Odometer
16. Low Fuel Warning Light
17. Diesel Pre-heat Indicator Light
18. Trip Odometer Reset Switch
Page 37 of 211
1
FEATURES OF YOUR HYUNDAI
25
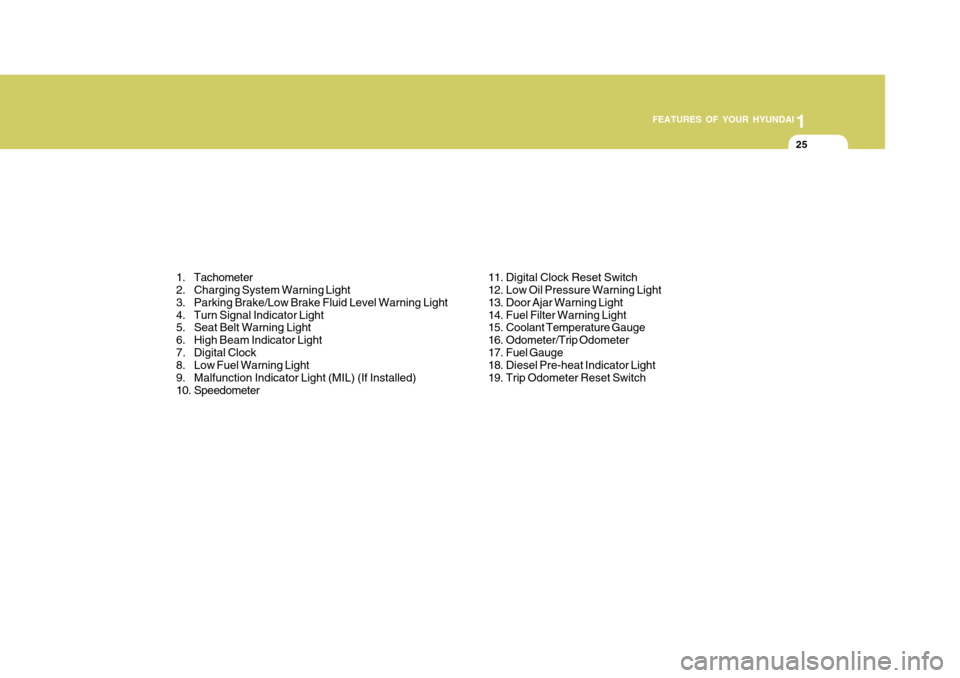
1. Tachometer
2. Charging System Warning Light
3. Parking Brake/Low Brake Fluid Level Warning Light
4. Turn Signal Indicator Light
5. Seat Belt Warning Light
6. High Beam Indicator Light
7. Digital Clock
8. Low Fuel Warning Light
9. Malfunction Indicator Light (MIL) (If Installed)
10. Speedometer 11. Digital Clock Reset Switch
12. Low Oil Pressure Warning Light
13. Door Ajar Warning Light
14. Fuel Filter Warning Light
15. Coolant Temperature Gauge
16. Odometer/Trip Odometer
17. Fuel Gauge
18. Diesel Pre-heat Indicator Light
19. Trip Odometer Reset Switch
Page 96 of 211
1FEATURES OF YOUR HYUNDAI
84ANTENNA
o The playback head, capstan and pinch rollers will develop a coating of tape residue that can result in dete- rioration of sound quality, such as a wavering sound. They should becleaned monthly using a commer- cially available head cleaning tape or special solution available from audiospecialty shops. Follow the supplier's directions carefully and never oil any part of the tape player unit.
o Always be sure that the tape is tightly wound on its reel before inserting inthe player. Rotate a pencil in thedrive sprockets to wind up any slack. NOTE: Look at a tape before you insert it. If the tape is loose, tighten it by turning one of the hubs with a pencil or your finger.If the label is peeling off, do not put it in the drive mechanism. Do not leave tapes sitting wherethey are exposed to hot, warm, or high humidity, such as on top of the dashboard or in the player.If a tape is exposed to excessively hot or cold, let it reach a moderate temperature before putting it in theplayer.
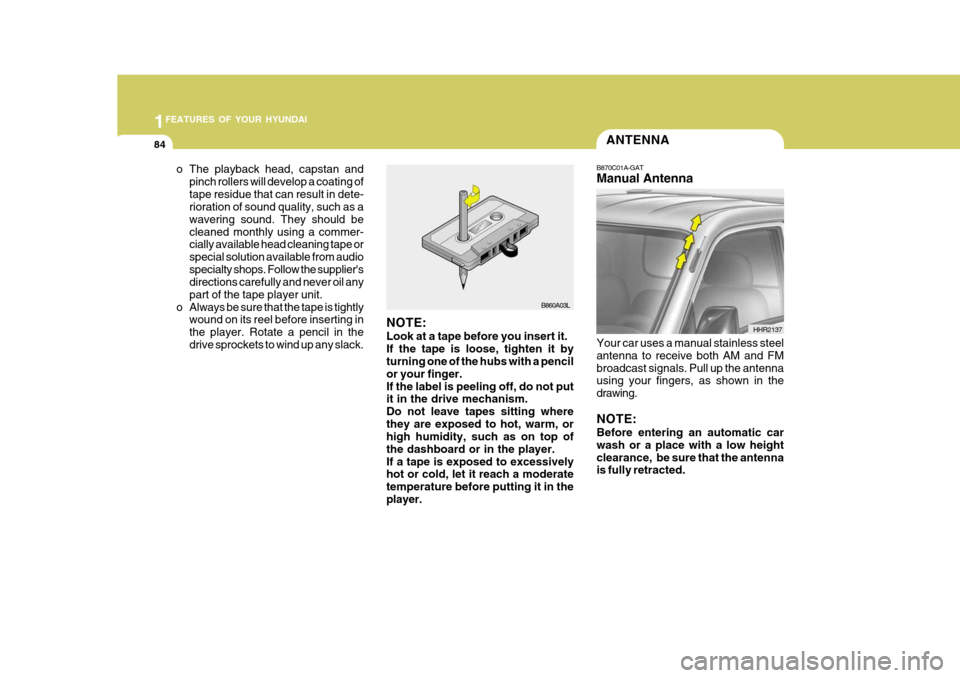
B860A03LB870C01A-GAT Manual Antenna Your car uses a manual stainless steel antenna to receive both AM and FMbroadcast signals. Pull up the antenna using your fingers, as shown in the drawing. NOTE: Before entering an automatic car wash or a place with a low heightclearance, be sure that the antenna is fully retracted. HHR2137
Page 157 of 211
6 DO-IT-YOURSELF MAINTENANCE
6
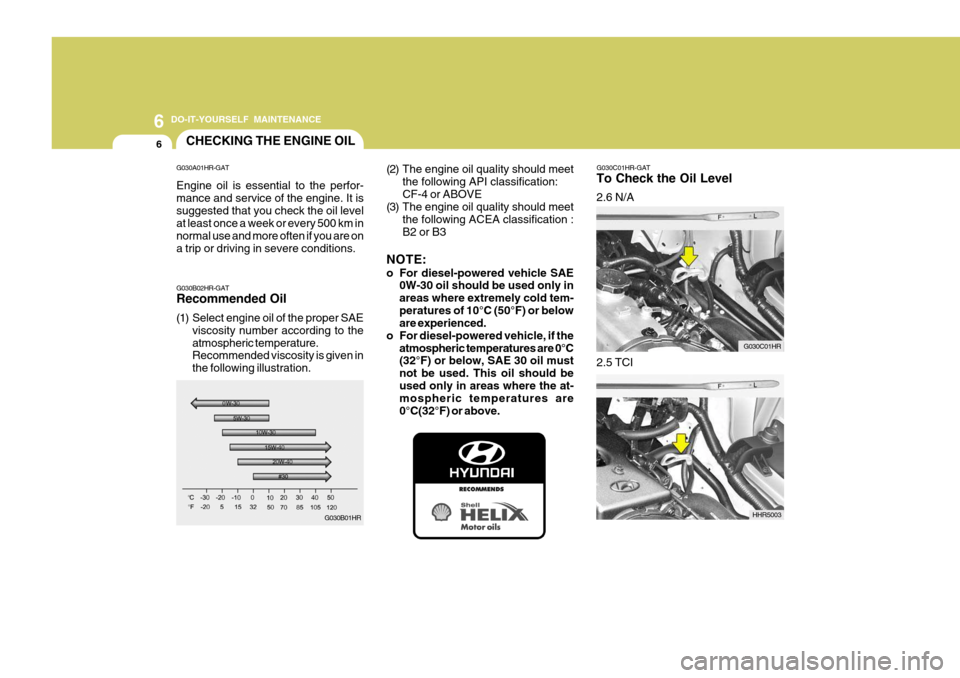
G030C01HR-GAT To Check the Oil Level 2.6 N/A
HHR5003
2.5 TCI
CHECKING THE ENGINE OIL
G030B01HR
G030B02HR-GAT Recommended Oil
(1) Select engine oil of the proper SAE
viscosity number according to the atmospheric temperature. Recommended viscosity is given in the following illustration. (2) The engine oil quality should meet
the following API classification:CF-4 or ABOVE
(3) The engine oil quality should meet
the following ACEA classification :B2 or B3
NOTE:
o For diesel-powered vehicle SAE 0W-30 oil should be used only in areas where extremely cold tem-peratures of 10°C (50°F) or below are experienced.
o For diesel-powered vehicle, if the
atmospheric temperatures are 0°C(32°F) or below, SAE 30 oil must not be used. This oil should beused only in areas where the at- mospheric temperatures are 0°C(32°F) or above. G030C01HR
G030A01HR-GAT Engine oil is essential to the perfor- mance and service of the engine. It issuggested that you check the oil level at least once a week or every 500 km in normal use and more often if you are ona trip or driving in severe conditions.
Page 159 of 211
6 DO-IT-YOURSELF MAINTENANCE
8
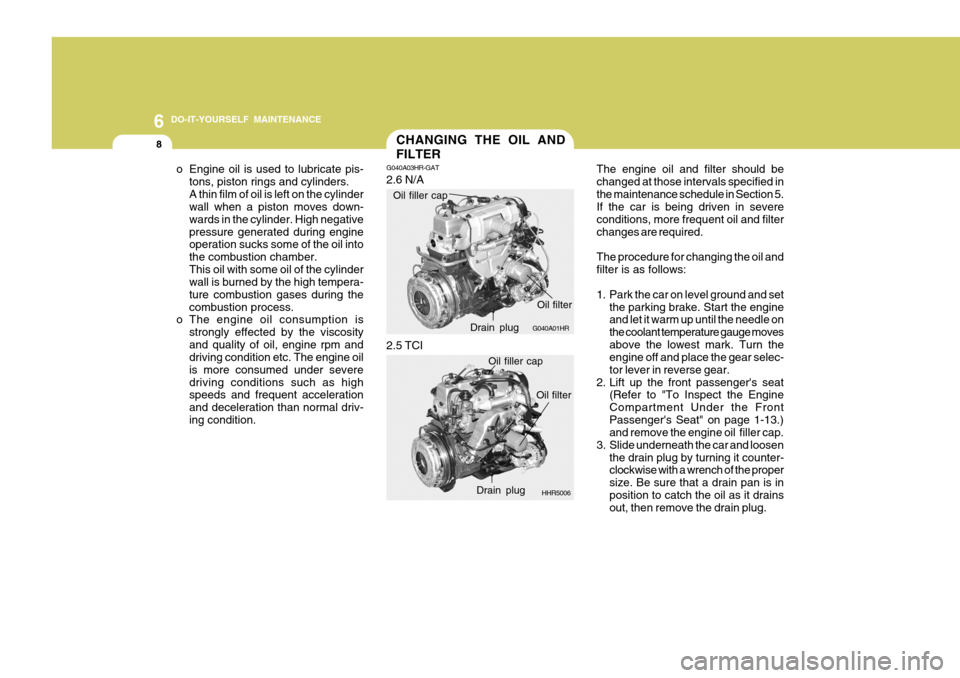
The engine oil and filter should be changed at those intervals specified inthe maintenance schedule in Section 5. If the car is being driven in severe conditions, more frequent oil and filterchanges are required. The procedure for changing the oil and filter is as follows:
1. Park the car on level ground and set
the parking brake. Start the engine and let it warm up until the needle on the coolant temperature gauge movesabove the lowest mark. Turn the engine off and place the gear selec- tor lever in reverse gear.
2. Lift up the front passenger's seat (Refer to "To Inspect the EngineCompartment Under the FrontPassenger's Seat" on page 1-13.) and remove the engine oil filler cap.
3. Slide underneath the car and loosen the drain plug by turning it counter-clockwise with a wrench of the proper size. Be sure that a drain pan is inposition to catch the oil as it drains out, then remove the drain plug.
CHANGING THE OIL AND FILTER
o Engine oil is used to lubricate pis- tons, piston rings and cylinders. A thin film of oil is left on the cylinder wall when a piston moves down- wards in the cylinder. High negativepressure generated during engine operation sucks some of the oil into the combustion chamber.This oil with some oil of the cylinder wall is burned by the high tempera-
ture combustion gases during thecombustion process.
o The engine oil consumption is
strongly effected by the viscosityand quality of oil, engine rpm and driving condition etc. The engine oil is more consumed under severedriving conditions such as high speeds and frequent acceleration and deceleration than normal driv-ing condition. G040A03HR-GAT 2.6 N/A
G040A01HR
Oil filler capDrain plugOil filter
2.5 TCI
HHR5006
Oil filler cap
Drain plug Oil filter
Page 181 of 211
6 DO-IT-YOURSELF MAINTENANCE
30REPLACEMENT OF LIGHT BULBS
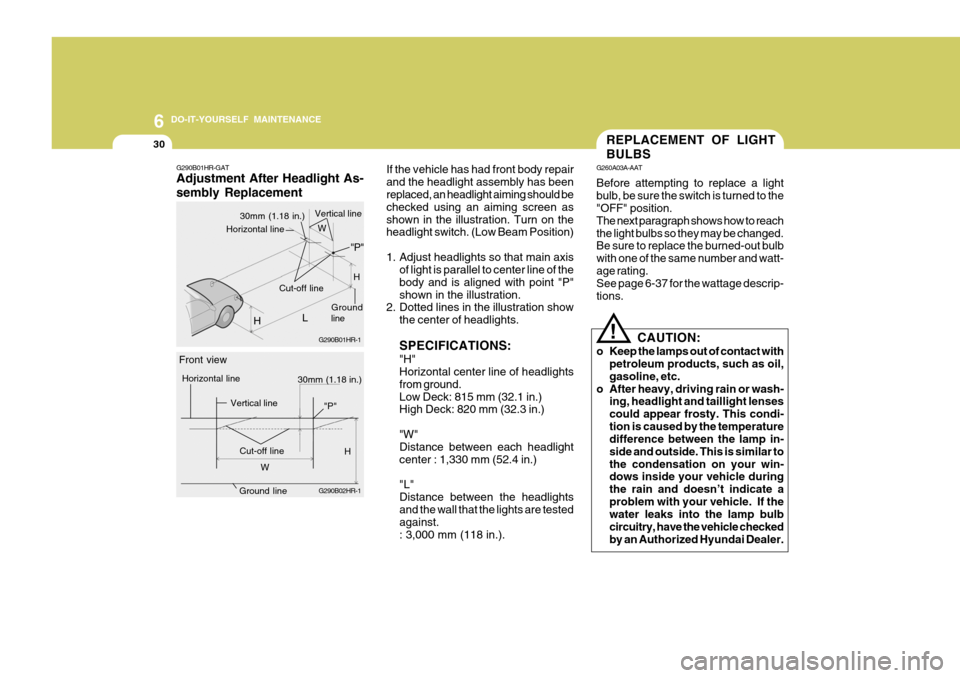
If the vehicle has had front body repair and the headlight assembly has been replaced, an headlight aiming should be checked using an aiming screen asshown in the illustration. Turn on the headlight switch. (Low Beam Position)
1. Adjust headlights so that main axis of light is parallel to center line of the body and is aligned with point "P"shown in the illustration.
2. Dotted lines in the illustration show
the center of headlights. SPECIFICATIONS: "H" Horizontal center line of headlights from ground.Low Deck: 815 mm (32.1 in.) High Deck: 820 mm (32.3 in.) "W" Distance between each headlight center : 1,330 mm (52.4 in.) "L" Distance between the headlightsand the wall that the lights are tested against. : 3,000 mm (118 in.). G260A03A-AAT Before attempting to replace a light bulb, be sure the switch is turned to the "OFF" position. The next paragraph shows how to reachthe light bulbs so they may be changed. Be sure to replace the burned-out bulb with one of the same number and watt-age rating. See page 6-37 for the wattage descrip- tions.
CAUTION:
o Keep the lamps out of contact with petroleum products, such as oil,gasoline, etc.
o After heavy, driving rain or wash- ing, headlight and taillight lensescould appear frosty. This condi-tion is caused by the temperature difference between the lamp in- side and outside. This is similar tothe condensation on your win- dows inside your vehicle during the rain and doesn’t indicate aproblem with your vehicle. If the water leaks into the lamp bulb circuitry, have the vehicle checkedby an Authorized Hyundai Dealer.
!
G290B01HR-GAT Adjustment After Headlight As- sembly Replacement
G290B01HR-1
H
Ground line
30mm (1.18 in.)
Vertical line
L
Cut-off line "P"
Horizontal line
G290B02HR-1
30mm (1.18 in.)
Front view
Horizontal line
Vertical line
Cut-off lineH
W H
W
Ground line
"P"
Page 208 of 211
10
INDEX
3
D Door Central door locks .................................................... 1-6
Door locks ................................................................ 1-5Locking, unlocking front doors with a key ................ 1-5
Drink Holder ................................................................ 1-41
Drive Belts .................................................................. 6-21
Driving Economical driving .................................................. 2-11
Smooth corneri ng ..................................................... 2-12
Winter driving ........................................................... 2-13
E
Emergency Commodity .............................................. 3-15
Emission Contro l System ............................................ 7-2
Engine
Before starting the engine ........................................ 2-3
Changing the oil and filter ......................................... 6-8Compartment ............................................................ 6-3
Coolant ..................................................................... 6-9
Coolant temperature gauge ......................................1-30
Engine idle RPM adjustment knob ..........................1-41
If the engine overheats ............................................. 3-4
Number ..................................................................... 8-2
Oil ............................................................................. 6-6Starting ..................................................................... 2-5 To access the
engine .............................................. 1-12
To inspect the engine compartment under the
driver's seat .......................................................... 1-12
To inspect the engine compartment under the frontpassenger's seat (Fixed seatback type) ............... 1-13
To inspect the engine compartment under the frontpassenger's seat (Fol ding seatback type) ............ 1-13
Engine Exhaust Can Be Dangerous ............................ 2-2
Exterior Tool Box ........................................................ 1-51
FFog Light Front ........................................................................ 1-37
Rear ......................................................................... 1-38
Front Open Service Panel ........................................... 6-2
Front Seats Adjustable front seats ............................................... 1-8
Adjusting seat forward and rearward ......................... 1-8
Adjusting seatback angle ......................................... 1-9
Center seat(with seatback console compartment) ... 1-11
Fuel
Capacity ................................................................... 9-3
Gauge ...................................................................... 1-29
Recommendations .................................................... 1-2
Fuel Tank Cap ............................................................ 1-48
Fuses ......................................................................... 6-22
Fuse Panel Description .............................................. 6-38