2011 Hyundai H-1 (Grand Starex) ignition
[x] Cancel search: ignitionPage 127 of 338
457
Features of your vehicle
D210200ATQ
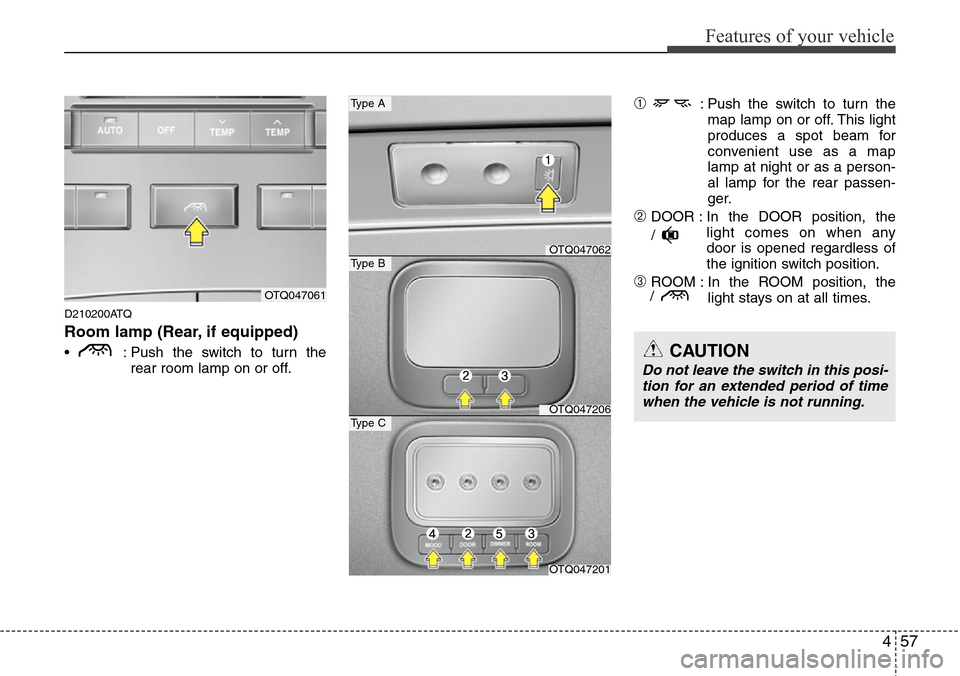
Room lamp (Rear, if equipped)
• : Push the switch to turn the
rear room lamp on or off.
➀: Push the switch to turn the
map lamp on or off. This light
produces a spot beam for
convenient use as a map
lamp at night or as a person-
al lamp for the rear passen-
ger.
➁DOOR : In the DOOR position, the
light comes on when any
door is opened regardless of
the ignition switch position.
➂ROOM : In the ROOM position, the
light stays on at all times.OTQ047061
OTQ047201
Type C
OTQ047062
Type A
Type B
OTQ047206
/
/
CAUTION
Do not leave the switch in this posi-
tion for an extended period of time
when the vehicle is not running.
Page 128 of 338

Features of your vehicle
58 4
DEFROSTER (IF EQUIPPED)
➃MOOD : Push the switch to turn the
mood lamp on when the
room lamp is off. Once the
mood lamp is on, each time
you press the button the color
of the light will change. The
mood lamp will turn off when
the button is pressed again
after the last color or when
the mood lamp button is
pressed for approximately 4
seconds or when the ROOM,
DOOR or DIMMER button is
pressed.
➄DIMMER : Whenever you push this
button when the room lamp
is turned on, the brightness
of the room lamp will
change within 3 level.
D220000AUN
✽NOTICE
If you want to defrost and defog the
front windshield, refer to “Windshield
defrosting and defogging” in this sec-
tion.
D220100AUN
Rear window defroster (if equipped)
The defroster heats the window to
remove frost, fog and thin ice from the
rear window, while the engine is running.
To activate the rear window defroster,
press the rear window defroster button
located in the center facia switch panel.
The indicator on the rear window
defroster button illuminates when the
defroster is ON.
If there is heavy accumulation of snow on
the rear window, brush it off before oper-
ating the rear defroster.
The rear window defroster automatically
turns off after approximately 20 minutes
or when the ignition switch is turned off. (if
equipped) To turn off the defroster, press
the rear window defroster button again.
OTQ047064
CAUTION
To prevent damage to the conduc-
tors bonded to the inside surface of
the rear window, never use sharp
instruments or window cleaners
containing abrasives to clean the
window.
Page 133 of 338
463
Features of your vehicle
Recirculated air position
The indicator light on the
button illuminates when the
recirculated air position is
selected.
With the recirculated air
position selected, air from
the passenger compart-
ment will be drawn through
the heating system and
heated or cooled according
to the function selected.
Outside (fresh) air position
The indicator light on the
button will not illuminate
when the outside (fresh) air
position is selected.
With the outside (fresh) air
position selected, air enters
the vehicle from outside and
is heated or cooled accord-
ing to the function selected.✽NOTICE
Prolonged operation of the heater in the
recirculated air position (without air
conditioning selected) may cause fog-
ging of the windshield and side windows
and the air within the passenger com-
partment may become stale.
In addition, prolonged use of the air con-
ditioning with the recirculated air posi-
tion selected will result in excessively dry
air in the passenger compartment.
D230104AUN
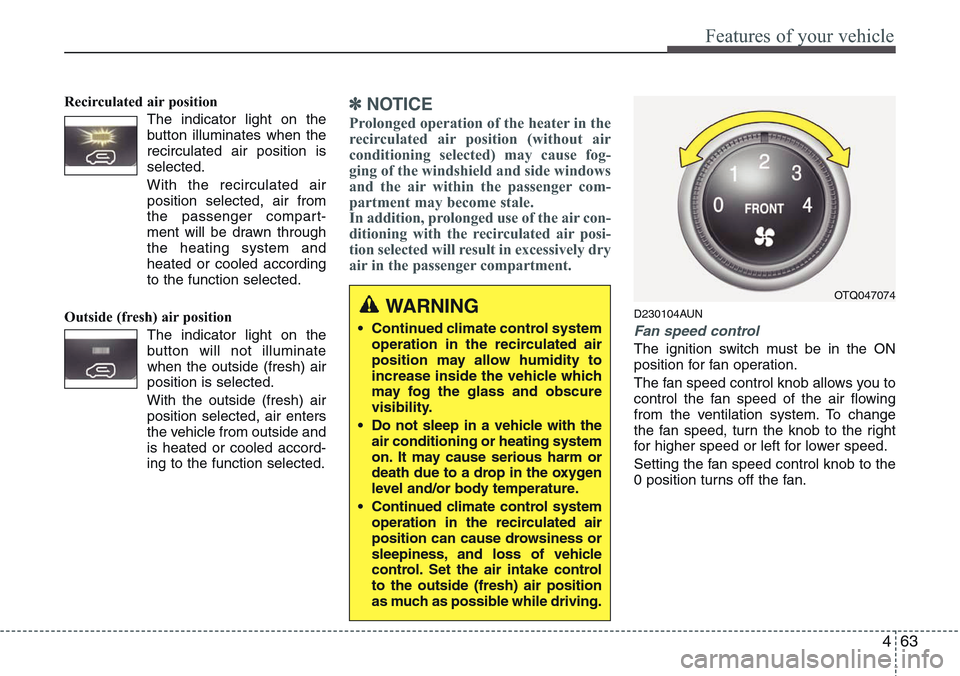
Fan speed control
The ignition switch must be in the ON
position for fan operation.
The fan speed control knob allows you to
control the fan speed of the air flowing
from the ventilation system. To change
the fan speed, turn the knob to the right
for higher speed or left for lower speed.
Setting the fan speed control knob to the
0 position turns off the fan.
WARNING
• Continued climate control system
operation in the recirculated air
position may allow humidity to
increase inside the vehicle which
may fog the glass and obscure
visibility.
• Do not sleep in a vehicle with the
air conditioning or heating system
on. It may cause serious harm or
death due to a drop in the oxygen
level and/or body temperature.
• Continued climate control system
operation in the recirculated air
position can cause drowsiness or
sleepiness, and loss of vehicle
control. Set the air intake control
to the outside (fresh) air position
as much as possible while driving.
OTQ047074
Page 141 of 338
471
Features of your vehicle
D250102AFD
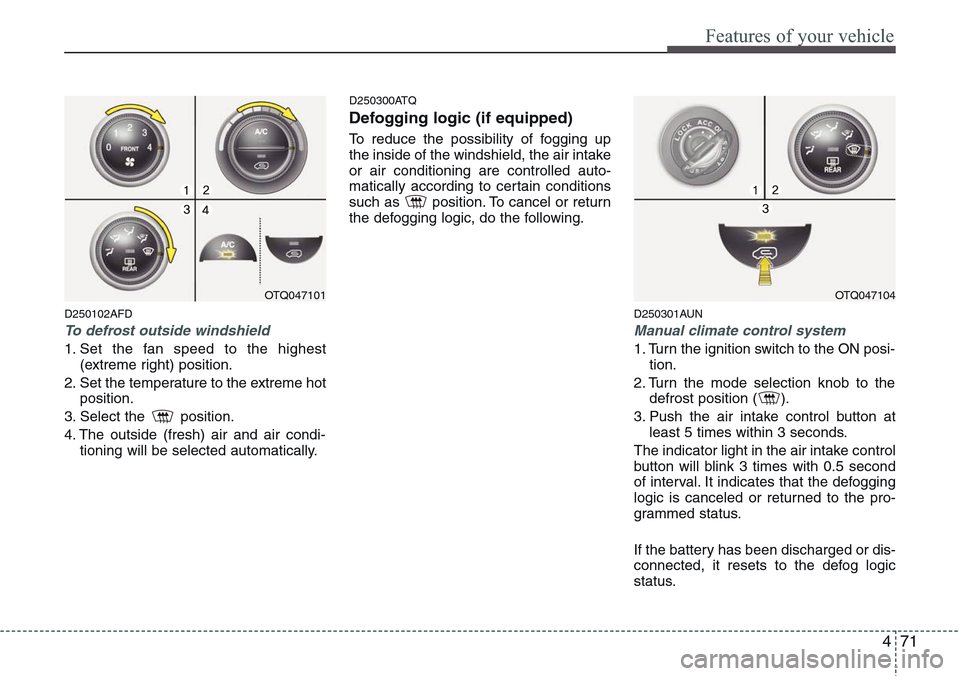
To defrost outside windshield
1. Set the fan speed to the highest
(extreme right) position.
2. Set the temperature to the extreme hot
position.
3. Select the position.
4. The outside (fresh) air and air condi-
tioning will be selected automatically.
D250300ATQ
Defogging logic (if equipped)
To reduce the possibility of fogging up
the inside of the windshield, the air intake
or air conditioning are controlled auto-
matically according to certain conditions
such as position. To cancel or return
the defogging logic, do the following.
D250301AUN
Manual climate control system
1. Turn the ignition switch to the ON posi-
tion.
2. Turn the mode selection knob to the
defrost position ( ).
3. Push the air intake control button at
least 5 times within 3 seconds.
The indicator light in the air intake control
button will blink 3 times with 0.5 second
of interval. It indicates that the defogging
logic is canceled or returned to the pro-
grammed status.
If the battery has been discharged or dis-
connected, it resets to the defog logic
status.
OTQ047101OTQ047104
Page 147 of 338

477
Features of your vehicle
D280600AEN
Digital clock (if equipped)
Whenever the battery terminals or relat-
ed fuses are disconnected, you must
reset the time.
When the ignition switch is in the ACC or
ON position, the clock buttons operate as
follows:
D280601AUN
Hour (1)
Pressing the H button with your finger, a
pencil or similar object will advance the
time displayed by one hour.
D280602AUN
Minute (2)
Pressing the M button with your finger, a
pencil or similar object will advance the
time displayed by one minute.
D280603AUN
Reset (3)
To clear away minutes, press the R but-
ton with your finger, a pencil or similar
object. Then the clock will be set precise-
ly on the hour.
For example, if the R button is pressed
while the time is between 9:01 and 9:29,
the display will be reset to 9:00.
9:01 ~ 9:29 display changed to 9:00
9:30 ~ 9:59 display changed to 10:00
D280604AEN
Display conversion (if equipped)
To change the 12 hour format to the 24
hour format, press the R button until the
display blinks.
For example, if the R button is pressed
while the time is 10:15 p.m., the display
will be changed to 22:15.
OTQ047119
WARNING
Do not adjust the clock while driv-
ing. You may lose your steering
control and cause an accident that
results in severe personal injury or
death.
CAUTION
• Use the power outlet only when
the engine is running and remove
the accessory plug after use.
Using the accessory plug for pro-
longed periods of time with the
engine off could cause the bat-
tery to discharge.
• Only use 12V electric accessories
which are less than 10A in elec-
tric capacity.
• Adjust the air-conditioner or
heater to the lowest operating
level when using the power outlet.
• Close the cover when not in use.
• Some electronic devices can
cause electronic interference
when plugged into a vehicle’s
power outlet. These devices may
cause excessive audio static and
malfunctions in other electronic
systems or devices used in your
vehicle.
Page 155 of 338
485
Features of your vehicle
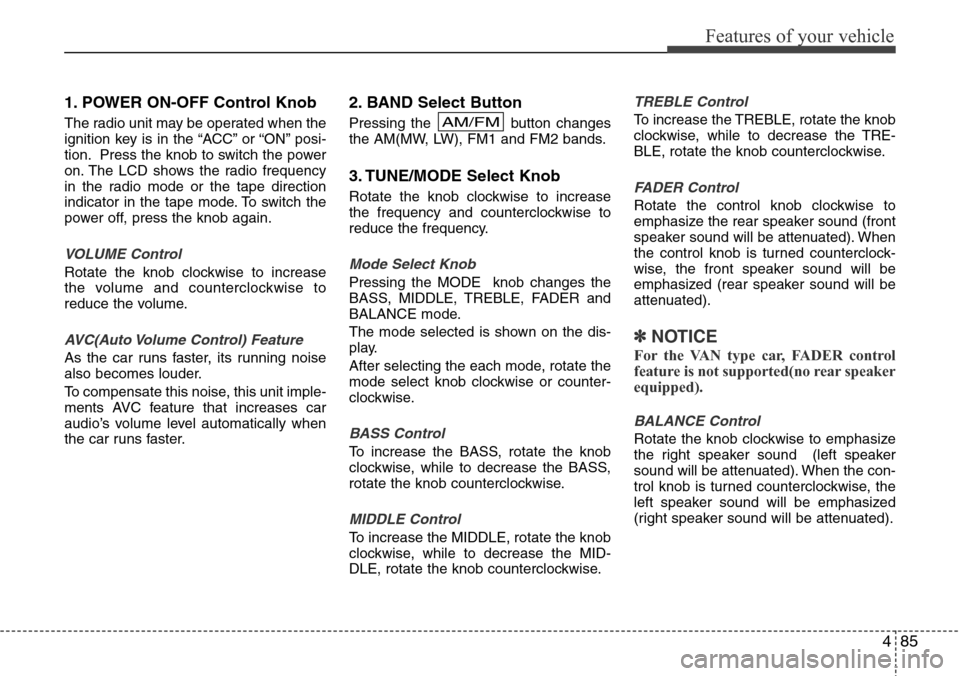
1. POWER ON-OFF Control Knob
The radio unit may be operated when the
ignition key is in the “ACC” or “ON” posi-
tion. Press the knob to switch the power
on. The LCD shows the radio frequency
in the radio mode or the tape direction
indicator in the tape mode. To switch the
power off, press the knob again.
VOLUME Control
Rotate the knob clockwise to increase
the volume and counterclockwise to
reduce the volume.
AVC(Auto Volume Control) Feature
As the car runs faster, its running noise
also becomes louder.
To compensate this noise, this unit imple-
ments AVC feature that increases car
audio’s volume level automatically when
the car runs faster.
2. BAND Select Button
Pressing the button changes
the AM(MW, LW), FM1 and FM2 bands.
3. TUNE/MODE Select Knob
Rotate the knob clockwise to increase
the frequency and counterclockwise to
reduce the frequency.
Mode Select Knob
Pressing the MODE knob changes the
BASS, MIDDLE, TREBLE, FADER and
BALANCE mode.
The mode selected is shown on the dis-
play.
After selecting the each mode, rotate the
mode select knob clockwise or counter-
clockwise.
BASS Control
To increase the BASS, rotate the knob
clockwise, while to decrease the BASS,
rotate the knob counterclockwise.
MIDDLE Control
To increase the MIDDLE, rotate the knob
clockwise, while to decrease the MID-
DLE, rotate the knob counterclockwise.
TREBLE Control
To increase the TREBLE, rotate the knob
clockwise, while to decrease the TRE-
BLE, rotate the knob counterclockwise.
FADER Control
Rotate the control knob clockwise to
emphasize the rear speaker sound (front
speaker sound will be attenuated). When
the control knob is turned counterclock-
wise, the front speaker sound will be
emphasized (rear speaker sound will be
attenuated).
✽NOTICE
For the VAN type car, FADER control
feature is not supported(no rear speaker
equipped).
BALANCE Control
Rotate the knob clockwise to emphasize
the right speaker sound (left speaker
sound will be attenuated). When the con-
trol knob is turned counterclockwise, the
left speaker sound will be emphasized
(right speaker sound will be attenuated).
AM/FM
Page 160 of 338
Features of your vehicle
90 4
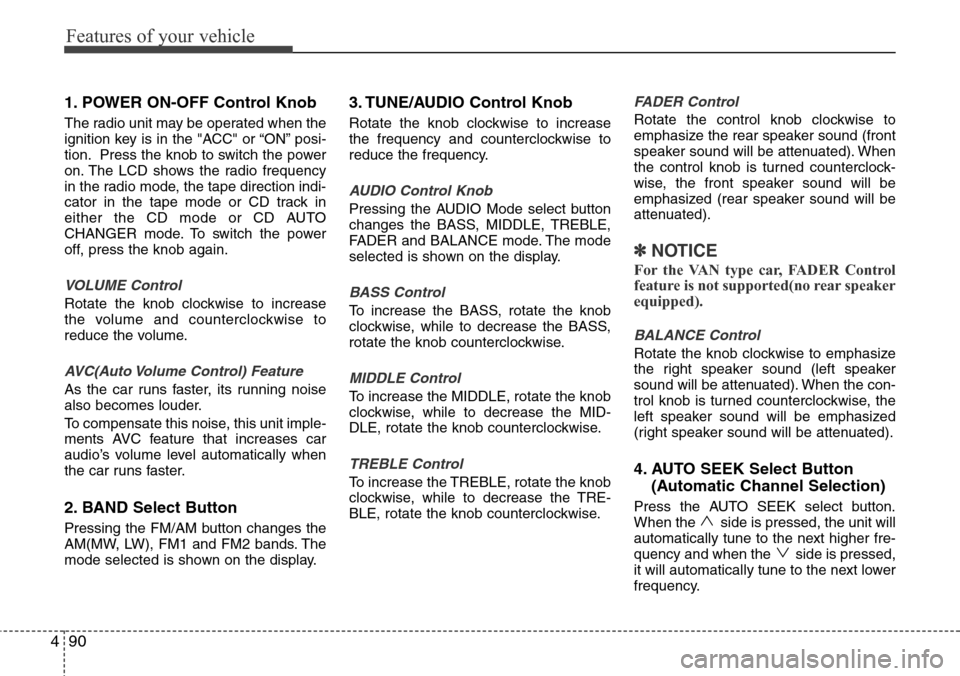
1. POWER ON-OFF Control Knob
The radio unit may be operated when the
ignition key is in the "ACC" or “ON” posi-
tion. Press the knob to switch the power
on. The LCD shows the radio frequency
in the radio mode, the tape direction indi-
cator in the tape mode or CD track in
either the CD mode or CD AUTO
CHANGER mode. To switch the power
off, press the knob again.
VOLUME Control
Rotate the knob clockwise to increase
the volume and counterclockwise to
reduce the volume.
AVC(Auto Volume Control) Feature
As the car runs faster, its running noise
also becomes louder.
To compensate this noise, this unit imple-
ments AVC feature that increases car
audio’s volume level automatically when
the car runs faster.
2. BAND Select Button
Pressing the FM/AM button changes the
AM(MW, LW), FM1 and FM2 bands. The
mode selected is shown on the display.
3. TUNE/AUDIO Control Knob
Rotate the knob clockwise to increase
the frequency and counterclockwise to
reduce the frequency.
AUDIO Control Knob
Pressing the AUDIO Mode select button
changes the BASS, MIDDLE, TREBLE,
FADER and BALANCE mode. The mode
selected is shown on the display.
BASS Control
To increase the BASS, rotate the knob
clockwise, while to decrease the BASS,
rotate the knob counterclockwise.
MIDDLE Control
To increase the MIDDLE, rotate the knob
clockwise, while to decrease the MID-
DLE, rotate the knob counterclockwise.
TREBLE Control
To increase the TREBLE, rotate the knob
clockwise, while to decrease the TRE-
BLE, rotate the knob counterclockwise.
FADER Control
Rotate the control knob clockwise to
emphasize the rear speaker sound (front
speaker sound will be attenuated). When
the control knob is turned counterclock-
wise, the front speaker sound will be
emphasized (rear speaker sound will be
attenuated).
✽NOTICE
For the VAN type car, FADER Control
feature is not supported(no rear speaker
equipped).
BALANCE Control
Rotate the knob clockwise to emphasize
the right speaker sound (left speaker
sound will be attenuated). When the con-
trol knob is turned counterclockwise, the
left speaker sound will be emphasized
(right speaker sound will be attenuated).
4. AUTO SEEK Select Button
(Automatic Channel Selection)
Press the AUTO SEEK select button.
When the side is pressed, the unit will
automatically tune to the next higher fre-
quency and when the side is pressed,
it will automatically tune to the next lower
frequency.
Page 163 of 338
493
Features of your vehicle
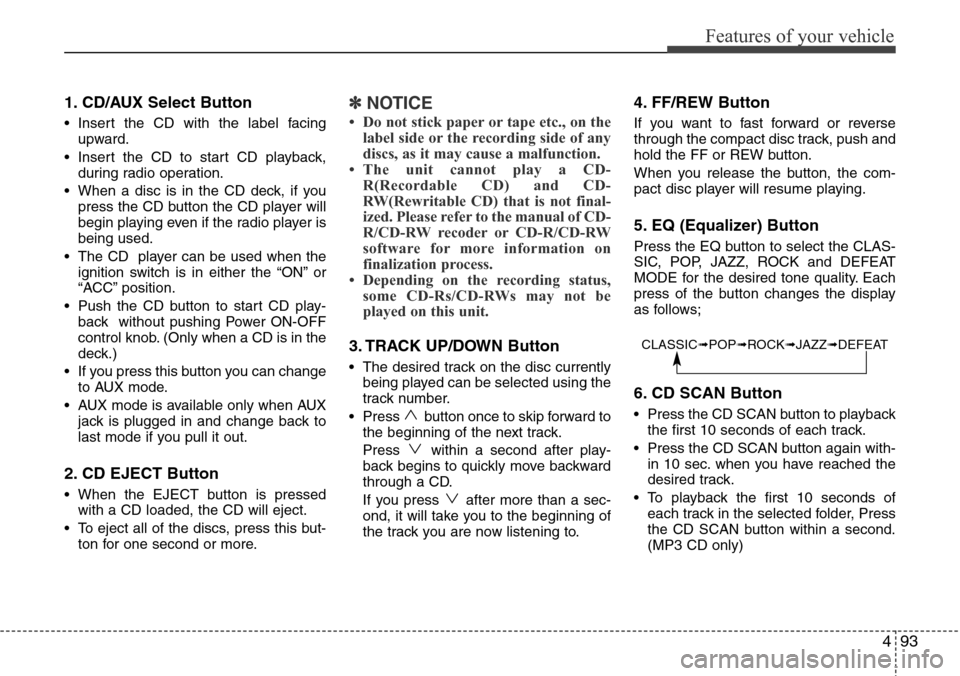
1. CD/AUX Select Button
• Insert the CD with the label facing
upward.
• Insert the CD to start CD playback,
during radio operation.
• When a disc is in the CD deck, if you
press the CD button the CD player will
begin playing even if the radio player is
being used.
• The CD player can be used when the
ignition switch is in either the “ON” or
“ACC” position.
• Push the CD button to start CD play-
back without pushing Power ON-OFF
control knob. (Only when a CD is in the
deck.)
• If you press this button you can change
to AUX mode.
• AUX mode is available only when AUX
jack is plugged in and change back to
last mode if you pull it out.
2. CD EJECT Button
• When the EJECT button is pressed
with a CD loaded, the CD will eject.
• To eject all of the discs, press this but-
ton for one second or more.
✽NOTICE
• Do not stick paper or tape etc., on the
label side or the recording side of any
discs, as it may cause a malfunction.
• The unit cannot play a CD-
R(Recordable CD) and CD-
RW(Rewritable CD) that is not final-
ized. Please refer to the manual of CD-
R/CD-RW recoder or CD-R/CD-RW
software for more information on
finalization process.
• Depending on the recording status,
some CD-Rs/CD-RWs may not be
played on this unit.
3. TRACK UP/DOWN Button
• The desired track on the disc currently
being played can be selected using the
track number.
• Press button once to skip forward to
the beginning of the next track.
Press within a second after play-
back begins to quickly move backward
through a CD.
If you press after more than a sec-
ond, it will take you to the beginning of
the track you are now listening to.
4. FF/REW Button
If you want to fast forward or reverse
through the compact disc track, push and
hold the FF or REW button.
When you release the button, the com-
pact disc player will resume playing.
5. EQ (Equalizer) Button
Press the EQ button to select the CLAS-
SIC, POP, JAZZ, ROCK and DEFEAT
MODE for the desired tone quality. Each
press of the button changes the display
as follows;
6. CD SCAN Button
• Press the CD SCAN button to playback
the first 10 seconds of each track.
• Press the CD SCAN button again with-
in 10 sec. when you have reached the
desired track.
• To playback the first 10 seconds of
each track in the selected folder, Press
the CD SCAN button within a second.
(MP3 CD only)
CLASSIC➟POP➟ROCK➟JAZZ➟DEFEAT