2011 Hyundai H-1 (Grand Starex) reset
[x] Cancel search: resetPage 180 of 338
Features of your vehicle
110 4
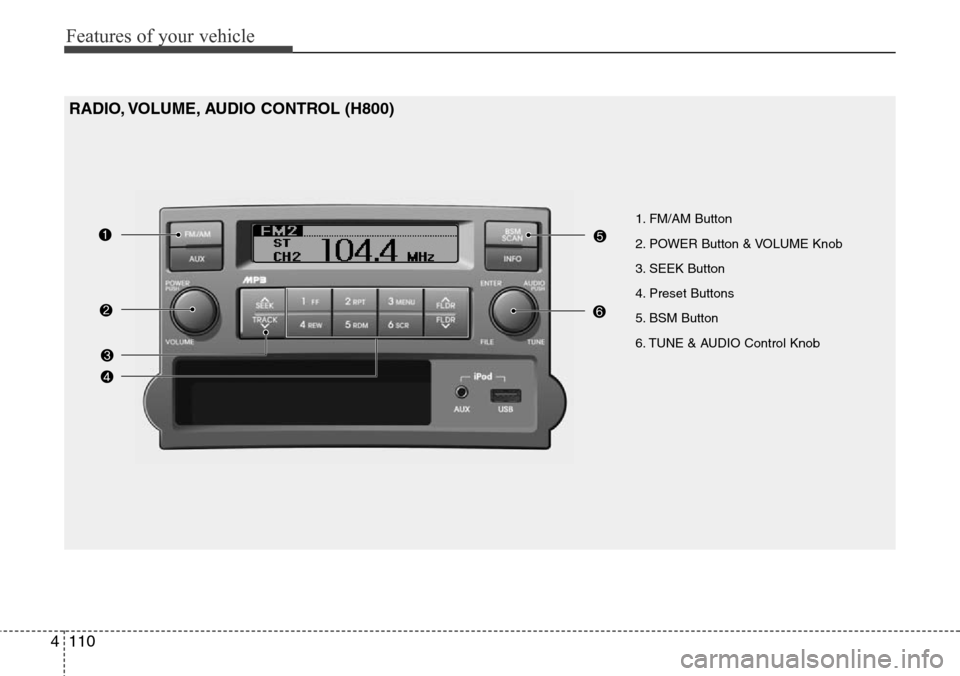
1. FM/AM Button
2. POWER Button & VOLUME Knob
3. SEEK Button
4. Preset Buttons
5. BSM Button
6. TUNE & AUDIO Control Knob
RADIO, VOLUME, AUDIO CONTROL (H800)
Page 181 of 338
![Hyundai H-1 (Grand Starex) 2011 Owners Manual 4111
Features of your vehicle
RADIO, SET UP, VOLUME CON-
TROL
1. FM/AM Button
Pressing the [FM/AM] button selects the
FM/AM band and toggles in the order of
FM1
➟ FM2 ➟ AM ➟ ...➟ FM1... when
Hyundai H-1 (Grand Starex) 2011 Owners Manual 4111
Features of your vehicle
RADIO, SET UP, VOLUME CON-
TROL
1. FM/AM Button
Pressing the [FM/AM] button selects the
FM/AM band and toggles in the order of
FM1
➟ FM2 ➟ AM ➟ ...➟ FM1... when](/manual-img/35/14839/w960_14839-180.png)
4111
Features of your vehicle
RADIO, SET UP, VOLUME CON-
TROL
1. FM/AM Button
Pressing the [FM/AM] button selects the
FM/AM band and toggles in the order of
FM1
➟ FM2 ➟ AM ➟ ...➟ FM1... when
the button is pressed each time. FM/AM
Mode is displayed on the LCD.
2. POWER Button & Volume Knob
Turns the set on/off when the IGNITION
SWITCH is on ACC or ON.
If the button is turned to the right, it
increases the volume and left, decreases
the volume.
3. SEEK Button
• When the [SEEK ] button is
pressed, it increases the band fre-
quency to automatically select a chan-
nel. Stops at the previous frequency if
no channel is found.
• When the [TRACK ] button is
pressed, it reduces the band frequency
to automatically select a channel.
Stops at the previous frequency if no
channel is found.
4. Preset Buttons
Push [1]~[6] buttons less than 0.8 sec-
ond to play the channel saved in each
button. Push Preset button for 0.8 sec-
ond or longer to save current channel to
the respective button with a beep.
5. BSM Button
When the button is pressed, it automati-
cally selects and saves channels with
high reception rate to [PRESET] buttons
[1]~[6] and plays the channel saved in
PRESET1. If no channel is saved after
BSM, it will play the previous channel.
6. TUNE & AUDIO Control Knob
Turn this control while listening to a radio
channel to manually adjust frequency.
Turn clockwise to increase frequency
and counterclockwise to reduce frequen-
cy.
Pressing the button changes the BASS,
TREBLE, FADER and BALANCE TUNE
mode. The mode selected is shown on
the display.
After selecting each mode, rotate the
Audio control knob clockwise or counter-
clockwise.BASS Control
To increase the BASS, rotate the knob
clockwise, while to decrease the BASS,
rotate the knob counterclockwise.
TREBLE Control
To increase the TREBLE, rotate the knob
clockwise, while to decrease the TRE-
BLE, rotate the knob counterclockwise.
FADER Control
Turn the control knob clockwise to
emphasize rear speaker sound (front
speaker sound will be attenuated).
When the control knob is turned counter-
clockwise, front speaker sound will be
emphasized (rear speaker sound will be
attenuated).
BALANCE Control
Rotate the knob clockwise to emphasize
right speaker sound (left speaker sound
will be attenuated). When the control
knob is turned counter clockwise, left
speaker sound will be emphasized (right
speaker sound will be attenuated).
Page 187 of 338

4117
Features of your vehicle
USING iPod®
When the iPod is connected, the 'iPod'
icon will be displayed on the top left cor-
ner of the display screen.
1. iPod Button
If iPod is connected, it switches to the
iPod mode from the Radio mode to play
the song files stored in the iPod. If iPod is
not connected, it displays "NO Media" for
3 seconds and returns to the previous
mode.
2. TRACK Button
• Press the [TRACK ] button for less
than 0.8 second to play from the begin-
ning of the song currently played.
Press the button for less than 0.8 sec-
ond and press it again within 1 second
to move and play the previous track.
Press the button for 0.8 second or
longer to play the song in reverse
direction in fast speed.
• Press the [SEEK ] button for less
than 0.8 second to move to the next
track. Press the button for 0.8 second
or longer to play the song in forward
direction in fast speed.
3. RDM (RANDOM) Button
Press the button for less than 0.8 second
to activate or deactivate the random play-
back of the songs within the current cat-
egory. Press the button for longer than
0.8 second to randomly play all songs in
the entire album of the iPod.
Press the button once again to cancel
the mode.
4. RPT (REPEAT) Button
Repeats the song currently played.
5. MENU Button
Moves to the upper category from cur-
rently played category of the iPod.
To move to (play) the category (song)
displayed, MENU (preset6) You will be
able to search through the lower catego-
ry of the selected category.
The order of iPod's category is SONG,
ALBUMS, ARTISTS, GENRES, and
iPod.
6. INFO Button
Displays the information of the file cur-
rently played in the order of TITLE ➟
ARTIST ➟ALBUM ➟NORMAL DIS-
PLAY ➟TITLE ➟... (Displays no informa-
tion if the file has no song information.)
7. TUNE Knob & ENTER Button
When you turn the button clockwise, it
will display the songs (category) next to
the song currently played (category in
the same level).
Also, when you turn the button counter-
clockwise, it will display the songs (cate-
gory) before the song currently played
(category in the same level).
If you want to listen to the song displayed
in the song category, press the button,
then it will skip to the selected song and
play.
Page 188 of 338
Features of your vehicle
118 4
✽NOTICE FOR USING THE
iPod®DEVICE
• Some iPod models might not support
the communication protocol and the
files will not be played.
Supported iPod models:
- iPod Mini
- iPod 4th (Photo) ~ 6th (Classic) gen-
eration
- iPod Nano 1st~4th generation
- iPod Touch 1st~2nd generation
• The order of search or playback of
songs in the iPod can be different
from the order searched in the audio
system.
• If the iPod disabled due to its own
malfunction, reset the iPod. (Reset:
Refer to iPod manual)
• An iPod may not operate normally on
low battery.
• Some iPod devices, such as the
iPhone, can be connected through the
Bluetooth
®Wireless Technology inter-
face. The device must have audio
Bluetooth
®Wireless Technology capa-
bility (such as for stereo headphone
Bluetooth
®Wireless Technology). The
device can play, but it will not be con-
trolled by the audio system.
CAUTION IN USING THE
iPod®DEVICE
• The HYUNDAI iPod Power Cable
is needed in order to operate iPod
with the audio buttons on the
audio system. The USB cable pro-
vided by Apple may cause mal-
function and should not be used
for HYUNDAI vehicles.
❋The HYUNDAI iPod Power
Cable may be purchased
through your HYUNDAI Dealer.
Page 295 of 338
741
Maintenance
G190200AUN
Battery recharging
Your vehicle has a maintenance-free,
calcium-based battery.
• If the battery becomes discharged in a
short time (because, for example, the
headlights or interior lights were left on
while the vehicle was not in use),
recharge it by slow charging (trickle)
for 10 hours.
• If the battery gradually discharges
because of high electric load while the
vehicle is being used, recharge it at 20-
30A for two hours.
G190300ATQ
Reset items
Items should be reset after the battery
has been discharged or the battery has
been disconnected.
• Climate control system
(See section 4)
• Clock (See section 4)
• Audio (See section 4)
WARNING
• Before performing maintenance
or recharging the battery, turn off
all accessories and stop the
engine.
• The negative battery cable must
be removed first and installed
last when the battery is discon-
nected.
WARNING- Recharging
battery
When recharging the battery,
observe the following precautions:
• The battery must be removed
from the vehicle and placed in an
area with good ventilation.
• Do not allow cigarettes, sparks,
or flame near the battery.
• Watch the battery during charg-
ing, and stop or reduce the charg-
ing rate if the battery cells begin
gassing (boiling) violently or if
the temperature of the electrolyte
of any cell exceeds 49°C (120°F).
• Wear eye protection when check-
ing the battery during charging.
• Disconnect the battery charger in
the following order.
1. Turn off the battery charger main
switch.
2. Unhook the negative clamp from
the negative battery terminal.
3. Unhook the positive clamp from
the positive battery terminal.
Page 299 of 338
745
Maintenance
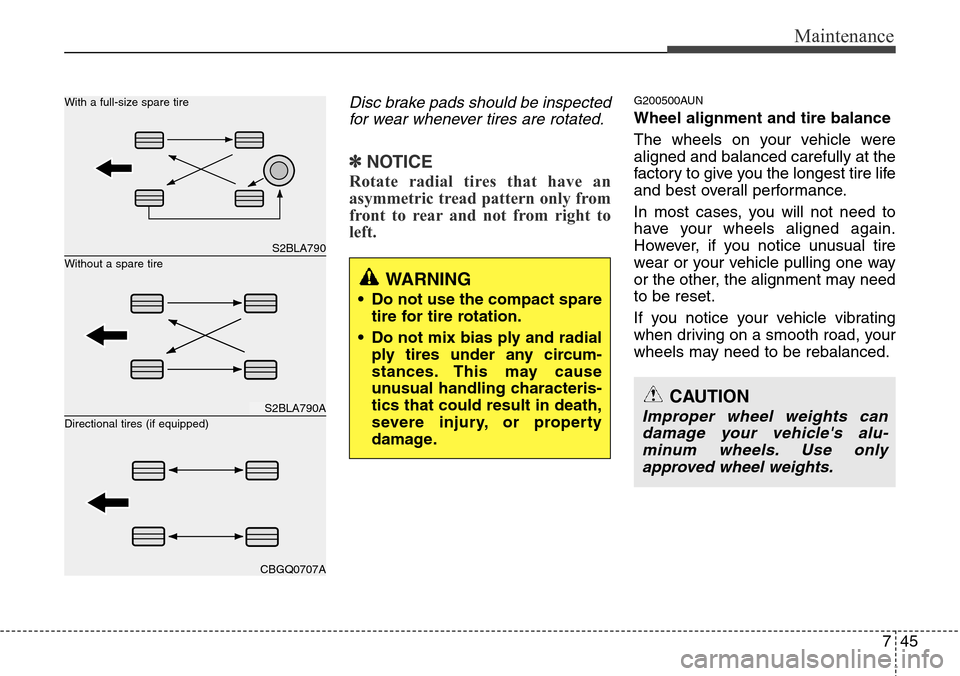
Disc brake pads should be inspected
for wear whenever tires are rotated.
✽NOTICE
Rotate radial tires that have an
asymmetric tread pattern only from
front to rear and not from right to
left.
G200500AUN
Wheel alignment and tire balance
The wheels on your vehicle were
aligned and balanced carefully at the
factory to give you the longest tire life
and best overall performance.
In most cases, you will not need to
have your wheels aligned again.
However, if you notice unusual tire
wear or your vehicle pulling one way
or the other, the alignment may need
to be reset.
If you notice your vehicle vibrating
when driving on a smooth road, your
wheels may need to be rebalanced.
WARNING
• Do not use the compact spare
tire for tire rotation.
• Do not mix bias ply and radial
ply tires under any circum-
stances. This may cause
unusual handling characteris-
tics that could result in death,
severe injury, or property
damage.
CAUTION
Improper wheel weights can
damage your vehicle's alu-
minum wheels. Use only
approved wheel weights.
S2BLA790
S2BLA790A
CBGQ0707A
Without a spare tire With a full-size spare tire
Directional tires (if equipped)
Page 307 of 338
753
Maintenance
If the headlights or other electrical com-
ponents do not work and the fuses are
OK, check the fuse panel in the engine
compartment. If a fuse is blown, it must
be replaced.
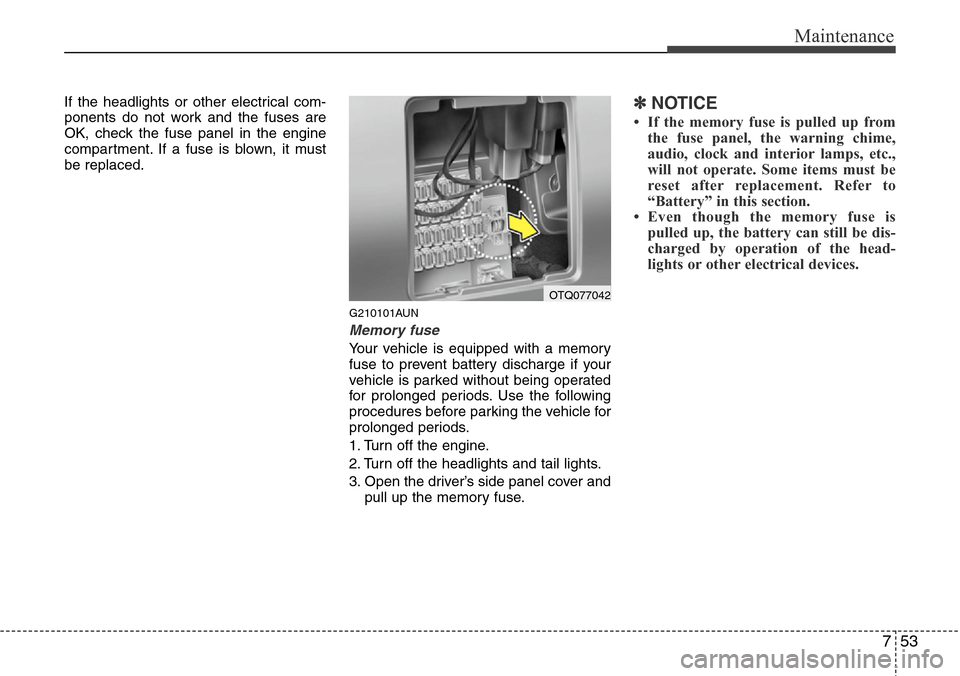
G210101AUN
Memory fuse
Your vehicle is equipped with a memory
fuse to prevent battery discharge if your
vehicle is parked without being operated
for prolonged periods. Use the following
procedures before parking the vehicle for
prolonged periods.
1. Turn off the engine.
2. Turn off the headlights and tail lights.
3. Open the driver’s side panel cover and
pull up the memory fuse.
✽NOTICE
• If the memory fuse is pulled up from
the fuse panel, the warning chime,
audio, clock and interior lamps, etc.,
will not operate. Some items must be
reset after replacement. Refer to
“Battery” in this section.
• Even though the memory fuse is
pulled up, the battery can still be dis-
charged by operation of the head-
lights or other electrical devices.
OTQ077042