Page 84 of 338
Features of your vehicle
14 4
4. After use, before closing the tail gate,
pull out the pin from the pin hole.
5. Align the checker arm hole and the tail
gate bracket hole, and insert the pin
into the bracket hole.
6. Close the tail gate.
D070200AUN
Closing the tailgate
To close the tailgate, lower and push
down the tailgate firmly. Make sure that
the tailgate is securely latched.
WARNING- Exhaust
fumes
If you drive with the tailgate open,
you will draw dangerous exhaust
fumes into your vehicle which can
cause serious injury or death to
vehicle occupants.
If you must drive with the tailgate
open, keep the air vents and all win-
dows open so that additional out-
side air comes into the vehicle.
OTQ047213
CAUTION
Insert the pin into the bracket hole
before closing the tail gate. Or the
tail gate checker and/or vehicle
damage is possible and a danger-
ous situation may occur.
Page 85 of 338

415
Features of your vehicle
D070300AEN
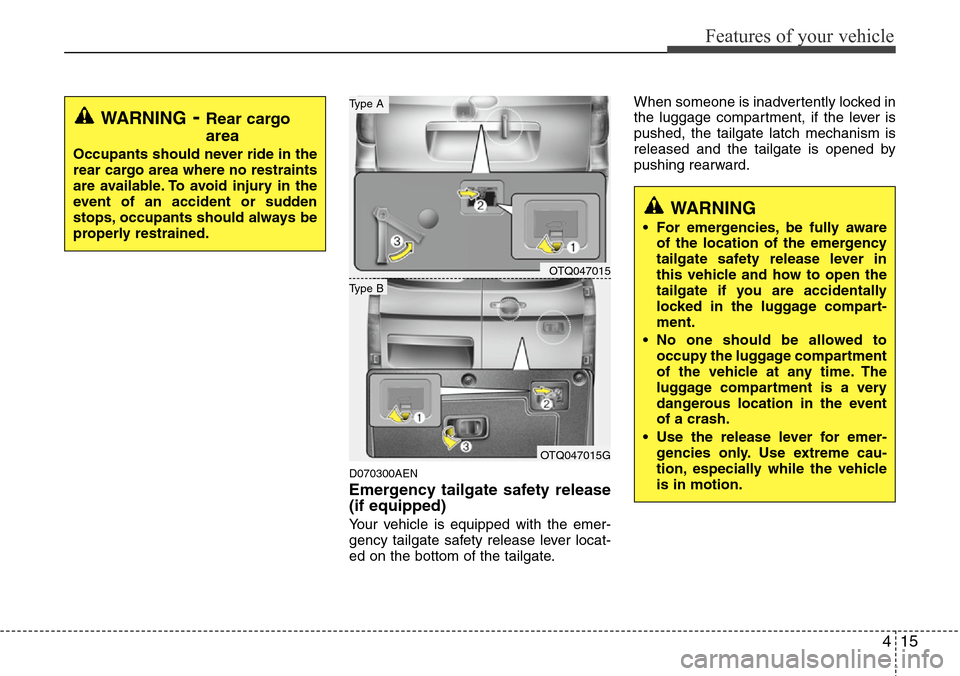
Emergency tailgate safety release
(if equipped)
Your vehicle is equipped with the emer-
gency tailgate safety release lever locat-
ed on the bottom of the tailgate.When someone is inadvertently locked in
the luggage compartment, if the lever is
pushed, the tailgate latch mechanism is
released and the tailgate is opened by
pushing rearward.
WARNING
• For emergencies, be fully aware
of the location of the emergency
tailgate safety release lever in
this vehicle and how to open the
tailgate if you are accidentally
locked in the luggage compart-
ment.
• No one should be allowed to
occupy the luggage compartment
of the vehicle at any time. The
luggage compartment is a very
dangerous location in the event
of a crash.
• Use the release lever for emer-
gencies only. Use extreme cau-
tion, especially while the vehicle
is in motion.
WARNING- Rear cargo
area
Occupants should never ride in the
rear cargo area where no restraints
are available. To avoid injury in the
event of an accident or sudden
stops, occupants should always be
properly restrained.
OTQ047015
OTQ047015G
Type B
Type A
Page 111 of 338

441
Features of your vehicle
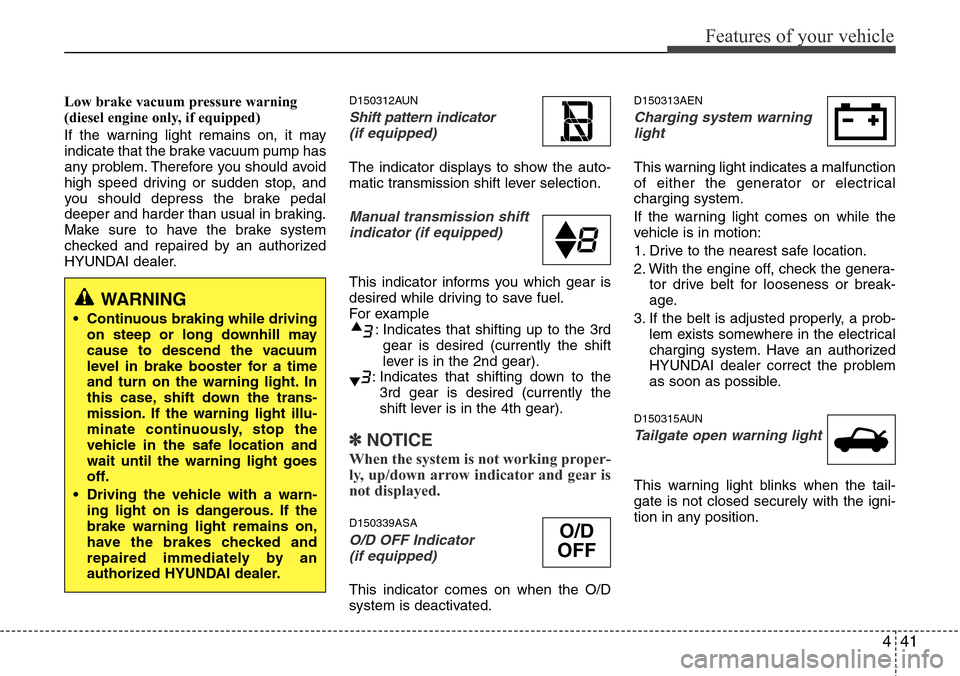
Low brake vacuum pressure warning
(diesel engine only, if equipped)
If the warning light remains on, it may
indicate that the brake vacuum pump has
any problem. Therefore you should avoid
high speed driving or sudden stop, and
you should depress the brake pedal
deeper and harder than usual in braking.
Make sure to have the brake system
checked and repaired by an authorized
HYUNDAI dealer.D150312AUN
Shift pattern indicator
(if equipped)
The indicator displays to show the auto-
matic transmission shift lever selection.
Manual transmission shift
indicator (if equipped)
This indicator informs you which gear is
desired while driving to save fuel.
For example
: Indicates that shifting up to the 3rd
gear is desired (currently the shift
lever is in the 2nd gear).
: Indicates that shifting down to the
3rd gear is desired (currently the
shift lever is in the 4th gear).
✽ NOTICE
When the system is not working proper-
ly, up/down arrow indicator and gear is
not displayed.
D150339ASA
O/D OFF Indicator
(if equipped)
This indicator comes on when the O/D
system is deactivated.
D150313AEN
Charging system warning
light
This warning light indicates a malfunction
of either the generator or electrical
charging system.
If the warning light comes on while the
vehicle is in motion:
1. Drive to the nearest safe location.
2. With the engine off, check the genera-
tor drive belt for looseness or break-
age.
3. If the belt is adjusted properly, a prob-
lem exists somewhere in the electrical
charging system. Have an authorized
HYUNDAI dealer correct the problem
as soon as possible.
D150315AUN
Tailgate open warning light
This warning light blinks when the tail-
gate is not closed securely with the igni-
tion in any position.
WARNING
• Continuous braking while driving
on steep or long downhill may
cause to descend the vacuum
level in brake booster for a time
and turn on the warning light. In
this case, shift down the trans-
mission. If the warning light illu-
minate continuously, stop the
vehicle in the safe location and
wait until the warning light goes
off.
• Driving the vehicle with a warn-
ing light on is dangerous. If the
brake warning light remains on,
have the brakes checked and
repaired immediately by an
authorized HYUNDAI dealer.
O/D
OFF
Page 190 of 338

Driving your vehicle
2 5
E010000AEN
WARNING- ENGINE EXHAUST CAN BE DANGEROUS!
Engine exhaust fumes can be extremely dangerous. If, at any time, you smell exhaust fumes inside the vehicle, open the win-
dows immediately.
• Do not inhale exhaust fumes.
Exhaust fumes contain carbon monoxide, a colorless, odorless gas that can cause unconsciousness and death by asphyxia-
tion.
• Be sure the exhaust system does not leak.
The exhaust system should be checked whenever the vehicle is raised to change the oil or for any other purpose. If you hear
a change in the sound of the exhaust or if you drive over something that strikes the underneath side of the car, have the
exhaust system checked as soon as possible by an authorized HYUNDAI dealer.
• Do not run the engine in an enclosed area.
Letting the engine idle in your garage, even with the garage door open, is a hazardous practice. Never run the engine in your
garage any longer than it takes to start the engine and back the car out.
• Avoid idling the engine for prolonged periods with people inside the car.
If it is necessary to idle the engine for a prolonged period with people inside the car, be sure to do so only in an open area
with the air intake set at "Fresh" and fan operating at one of the higher speeds so fresh air is drawn into the interior.
If you must drive with the tailgate open because you are carrying objects that make this necessary:
1. Close all windows.
2. Open side vents.
3. Set the air intake control at "Fresh", the air flow control at "Floor" or "Face" and the fan at one of the higher speeds.
To assure proper operation of the ventilation system, be sure the ventilation air intakes located just in front of the windshield are
kept clear of snow, ice, leaves or other obstructions.
Page 243 of 338

What to do in an emergency
8 6
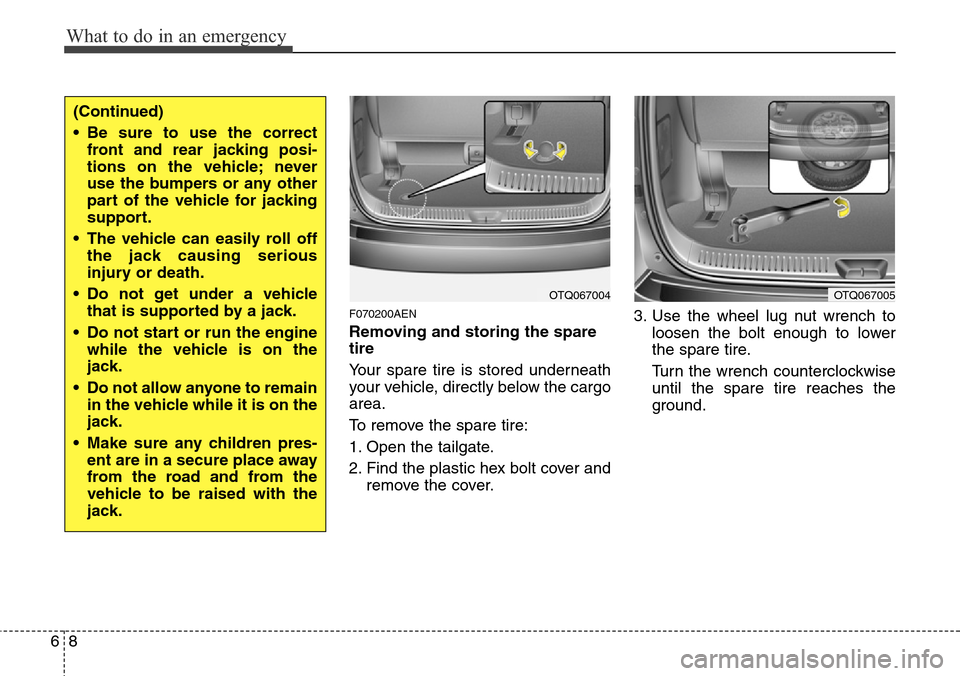
F070200AEN
Removing and storing the spare
tire
Your spare tire is stored underneath
your vehicle, directly below the cargo
area.
To remove the spare tire:
1. Open the tailgate.
2. Find the plastic hex bolt cover and
remove the cover.3. Use the wheel lug nut wrench to
loosen the bolt enough to lower
the spare tire.
Turn the wrench counterclockwise
until the spare tire reaches the
ground.
OTQ067004OTQ067005
(Continued)
• Be sure to use the correct
front and rear jacking posi-
tions on the vehicle; never
use the bumpers or any other
part of the vehicle for jacking
support.
• The vehicle can easily roll off
the jack causing serious
injury or death.
• Do not get under a vehicle
that is supported by a jack.
• Do not start or run the engine
while the vehicle is on the
jack.
• Do not allow anyone to remain
in the vehicle while it is on the
jack.
• Make sure any children pres-
ent are in a secure place away
from the road and from the
vehicle to be raised with the
jack.
Page 317 of 338
763
Maintenance
G220300ATQ
Rear combination light bulb
replacement
- Without rear fog light
(1) Tail light
(2) Back-up light
(3) Rear turn signal light
(4) Stop light
- With rear fog light
(1) Tail and stop light
(2) Back-up light
(3) Rear turn signal light
(4) Rear fog light
1. Open the tailgate.
2. Loosen the light assembly retaining
screws with a philips head screwdriver.
3. Remove the rear combination light
assembly from the body of the vehicle.
OTQ077052
OTQ077053
OTQ077051
OTQ077051G
Type B
Type A
Page 318 of 338
Maintenance
64 7
4. Remove the socket from the assembly
by turning the socket counterclockwise
until the tabs on the socket align with
the slots on the assembly.
5. Remove the bulb from the socket by
pressing it in and rotating it counter-
clockwise until the tabs on the bulb
align with the slots in the socket. Pull
the bulb out of the socket.6. Insert a new bulb by inserting it into
the socket and rotating it until it locks
into place.
7. Install the socket in the assembly by
aligning the tabs on the socket with the
slots in the assembly. Push the socket
into the assembly and turn the socket
clockwise.
8. Reinstall the light assembly to the
body of the vehicle.G220400ATQ
High mounted stop light
replacement (if equipped)
1. Open the tailgate.
2. Loosen the light assembly retaining
bolts with a proper tool.
OTQ077054
OTQ077055
OTQ077060G
OTQ077091