Page 115 of 403
439
Features of your vehicle
Horn
To sound the horn, press the horn sym-
bol on your steering wheel. Check the
horn regularly to be sure it operates
properly.
✽NOTICE
To sound the horn, press the area indi-
cated by the horn symbol on your steer-
ing wheel (see illustration). The horn
will operate only when this area is
pressed.
OHG040038
CAUTION
Do not strike the horn severely to
operate it, or hit it with your fist. Do
not press on the horn with a sharp-
pointed object.
Page 127 of 403

451
Features of your vehicle
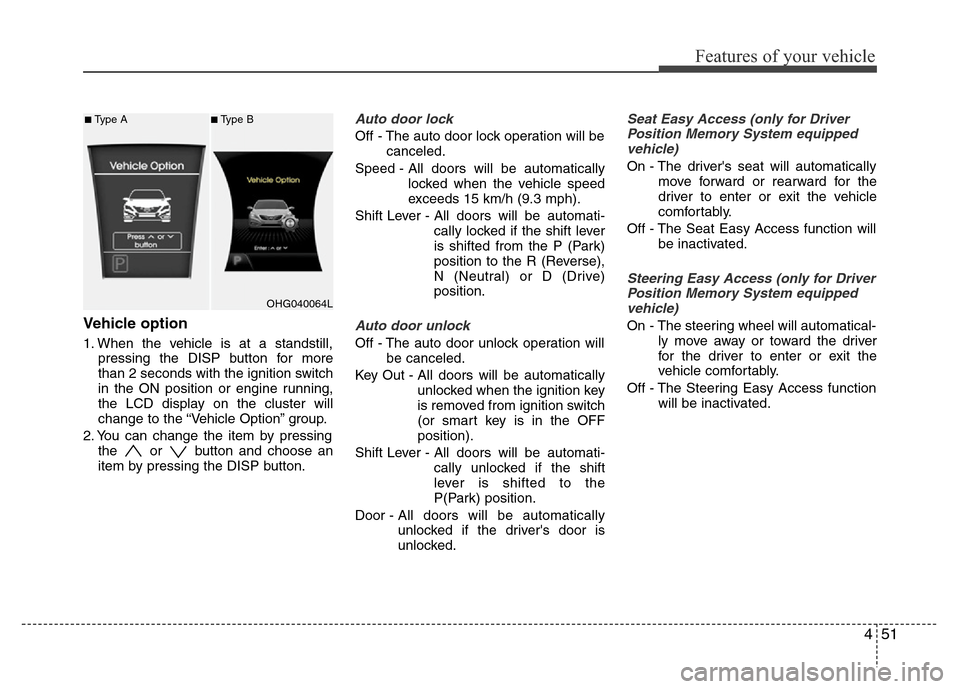
Vehicle option
1. When the vehicle is at a standstill,
pressing the DISP button for more
than 2 seconds with the ignition switch
in the ON position or engine running,
the LCD display on the cluster will
change to the “Vehicle Option” group.
2. You can change the item by pressing
the or button and choose an
item by pressing the DISP button.
Auto door lock
Off - The auto door lock operation will be
canceled.
Speed - All doors will be automatically
locked when the vehicle speed
exceeds 15 km/h (9.3 mph).
Shift Lever - All doors will be automati-
cally locked if the shift lever
is shifted from the P (Park)
position to the R (Reverse),
N (Neutral) or D (Drive)
position.
Auto door unlock
Off - The auto door unlock operation will
be canceled.
Key Out - All doors will be automatically
unlocked when the ignition key
is removed from ignition switch
(or smart key is in the OFF
position).
Shift Lever - All doors will be automati-
cally unlocked if the shift
lever is shifted to the
P(Park) position.
Door - All doors will be automatically
unlocked if the driver's door is
unlocked.
Seat Easy Access (only for Driver
Position Memory System equipped
vehicle)
On - The driver's seat will automatically
move forward or rearward for the
driver to enter or exit the vehicle
comfortably.
Off - The Seat Easy Access function will
be inactivated.
Steering Easy Access (only for Driver
Position Memory System equipped
vehicle)
On - The steering wheel will automatical-
ly move away or toward the driver
for the driver to enter or exit the
vehicle comfortably.
Off - The Steering Easy Access function
will be inactivated.
OHG040064L
■Type A■Type B
Page 133 of 403

457
Features of your vehicle
Your vehicle is equipped with dual-diago-
nal braking systems. This means you still
have braking on two wheels even if one
of the dual systems should fail. With only
one of the dual systems working, more
than normal pedal travel and greater
pedal pressure are required to stop the
car. Also, the car will not stop in as short
a distance with only a portion of the
brake system working. If the brakes fail
while you are driving, shift to a lower gear
for additional engine braking and stop the
car as soon as it is safe to do so.
To check bulb operation, check whether
the parking brake and brake fluid warning
light illuminates when the ignition switch
is in the ON position.Anti-lock brake system
(ABS) warning light
(if equipped)
This light illuminates if the ignition switch
is turned ON and goes off in approxi-
mately 3 seconds if the system is operat-
ing normally.
If the ABS warning light remains on,
comes on while driving, or does not
come on when the ignition switch is
turned to the ON position, this indicates
that there may be a malfunction with the
ABS.
If this occurs, have your vehicle checked
by an authorized HYUNDAI dealer as
soon as possible. The normal braking
system will still be operational, but with-
out the assistance of the anti-lock brake
system.Electronic brake
force distribution
(EBD) system
warning light
If two warning lights illuminate at the
same time while driving, your vehicle
may have a malfunction with the ABS
and EBD system. In this case, your ABS
and regular brake system may not work
normally. Have the vehicle checked by an
authorized HYUNDAI dealer as soon as
possible.
✽NOTICE
If the ABS warning light or EBD warn-
ing light is on and stays on, the
speedometer or odometer/tripmeter
may not work. In this case, have your
vehicle checked by an authorized
HYUNDAI dealer as soon as possible.
WARNING
Driving the vehicle with a warning
light on is dangerous. If the brake
warning light remains on, have the
brakes checked and repaired imme-
diately by an authorized HYUNDAI
dealer.
WARNING
If both ABS and brake warning
lights are on and stay on, your vehi-
cle’s brake system will not work
normally during sudden braking. In
this case, avoid high speed driving
and abrupt braking. Have your vehi-
cle checked by an authorized
HYUNDAI dealer as soon as possi-
ble.
Page 138 of 403

Features of your vehicle
62 4
Cruise indicator
(if equipped)
CRUISE indicator
The indicator light illuminates when the
cruise control system is enabled.
The cruise indicator light in the instru-
ment cluster is illuminated when the
cruise control ON-OFF button on the
steering wheel is pushed.
The indicator light turns off when the
cruise control ON-OFF button is pushed
again. For more information about the
use of cruise control, refer to “Cruise
control system or Smart cruise control
system” in section 5.
Cruise SET indicator
The indicator light illuminates when the
cruise function switch (SET- or RES+) is
ON. The cruise SET indicator light in the
instrument cluster is illuminated when
the cruise control switch (SET- or RES+)
is pushed. The cruise SET indicator light
does not illuminate when the cruise con-
trol switch (CANCEL) is pushed or the
system is disengaged.
Smart cruise control indicator
(if equipped)
SCC (Smart cruise control)
malfunction indicator
The warning light illuminates when the
vehicle to vehicle distance function does
not operate properly.
Take your vehicle to an authorized
HYUNDAI dealer and have the system
checked.
SCC (Smart cruise control)
sensor malfunction indicator
If the sensor or cover is stained with for-
eign matter such as snow, the indicator
will illuminate. Remove the stains around
the sensor by using a soft cloth.
For more information about the use of
smart cruise control, refer to "Smart
cruise control system" in section 5.
TPMS (Tire Pressure Monitoring
System) indicator (if equipped)
Low tire pressure telltale /
TPMS malfunction indicator
The low tire pressure telltale/TPMS mal-
function indicator comes on for 3 sec-
onds after the ignition switch is turned to
the "ON" position.
The TPMS malfunction indicator will illu-
minate after it blinks for approximately 1
minute when there is a problem with the
Tire Pressure Monitoring System.
If this occurs, have the system checked
by an authorized HYUNDAI dealer as
soon as possible.
For details, refer to the “TPMS” in section
6.
SET
CRUISE
■Type A■Type B
Page 142 of 403

Features of your vehicle
66 4
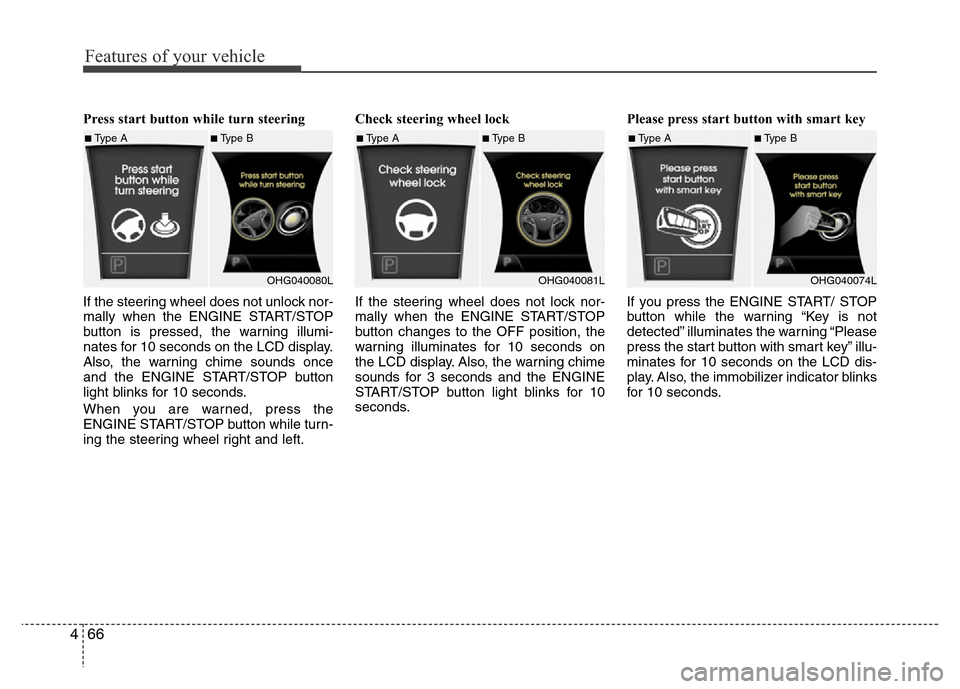
Press start button while turn steering
If the steering wheel does not unlock nor-
mally when the ENGINE START/STOP
button is pressed, the warning illumi-
nates for 10 seconds on the LCD display.
Also, the warning chime sounds once
and the ENGINE START/STOP button
light blinks for 10 seconds.
When you are warned, press the
ENGINE START/STOP button while turn-
ing the steering wheel right and left.Check steering wheel lock
If the steering wheel does not lock nor-
mally when the ENGINE START/STOP
button changes to the OFF position, the
warning illuminates for 10 seconds on
the LCD display. Also, the warning chime
sounds for 3 seconds and the ENGINE
START/STOP button light blinks for 10
seconds.Please press start button with smart key
If you press the ENGINE START/ STOP
button while the warning “Key is not
detected” illuminates the warning “Please
press the start button with smart key” illu-
minates for 10 seconds on the LCD dis-
play. Also, the immobilizer indicator blinks
for 10 seconds.
■Type A■Type B
OHG040080L■Type A■Type B
OHG040081L■Type A■Type B
OHG040074L
Page 170 of 403
Features of your vehicle
94 4
MAX A/C-Level (B, C, D, E, F)
To select the MAX A/C, turn the temper-
ature knob to the extreme left.
Air flow is directed toward the upper body
and face.
In this mode, the air conditioning and the
recirculated air position will be selected
automatically.Instrument panel vents
The outlet vents can be opened or closed
separately using the thumbwheel.
Also, you can adjust the direction of air
delivery from these vents using the vent
control lever as shown.Temperature control
The temperature control knob allows you
to control the temperature of the air flow-
ing from the ventilation system. To
change the air temperature in the pas-
senger compartment, turn the knob to
the right position for warm and hot air or
left position for cooler air.
OHG040134OHG040136OHG040135
Page 181 of 403

4105
Features of your vehicle
Instrument panel vents
The outlet vents can be opened or closed
separately using the thumbwheel.
Also, you can adjust the direction of air
delivery from these vents using the vent
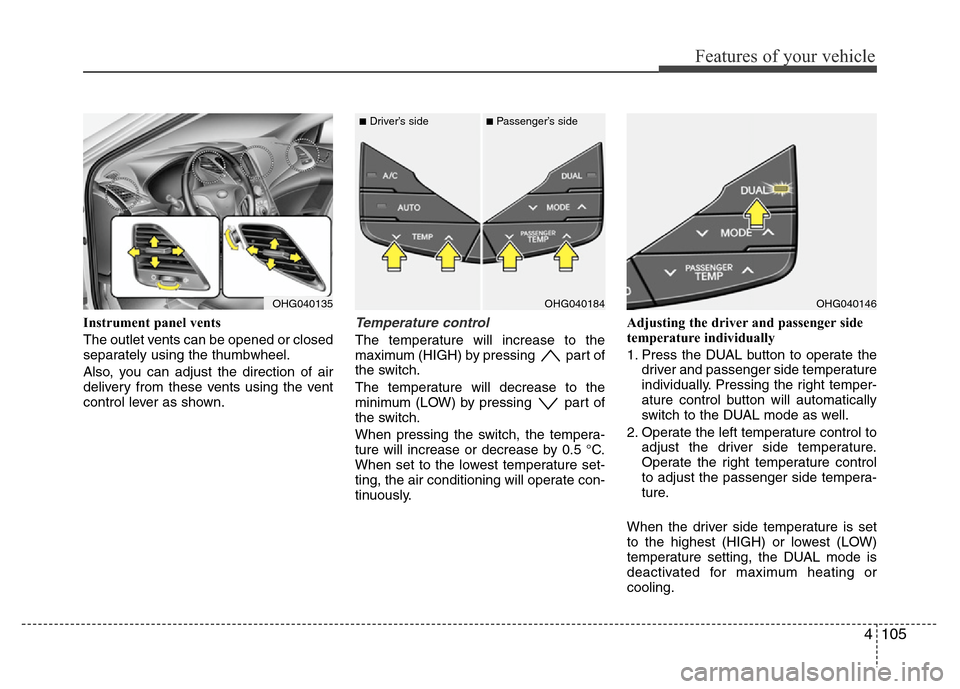
control lever as shown.Temperature control
The temperature will increase to the
maximum (HIGH) by pressing part of
the switch.
The temperature will decrease to the
minimum (LOW) by pressing part of
the switch.
When pressing the switch, the tempera-
ture will increase or decrease by 0.5 °C.
When set to the lowest temperature set-
ting, the air conditioning will operate con-
tinuously.Adjusting the driver and passenger side
temperature individually
1. Press the DUAL button to operate the
driver and passenger side temperature
individually. Pressing the right temper-
ature control button will automatically
switch to the DUAL mode as well.
2. Operate the left temperature control to
adjust the driver side temperature.
Operate the right temperature control
to adjust the passenger side tempera-
ture.
When the driver side temperature is set
to the highest (HIGH) or lowest (LOW)
temperature setting, the DUAL mode is
deactivated for maximum heating or
cooling.
OHG040135OHG040146OHG040184
■Driver’s side■Passenger’s side
Page 202 of 403

Features of your vehicle
126 4
Steering wheel audio control
(if equipped)
The steering wheel audio control button
is installed to promote safe driving.
VOLUME (VOL +/-) (1)
• Push up the lever to increase volume.
• Push down the lever to decrease vol-
ume.
SEEK/PRESET ( / ) (2)
If the SEEK/PRESET button is pressed
for 0.8 seconds or more, it will work as
follows in each mode.
RADIO mode
It will function as the AUTO SEEK select
button. It will SEEK until you release the
button.
CDP mode
It will function as the FF/REW button.
CDC mode
It will function as the DISC UP/DOWN
button.
If the SEEK/PRESET button is pressed
for less than 0.8 seconds, it will work as
follows in each mode.RADIO mode
It will function as the PRESET STATION
select buttons.
CDP mode
It will function as the TRACK UP/DOWN
button.
CDC mode
It will function as the TRACK UP/DOWN
button.
Detailed information for audio control
buttons is included in the following pages
in this section.
MODE (3)
Press the MODE button to select Fadio,
CD (Compact Disc) or CDC* (Compact
Disc Changer).
MUTE (4) (if equipped)
• Press the MUTE button to cancel the
sound.
• Press the MUTE button again to acti-
vate the sound.
OHG040179L
CAUTION
Do not operate audio remote con-
trol buttons simultaneously.