Page 167 of 403
491
Features of your vehicle
MANUAL CLIMATE CONTROL SYSTEM
1. Air conditioning button
2. Front windshield defroster button
3. Temperature control knob
4. Rear window defroster button5. Air intake control button
6. Mode selection switch
7. Fan speed control switch
8. OFF button
OHG040131
CAUTION
Operating the blower when the igni-
tion switch is in the ON position
could cause the battery to dis-
charge. Operate the blower when
the engine is running.
Page 171 of 403

495
Features of your vehicle
Temperature conversion
You can switch the temperature mode
between Centigrade to Fahrenheit as fol-
lows:
1. Select mode.
2. Press the OFF button.
3. Press the air intake control button
( ) 5 times within 3 seconds.
The display will change from Centigrade
to Fahrenheit, or from Fahrenheit to
Centigrade.
If the battery has been discharged or dis-
connected, the temperature mode dis-
play will reset to Centigrade.
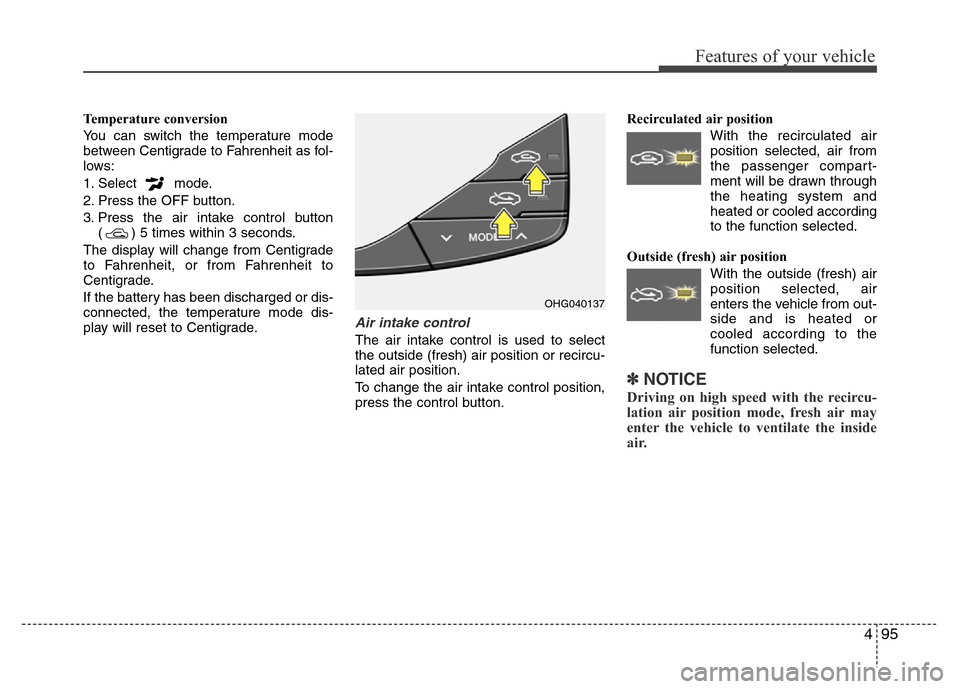
Air intake control
The air intake control is used to select
the outside (fresh) air position or recircu-
lated air position.
To change the air intake control position,
press the control button.Recirculated air position
With the recirculated air
position selected, air from
the passenger compart-
ment will be drawn through
the heating system and
heated or cooled according
to the function selected.
Outside (fresh) air position
With the outside (fresh) air
position selected, air
enters the vehicle from out-
side and is heated or
cooled according to the
function selected.
✽NOTICE
Driving on high speed with the recircu-
lation air position mode, fresh air may
enter the vehicle to ventilate the inside
air.
OHG040137
Page 177 of 403
4101
Features of your vehicle
AUTOMATIC CLIMATE CONTROL SYSTEM (IF EQUIPPED)
1. Front windshield defroster button
2. Fan speed control knob
3. OFF button
4. Rear window defroster button
5. Dual temperature control selection button
6. Mode selection button
7. Passenger's temperature control switch
8. Air intake control button
9. Climate information screen selection
button
10. Driver’s temperature control switch
11. AUTO (automatic control) button
12. Air conditioning button
■■Type A
■Type B
OHG040140/OHG040141
CAUTION
Operating the blower when the igni-
tion switch is in the ON position
could cause the battery to dis-
charge. Operate the blower when
the engine is running.
Page 182 of 403
Features of your vehicle
106 4
Adjusting the driver and passenger side
temperature equally
1. Press the DUAL button again to deac-
tivate DUAL mode. The passenger
side temperature will be set to the
same temperature as the driver side
temperature.
2. Operate the driver’s side temperature
control switch. The driver and passen-
ger side temperature will be adjusted
equally.Temperature conversion
You can switch the temperature mode
between Centigrade to Fahrenheit as fol-
lows:
While pressing the MODE button, press
the DUAL button for 3 seconds or more.
The display will change from Centigrade
to Fahrenheit, or from Fahrenheit to
Centigrade.
If the battery has been discharged or dis-
connected, the temperature mode dis-
play will reset to Centigrade.
Air intake control
This is used to select the outside (fresh)
air position or recirculated air position.
To change the air intake control position,
push the control button.
OHG040147
■Type A
■Type B
Page 191 of 403

4115
Features of your vehicle
Defogging logic
To reduce the probability of fogging up
the inside of the windshield, the air intake
or air conditioning are controlled auto-
matically according to certain conditions
such as or position. To cancel or
return the defogging logic, do the follow-
ing.
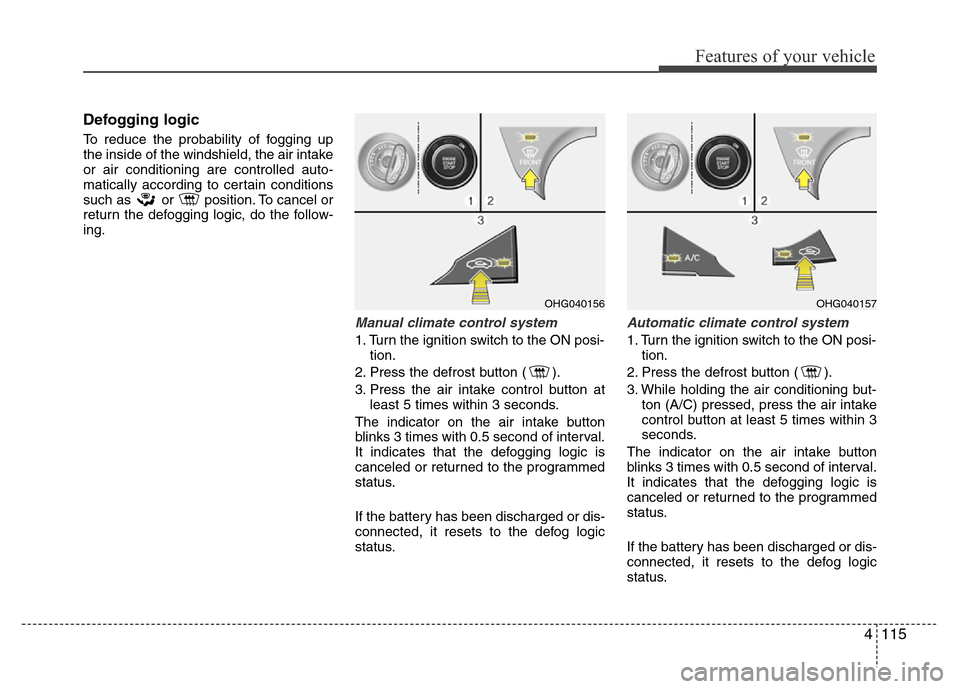
Manual climate control system
1. Turn the ignition switch to the ON posi-
tion.
2. Press the defrost button ( ).
3. Press the air intake control button at
least 5 times within 3 seconds.
The indicator on the air intake button
blinks 3 times with 0.5 second of interval.
It indicates that the defogging logic is
canceled or returned to the programmed
status.
If the battery has been discharged or dis-
connected, it resets to the defog logic
status.
Automatic climate control system
1. Turn the ignition switch to the ON posi-
tion.
2. Press the defrost button ( ).
3. While holding the air conditioning but-
ton (A/C) pressed, press the air intake
control button at least 5 times within 3
seconds.
The indicator on the air intake button
blinks 3 times with 0.5 second of interval.
It indicates that the defogging logic is
canceled or returned to the programmed
status.
If the battery has been discharged or dis-
connected, it resets to the defog logic
status.
OHG040156OHG040157
Page 192 of 403

Features of your vehicle
116 4
Auto defogging system
(Only for automatic climate control
system, if equipped)
Auto defogging reduces the possibility of
fogging up the inside of the windshield by
automatically sensing the moisture of
inside the windshield.
The auto defogging system operates
when the heater or air conditioning is on.This indicator illuminates
when the auto defogging
system senses the moisture
of inside the windshield and
operates.
If more moisture is in the vehicle, higher
steps operate as follow. For example if
auto defogging does not defog inside the
windshield at step 1 Outside air position,
it tries to defog again at step 2 Blowing
air toward the windshield.
Step 1 : Outside air position
Step 2 : Blowing air toward the wind-
shield
Step 3 : Increasing air flow toward the
windshield
Step 4 : Operating the air conditioning
Step 5 : Maximizing the air conditioning
If your vehicle is equipped with the auto
defogging system, it is automatically acti-
vated when the conditions are met.
However, if you would like to cancel the
auto defogging system, press the front
defroster button 4 times within 2 seconds
while pressing the AUTO button. The
indicator of front defroster button will
blink 3 times to notify you that the system
is cancelled. To use the auto defogging
system again, follow the procedures
mentioned above.If the battery has been disconnected or
discharged, it resets to the auto defog-
ging status.
✽NOTICE
If the A/C off or recirculated air position
is manually selected while the auto
defogging system is on, the auto defog-
ging indicator will blink 3 times to give
notice that the A/C off or recirculated air
position operation cannot be selected.
OHG040158CAUTION
Do not remove the sensor cover
located on the upper end of the
driver side windshield glass.
Damage to the system parts could
occur and may not be covered by
your vehicle warranty.
Page 197 of 403

4121
Features of your vehicle
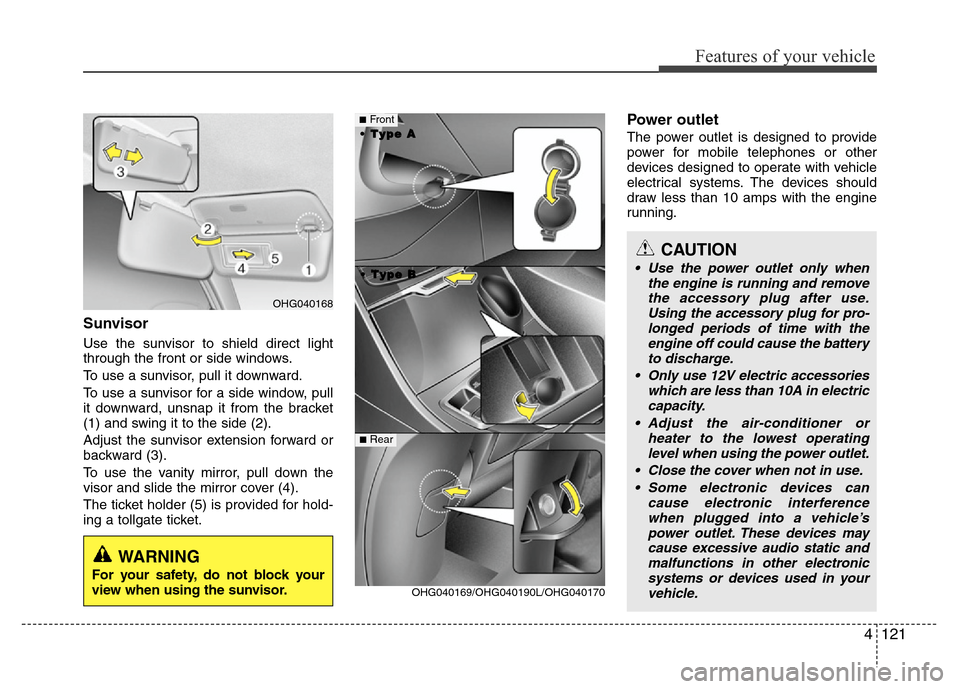
Sunvisor
Use the sunvisor to shield direct light
through the front or side windows.
To use a sunvisor, pull it downward.
To use a sunvisor for a side window, pull
it downward, unsnap it from the bracket
(1) and swing it to the side (2).
Adjust the sunvisor extension forward or
backward (3).
To use the vanity mirror, pull down the
visor and slide the mirror cover (4).
The ticket holder (5) is provided for hold-
ing a tollgate ticket.
Power outlet
The power outlet is designed to provide
power for mobile telephones or other
devices designed to operate with vehicle
electrical systems. The devices should
draw less than 10 amps with the engine
running.
CAUTION
• Use the power outlet only when
the engine is running and remove
the accessory plug after use.
Using the accessory plug for pro-
longed periods of time with the
engine off could cause the battery
to discharge.
• Only use 12V electric accessories
which are less than 10A in electric
capacity.
• Adjust the air-conditioner or
heater to the lowest operating
level when using the power outlet.
• Close the cover when not in use.
• Some electronic devices can
cause electronic interference
when plugged into a vehicle’s
power outlet. These devices may
cause excessive audio static and
malfunctions in other electronic
systems or devices used in your
vehicle.
OHG040169/OHG040190L/OHG040170
■Front
• •
T T
y y
p p
e e
B B • •
T T
y y
p p
e e
A A
■Rear
OHG040168
WARNING
For your safety, do not block your
view when using the sunvisor.
Page 198 of 403

Features of your vehicle
122 4
Digital clock
Whenever the battery terminals or relat-
ed fuses are disconnected, you must
reset the time.
Detailed information on setting the clock
is described in Audio system section 4.
Clothes hanger (if equipped)
To use the hanger, pull down the upper
portion of hanger.
Floor mat anchor(s) (if equipped)
When using a floor mat on the front floor
carpet, make sure it attaches to the floor
mat anchor(s) in your vehicle. This keeps
the floor mat from sliding forward.
OCM039200N
CAUTION
Do not hang heavy clothes, since
those may damage the hook.
OUN026348
WARNING
Do not adjust the clock while driv-
ing. You may lose your steering
control and cause an accident that
results in severe personal injury or
death.
WARNING
Do not put a finger or a foreign ele-
ment (pin, etc.) into a power outlet
and do not touch with a wet hand.
You may get electrocuted or fire
may occur.
WARNING
Do not hang other objects except
clothes. In an accident it may cause
vehicle damage or personal injury.