2011 Hyundai Azera ESP
[x] Cancel search: ESPPage 147 of 403

471
Features of your vehicle
✽NOTICE
This system can only sense objects with-
in the range and location of the sensors;
It can not detect objects in other areas
where sensors are not installed. Also,
small or slim objects, such as poles or
objects located between sensors may not
be detected by the sensors.
Always visually check behind the vehi-
cle when backing up.
Be sure to inform any drivers of the
vehicle that may be unfamiliar with the
system regarding the systems capabili-
ties and limitations.
Self-diagnosis
When you shift the gear to the R
(Reverse) position and if one or more of
the below occurs you may have a mal-
function in the rear parking assist sys-
tem.
• You don't hear an audible warning
sound or if the buzzer sounds intermit-
tently.
If this occurs, have your vehicle checked
by an authorized HYUNDAI dealer as
soon as possible.
WARNING
Pay close attention when the vehi-
cle is driven close to objects on the
road, particularly pedestrians, and
especially children. Be aware that
some objects may not be detected
by the sensors, due to the object’s
distance, size or material, all of
which can limit the effectiveness of
the sensor. Always perform a visual
inspection to make sure the vehicle
is clear of all obstructions before
moving the vehicle in any direction.
WARNING
Your new vehicle warranty does not
cover any accidents or damage to
the vehicle or injuries to its occu-
pants due to a rear parking assist
system malfunction. Always drive
safely and cautiously.
(blinks)
• is displayed. (if equipped)
Page 148 of 403

Features of your vehicle
72 4
The parking assist system assists the
driver during movement of the vehicle by
chiming if any object is sensed within the
distance of 100 cm (39 in.) in front and
120 cm (47 in.) behind the vehicle. This
system is a supplemental system and it
is not intended to nor does it replace the
need for extreme care and attention of
the driver.The sensing range and objects
detectable by the sensors are limited.
Whenever moving pay as much attention
to what is in front and behind of you as
you would in a vehicle without a parking
assist system.
PARKING ASSIST SYSTEM (IF EQUIPPED)
WARNING
The parking assist system should
only be considered as a supple-
mentary function. The driver must
check the front and rear view. The
operational function of the parking
assist system can be affected by
many factors and conditions of the
surroundings, so the responsibility
rests always with the driver.
OHG042089C
OHG040088
S S
e e
n n
s s
o o
r r
■Front
■Rear
S S
e e
n n
s s
o o
r r
OHG040091/OHG040192L/OHG040193L
■Type A
■Type B
■Type C
Page 151 of 403

475
Features of your vehicle
✽NOTICE
1. The warning may not sound sequen-
tially depending on the speed and
shapes of the objects detected.
2. The parking assist system may mal-
function if the vehicle bumper height
or sensor installation has been modi-
fied. Any non-factory installed equip-
ment or accessories may also interfere
with the sensor performance.
3. Sensor may not recognize objects less
than 30 cm from the sensor, or it may
sense an incorrect distance. Use with
caution.
4. When the sensor is frozen or stained
with snow or water, the sensor may be
inoperative until the stains are
removed using a soft cloth.
5. Do not push, scratch or strike the sen-
sor with any hard objects that could
damage the surface of the sensor.
Sensor damage could occur.
✽NOTICE
This system can only sense objects with-
in the range and location of the sensors,
it can not detect objects in other areas
where sensors are not installed. Also,
small or slim objects, or objects located
between sensors may not be detected.
Always visually check in front and
behind the vehicle when driving.
Be sure to inform any drivers in the
vehicle that may be unfamiliar with the
system regarding the systems capabili-
ties and limitations.
Self-diagnosis
When you shift the gear to the R
(Reverse) position and if one or more of
the below occurs you may have a mal-
function in the rear parking assist sys-
tem.
• You don't hear an audible warning
sound or if the buzzer sounds intermit-
tently.
If this occurs, have your vehicle checked
by an authorized HYUNDAI dealer as
soon as possible.
WARNING
Your new vehicle warranty does not
cover any accidents or damage to
the vehicle or injuries to its occu-
pants related to a parking assist
system. Always drive safely and
cautiously.
WARNING
Pay close attention when the vehi-
cle is driven close to objects on the
road, particularly pedestrians, and
especially children. Be aware that
some objects may not be detected
by the sensors, due to the objects
distance, size or material, all of
which can limit the effectiveness of
the sensor. Always perform a visual
inspection to make sure the vehicle
is clear of all obstructions before
moving the vehicle in any direction.
(blinks)
• is displayed. (if equipped)
Page 152 of 403

Features of your vehicle
76 4
The rearview camera will activate when
the back-up light is ON with the ignition
switch ON and the shift lever in the R
position.
This system is a supplemental system
that shows behind the vehicle through
the AV monitor while backing-up.
✽NOTICE
The rearview camera may not operate
normally, when you drive in the
extremely high or low temperature
area. (operating temperature: -30°C ~
75°C (-22°F ~ 167°F))
The hazard warning flasher should be
used whenever you find it necessary to
stop the car in a hazardous location.
When you must make such an emer-
gency stop, always pull off the road as far
as possible.
The hazard warning lights are turned on
by pushing in the hazard switch. This
causes all turn signal lights to blink. The
hazard warning lights will operate even
though the key is not in the ignition
switch.
To turn the hazard warning lights off,
push the switch a second time.
HAZARD WARNING FLASHER
OHG040109
REARVIEW CAMERA (IF EQUIPPED)
OHG043095
WARNING
• This system is a supplementary
function only. It is the responsi-
bility of the driver to always
check the inside/outside rearview
mirror and the area behind the
vehicle before and while backing
up because there is a dead zone
that can't be seen through the
camera.
• Always keep the camera lens
clean. If the lens is covered with
foreign matter, the camera may
not operate normally.
Page 189 of 403

4113
Features of your vehicle
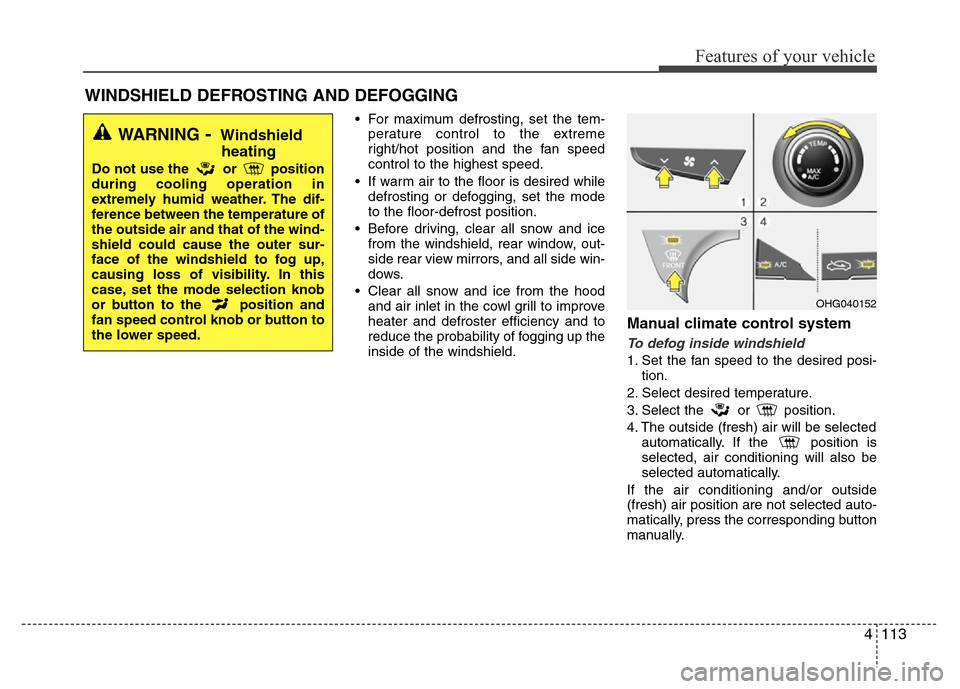
• For maximum defrosting, set the tem-
perature control to the extreme
right/hot position and the fan speed
control to the highest speed.
• If warm air to the floor is desired while
defrosting or defogging, set the mode
to the floor-defrost position.
• Before driving, clear all snow and ice
from the windshield, rear window, out-
side rear view mirrors, and all side win-
dows.
• Clear all snow and ice from the hood
and air inlet in the cowl grill to improve
heater and defroster efficiency and to
reduce the probability of fogging up the
inside of the windshield.
Manual climate control system
To defog inside windshield
1. Set the fan speed to the desired posi-
tion.
2. Select desired temperature.
3. Select the or position.
4. The outside (fresh) air will be selected
automatically. If the position is
selected, air conditioning will also be
selected automatically.
If the air conditioning and/or outside
(fresh) air position are not selected auto-
matically, press the corresponding button
manually.
WINDSHIELD DEFROSTING AND DEFOGGING
WARNING- Windshield
heating
Do not use the or position
during cooling operation in
extremely humid weather. The dif-
ference between the temperature of
the outside air and that of the wind-
shield could cause the outer sur-
face of the windshield to fog up,
causing loss of visibility. In this
case, set the mode selection knob
or button to the position and
fan speed control knob or button to
the lower speed.
OHG040152
Page 190 of 403

Features of your vehicle
114 4
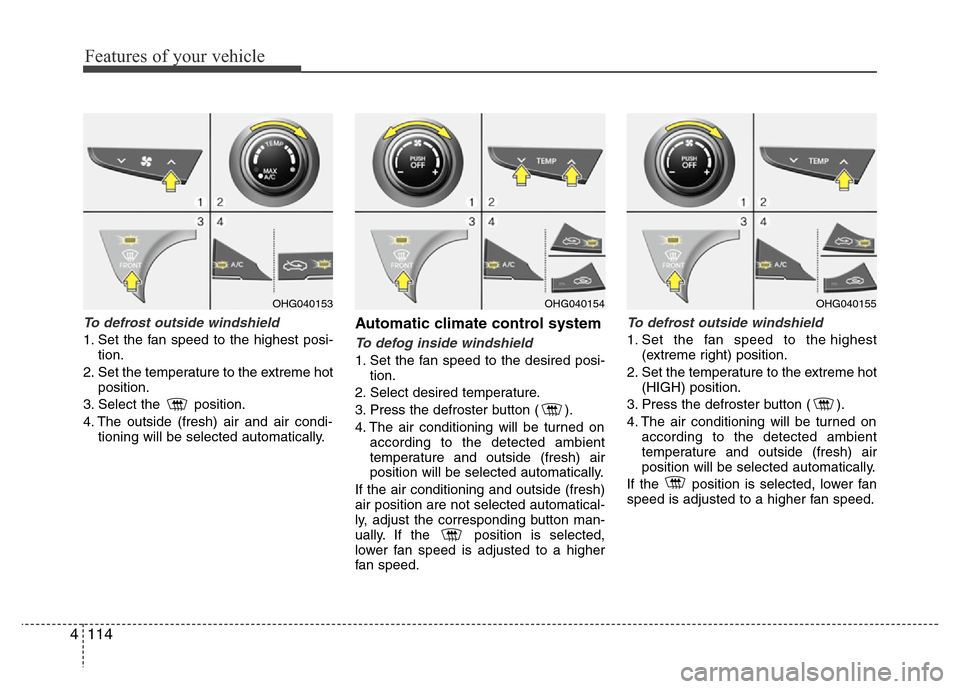
To defrost outside windshield
1. Set the fan speed to the highest posi-
tion.
2. Set the temperature to the extreme hot
position.
3. Select the position.
4. The outside (fresh) air and air condi-
tioning will be selected automatically.
Automatic climate control system
To defog inside windshield
1. Set the fan speed to the desired posi-
tion.
2. Select desired temperature.
3. Press the defroster button ( ).
4. The air conditioning will be turned on
according to the detected ambient
temperature and outside (fresh) air
position will be selected automatically.
If the air conditioning and outside (fresh)
air position are not selected automatical-
ly, adjust the corresponding button man-
ually. If the position is selected,
lower fan speed is adjusted to a higher
fan speed.
To defrost outside windshield
1. Set the fan speed to the highest
(extreme right) position.
2. Set the temperature to the extreme hot
(HIGH) position.
3. Press the defroster button ( ).
4. The air conditioning will be turned on
according to the detected ambient
temperature and outside (fresh) air
position will be selected automatically.
If the position is selected, lower fan
speed is adjusted to a higher fan speed.
OHG040154OHG040155OHG040153
Page 210 of 403

Features of your vehicle
134 4
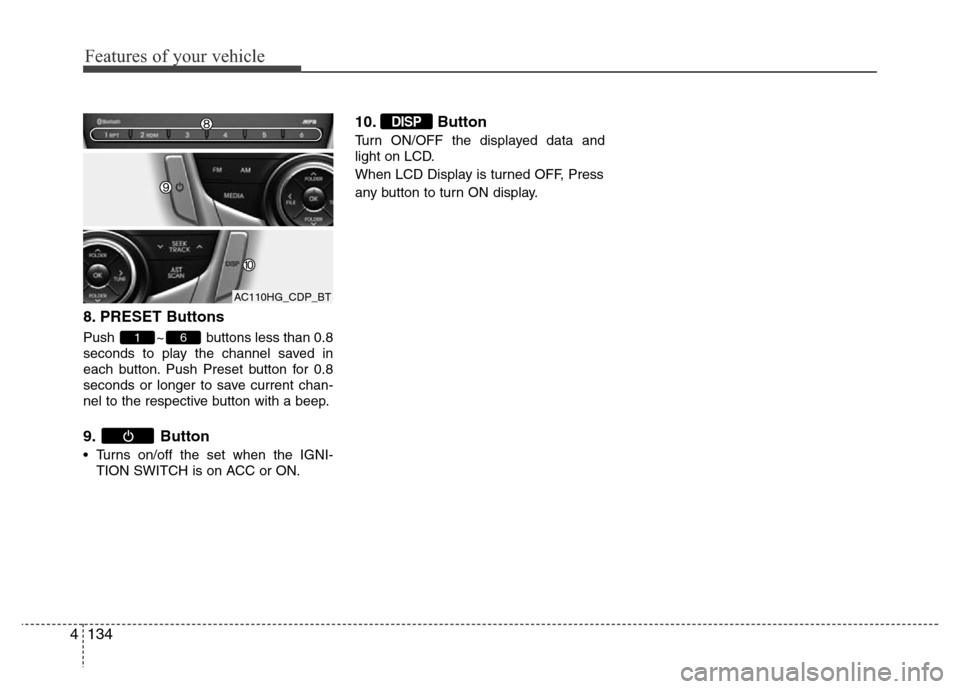
8. PRESET Buttons
Push ~ buttons less than 0.8
seconds to play the channel saved in
each button. Push Preset button for 0.8
seconds or longer to save current chan-
nel to the respective button with a beep.
9. Button
• Turns on/off the set when the IGNI-
TION SWITCH is on ACC or ON.
10. Button
Turn ON/OFF the displayed data and
light on LCD.
When LCD Display is turned OFF, Press
any button to turn ON display.
DISP
61
AC110HG_CDP_BT
Page 212 of 403

Features of your vehicle
136 4
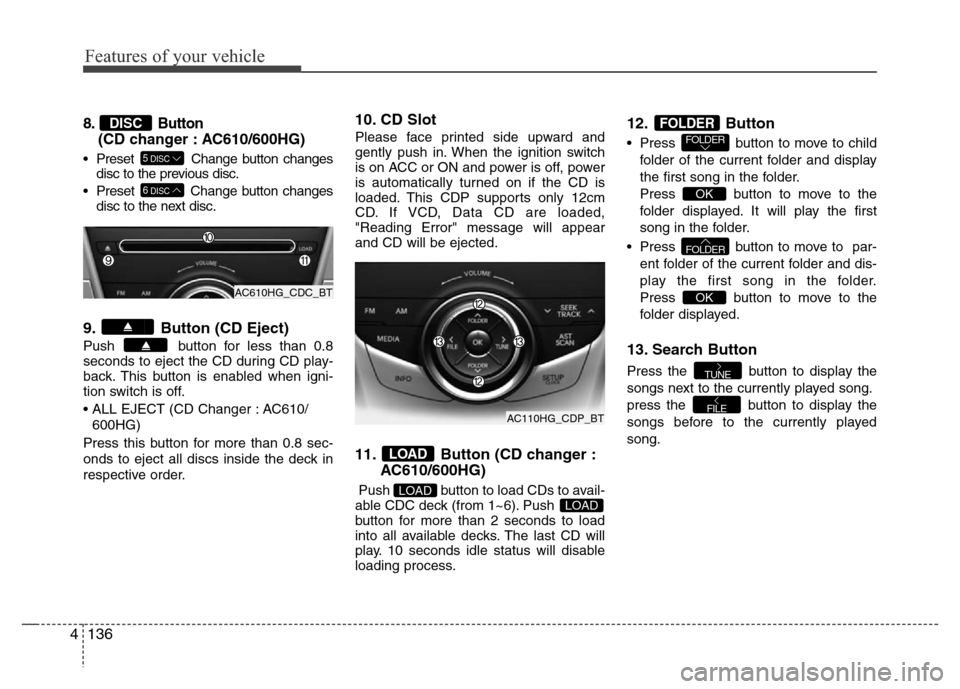
8. Button
(CD changer : AC610/600HG)
• Preset Change button changes
disc to the previous disc.
• Preset Change button changes
disc to the next disc.
9. Button (CD Eject)
Push button for less than 0.8
seconds to eject the CD during CD play-
back. This button is enabled when igni-
tion switch is off.
• ALL EJECT (CD Changer : AC610/
600HG)
Press this button for more than 0.8 sec-
onds to eject all discs inside the deck in
respective order.
10. CD Slot
Please face printed side upward and
gently push in. When the ignition switch
is on ACC or ON and power is off, power
is automatically turned on if the CD is
loaded. This CDP supports only 12cm
CD. If VCD, Data CD are loaded,
"Reading Error" message will appear
and CD will be ejected.
11. Button (CD changer :
AC610/600HG)
Push button to load CDs to avail-
able CDC deck (from 1~6). Push
button for more than 2 seconds to load
into all available decks. The last CD will
play. 10 seconds idle status will disable
loading process.
12. Button
• Press button to move to child
folder of the current folder and display
the first song in the folder.
Press button to move to the
folder displayed. It will play the first
song in the folder.
• Press button to move to par-
ent folder of the current folder and dis-
play the first song in the folder.
Press button to move to the
folder displayed.
13. Search Button
Press the button to display the
songs next to the currently played song.
press the button to display the
songs before to the currently played
song.
FILE
TUNE
OK
FOLDER
OK
FOLDERFOLDER
LOADLOAD
LOAD
6DISC
5DISC
DISC
AC610HG_CDC_BT
AC110HG_CDP_BT