Page 373 of 403
761
Maintenance
No.Fuse ratingSymbol Protected component
MULTI
FUSE
F1 60ASmart Junction Box (Fuse - F20/F25/F28/F35, IPS 1, IPS 2, ARISU-LT 1)
F2 60ASmart Junction Box (Fuse - F26/F29/F32/F36)
F3 40AW/O Smart Key - Ignition Switch
With Smart Key - RLY. 2 (PDM 1 (ACC) Relay), LY. 9 (PDM 2 (IG1) Relay)
F440AESP Control Module, ABS Control Module
F540ARLY. 1 (RR HTD Relay)
F640ARLY. 14 (Blower Relay)
F760ASmart Junction Box (Fuse - F19/F24/F27/F30, IPS 3, IPS 4, ARISU-LT 2)
F880A-
FUSE
F910AA/C Control Module
F1010ARear Combination Lamp (IN) LH/RH, Electro Chromic Mirror , A/V & Navigation Head Unit
F1115ATransaxle Range Switch
F1210APCM
F1310AMultipurpose Check Connector
Engine compartment main fuse panel
Page 374 of 403
Maintenance
62 7
No.Fuse ratingSymbol Protected component
FUSE
F1425A-
F1530AElectronic Parking Brake Module
F1640ARLY. 5 (S tart Relay), W/O Smart Key - Ignition Switch,
With Smart Key - RLY. 10 (PDM 3 (IG2) Relay)
F1730AElectronic Parking Brake Module
F1840AEMS Box (Fuse - F36 / F37 / F38 / F39)
F1940AESP Control Module, ABS Control Module
F2050ARLY. 3 (C/F an (HI) Relay), RLY. 4 (C/F an (LO) Relay)
F2220AMultipurpose Check Connector
F2325ARLY. 13 (P/Outlet Relay)
F2410ABattery Sensor
F2510ASmart Cruise Control Radar
F2615ARLY. 6 (Stop LP Relay), Stop Signal Relay
F2720ARLY. 7 (Deicer Relay)
Page 380 of 403

Maintenance
68 7
Traffic Change (For Europe)
The low beam light distribution is asym-
metric.
If you go abroad to a country with oppo-
site traffic direction, this asymmetric part
will dazzle oncoming car driver. To pre-
vent dazzle, ECE regulation demand
several technical solutions (ex. automatic
change system, adhesive sheet, down
aiming). This headlamps are designed
not to dazzle opposite drivers. So, you do
not need to change your headlamps in a
country with opposite traffic direction.
Turn signal light
1. Turn off the engine.
2. Open the hood.
3. Remove the socket from the assembly
by turning the socket counterclockwise
until the tabs on the socket align with
the slots on the assembly.
4. Remove the bulb from the socket by
pressing it in and rotating it counter-
clockwise until the tabs on the bulb
align with the slots in the socket. Pull
the bulb out of the socket
5. Insert a new bulb by inserting it into
the socket and rotating it until it locks
into place.6. Install the socket in the assembly by
aligning the tabs on the socket with the
slots in the assembly. Push the socket
into the assembly and turn the socket
clockwise.
Position and front fog light
If the light bulb does not operate, have
the vehicle checked by an authorized
HYUNDAI dealer.
OHG070042
Page 382 of 403

Maintenance
70 7
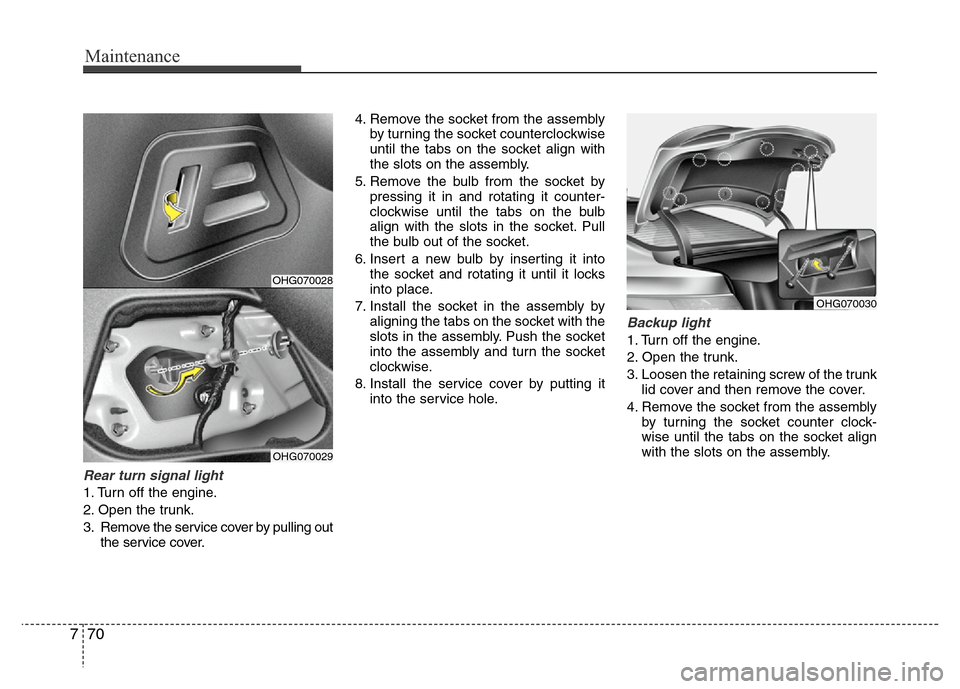
Rear turn signal light
1. Turn off the engine.
2. Open the trunk.
3. Remove the service cover by pulling out
the service cover.4. Remove the socket from the assembly
by turning the socket counterclockwise
until the tabs on the socket align with
the slots on the assembly.
5. Remove the bulb from the socket by
pressing it in and rotating it counter-
clockwise until the tabs on the bulb
align with the slots in the socket. Pull
the bulb out of the socket.
6. Insert a new bulb by inserting it into
the socket and rotating it until it locks
into place.
7. Install the socket in the assembly by
aligning the tabs on the socket with the
slots in the assembly. Push the socket
into the assembly and turn the socket
clockwise.
8. Install the service cover by putting it
into the service hole.
Backup light
1. Turn off the engine.
2. Open the trunk.
3. Loosen the retaining screw of the trunk
lid cover and then remove the cover.
4. Remove the socket from the assembly
by turning the socket counter clock-
wise until the tabs on the socket align
with the slots on the assembly.
OHG070028
OHG070029
OHG070030
Page 383 of 403
771
Maintenance
5. Remove the bulb by pulling it straight
out.
6. Insert a new bulb by inserting it into
the socket and rotating it until it locks
into place.
7. Install the socket into the assembly by
aligning the tabs on the socket with the
slots in the assembly. Push the socket
into the assembly and turn the socket
clockwise.
8. Reinstall the trunk lid cover by pushing
in the screw.
Rear fog light (if equipped)
If the light bulb does not operate, have
the vehicle checked by an authorized
HYUNDAI dealer.
High mounted stop light
replacement (if equipped)
If the light bulb does not operate, have
the vehicle checked by an authorized
HYUNDAI dealer.
OHG070040OHG070031
Page 384 of 403

Maintenance
72 7
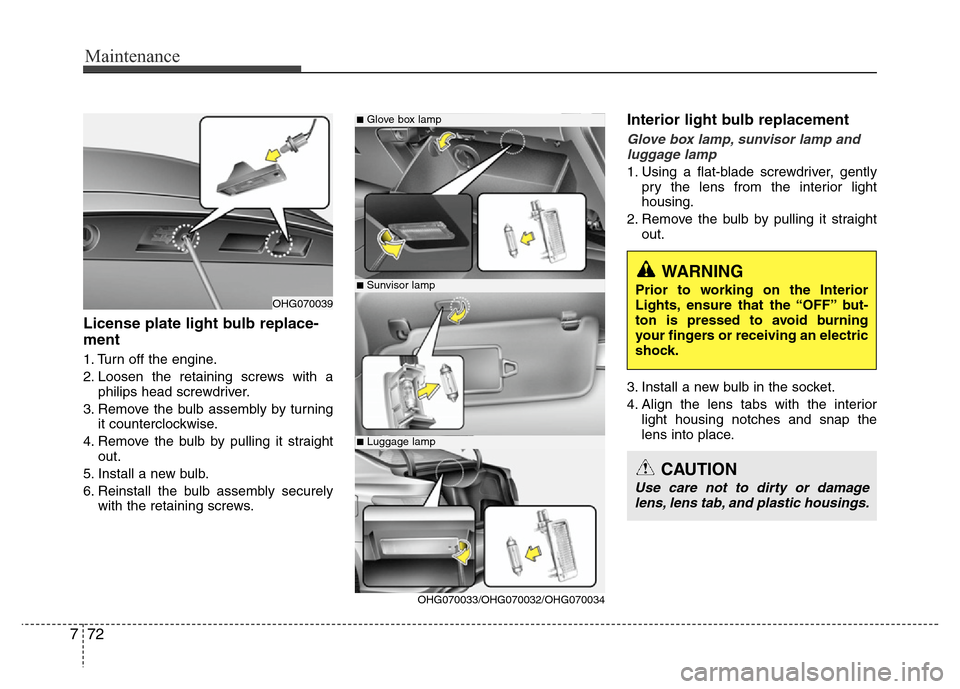
License plate light bulb replace-
ment
1. Turn off the engine.
2. Loosen the retaining screws with a
philips head screwdriver.
3. Remove the bulb assembly by turning
it counterclockwise.
4. Remove the bulb by pulling it straight
out.
5. Install a new bulb.
6. Reinstall the bulb assembly securely
with the retaining screws.
Interior light bulb replacement
Glove box lamp, sunvisor lamp and
luggage lamp
1. Using a flat-blade screwdriver, gently
pry the lens from the interior light
housing.
2. Remove the bulb by pulling it straight
out.
3. Install a new bulb in the socket.
4. Align the lens tabs with the interior
light housing notches and snap the
lens into place.
■Glove box lamp
■Sunvisor lamp
■Luggage lamp
OHG070039
OHG070033/OHG070032/OHG070034
WARNING
Prior to working on the Interior
Lights, ensure that the “OFF” but-
ton is pressed to avoid burning
your fingers or receiving an electric
shock.
CAUTION
Use care not to dirty or damage
lens, lens tab, and plastic housings.
Page 393 of 403

781
Maintenance
Canister
Fuel vapors generated inside the fuel
tank are absorbed and stored in the
onboard canister. When the engine is
running, the fuel vapors absorbed in the
canister are drawn into the surge tank
through the purge control solenoid valve.
Purge Control Solenoid Valve (PCSV)
The purge control solenoid valve is con-
trolled by the Engine Control Module
(ECM); when the engine coolant temper-
ature is low during idling, the PCSV clos-
es so that evaporated fuel is not taken
into the engine. After the engine warms-
up during ordinary driving, the PCSV
opens to introduce evaporated fuel to the
engine.
3. Exhaust emission control
system
The Exhaust Emission Control System is
a highly effective system which controls
exhaust emissions while maintaining
good vehicle performance.
Vehicle modifications
This vehicle should not be modified.
Modification of your vehicle could affect
its performance, safety or durability and
may even violate governmental safety
and emissions regulations.
In addition, damage or performance
problems resulting from any modification
may not be covered under warranty.
• If you use unauthorized electronic
devices, it may cause the vehicle to
operate abnormally, wire damage, bat-
tery discharge and fire. For your safety,
do not use unauthorized electronic
devices.
Engine exhaust gas precautions (car-
bon monoxide)
• Carbon monoxide can be present with
other exhaust fumes. Therefore, if you
smell exhaust fumes of any kind inside
your vehicle, have it inspected and
repaired immediately. If you ever sus-
pect exhaust fumes are coming into
your vehicle, drive it only with all the
windows fully open. Have your vehicle
checked and repaired immediately.
WARNING- Exhaust
Engine exhaust gases contain car-
bon monoxide (CO). Though color-
less and odorless, it is dangerous
and could be lethal if inhaled.
Follow the instructions on this
page to avoid CO poisoning.
Page:
< prev 1-8 9-16 17-24