2011 Hyundai Azera ECU
[x] Cancel search: ECUPage 48 of 403
333
Safety features of your vehicle
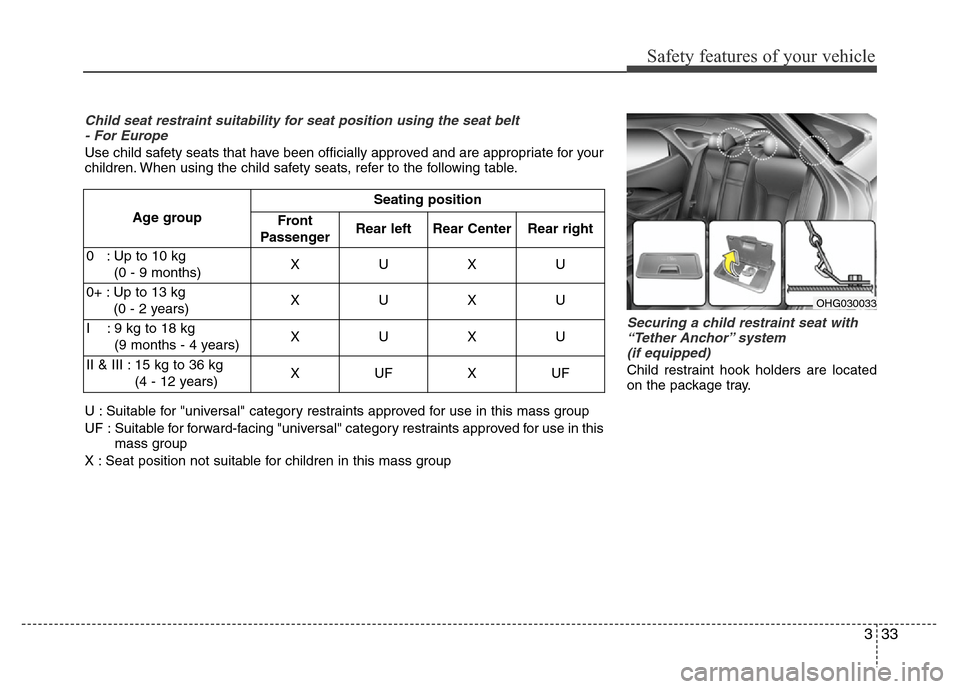
Securing a child restraint seat with
“Tether Anchor” system
(if equipped)
Child restraint hook holders are located
on the package tray.
Child seat restraint suitability for seat position using the seat belt
- For Europe
Use child safety seats that have been officially approved and are appropriate for your
children. When using the child safety seats, refer to the following table.
U : Suitable for "universal" category restraints approved for use in this mass group
UF : Suitable for forward-facing "universal" category restraints approved for use in this
mass group
X : Seat position not suitable for children in this mass groupAge groupSeating position
Front
PassengerRear left Rear Center
Rear right
0 : Up to 10 kg
(0 - 9 months)XUX
U
0+ : Up to 13 kg
(0 - 2 years)XUX
U
I : 9 kg to 18 kg
(9 months - 4 years)XUX
U
II & III : 15 kg to 36 kg
(4 - 12 years) XUFX
UF
OHG030033
Page 49 of 403
Safety features of your vehicle
34 3
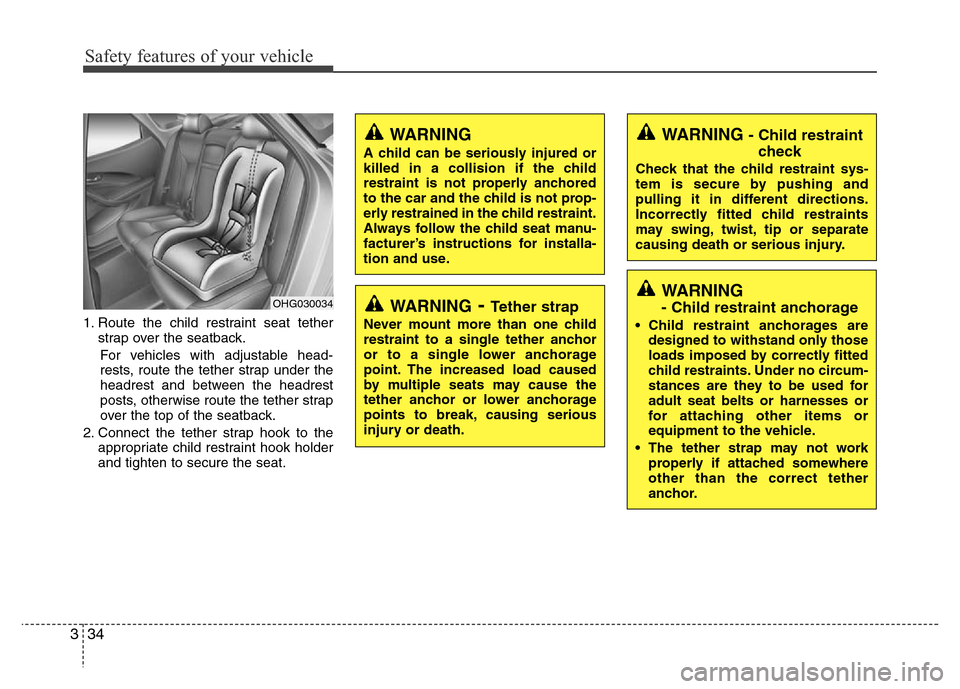
1. Route the child restraint seat tether
strap over the seatback.
For vehicles with adjustable head-
rests, route the tether strap under the
headrest and between the headrest
posts, otherwise route the tether strap
over the top of the seatback.
2. Connect the tether strap hook to the
appropriate child restraint hook holder
and tighten to secure the seat.
OHG030034WARNING- Tether strap
Never mount more than one child
restraint to a single tether anchor
or to a single lower anchorage
point. The increased load caused
by multiple seats may cause the
tether anchor or lower anchorage
points to break, causing serious
injury or death.
WARNING
A child can be seriously injured or
killed in a collision if the child
restraint is not properly anchored
to the car and the child is not prop-
erly restrained in the child restraint.
Always follow the child seat manu-
facturer’s instructions for installa-
tion and use.
WARNING - Child restraint
check
Check that the child restraint sys-
tem is secure by pushing and
pulling it in different directions.
Incorrectly fitted child restraints
may swing, twist, tip or separate
causing death or serious injury.
WARNING
- Child restraint anchorage
• Child restraint anchorages are
designed to withstand only those
loads imposed by correctly fitted
child restraints. Under no circum-
stances are they to be used for
adult seat belts or harnesses or
for attaching other items or
equipment to the vehicle.
• The tether strap may not work
properly if attached somewhere
other than the correct tether
anchor.
Page 50 of 403
335
Safety features of your vehicle
Securing a child restraint system
with “ISOFIX” system and “Tether
Anchorage” system (if equipped)
ISOFIX is a standardised method of fit-
ting child seats that eliminates the need
to use the standard adult seat belt to
secure the seat in the vehicle. This
enables a much more secure and posi-
tive location with the added benefit of
easier and quicker installation.
An ISOFIX-seat can only be installed if it
has vehicle-specific approval in accor-
dance with the requirements of ECE-
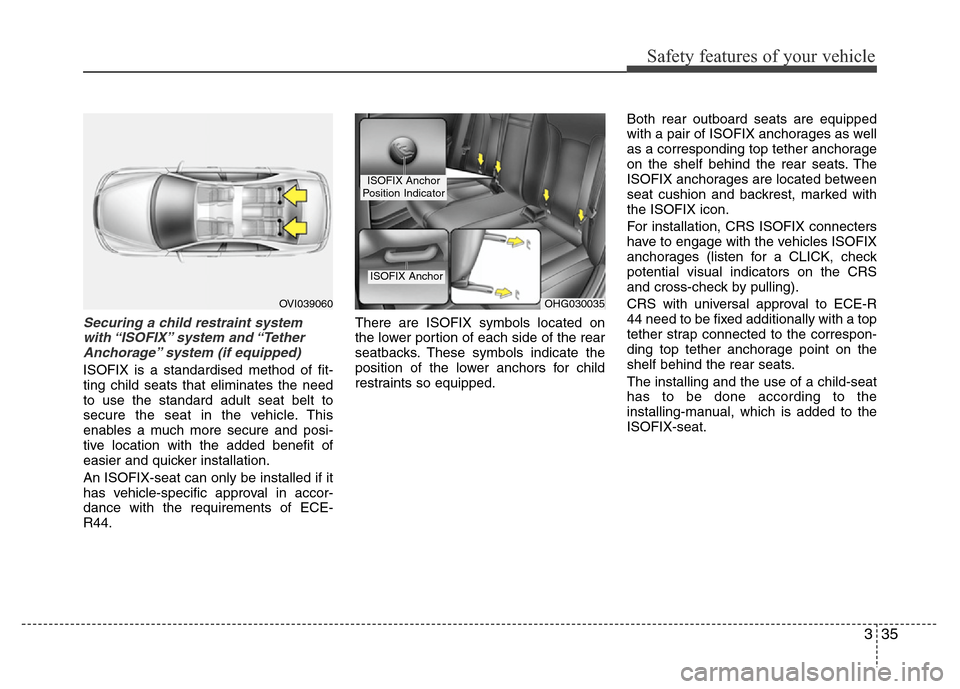
R44.There are ISOFIX symbols located on
the lower portion of each side of the rear
seatbacks. These symbols indicate the
position of the lower anchors for child
restraints so equipped.Both rear outboard seats are equipped
with a pair of ISOFIX anchorages as well
as a corresponding top tether anchorage
on the shelf behind the rear seats. The
ISOFIX anchorages are located between
seat cushion and backrest, marked with
the ISOFIX icon.
For installation, CRS ISOFIX connecters
have to engage with the vehicles ISOFIX
anchorages (listen for a CLICK, check
potential visual indicators on the CRS
and cross-check by pulling).
CRS with universal approval to ECE-R
44 need to be fixed additionally with a top
tether strap connected to the correspon-
ding top tether anchorage point on the
shelf behind the rear seats.
The installing and the use of a child-seat
has to be done according to the
installing-manual, which is added to the
ISOFIX-seat.
OVI039060OHG030035
ISOFIX Anchor
ISOFIX Anchor
Position Indicator
Page 51 of 403
Safety features of your vehicle
36 3
WARNING
• Do not install a child restraint
seat at the center of the rear seat
using the vehicle's ISOFIX
anchors. The ISOFIX anchors are
only provided for the left and
right outboard rear seating posi-
tions. Do not misuse the ISOFIX
anchors by attempting to attach a
child restraint seat in the middle
of the rear seat to the ISOFIX
anchors.
In a crash, the child restraint seat
ISOFIX attachments may not be
strong enough to secure the child
restraint seat properly in the cen-
ter of the rear seat and may
break, causing serious injury or
death.
(Continued)
To secure the child restraint seat
1. To engage the child restraint seat to
the ISOFIX anchor, insert the child
restraint seat latch into the ISOFIX
anchor. Listen for the audible “click”
sound.
2. Connect the tether strap hook to the
child restraint hook holder and tighten
to secure the seat. (Refer to the previ-
ous page.)
CAUTION
Do not allow the rear seat belt web-
bing to get scratched or pinched by
the ISOFIX-seat latch and ISOFIX
anchor during installation.
WARNING
• When using the vehicle's
"ISOFIX" system to install a child
restraint system in the rear seat,
all unused vehicle rear seat belt
metal latch plates or tabs must be
latched securely in their seat belt
buckles and the seat belt web-
bing must be retracted behind
the child restraint to prevent the
child from reaching and taking
hold of unretracted seat belts.
Unlatched metal latch plates or
tabs may allow the child to reach
the unretracted seat belts which
may result in strangulation and a
serious injury or death to the
child in the child restraint.
• Do not place anything around the
lower anchors. Also make sure
that the seat belt is not caught in
the lower anchors.
Page 57 of 403
Safety features of your vehicle
42 3
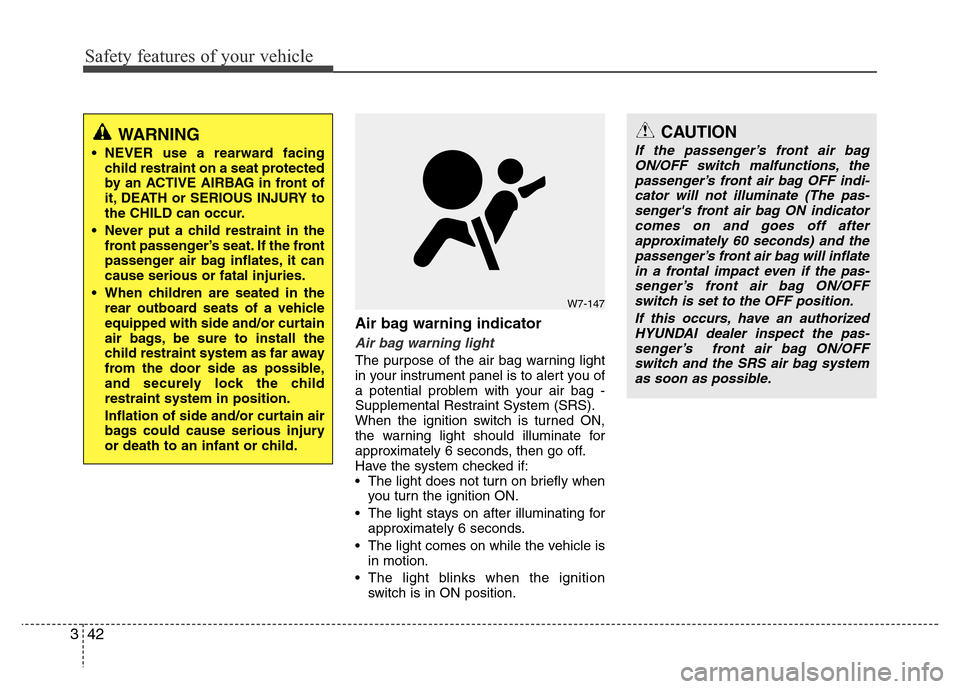
Air bag warning indicator
Air bag warning light
The purpose of the air bag warning light
in your instrument panel is to alert you of
a potential problem with your air bag -
Supplemental Restraint System (SRS).
When the ignition switch is turned ON,
the warning light should illuminate for
approximately 6 seconds, then go off.
Have the system checked if:
• The light does not turn on briefly when
you turn the ignition ON.
• The light stays on after illuminating for
approximately 6 seconds.
• The light comes on while the vehicle is
in motion.
• The light blinks when the ignition
switch is in ON position.
W7-147
CAUTION
If the passenger’s front air bag
ON/OFF switch malfunctions, the
passenger’s front air bag OFF indi-
cator will not illuminate (The pas-
senger's front air bag ON indicator
comes on and goes off after
approximately 60 seconds) and the
passenger’s front air bag will inflate
in a frontal impact even if the pas-
senger’s front air bag ON/OFF
switch is set to the OFF position.
If this occurs, have an authorized
HYUNDAI dealer inspect the pas-
senger’s front air bag ON/OFF
switch and the SRS air bag system
as soon as possible.WARNING
• NEVER use a rearward facing
child restraint on a seat protected
by an ACTIVE AIRBAG in front of
it, DEATH or SERIOUS INJURY to
the CHILD can occur.
• Never put a child restraint in the
front passenger’s seat. If the front
passenger air bag inflates, it can
cause serious or fatal injuries.
• When children are seated in the
rear outboard seats of a vehicle
equipped with side and/or curtain
air bags, be sure to install the
child restraint system as far away
from the door side as possible,
and securely lock the child
restraint system in position.
Inflation of side and/or curtain air
bags could cause serious injury
or death to an infant or child.
Page 68 of 403
353
Safety features of your vehicle
The curtain air bags are designed to
deploy only during certain side impact
collisions, depending on the crash sever-
ity, angle, speed and impact. The curtain
air bags are not designed to deploy in all
side impact situations, collisions from the
front or rear of the vehicle or in most
rollover situations.
WARNING
• In order for side and curtain air
bags to provide the best protec-
tion, front seat occupants and
outboard rear occupants should
sit in an upright position with the
seat belts properly fastened.
Importantly, children should sit in
a proper child restraint system in
the rear seat.
• When children are seated in the
rear outboard seats, they must be
seated in the proper child
restraint system. Make sure to
position the child restraint sys-
tem as far away from the door
side as possible, and secure the
child restraint system in a locked
position.
(Continued)
(Continued)
• Do not allow the passengers to
lean their heads or bodies onto
doors, put their arms on the
doors, stretch their arms out of
the window, or place objects
between the doors and passen-
gers when they are seated on
seats equipped with side and/or
curtain air bags.
• Never try to open or repair any
components of the side curtain
air bag system. This should only
be done by an authorized
HYUNDAI dealer.
Failure to follow the above instruc-
tions can result in injury or death to
the vehicle occupants in an acci-
dent.
Page 89 of 403
413
Features of your vehicle
THEFT-ALARM SYSTEM (IF EQUIPPED)
Vehicles equipped with a theft alarm sys-
tem will have a label attached to the vehi-
cle with the following words:
1. WARNING
2. SECURITY SYSTEMThis system is designed to provide pro-
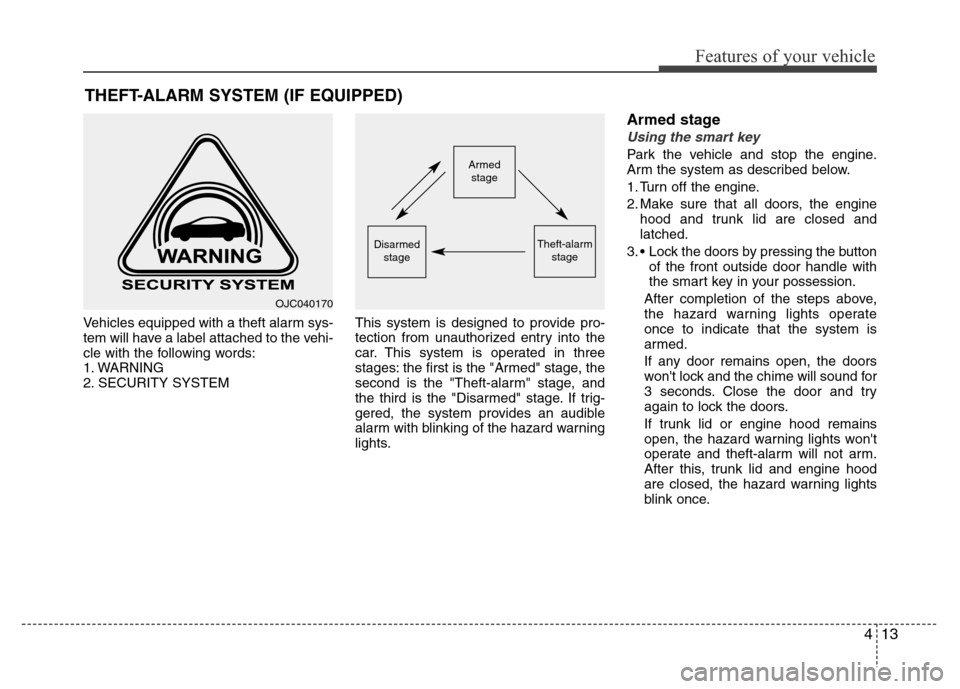
tection from unauthorized entry into the
car. This system is operated in three
stages: the first is the "Armed" stage, the
second is the "Theft-alarm" stage, and
the third is the "Disarmed" stage. If trig-
gered, the system provides an audible
alarm with blinking of the hazard warning
lights.
Armed stage
Using the smart key
Park the vehicle and stop the engine.
Arm the system as described below.
1. Turn off the engine.
2. Make sure that all doors, the engine
hood and trunk lid are closed and
latched.
3. • Lock the doors by pressing the button
of the front outside door handle with
the smart key in your possession.
After completion of the steps above,
the hazard warning lights operate
once to indicate that the system is
armed.
If any door remains open, the doors
won't lock and the chime will sound for
3 seconds. Close the door and try
again to lock the doors.
If trunk lid or engine hood remains
open, the hazard warning lights won't
operate and theft-alarm will not arm.
After this, trunk lid and engine hood
are closed, the hazard warning lights
blink once.Armed
stage
Theft-alarm
stageDisarmed
stage
OJC040170
Page 92 of 403

Features of your vehicle
16 4
Operating door locks from out-
side the vehicle
Mechanical key
To remove the cover:
1. Pull out the door handle (1).
2. Press the lever (A) located inside the
bottom part of the cover with a key or
flat-head screwdriver (2).
3. Push out the cover while pressing the
lever.• After removing the cover, turn the key
toward the rear of the vehicle to unlock
and toward the front of the vehicle to
lock (3).
• If you lock/unlock the driver’s door with
a key, only the driver’s door will
lock/unlock.
• Once the door is unlocked, it may be
opened by pulling the door handle.
• When closing the door, push the door
by hand. Make sure that doors are
closed securely.
Transmitter/Smart key
• Doors can be locked and unlocked with
the transmitter (or smart key).
• Doors can be locked and unlocked
pressing the button of the outside door
handle with the smart key in your pos-
session.
• Once the doors are unlocked, they may
be opened by pulling the door handle.
• When closing the door, push the door
by hand. Make sure that doors are
closed securely.
✽NOTICE
• In cold and wet climates, door locks
and door mechanisms may not work
properly due to freezing conditions.
• If the door is locked/unlocked multi-
ple times in rapid succession with
either the vehicle key or door lock
switch, the system may stop operating
temporarily in order to protect the
circuit and prevent damage to system
components.
DOOR LOCKS
OHG400012
L L
o o
c c
k kU U
n n
l l
o o
c c
k k
WARNING
Be careful not to damage the cover
while removing it or misplace it
after removing it.
WARNING
• If you don’t close the door secure-
ly, the door may open again.
• Be careful that someone’s body
and hands are not trapped when
closing the door.