Page 349 of 427

The floor mats that came with your
vehicle hook over the f loor mat
anchors. This keeps the f loor mats
f rom sliding f orward, possibly
interf ering with the pedals, or
backwards, making the f ront
passenger’s weight sensors
inef f ective.
If you remove a f loor mat, make sure
tore-anchoritwhenyouputitback
in your vehicle.A non-Honda f loor mat may not f it
your vehicle properly. This could
prevent the proper operation of the
f olding rear seats and the passenger’s
seat weight sensors. We recommend
using genuine Honda f loor mats. Do
not put additional f loor mats on top
of the anchored mats.
This f ilter removes the dust and
pollenthatisbroughtinfromthe
outside through the heating and
cooling system/climate control
system.
Have your dealer replace the filter
when this service is indicated by a
maintenance message on the
inf ormation display or multi-
inf ormation display (depending on
the models). It should be replaced
every 15,000 miles (24,000 km) if you
drive primarily in urban areas that
have high concentrations of soot in
the air, or if the flow from the
heating and cooling system/climate
control system becomes less than
usual.
Floor Mats, Dust and Pollen Filter
Floor Mats
Dust and Pollen Filter
Maint enance
345
Main MenuTable of Contents
Page 355 of 427

In addition to proper inf lation,
correct wheel alignment helps to
decrease tire wear. If you f ind a tire
is worn unevenly, have your dealer
check the wheel alignment.
Have your dealer check the tires if
you f eel a consistent vibration while
driving. A tire should always be
rebalanced if it is removed f rom the
wheel. When you have new tires
installed, make sure they are
balanced. This increases riding
comf ort and tire lif e. For best results,
have the installer perform a dynamic
balance.
The service lif e of your tires is
dependent on many f actors,
including, but not limited to, driving
habits, road conditions, vehicle
loading, inf lation pressure,
maintenance history, speed, and
environmental conditions (even
when the tires are not in use).
In addition to your regular
inspections and inf lation pressure
maintenance, it is recommended that
you have annual inspections
perf ormed once the tires reach f ive
years old. It is also recommended
that all tires, including the spare, be
removed f rom service af ter 10 years
from the date of manufacture,
regardless of their condition or state
of wear.
The last f our digits of the TIN (tire
identif ication number) are f ound on
the sidewall of the tire and indicate
the date of manufacture (See
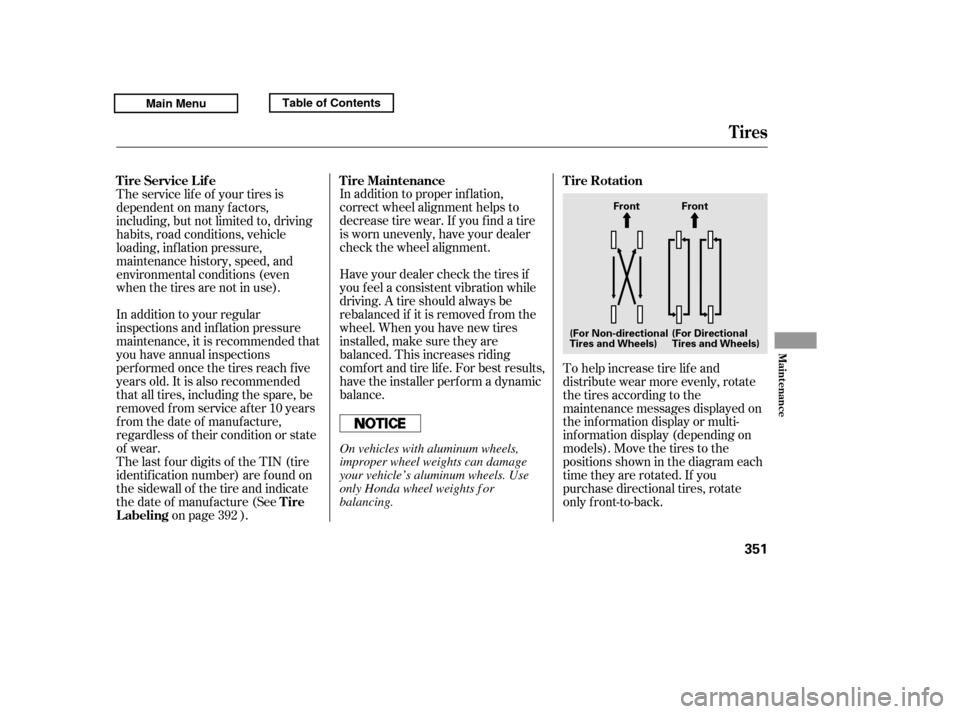
on page ). To help increase tire lif e and
distribute wear more evenly, rotate
the tires according to the
maintenance messages displayed on
the inf ormation display or multi-
inf ormation display (depending on
models). Move the tires to the
positions shown in the diagram each
time they are rotated. If you
purchase directional tires, rotate
only f ront-to-back.
392 Tire Rotation
T ire Maintenance
Tire Service Lif e
Tire
Labeling
Tires
Maint enance
351
Front
(For Non-directional
Tires and Wheels) (For Directional
Tires and Wheels)Front
On vehicles with aluminum wheels,
improper wheel weights can damage
your vehicle’s aluminum wheels. Use
only Honda wheel weights f or
balancing.
Main MenuTable of Contents
Page 370 of 427
Tighten the wheel nuts securely in
the same crisscross pattern. Have
the wheel nut torque checked at
the nearest automotive service
f acility.
Tighten the wheel nuts to:Place the flat tire face up on the
tire tray.
Remove the spacer cone f rom the
wing bolt, turn it over, and put it
back on the bolt.
Securetheflattirebyscrewing
the wing bolt back into its hole.Release the tire tray and slide it
back in place.
Tighten the tire tray holding bolts
securely.
Remove the center cap from the
flat tire.
18. 19.
20. 21. 22.23. 24.
On RTS, RTL, and Canadian VP, EX-L
models
Changing a Flat T ire
366
WING BOLT
SPACER CONE For normal tireFor sparetire
94 lbf·ft (127 N·m , 13 kgf·m)
Main MenuTable of Contents
Page 378 of 427

Saf ely pull of f the road, and shut
of f the engine. Turn on the hazard
warning indicators.
Let the vehicle sit f or a minute.
Open the hood, and check the oil
level (see page ). An engine
very low on oil can lose pressure
during cornering and other driving
maneuvers.
If necessary, add oil to bring the
level back to the full mark on the
dipstick (see page ).
Start the engine, and watch the oil
pressure indicator. If it does not go
out within 10 seconds, turn of f the
engine. There is a mechanical
problem that needs to be repaired
bef ore you can continue driving
(see on page).
This indicator should never come on
when the engine is running. If it
starts flashing or stays on, the oil
pressure has dropped very low or
lost pressure. Serious engine
damage is possible, and you should
take immediate action.
You will also see a ‘‘CHECK
ENGINE OIL LEVEL’’ message on
the multi-information display when
this indicator comes on.
If the charging system indicator
comes on brightly when the engine
is running, the battery is not being
charged.
You will also see a ‘‘CHECK
CHARGING SYSTEM’’ message on
the multi-information display (see
page ).
Immediately turn of f all electrical
accessories. Try not to use other
electrically operated controls such as
the power windows. Keep the engine
running; starting the engine will
discharge the battery rapidly.
Go to a service station or garage
where you can get technical
assistance.
1. 2. 3. 4.
253
326
383 90
On models with navigation system
On models with navigation system
Emergency T owing
L ow Oil Pressure
Indicator
Charging System
Indicator
L ow Oil Pressure Indicator, Charging System Indicator
374
Running the engine with low oil
pressure can cause serious mechanical
damage almost immediately. Turn of f
the engine as soon as you can saf ely get
the vehicle stopped.
Main MenuTable of Contents
Page 380 of 427

Your vehicle has certain ‘‘readiness
codes’’ that are part of the on-board
diagnostics f or the emissions
systems. In some states, part of the
emissions testing is to make sure
these codes are set. If they are not
set, the test cannot be completed.
If the battery in your vehicle has
been disconnected or gone dead,
thesecodesmaybeerased.Itcan
take several days of driving under
various conditions to set the codes
again.To check if they are set, turn the
ignition switch to the ON (II)
position, without starting the engine.
The malf unction indicator lamp will
come on f or 20 seconds. If it then
goes of f , the readiness codes are set.
If it blinks f ive times, the readiness
codes are not set. If possible, do not
take your vehicle f or an emissions
test until the readiness codes are set.
Refer to for
more inf ormation (see page ).
If the brake system indicator comes
on while driving, the brake f luid level
is probably low. Press lightly on the
brake pedal to see if it f eels normal.
If it does, check the brake f luid level
thenexttimeyoustopataservice
station (see page ).
The brake system indicator normally
comesonwhenyouturntheignition
switch to the ON (II) position, and as
a reminder to check the parking
brake. It will stay on if you do not
f ully release the parking brake.
400
334
Readiness Codes
Emissions T esting Brake System
Indicator
Malf unction Indicat or L amp, Brake Syst em Indicat or
376
U.S. Canada
Main MenuTable of Contents
Page 387 of 427

CONT INUED
If your vehicle needs to be towed,
call a prof essional towing service or
organization. Never tow your vehicle
with just a rope or chain. It is very
dangerous.The operator will load
your vehicle on the back of a truck.
Any other method of towing will
damage the drive system. When you
contact the towing agency, inf orm
them a f lat-bed is required. If your vehicle gets stuck in sand,
mud, or snow, call a towing service
to pull it out (see the previous
column).
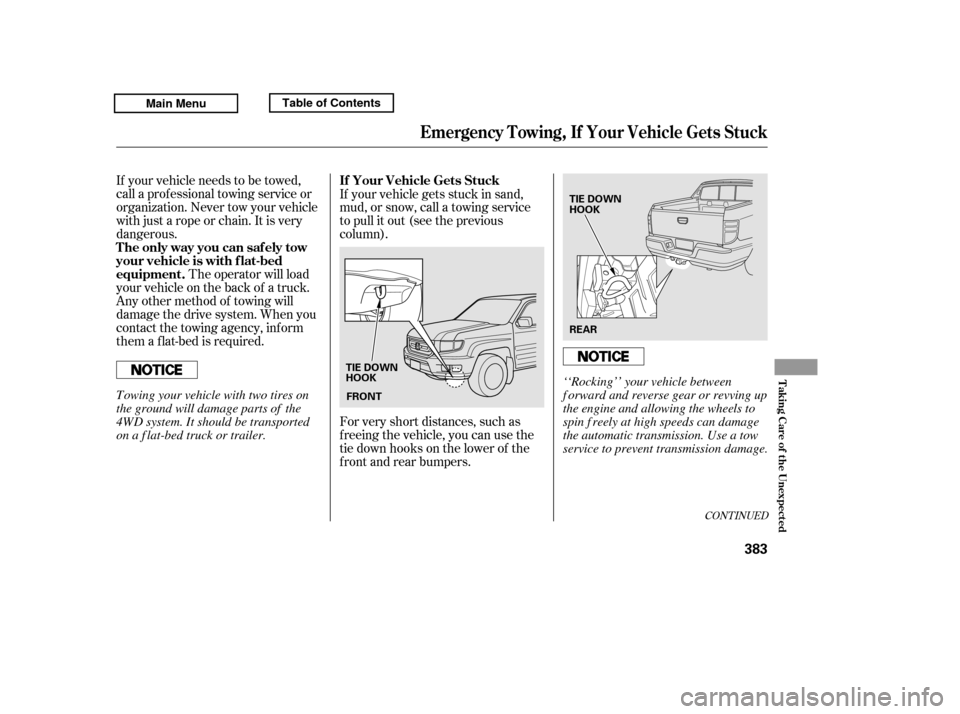
For very short distances, such as
f reeing the vehicle, you can use the
tie down hooks on the lower of the
f ront and rear bumpers.
Emergency Towing, If Your Vehicle Gets Stuck
The only way you can saf ely tow
your vehicle is with f lat-bed
equipment.
If Your Vehicle Gets Stuck
T aking Care of t he Unexpect ed
383
FRONT
REAR
TIE DOWN
HOOK TIE DOWN
HOOK
‘‘Rocking’’ your vehicle between
f orward and reverse gear or revving up
the engine and allowing the wheels to
spin f reely at high speeds can damage
the automatic transmission. Use a tow
service to prevent transmission damage.
Towing your vehicle with two tires on
the ground will damage parts of the
4WD system. It should be transported
on a f lat-bed truck or trailer.
Main MenuTable of Contents
Page 394 of 427

The tires on your vehicle meet all
U.S. Federal Saf ety Requirements.
All tires are also graded f or
treadwear, traction, and temperature
perf ormance according to
Department of Transportation
(DOT) standards. The f ollowing
explains these gradings.The treadwear grade is a compara-
tive rating based on the wear rate of
the tire when tested under controlled
conditions on a specif ied government
test course. For example, a tire
graded 150 would wear one and one-
half (1 1/2) times as well on the
government course as a tire graded
100. The relative perf ormance of
tires depends upon the actual condi-
tions of their use, however, and may
depart signif icantly f rom the norm
due to variations in driving habits,
service practices and dif f erences in
road characteristics and climate.The traction grades, f rom highest to
lowest, are AA, A, B, and C. Those
grades represent the tire’s ability to
stop on wet pavement as measured
under controlled conditions on
specif ied government test surf aces
of asphalt and concrete. A tire
marked C may have poor traction
perf ormance.
Warning: The traction grade
assignedtothistireisbasedon
straight-ahead braking traction tests,
and does not include acceleration,
cornering, hydroplaning, or peak
traction characteristics.
Quality grades can be f ound where
applicable on the tire sidewall
between tread shoulder and
maximum section width. For
example:
All passenger car tires must conf orm
to Federal Saf ety Requirements in
addition to these grades.
Unif orm T ire Quality Grading
T readwear T raction
T readwear 200
Traction AA
Temperature A
DOT Tire Quality Grading (U.S. Vehicles)
390
Main MenuTable of Contents
Page 407 of 427
....
Customer Service Inf ormation . 404
....................
Warranty Coverages . 405
Reporting Saf ety Def ects
..........................
(U.S. Vehicles) . 406
.....................
Authorized Manuals . 407
Warrant y and Customer Relat ions
Warrant y and Cust omer Relat ions
403
Main Menu