Page 212 of 427

If equipped
The security system helps to protect
your vehicle and valuables f rom thef t.
The horn sounds and a combination
of headlights, parking lights, license
plate lights, and taillights f lash if
someone attempts to break into your
vehicleorremovetheradio.This
alarm continues f or 2 minutes, then
the system resets. To reset an
activated system before the 2
minutes have elapsed, unlock the
driver’s door with the key or the
remote transmitter.Once the security system is set,
opening any door (without using the
key or the remote transmitter), the
hood,ortheIn-BedTrunk,willcause
it to alarm. It also alarms if the radio
and navigation components are
removed f rom the dashboard or the
wiring is cut.
The security system automatically
sets 15 seconds after you lock the
doors, hood, and the In-Bed Trunk.
For the system to activate, you must
lock the doors f rom the outside with
the key, driver’s lock tab, door lock
switch, or remote transmitter. The
security system indicator on the
instrument panel starts blinking
immediately to show you the system
is setting itself .
Security System
208
SECURITY SYSTEM INDICATOR
Main MenuTable of Contents
Page 261 of 427

Your dealer has Honda accessories
that allow you to personalize your
vehicle. These accessories have
been designed and approved f or your
vehicle, and are covered by warranty.
Modif ying your vehicle, or installing
some non-Honda accessories, can
make it unsaf e. Bef ore you make any
modif ications or add any accessories,
be sure to read the f ollowing
inf ormation.
Although non-Honda accessories
may f it on your vehicle, they may not
meet f actory specif ications, and
could adversely af f ect your vehicle’s
handling, stability, and reliability.
If you install a truck cap, be sure it is
properly installed and does not
exceed your vehicle’s load limits (see
page ).When properly installed, cellular
phones, alarms, two-way radios, and
low-powered audio systems should
not interf ere with your vehicle’s
computer controlled systems, such
as your airbags, anti-lock brakes, and
tire pressure monitoring system.
Be sure electronic accessories do
not overload electrical circuits
(see page ) or interf ere with
the proper operation of your
vehicle.
Make sure the accessory does not
obscure any lights, or interf ere
with proper vehicle operation or
perf ormance.
Bef ore installing any accessory:
260 378
CONT INUED
A ccessories
Your vehicle should not be used to
carry a slide-in camper.
A ccessories and Modif icat ions
Bef ore Driving
257
Improper accessories or
modifications can affect your
vehicle’s handling, stability, and
performance, and cause a
crash in which you can be hurt
or killed.
Follow all instructions in this
owner’s manual regarding
accessories and modifications.
Main MenuTable of Contents
Page 273 of 427

Youshoulddothefollowingchecks
and adjustments bef ore you drive
your vehicle.Make sure all windows, mirrors,
and outside lights are clean and
unobstructed. Remove f rost, snow,
or ice.
Check that the hood is f ully closed.
Check that the tailgate is f ully
closed when it is not used as an
extended pickup bed.
Visually check the tires. If a tire
looks low, use a gauge to check its
pressure.
Check that any items you may be
carrying are stored properly or
f astened down securely. Check the adjustment of the
inside and outside mirrors (see
page ).
Check the steering wheel
adjustment (see page ).
Make sure the doors and In-Bed
Trunk are securely closed and
locked.
Fasten your seat belt. Check that
your passengers have f astened
their seat belts (see page ).
Check the seat adjustment (see
pages and ). When you start the engine, check
the gauges and indicators in the
instrument panel, and the
messages on the inf ormation
display or multi-inf ormation
display (depending on models)(
s e e pag es,,, an d
).
1. 2. 3. 4.5.6. 8.
7. 9.
10. 11.
121 133
99
16
61 76 77
90
119
Preparing to Drive
Driving
269
Main MenuTable of Contents
Page 291 of 427
Make sure the parking brake is
f ully released bef ore driving away.
Driving with the parking brake
partially set can overheat or
damage the rear brakes.
Make sure the moonroof (if
equipped) and the windows are
closed.
Turn of f the lights.
Place any packages, valuables, etc.
in the cargo area in your vehicle or
the In-Bed Trunk, or take them
with you.
Lock the doors.
Check the indicator on the driver’s
door to verify that the security
system is set.
Never park over dry leaves, tall
grass, or other f lammable
materials. The hot three way
catalytic converter could cause
these materials to catch on fire.If the vehicle is f acing uphill, turn
the f ront wheels away f rom the
curb.
If the vehicle is f acing downhill,
turn the front wheels toward the
curb.
On vehicles with security system
Parking
Parking T ips
Driving
287
Main MenuTable of Contents
Page 292 of 427

Your vehicle is equipped with disc
brakes at all f our wheels. A power
assist helps reduce the ef f ort needed
on the brake pedal. The emergency
brake assist system increases the
stopping f orce when you depress the
brake pedal hard in an emergency
situation. The anti-lock brake system
(ABS) helps you retain steering
control when braking very hard.
Resting your f oot on the pedal keeps
the brakes applied lightly, builds up
heat, reduces their ef f ectiveness and
reduces brake pad lif e. In addition,
f uel economy can be reduced. It also
keeps your brake lights on all the
time, conf using drivers behind you.Constant application of the brakes
when going down a long hill builds
up heat and reduces their ef f ective-
ness. Use the engine to assist the
brakes by taking your f oot of f the
accelerator and downshif ting to a
lower gear.
Check the brakes after driving
through deep water. Apply the
brakes moderately to see if they f eel
normal. If not, apply them gently and
f requently until they do. Be extra
cautious and alert in your driving.
The hydraulic system that operates
the brakes has two separate circuits.
Each circuit works diagonally across
the vehicle (the lef t-f ront brake is
connected with the right-rear brake,
etc.). If one circuit should develop a
problem, you will still have braking
at two wheels.
If the brake pads need replacing, you
will hear a distinctive, metallic
screeching sound when you apply
the brake pedal. If you do not have
the brake pads replaced, they will
screech all the time. It is normal f or
the brakes to occasionally squeal or
squeak when you apply them.
Braking System Design
Brake Pad Wear Indicators
Braking System
288
Main MenuTable of Contents
Page 304 of 427

�´
Trailer lights and equipment must
comply with f ederal, state, province/
territory, and local regulations.
Check trailer light requirements f or
the areas where you plan to tow, and
use only equipment designed f or
your vehicle.Ref er to the above illustration f or
wiring information.
We recommend that you have your
dealer install a Honda wiring harness
and converter. This harness has
been designed f or your vehicle.
Your vehicle is equipped with a
trailer lighting connector.
Your vehicle is equipped with a
connector to install an optional trailer
lighting connector that mates with
your vehicle. You can get this
optional connector f rom your dealer. Since lighting and wiring vary with
trailer type and brand, you should
also have a qualif ied mechanic install
a suitable connector between the
vehicle and the trailer.Except RT models
On RT models
Trailer Lights
Towing a Trailer
300
TAILLIGHTS
(GREEN/BLACK) ELECTRIC BRAKE
(BROWN/WHITE)
RIGHT TURN SIGNAL
AND BRAKE LIGHTS
(GREEN/RED) GROUND
(BLACK)
B CHARGE
(GREEN)
LEFT TURN SIGNAL
AND BRAKE LIGHTS
(GREEN/RED)
BACK-UP LIGHTS
(BLUE)
Main MenuTable of Contents
Page 305 of 427
CONT INUED
Insert the connector securely into
the socket.
Hook the retaining tab on the
inner side of the lid against the
retaining tab of the connector to
prevent disconnection during
operation.
Your vehicle has a class 3 trailer
hitch as standard equipment. Make sure the connector and the
socketarefreeof dirt,moisture,
or other f oreign material.
Open the socket lid by pulling it up.
Also see page f or trailer-related
inf ormation.
The 7-pin trailer connector is needed
f or the trailer lights. To connect the
connector: 1. 2.3. 4.
299
Except RT models
Towing Equipment
Towing a Trailer
Connect ing t he T railer Connect ors
Driving
301
TRAILER HITCH
7-PIN TRAILER CONNECTOR
7-PIN TRAILER CONNECTORLID
RETAINING TAB
SOCKET RETAINING TAB
Main MenuTable of Contents
Page 306 of 427
�´
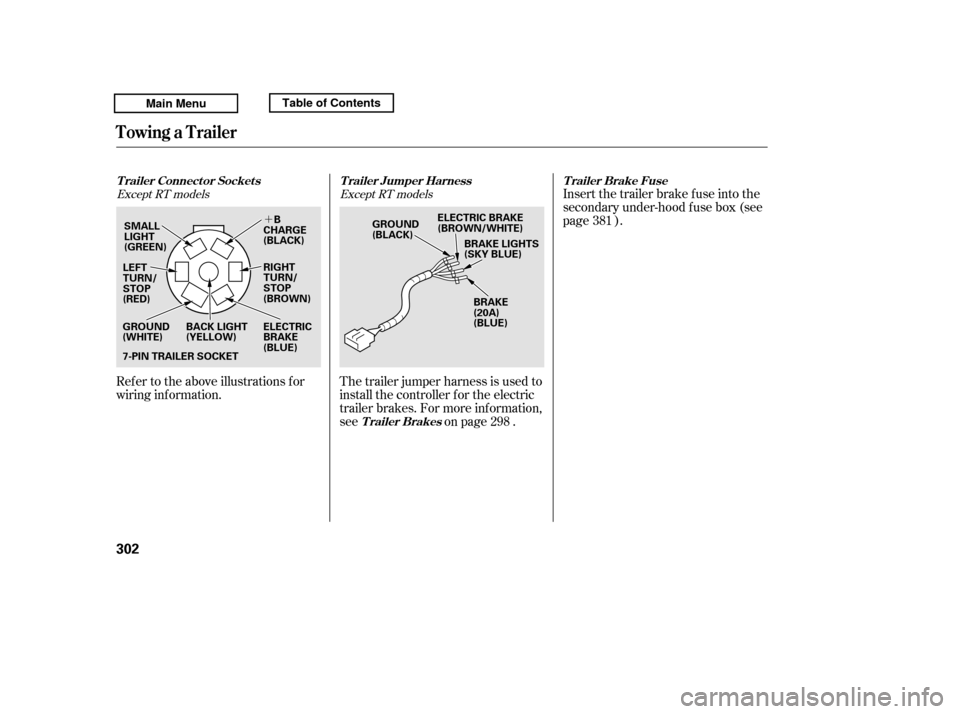
Ref er to the above illustrations f or
wiring information.The trailer jumper harness is used to
install the controller f or the electric
trailer brakes. For more inf ormation,
see on page .Insert the trailer brake f use into the
secondary under-hood f use box (see
page ).
298 381
Except RT models Except RT models
T railer Connect or Socket s T railer Jumper Harness
Trailer BrakesT railer Brake Fuse
Towing a Trailer
302
7-PIN TRAILER SOCKET
SMALL
LIGHT
(GREEN)
BACK LIGHT
(YELLOW)
GROUND
(WHITE) GROUND
(BLACK)
ELECTRIC BRAKE
(BROWN/WHITE)
LEFT
TURN/
STOP
(RED) BRAKE
(20A)
(BLUE)
B
CHARGE
(BLACK)
RIGHT
TURN/
STOP
(BROWN)
ELECTRIC
BRAKE
(BLUE) BRAKE LIGHTS
(SKY BLUE)
Main MenuTable of Contents
 and the")