Page 103 of 427

Push the lever up to lock the
steering wheel in position.
Make sure you have securely
locked the steering wheel in place
by trying to move it up and down.
Make any steering wheel adjustment
bef ore you start driving.
Move the steering wheel so it
points toward your chest, not
toward your f ace. Make sure you
can see the instrument panel
gauges and indicators.
Push the lever on the lef t side of
the steering column all the way
down.
Pushthebuttontoturnonthe
hazard warning lights (f our-way
flashers). This causes all four
outside turn signals and both turn
indicators in the instrument panel to
f lash. Use the hazard warning lights
if you need to park in a dangerous
area near heavy traffic, or if your
vehicle is disabled. 3. 4.
1. 2.
Steering Wheel A djustment
Hazard Warning Button
Hazard Warning Button, Steering Wheel A djustment
Inst rument s and Cont rols
99
Adjusting the steering wheel
position while driving may
cause you to lose control of the
vehicle and be seriously injured
inacrash.
Adjust the steering wheel only
when the vehicle is stopped.
Main MenuTable of ContentsTable of Contents
Page 123 of 427
�µ
The f ront passenger’s seat in all
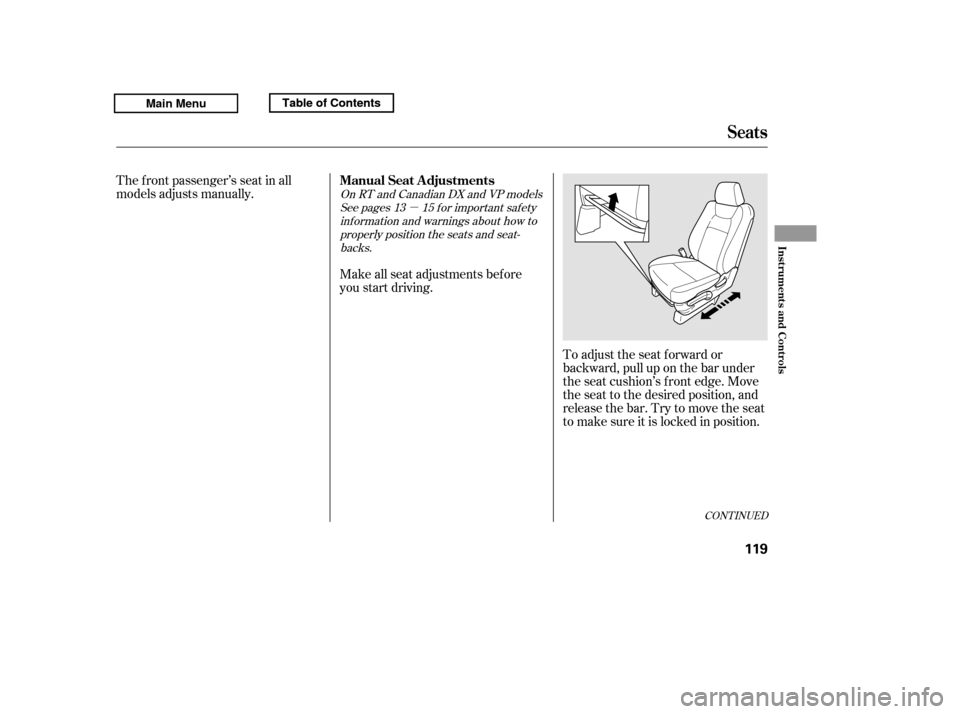
models adjusts manually.To adjust the seat f orward or
backward, pull up on the bar under
the seat cushion’s f ront edge. Move
the seat to the desired position, and
releasethebar.Trytomovetheseat
to make sure it is locked in position.
Make all seat adjustments bef ore
you start driving.
See pages f or important saf ety
inf ormation and warnings about how to
properly position the seats and seat- backs.
On RT and Canadian DX and VP models
13 15
CONT INUED
Manual Seat Adjustments
Seats
Inst rument s and Cont rols
119
Main MenuTable of ContentsTable of Contents
Page 125 of 427
�µ
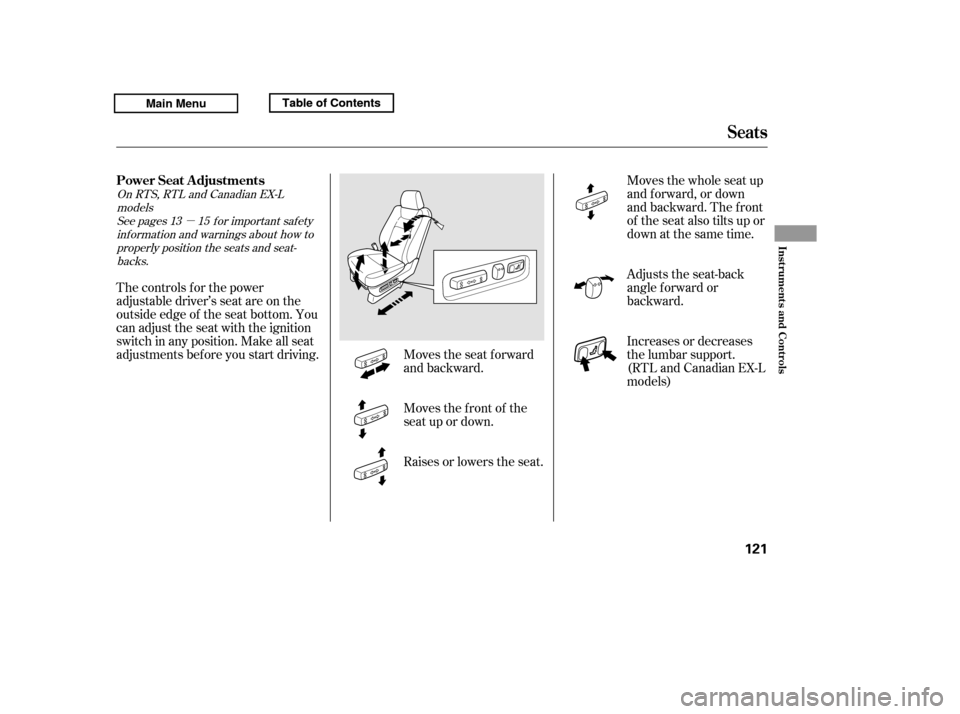
Moves the seat forward
and backward.
The controls f or the power
adjustable driver’s seat are on the
outside edge of the seat bottom. You
can adjust the seat with the ignition
switch in any position. Make all seat
adjustments bef ore you start driving. Moves the whole seat up
and f orward, or down
and backward. The f ront
of the seat also tilts up or
down at the same time.
Moves the f ront of the
seat up or down.
Raises or lowers the seat. Adjusts the seat-back
angle f orward or
backward.
Increases or decreases
the lumbar support.
(RTL and Canadian EX-L
models)
See pages f or important saf ety
inf ormation and warnings about how toproperly position the seats and seat-
backs. 13 15
On RTS, RTL and Canadian EX-L
models
Power Seat A djustments
Seats
Inst rument s and Cont rols
121
Main MenuTable of ContentsTable of Contents
Page 126 of 427
To use the console lid as an armrest,
slide it to the desired position.The rear seat armrest is in the
center of the rear seats. Pivot it
down to use it.Your vehicle is equipped with head
restraints in all seating positions to
help protect you and your
passengers f rom the likelihood of
whiplash and other injuries.
Make sure your passenger’s hands
and fingers are away from the
armrest bef ore moving it.
See page f or important saf ety inf ormation and a warning aboutimproperly positioning head restraints. 15
Armrests
Head Restraints
Seats
122
FRONTREAR
Main MenuTable of ContentsTable of Contents
Page 255 of 427
Whenever f illing a f uel container,
use an approved f uel container, and
place it on the ground. Do not f ill the
f uel container in the vehicle,
including the pickup bed and the
In-Bed Trunk. Make sure to put the
f uel pump nozzle in the f uel f iller of
the container securely and to handle
it properly.Gasoline or f uel vapors are
extremely f lammable and explosive.
Improperly handling f uel can cause
anexplosioninwhichyoucanbe
seriously injured.
Before placing the fuel container in
the vehicle, wipe up any spill
completely.
Your vehicle has a warning label f or
f illing a portable f uel container on
the lef t rear side of the pickup bed.
Filling a Port able Fuel Cont ainer
Service Station Procedures
Bef ore Driving
251
Do not fill a portable fuel
container in the pickup bed.
Static electricity can ignite gas
vapors and you can be burned.
Main MenuTable of Contents
Page 288 of 427
If there is a problem with the TPMS,
thetirepressuremonitorshowsa
‘‘SYSTEM FUNCTION ERROR’’
message and the tire pressure
readings are not displayed. If this
happens, you will f irst see a system
warning message ‘‘CHECK TPMS
SYSTEM’’ on the multi-inf ormation
display.If there is a problem with the TPMS,
youwillseetheabovemessageon
the multi-information display.
If you see this message, the system
is of f and is not monitoring the tire
pressures. Have the system checked
by your dealer as soon as possible.Also, the low tire pressure/TPMS
indicator begins to f lash, then stays
on (see page ).
281
Tire Pressure Monitoring System (TPMS)
TPMS System Failure
284
Main MenuTable of Contents
Page 289 of 427

If the low tire pressure/TPMS
indicator comes on, or the multi-
inf ormation display shows a
‘‘CHECK TPMS SYSTEM’’ message,
the VSA system automatically turns
on even when the VSA system is
turned of f by pressing the VSA OFF
switch (see page ). If this
happens, you cannot turn the VSA
system of f by pressing the VSA OFF
switch again.
When you restart the vehicle with
thecompactsparetire,theTPMS
system message will also be
displayed on the multi-inf ormation
display af ter several miles
(kilometers) driving.This indicator and the warning
message on the multi-information
display will go of f , af ter several miles
(kilometers) driving, when the spare
tire is replaced with the specified
regular tire equipped with the tire
pressure monitor sensor.
Each wheel is equipped with a tire
pressure sensor mounted inside the
tire behind the valve stem. You must
use TPMS specif ic wheels. It is
recommended that you always have
your tires serviced by your dealer or
a qualif ied technician.
Never use a puncture-repairing agent
in a f lat tire. If used, you will have to
replace the tire pressure sensor.
Havetheflattirerepairedbyyour
dealer as soon as possible.
If you have a f lat tire, the low tire
pressure/TPMS and tire monitor
indicators will come on. Replace the
indicated f lat tire with the compact
sparetire(seepage ).
After the flat tire is replaced with the
spare tire, the low tire pressure/
TPMS indicator stays on while
driving. Af ter several miles
(kilometers) driving, this indicator
begins to f lash, then stays on again.
You will also see a ‘‘CHECK TPMS
SYSTEM’’ message on the multi-
inf ormation display. This is normal;
the system cannot monitor the spare
tire pressure. Manually check the
spare tire pressure to be sure it is
correct.
292
361
CONT INUED
Tire Pressure Monitoring System (TPMS)
Changing a T ire with T PMS
Driving
285
Main MenuTable of Contents
Page 360 of 427
 cable first, and
reconnect it la")
�µ
If you need to connect the battery to
a charger, disconnect both cables to
prevent damaging your vehicle’s
electrical system. Always disconnect
the negative ( ) cable first, and
reconnect it last.
Check the terminals f or corrosion (a
white or yellowish powder). To
remove it, cover the terminals with a
solution of baking soda and water. It
will bubble up and turn brown. When
this stops, wash it of f with plain
water. Dry off the battery with a
cloth or paper towel. Coat the
terminals with grease to help prevent
f uture corrosion.
If additional battery maintenance is
needed, see your dealer or a
qualif ied technician.
Battery posts,
terminals, and related accessories
contain lead and lead compounds.
Check the condition of the battery
monthlybylookingatthetest
indicator window. The label on the
battery explains the test indicator’s
colors.
WARNING:
Wash your hands af ter handling.
Checking the Battery
356
TEST INDICATOR WINDOW
The battery gives off explosive
hydrogen gas during normaloperation.
A spark or flame can cause the
battery to explode with enough
force to kill or seriously hurt you.
Wear protective clothing and a
face shield, or have a skilled
technician do the batterymaintenance.
Main MenuTable of Contents