Page 7 of 574
�Î
�Î
�Î
�Î
�Î
�Î
�Î �Î
CONT INUED: If equipped
Your Vehicle at a Glance
Your Vehicle at a Glance
3
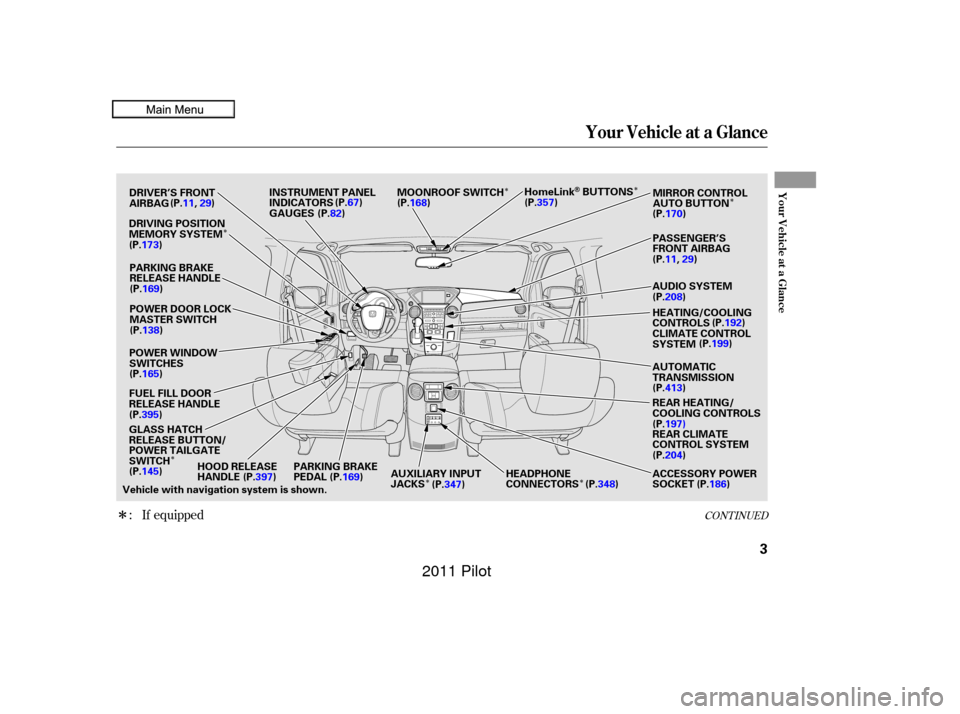
GAUGES INSTRUMENT PANEL
INDICATORS
AUTOMATIC
TRANSMISSION
POWER WINDOW
SWITCHES MIRROR CONTROL
AUTO BUTTON
PARKING BRAKE
PEDAL PASSENGER’S
FRONT AIRBAG
DRIVER’S FRONT
AIRBAG
POWER DOOR LOCK
MASTER SWITCH
HOOD RELEASE
HANDLE HEADPHONE
CONNECTORSAUDIO SYSTEM
DRIVING POSITION
MEMORY SYSTEM
PARKING BRAKE
RELEASE HANDLE MOONROOF SWITCH
HomeLink
BUTTONS
ACCESSORY POWER
SOCKET
Vehicle with navigation system is shown. FUEL FILL DOOR
RELEASE HANDLE
REAR CLIMATE
CONTROL SYSTEM REAR HEATING/
COOLING CONTROLS HEATING/COOLING
CONTROLS
CLIMATE CONTROL
SYSTEM
GLASS HATCH
RELEASE BUTTON/
POWER TAILGATE
SWITCH (P.11,
29)
(P.173)
(P.169)
(P.138)
(P.165)
(P.395)
(P.145) (P.397)(P.169)AUXILIARY INPUT
JACKS
(P.347) (P.348)(P.
186 )
(P.204) (P.197) (P.413) (P.199)
(P.192)
(P.208) (P.11,
29)
(P.170)
(P.357)
(P.168)
(P.
67)
(P. 82)
10/01/26 18:23:38 31SZA620_008
2011 Pilot
Page 70 of 574
�Î
�Î
�Î�Î
�Î
�Î
�Î �Î
: If equipped
Control L ocations
66
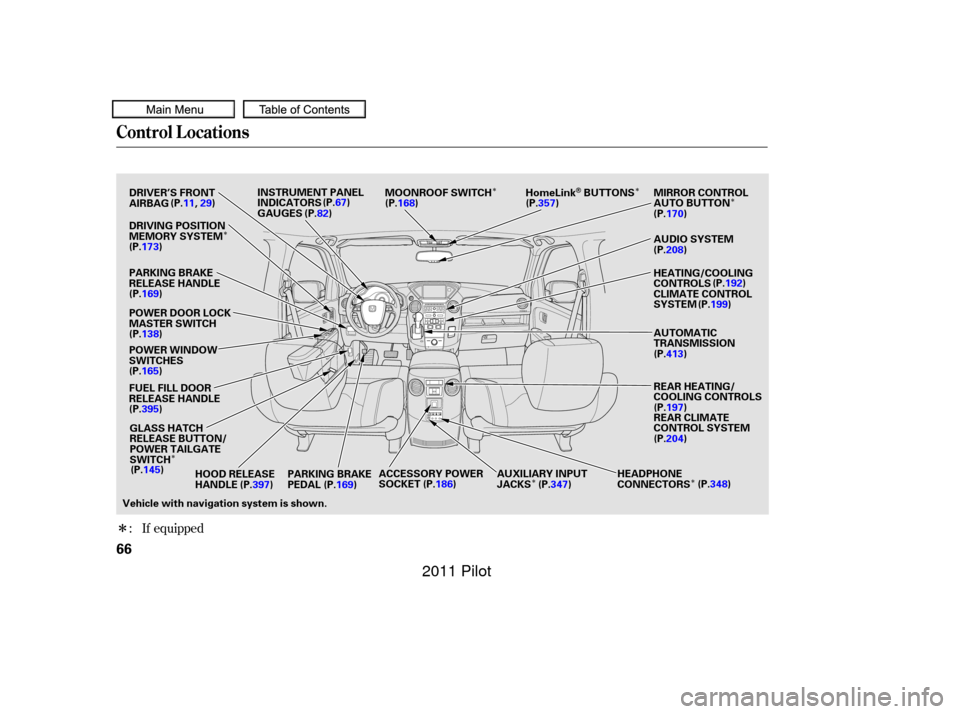
POWER WINDOW
SWITCHES POWER DOOR LOCK
MASTER SWITCH
HEADPHONE
CONNECTORS
INSTRUMENT PANEL
INDICATORS
GAUGES
Vehicle with navigation system is shown. DRIVER’S FRONT
AIRBAG
FUEL FILL DOOR
RELEASE HANDLE MOONROOF SWITCH HomeLink
BUTTONS MIRROR CONTROL
AUTO BUTTON
HEATING/COOLING
CONTROLS
AUTOMATIC
TRANSMISSION
REAR HEATING/
COOLING CONTROLS AUDIO SYSTEM
CLIMATE CONTROL
SYSTEM
REAR CLIMATE
CONTROL SYSTEM
PARKING BRAKE
PEDAL ACCESSORY POWER
SOCKET
PARKING BRAKE
RELEASE HANDLE DRIVING POSITION
MEMORY SYSTEM
GLASS HATCH
RELEASE BUTTON/
POWER TAILGATE
SWITCH AUXILIARY INPUT
JACKS
(P.11,
29)
(P.173)
(P.169)
(P.138)
(P.165)
(P.395)
(P.145) HOOD RELEASE
HANDLE(P.397) (P.169) (P.186)
(P.347) (P.
348 )
(P.
204 )
(P.
197 )
(P.
413 )(P.199)
(P.
192 )
(P.
208 )
(P.
170 )
(P.357)
(P.168)
(P.67)
(P.82)
10/01/26 18:34:13 31SZA620_071
2011 Pilot
Page 161 of 574
CONT INUED
The head restraints adjust f or height.
You need both hands to adjust the
restraint.Donotattempttoadjustit
while driving. To raise it, pull upward.
To lower the restraint, push the
release button sideways, and push
the restraint down.
Your vehicle is equipped with head
restraints in all seating positions to
help protect you and your
passengers f rom the likelihood of
whiplash and other injuries.
They are most ef f ective when you
adjust them so the center of the back
of the occupant’s head rests against
the center of the restraint.
See page f or important saf etyinf ormation and a warning aboutimproperly positioning head restraints. 16
Seats
A djust ing t he Head Rest raint
Head Restraints
Inst rument s and Cont rols
157
RELEASE BUTTON
SEAT-
BACK
LEGS CUSHION
Front
10/01/26 18:50:04 31SZA620_162
2011 Pilot
Page 163 of 574

To adjust the second row seats
f orward and backward, pull up on the
bar under the f ront edge of the seat
cushion. Move the seat to the
desired position and release the bar.
Trytomovetheseattomakesureit
is locked in position.
This reduces the distance between
the restraint and the occupant’s head.
It also helps protect the occupants
against the likelihood of whiplash
and injuries to the neck and upper
spine.
For a head restraint system to work
properly:
Do not hang any items on the head
restraints, or f rom the restraint
legs.
Only use genuine Honda
replacement head restraints. Install each restraint in its proper
location. Do not place any object between
an occupant and the seat-back.
If the restraints do not return to their
normal position, or in the event of a
severe collision, have the vehicle
inspected by a Honda dealer. Af ter a collision, the activated
restraint should return to its normal
position.
CONT INUED
Seats
Adjusting the Second Row Seats
Inst rument s and Cont rols
159
10/01/26 18:50:27 31SZA620_164
2011 Pilot
Page 401 of 574

Park the vehicle, and set the
parking brake. Pull the hood
release handle located under the
lower lef t corner of the dashboard.
The hood will pop up slightly.Put your f ingers under the f ront
edge of the hood near the center.
Slide your hand to your lef t until
you f eel the hood latch handle.
Push this handle up until it
releases the hood. Lif t up the hood.
If the hood latch handle moves stif f ly,
or if you can open the hood without
lif ting the handle, the mechanism
should be cleaned and lubricated. Holding the grip, pull the support
rod out of its clip. Insert the end
into the designated hole in the
hood.
To close the hood, lif t it up slightly to
remove the support rod f rom the
hole. Put the support rod back into
its holding clip. Lower the hood to
about a f oot (30 cm) above the
f ender, then let it drop. Make sure it
is securely latched.
1.
2.3.
Service Station Procedures
Opening and Closing the Hood
Bef ore Driving
397
LATCH CLIPSUPPORT ROD
GRIP
HOOD RELEASE HANDLE
10/01/26 19:31:31 31SZA620_402
2011 Pilot
Page 496 of 574
Check the condition of the wiper
blades at least every 6 months.
Replace them if you f ind signs of
cracking in the rubber, and areas
that are getting hard or if they leave
streaks and unwiped areas when
used.To replace the f ront wiper blades:Raise each wiper arm of f the
windshield, lif ting the driver’s side
first, then the passenger’s side. Disconnect the blade assembly
from the wiper arm:
Press and hold the lock tab.
Slide the blade assembly toward
the lock tab until it releases
from the wiper arm.
When replacing a wiper blade, make
sure not to drop the wiper blade or
wiper arm down on the windshield. 2.
1.
Wiper Blades
492
WIPER ARMS
LOCK TAB
Do not open the hood when the wiper
arms are raised, or you will damage the
hood and the wiper arms.
10/01/26 19:48:31 31SZA620_497
2011 Pilot