Page 52 of 574

Af ter selecting a proper child seat
and a good place to install the seat,
there are three main steps in
installing the seat:All child seats must be
secured to the vehicle with the lap
part of a lap/shoulder belt or with
the LATCH (Lower Anchors and
Tethers f or CHildren) system. A
child whose seat is not properly
secured to the vehicle can be
endangered in a crash.
Af ter installing a child
seat, push and pull the seat
f orward and f rom side-to-side to
verify that it is secure. A child seat secured with a seat belt
should be installed as f irmly as
possible. However, it does not need
to be ‘‘rock solid.’’ Some side-to-side
movement can be expected and
should not reduce the child seat’s
ef f ectiveness.
If the child seat is not secure, try
installing it in a dif f erent seating
position, or use a dif f erent style of
child seat that can be f irmly secured.
Make sure the child is properly
strappedinthechildseat
according to the child seat maker’s
instructions. A child who is not
properly secured in a child seat
can be seriously injured in a crash. The f ollowing pages provide
guidelines on how to properly install
a child seat. A f orward-f acing child
seat is used in all examples, but the
instructions are the same f or rear-
f acing child seats.
Properly secure t he child seat t o
the vehicle.
Make sure t he child seat is f irmlysecured. Secure the child in the child seat.
1.
2. 3.
Installing a Child Seat
48
10/01/26 18:31:11 31SZA620_053
2011 Pilot
Page 53 of 574

CONT INUED
To install a LATCH-compatible child
seat in either outer second row seat:Move the seat belt buckle or
tongue away f rom the lower
anchors.
Make sure there are no objects
near the anchors that could
prevent a secure connection
between the child seat and the
anchors.
Your vehicle is equipped with
LATCH (Lower Anchors and
Tethers f or CHildren) at each of the
second row seats and the passenger’s
side third row seat.
When you install a child seat in the
second row seating position, use the
loweranchorsasshowninthe
illustration. You can install up to
three child seats at a time with
LATCH.
Do not attach two child seat
connectors to a single lower anchor
at a time.
You can f ind lower anchors in the
slits in the seat-backs. The lower anchors are located
between the seat-back and seat
bottom, and are to be used only with
a child seat designed f or use with
LATCH.
The location of each lower anchor is
indicated by a small button above the
anchor point.
1.
2.
Installing a Child Seat with
LATCH
Installing a Child Seat
Using t he Out er L A T CH
Driver and Passenger Saf ety
49
MARKS
LOWER ANCHORS
10/01/26 18:31:24 31SZA620_054
2011 Pilot
Page 54 of 574
Place the child seat on the vehicle
seat, then attach the seat to the
lower anchors according to the
child seat maker’s instructions.
Some LATCH-compatible seats
have a rigid-type connector as
shown above.Whatever type you have, f ollow
the child seat maker’s instructions
f or adjusting or tightening the f it.Lif t the head restraint (see page
), then route the tether strap
through the legs of the head
restraint and over the seat-back,
making sure the strap is not
twisted.
Other LATCH-compatible seats
have a f lexible-type connector as
shown above.
3.
4.5.
157
Installing a Child Seat
50
RIGID TYPE FLEXIBLE TYPE TETHER STRAP
10/01/26 18:31:33 31SZA620_055
2011 Pilot
Page 57 of 574

When not using the LATCH system,
all child seats must be secured to the
vehicle with the lap part of a lap/
shoulder belt.With the child seat in the desired
seating position, route the belt
through the child seat according
to the seat maker’s instructions,
then insert the latch plate into the
buckle and remove any slack f rom
the lap portion of the belt.To activate the lockable retractor,
slowly pull the shoulder part of the
belt all the way out until it stops,
then let the belt f eed back into the
retractor.
Af ter the belt has retracted, tug on
it. If the belt is locked, you will not
be able to pull it out. If you can pull
thebeltout,itisnotlocked,and
you will need to repeat these steps.
In addition, the lap/shoulder belts in
all seating positions except the
driver’s have a lockable retractor
that must be activated to secure a
child seat.
If you intend to install a child seat in
the center seating position of the
secondroworinthethirdrow,make
sure the detachable seat belt is
securely latched (see page ).
1.
2.
3.
163
CONT INUED
Installing a Child Seat with a L ap/
Shoulder Belt
Installing a Child Seat
Driver and Passenger Saf ety
53
10/01/26 18:32:04 31SZA620_058
2011 Pilot
Page 62 of 574

Does the shoulder belt cross
between the child’s neck and arm?
Is the lap part of the belt as low as
possible, touching the child’s
thighs?
Will the child be able to stay
seated like this f or the whole trip?
If you answer yes to all these
questions, the child is ready to wear
the lap/shoulder belt correctly. If
you answer no to any question, the
child needs to ride on a booster seat. A child who has outgrown a f orward- f acing child seat should ride in a
back seat and use a booster seat
until the lap/shoulder belt f its them
properly without the booster.Booster seats can be high-back or
low-back. Whichever style you select,
make sure the booster seat meets
f ederal saf ety standards (see page
) and that you f ollow the booster
seat maker’s instructions. Some states, Canadian provinces and
territories also require children to
use a booster seat until they reach a
given age or weight (e.g., 6 years or
60lbs).Besuretocheckcurrent
laws in the states, provinces or
territories where you intend to drive.
3.
4.
5.
47
Using a Booster Seat
Protecting L arger Children
58
10/01/26 18:32:53 31SZA620_063
2011 Pilot
Page 69 of 574

This section gives inf ormation about
the controls and displays that
contribute to the daily operation of
your vehicle. All the essential
controls are within easy reach............................
Control Locations .66 ............................
Instrument Panel .67
..........
Instrument Panel Indicators . 69
.............................................
Gauges .82
.............
Multi-Inf ormation Display . 87
Controls Near the Steering .........................................
Wheel .123
Windshield Wipers and .................................
Washers .124
Rear Window Wiper and ...................................
Washer .125
.......
Turn Signals and Headlights . 126
...............
Hazard Warning Button . 130
...............
Rear Window Def ogger . 130
......
Instrument Panel Brightness . 131
........
Steering Wheel Adjustment . 133
.............................
Keys and Locks .134
......................
Immobilizer System .135
..............................
Ignition Switch .137
....................................
Door Locks .138
............
Childproof Door Locks . 144
.............
Tailgate and Glass Hatch . 144
..........................
Power Tailgate .145
.....................
Remote Transmitter .150
...............................................
Seats .154
...................
Detachable Anchor . 162
..................................
Seat Heaters .164 ............................
Power Windows .165
.......................................
Moonroof .168
...............................
Parking Brake .169
...........................................
Mirrors .170
Driving Position Memory ........................................
System .173
...............................
Interior Lights .176
.........
Interior Convenience Items . 179
.........................
Center Console .180
.......
Console Compartments . 180
.....................
Beverage Holders .181
..............
Storage Compartment . 182
..................................
Glove Box .183
..............
Integrated Sunshades . 183
....................
Sunglasses Holder .183
................
Conversation Mirror . 184
...................................
Sun Visor .184
............................
Vanity Mirror .185
................................
Coat Hooks .185
.......................
Seat Under Tray .185
........
Accessory Power Sockets . 186
.......................
AC Power Outlet .187
.............................
Cargo Hooks .188
Cargo Floor Storage ........................
Compartment .188
..................................
Cargo Net .189
Instruments and Controls
Inst rument s and Cont rols
65
10/01/26 18:34:05 31SZA620_070
2011 Pilot
Page 158 of 574

�µ
See pages f or important saf ety
inf ormation and warnings about how toproperly position the seats and seat-backs.
Except LX models
On EX-L and Touring modelsExcept EX-L and Touring models
15 16
The controls f or the power
adjustable front seats are on the
outside edge of each seat bottom.
You can adjust the seats with the
ignition switch in any position. Make
all seat adjustments bef ore you start
driving.
The passenger seat has the same
adjustments as the driver’s seat but
without any height and lumbar
adjustments.
The f ront passenger’s seat adjusts
manually.
Here are the settings activated with
the remote:
Driving position memory
(see page ). Customized settings
(see page ). When you unlock and open the
driver’s door with the remote
transmitter, the driver’s seat (except
the power lumbar feature) and
outside mirrors start to move to the
positions stored in memory. The
indicator in the related memory
button to the remote comes on.
97
173 Front Seat Power A djustments
Remote Transmitter, Seats
154
10/01/26 18:49:30 31SZA620_159
2011 Pilot
Page 159 of 574
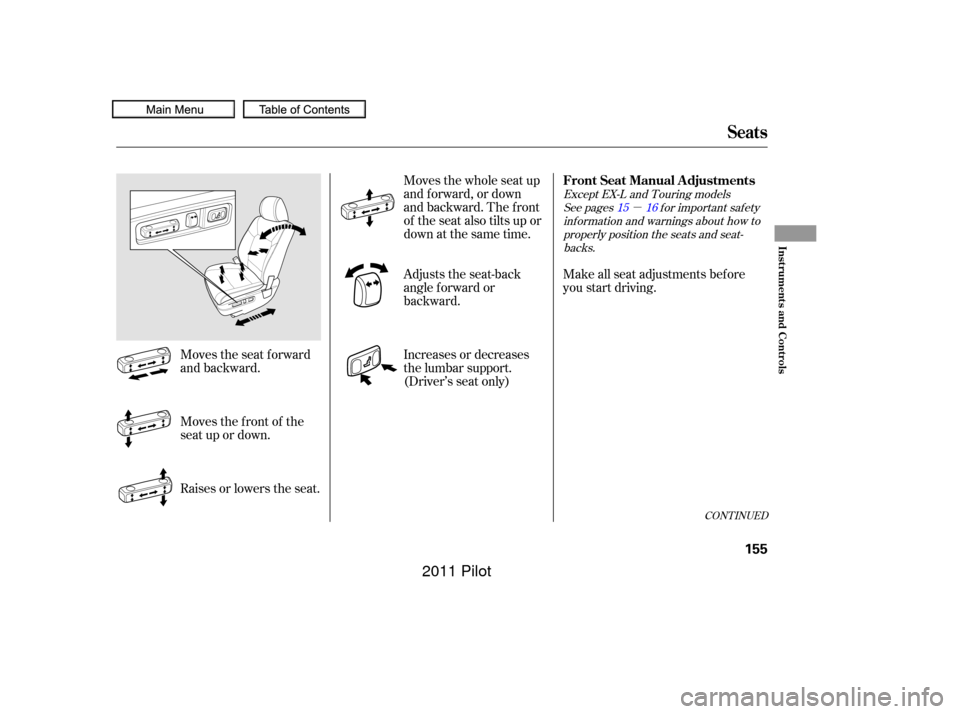
�µ
See pages f or important saf ety
inf ormation and warnings about how toproperly position the seats and seat-backs.
Except EX-L and Touring models
15 16
Make all seat adjustments bef ore
you start driving.
Moves the seat forward
and backward. Moves the whole seat up
and f orward, or down
and backward. The front
of the seat also tilts up or
down at the same time.
Moves the f ront of the
seat up or down.
Raises or lowers the seat. Adjusts the seat-back
angle f orward or
backward.
Increases or decreases
the lumbar support.
(Driver’s seat only)
CONT INUED
Seats
FrontSeatManualAdjustments
Inst rument s and Cont rols
155
10/01/26 18:49:45 31SZA620_160
2011 Pilot