Page 220 of 722

The heating and air conditioning
system in your vehicle provides a
comf ortable driving environment in
all weather conditions.
The standard audio system has
many f eatures. This section
describes those f eatures and how to
use them.
Your vehicle has an anti-theft audio
system that requires a code number
to enable it.
The security system helps to
discourage vandalism and thef t of
your vehicle.
Theclimatecontrolsystemandthe
audio system have a voice control
feature. Refer to the navigation
system manual f or more inf ormation..............
Vents, Heating, and A/C . 218
...................
Rear A/C Controls . 224
...............
Climate Control System . 225
................................
Audio System .234 ..........
Playing the FM/AM Radio . 236
................................
Playing a Disc .243
.......
Disc Player Error Messages . 250
................................
Audio System .251
..........
Playing the FM/AM Radio . 252
................
Playing the XM
Radio . 260
................................
Playing a Disc .266
.......
Disc Player Error Messages . 275
...........
Playing CD Library Audio . 276
............................
PlayinganiPod
. 286
.................
iPod
Error Messages . 294
.. 295
USB Flash Memory Device Error ...................................
Messages .303
.............
Audio System . 304
............................
Wallpaper Setup .309
.................................
Display Setup .312
..........................
Setting the Clock .315
...................
Setting the Language . 317
................................
Audio System .318
..........
Playing the FM/AM Radio . 319
................
Playing the XM
Radio . 332 ................................
Playing a Disc .339
.......
Disc Player Error Messages . 351
..................
Protecting Your Discs . 352
..... 355
............................
PlayinganiPod
. 383
.................
iPod
Error Messages . 391
.. 392
.. 403
.............
Audio System . 404
............
FM/AM Radio Reception . 409
................
Remote Audio Controls . 411
......................
Auxiliary Input Jack .412
.................
Radio Thef t Protection . 413
........
Rear Entertainment System . 414
Ultrawide Rear Entertainment ........................................
System .442
.........................................
Compass .475
............................
Security System .479
...............................
Cruise Control .480
...... 483
................
Parking Sensor System . 486
....
Reaview Camera and Monitor . 493HandsFreeLink
.....495
HandsFreeLink
....516
LX model
EX, EX-L models without navigation system
BluetoothModels with navigation system Bluetooth
BluetoothBluetooth
On vehicles with navigation systemPlaying a USB Flash Memory Device
Playing a USB Flash Memory Device
HomeLink
Universal Transceiver
(Models with navigation system)
Playing Hard Disc Drive (HDD) Audio
(Models without navigation system)USB Flash Memory Device Error Messages
Features
Features
217
10/07/17 10:03:06 31TK8600_222
2011 Odyssey
Page 312 of 722
Connect the USB f lash memory
device that includes pictures you
want to store. Press the SETUP
button to display the setup menu.
Turn the selector knob to
‘‘Wallpaper Setup’’ and press the
selector knob.The display will change to the
wallpaper setup menu. Turn the
selector knob to ‘‘Import Picture
f rom USB,’’ then press the
selector knob.
If the USB f lash memory device
does not have any picture, ‘‘No
Files’’ message will appear on the
display.
Ref er to the navigation system
manual f or operation of the
wallpaper setup. The wallpaper setup function can
change, store or delete the wallpaper
on the display. You can store up to
five pictures from USB flash
memory devices. Two def ault
wallpapers are already stored.
1.2.
CONT INUED
On vehicles with navigation system
EX-L models without navigation system
and Canadian EX model Import Pict ure f rom USB
Wallpaper Setup
Features
309
10/07/17 10:15:26 31TK8600_314
2011 Odyssey
Page 313 of 722
�·
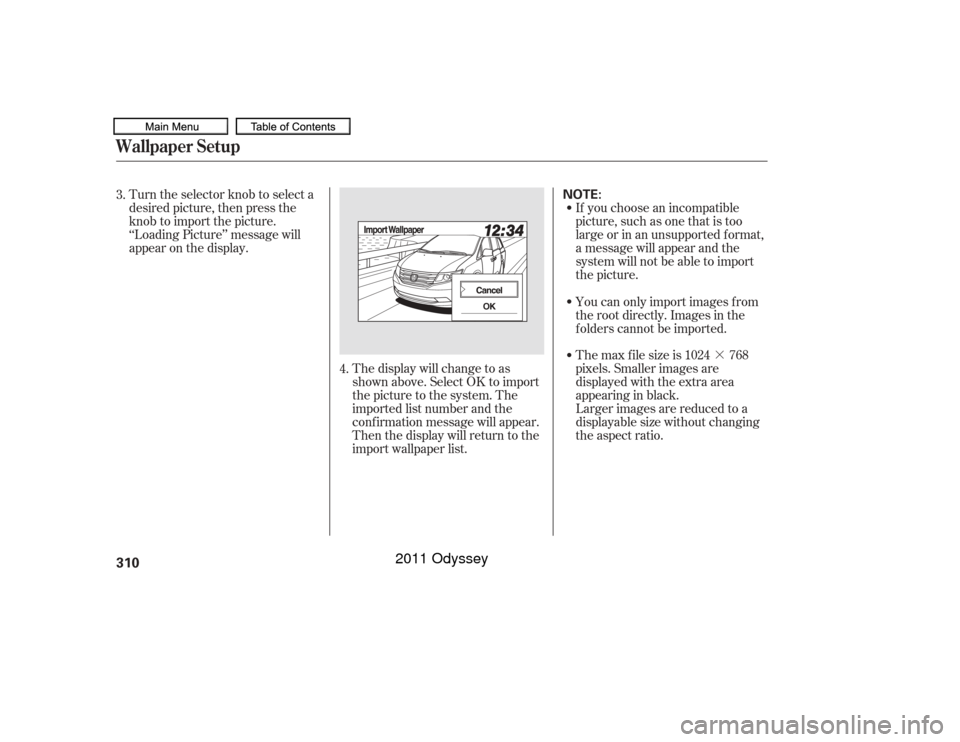
Turn the selector knob to select a
desired picture, then press the
knob to import the picture.
‘‘Loading Picture’’ message will
appear on the display.
If you choose an incompatible
picture, such as one that is too
large or in an unsupported f ormat,
a message will appear and the
system will not be able to import
the picture.
The display will change to as
shown above. Select OK to import
the picture to the system. The
imported list number and the
conf irmation message will appear.
Then the display will return to the
import wallpaper list. You can only import images f rom
the root directly. Images in the
f olders cannot be imported.
The max f ile size is 1024 768
pixels. Smaller images are
displayed with the extra area
appearinginblack.
Larger images are reduced to a
displayable size without changing
the aspect ratio.
3.
4.
Wallpaper Setup310
NOTE:
10/07/17 10:15:33 31TK8600_315
2011 Odyssey
Page 314 of 722
 can be saved.
If youattempttouploadanimage
withthesamenameasanexisting
image, a pop-up screen w")
311
10/07/17 09:47:14 31TK8600_098
Wallpaper Setup
Features
Five uploaded images (in BMP or
JPEG format) can be saved.
If youattempttouploadanimage
withthesamenameasanexisting
image, a pop-up screen will appear,
asking if you want to overwrite the
existing image f ile.
You cannot import images while
driving.You can conf irm the wallpaper which
you selected. Press the DISPLAY
button, and select Wallpaper by
turning and pressing the selector
knob. You can also select ‘‘Default
Wallpaper’’ (Honda logo) or ‘‘Clock’’
(analog) on the list. On the wallpaper setup menu, select
‘‘Choose Wallpaper,’’ then press the
selector knob. The screen will
change to the wallpaper list. Select
desired wallpaper and press the
selector knob. Your selection will be
indicated by the f illed in circle.
Choose Wallpaper
On the wallpaper setup menu, select
‘‘Delete Picture f rom mem’’ and
press the selector knob. The screen
will change to the Delete Wallpaper
list. Select the picture that you want
to delete, then press the selector
knob. The conf irmation message will
appear. Select ‘‘Yes’’ to delete
completely.Delet e Wallpaper
2011 Odyssey
Page 317 of 722
Trip Computer ResetYou can reset all data on the Trip
Computer. To reset the trip
computer, press the SETUP button
to display the setup menu. Turn the
selector knob to Trip Computer
Reset, and press the selector knob.
Select Trip A or Trip B by turning
the selector knob, then press the
selector knob. A conf irmation
message will appear. Select ‘‘Yes’’
and press the selector knob to
completely reset.When you select ‘‘Wallpaper,’’ the
display changes to your f avorite
screen. The minimum display
inf ormation also appear on the upper
part of the screen. See page f or
how to set up the wallpaper.
When you select ‘‘Minimum Display,’’
you will see only the compass, audio
status, and clock on the upper part of
the display.
309
Wallpaper Minimum Display
Display Setup314
10/07/17 10:16:07 31TK8600_319
2011 Odyssey