Page 64 of 722

This section gives inf ormation about
the controls and displays that
contribute to the daily operation of
your vehicle. All the essential
controls are within easy reach............................
Control Locations .62
............................
Instrument Panel .63
..........
Instrument Panel Indicators . 65
.............................................
Gauges .77
.............
Multi-Inf ormation Display . 83
Controls Near the Steering .........................................
Wheel .134 Windshield Wipers and
.................................
Washers .135
Rear Window Wiper and ...................................
Washer .136
.........
Turn Signal and Headlights . 136
.....................................
Fog Lights .139
......
Instrument Panel Brightness . 140
...............
Hazard Warning Button . 142
...............
Rear Window Def ogger . 142
......
Steering Wheel Adjustments . 143
.............................
Keys and Locks .144
......................
Immobilizer System .145
..............................
Ignition Switch .147
.....................
Remote Transmitter .148
Opening or Closing the Power .........................
Sliding Doors .151
Opening or Closing the Power ..................................
Tailgate .151
....................................
Door Locks .155
....................
Power Door Locks . 155
Auto Door Locking/ ..............................
Unlocking .156
............
Childproof Door Locks . 162
..........................................
Tailgate .162
..........................
Power Tailgate .163
.................................
Sliding Doors .167 ...............................................
Seats .175
..................................
Seat Heaters .189
Driving Position Memory ........................................
System .190
............................
Power Windows .192
.......................................
Moonroof .195
...........................................
Mirrors .197
...............................
Parking Brake .199
.........
Interior Convenience Items . 201
.....
Removable Center Console . 202
............
Flip-up Trash Bag Ring . 203
.....................
Beverage Holders .203
..............
Integrated Sunshades . 205
....................
Sunglasses Holder .206
................
Conversation Mirror . 207
...................................
Sun Visor .207
............................
Vanity Mirror .208
................................
Coat Hooks .208
..................................
Glove Box .208
...........................
Center Pocket .209
....................................
C ool Box
.209
....................................
Coin Box .211
........
Accessory Power Sockets . 211
.......................
AC Power Outlet .212
...............................
Interior Lights .213
Instruments and Controls
Instruments and Controls
61
10/07/17 09:42:28 31TK8600_066
2011 Odyssey
Page 147 of 722
The master key fits all the locks on
your vehicle. The valet key works
only in the ignition and the door
locks. You can keep the glove box
locked when you leave your vehicle
and the valet key at a parking f acility.Youshouldhavereceivedakey
number tag with your keys. You will
need this key number if you ever
have to get a lost key replaced. Use
only Honda-approved key blanks.Keys and Locks144
MASTER KEYS
WITH REMOTE
TRANSMITTER
KEY
NUMBER
TAG EX models
EX-L and Touring models
VALET KEY
(Gray) MASTER KEYS
WITH REMOTE
TRANSMITTER
KEY
NUMBER
TAG
KEY
NUMBER
TAGMASTER KEYS
WITH REMOTE
TRANSMITTER
LX models
VALET KEY
(Gray)VALET KEY
(Gray)
10/07/17 09:53:02 31TK8600_149
2011 Odyssey
Page 204 of 722
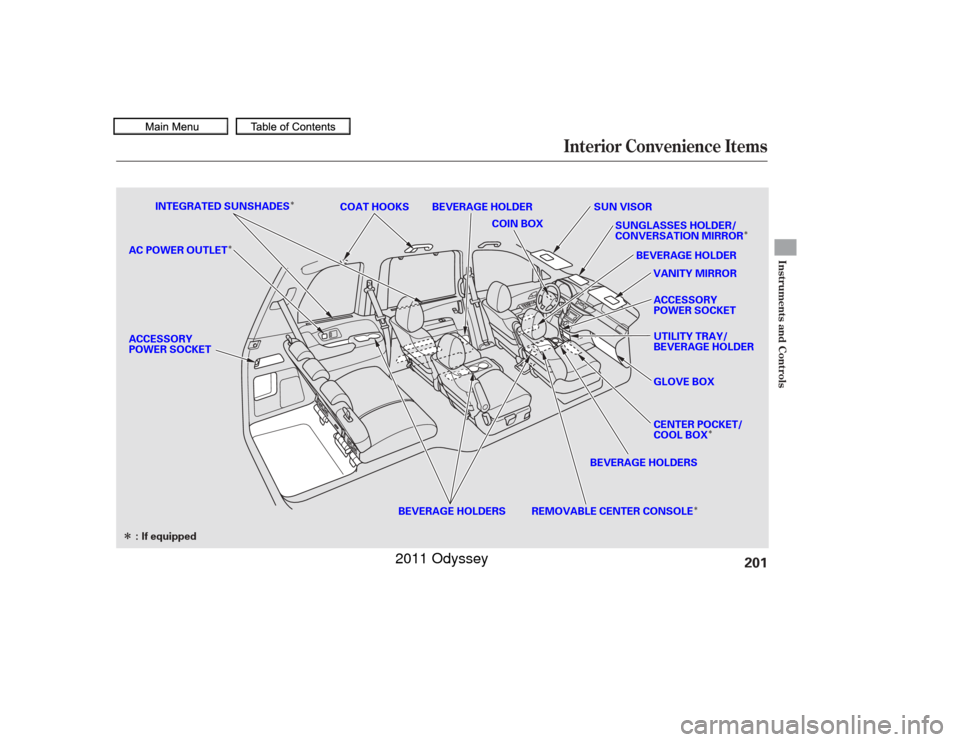
�Î
�Î�Î
�Î
�Î
�Î
Interior Convenience Items
Instruments and Controls
201
SUN VISOR
ACCESSORY
POWER SOCKET
: If equipped INTEGRATED SUNSHADES
SUNGLASSES HOLDER/
CONVERSATION MIRROR
GLOVE BOX
CENTER POCKET/
COOL BOX
BEVERAGE HOLDERS BEVERAGE HOLDER
VANITY MIRROR
BEVERAGE HOLDER
ACCESSORY
POWER SOCKET
COAT HOOKS
BEVERAGE HOLDERS
AC POWER OUTLET
COIN BOX
REMOVABLE CENTER CONSOLE UTILITY TRAY/
BEVERAGE HOLDER
10/07/19 15:58:26 31TK8600_206
2011 Odyssey
Page 211 of 722
Open the glove box by pulling the
handle to the lef t. Close it with a f irm
push. Lock or unlock the glove box
with the master key.
The glove box light comes on when
the parking lights are on.
To use a coat hook, pull it down.
Make sure the coat hook is closed
when you are not using it. This hook
is not designed f or large or heavy
items.
Pull up the vanity mirror cover to use
the mirror. The lights come on when
you open the cover. Make sure you
close the cover when you are not
using the vanity mirror.
Interior Convenience Items
Glove Box
Coat Hooks
Vanity Mirror
208
Second Row
Third Row
10/07/17 10:02:01 31TK8600_213
2011 Odyssey
Page 212 of 722
You can store beverage bottles and
cans in the center pocket, and keep
them cool with the air conditioning
system. To keep the inside of the
center pocket cool, press and release
the Cool Box switch. The indicator in
the switch will come on.
Open the center pocket by pressing
the button. Close it with a firm push.
Keep the center pocket closed while
driving. If it’s open, a passenger
could be injured during a crash or
sudden stop.
CONT INUED
On EX-L and Touring models
Cool Box
Center Pocket
Interior Convenience Items
Instruments and Controls
209
BUTTON
An open glove box can cause
serious injury to your passenger
inacrash,evenifthe
passenger is wearing the seat
belt.
Always keep the glove box
closed while driving.
10/07/17 10:02:08 31TK8600_214
2011 Odyssey
Page 290 of 722

The audio system reads and plays
playable sound f iles on the iPod. The
system cannot operate an iPod as a
mass storage device. The system will
only play songs stored on the iPod
with iTunes.
iPod and iTunes are registered
trademarks owned by Apple Inc.
iPods compatible with your audio
system using the USB adapter cable
are:
This audio system can select and
play the audio f iles on the iPod
with
the same controls used f or the in-
dash disc player. To play an iPod,
connect it to the USB adapter cable
in the glove box by using your dock
connector, then press the USB/AUX
button. The ignition switch must be
in the ACCESSORY (I) or ON (II)
position. The iPod will also be
charged with the ignition switch in
these settings.
Model
iPod 5th and 6th
generations
iPod classic
iPod nano
1st generation
iPod nano
2nd generation
iPod nano
3rd generation
iPod nano
4th generation
iPod nano
5th generation
iPod touch
1st generation
iPod touch
2nd generation
iPod touch
3rd generation
iPhone
iPhone 3G
iPhone 3GS
CONT INUED
Sof tware
Ver. 1.3 or more
Ver. 1.1.2 or more
Ver. 1.3.1 or more
Ver. 1.1.3 or more
Ver. 1.1.3 or more
Ver. 1.0.4 or more
Ver. 1.0.1 or more
Ver. 1.1.1 or more
Ver. 2.2.1 or more
Ver. 3.1.1 or more
Ver. 2.1.0 or more
Ver. 2.1.0 or more
Ver. 5.12.1 or more
EX-L models without navigation system and Canadian EX model
Playing an iPod
(Models without navigation system)
To Play an iPod
Features
287
10/07/17 10:12:53 31TK8600_292
2011 Odyssey
Page 291 of 722
Connect your dock connector to
the iPod correctly and securely.
Install the dock connector to the
USB adapter cable securely.
Some devices cannot be powered
or charged via the USB adapter. If
this is the case, use the accessory
adapter to supply power to your
device. We recommend backing up your
data bef ore playing it. Do not use an extension cable
between the USB adapter cable
equipped with your vehicle and
your dock connector. Do not keep the iPod and dock
connector cable in the vehicle.
Direct sunlight and high heat will
damage it. Do not connect your iPod using a
hub.
UseonlycompatibleiPodswiththe
latest sof tware. iPods that are not
compatible will not work in this audio
unit.
Open the glove box, and unclip the
USB adapter cable.
1.
2.
3.
Connect ing an iPod
Playing an iPod
(Models without navigation system)
288NOTE:
DOCK CONNECTOR
USB ADAPTER CABLE
USB ADAPTER CABLE
10/07/17 10:13:03 31TK8600_293
2011 Odyssey
Page 299 of 722

Do not use a device such as a card
reader or hard drive as the device
or your f iles may be damaged.
Do not connect your USB f lash
memory device using a hub.
Do not use an extension cable to
the USB adapter cable equipped
with your vehicle.
Do not keep a USB f lash memory
device in the vehicle. Direct
sunlight and high heat will
This audio system can select and
play the audio f iles f rom a USB f lash
memory device with the same
controls used f or the in-dash disc
player. To play a USB f lash memory
device, connect it to the USB adapter
cable in the glove box, then press the
USB/AUX button. The ignition
switch must be in the ACCESSORY
(I) or ON (II) position. The recommended USB f lash
memory devices are 256 MB or
higher, and f ormatted with the FAT
f ile system. Some digital audio
players may be compatible as well.
Some USB f lash memory devices
(such as devices with security lock-
out f eatures, etc.) will not work in
this audio unit.
EX-L models without navigation system
and Canadian EX modelPlaying a USB Flash Memory Device (Models without navigation system)To Play a USB Flash Memory
Device296
NOTE:
10/07/17 10:13:56 31TK8600_301
damage it.
2011 Odyssey