Page 668 of 722
�´�´
CONT INUED
Although this seems like a simple
procedure, you should take several
precautions.
You cannot start your vehicle by
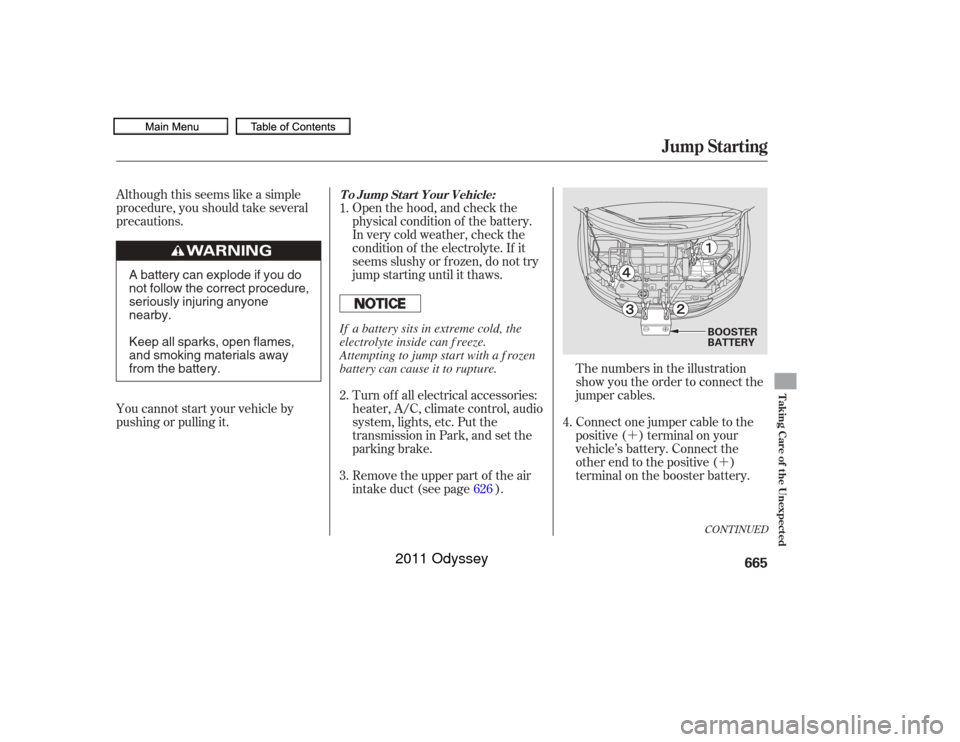
pushing or pulling it. The numbers in the illustration
show you the order to connect the
jumper cables.
Open the hood, and check the
physical condition of the battery.
In very cold weather, check the
condition of the electrolyte. If it
seems slushy or f rozen, do not try
jump starting until it thaws.
Remove the upper part of the air
intake duct (see page ).
Connect one jumper cable to the
positive ( ) terminal on your
vehicle’s battery. Connect the
other end to the positive ( )
terminal on the booster battery.
Turn of f all electrical accessories:
heater, A/C, climate control, audio
system, lights, etc. Put the
transmission in Park, and set the
parking brake.
1.
2.
3.
4.
626
To Jump Start Your Vehicle:
Jump Starting
Taking Care of the Unexpected
665
BOOSTER
BATTERY
A battery can explode if you do
not follow the correct procedure,
seriously injuring anyone
nearby.
Keep all sparks, open flames,
and smoking materials away
from the battery. If a battery sits in extreme cold, the
electrolyte inside can f reeze.
Attempting to jump start with a f rozen
battery can cause it to rupture.
10/07/17 11:03:15 31TK8600_670
2011 Odyssey
Page 674 of 722
If your vehicle’s battery has been
disconnected or gone dead, these
codes are erased. It can take several
days of driving under various
conditions to set the codes again.
To check if they are set, turn the
ignition switch to the ON (II)
position, without starting the engine.
The malf unction indicator lamp will
come on f or 20 seconds. If it then
goes of f , the readiness codes are set.
If it blinks f ive times, the readiness
codes are not set. If possible, do not
take your vehicle f or an emissions
test until the readiness codes are set.
Refer tofor
more information (see page ).
The indicator may also come on with
the ‘‘D’’ indicator.
If this indicator comes on
while driving, it means one
of the engine’s emissions control
systems may have a problem. Even
though you may f eel no dif f erence in
your vehicle’s perf ormance, it can
reduce your f uel economy and cause
increased emissions. Continued
operation may cause serious damage.
If you have recently ref ueled your
vehicle, the indicator coming on
could be due to a loose or missing
f uel f ill cap. Tighten the cap until it
clicks at least once. Tightening the
cap will not turn the indicator of f
immediately; it can take several days
of normal driving.
If the indicator comes on repeatedly,
even though it may turn of f as you
continue driving, have your vehicle
checked by your dealer as soon as
possible. You will also see a ‘‘CHECK
EMISSION SYSTEM’’ message on
the multi-information display.
Your vehicle has certain ‘‘readiness
codes’’ that are part of the on-board
diagnostics f or the emissions
systems. In some states, part of the
emissions testing is to make sure
these codes are set. If they are not
set, the test cannot be completed.
700
On Touring models
Malf unction Indicator L amp
Emissions T esting
Readiness Codes
Taking Care of the Unexpected
671
If you keep driving with the
malf unction indicator lamp on, you can
damage your vehicle’s emissions
controls and engine. Those repairs may
not be covered by your vehicle’s
warranties.
10/07/17 11:03:58 31TK8600_676
2011 Odyssey
Page 682 of 722
�µ
�µ
�µ
�µ
�µ
�µ
�µ
�µ
�µ
�µ
�µ
�µ
�µ
�µ
�µ
�µ
�µ
�µ
�µ
�µ
�µ
�µ
�Î
�Î
Amps.
No. Amps.
No.
CONT INUED
Circuits Protected
Circuits Protected
125 A
60 A
50 A
30 A
30 A
40 A
30 A
30 A
30 A
50 A
50 A
60 A
50 A
50 A
60 A
40 A
14
0A
40 A
7.5 A 20 A
15 A
7.5 A
38
4
5
6
7
8
9
10
11 Passenger’s Side Power
Slide Door Motor
Rear Window Defogger
Battery Management
System
Stop & Horn
Hazard
Interior Lights
Battery
Fan Main
Passenger’s Side Fuse Box 2
Rear Blower
FI Main
VSA Motor
Stop & Horn, Hazard
VSA FSR
Battery Management
System Main
Driver’s Side Fuse Box 2
IG1 Main
Rear Fuse Box 1
Passenger’s Side Fuse Box 1
Driver’s Side Fuse Box 1
Primary Under-hood Fuse
Box Main
Front Blower
: If equipped
21
22
23
24
25
26
27
28
31
32
33
34
35
36
37
Fuse Locations
Taking Care of the Unexpected
679
SECONDARY UNDER-HOOD FUSE BOX
10/07/17 11:04:53 31TK8600_684
2011 Odyssey
Page 692 of 722

�Î�Î
�Î �Î�Î�Î
�Î
�Î
�Î
�Î �Î
�µ
�µ
�µ �Î
�Î
�Î
�Î
�Î
�ÎSpecif ications
T echnical Inf ormation
689
Battery Lights
Seating Capacities Tires Alignment Fuses
60 W (HB3)
55 W
28/8 W
3.8 W (2 CP) 8W
1.4 W 8W 16 W
5W
21 W
3CP
21/5 W
21 W 55 W
Capacity 12 V
12 V 60 AH/5 HR
72 AH/20 HR 35 W
5W
1.4 W
The low beam headlights are high voltage discharged type.
Replacement of a low beam headlight bulb should be performed
by your dealer.
Replacement of a light bulb should be done by your dealer.
Headlights
Fog lights
Front turn signal/Parking/Side
marker lights
Side turn signal lights
Rear turn signal lights
Stop/Side marker/Taillights
Taillights
Back-up lights
License plate lights
High-mount brake light
Individual map lights
Vanity mirror lights
Cargo area light
Door courtesy lights
Glove box light
Foot light
3
3/2 2
8/7
Total
Front
Rear 60 psi (420 kPa , 4.2 kgf/cm
)
35 psi (240 kPa , 2.4 kgf/cm)
33 psi (230 kPa , 2.3 kgf/cm)
T135/80D17 103M P235/60R18 102T P235/65R17 103T
Size
Pressure 2°36’
0°30’0°
Toe-in
Camber
Caster Interior
Under-hood
Rear
0.07 in (2.0 mm) 0.00 in (0.0 mm)
See page
680or the fuse label
attached to the dashboard.
See page 681or the fuse label
attached to the inside of the fuse
box door under the dashboard.
See page 678and 679or the fuse
box cover.
See page 682or the fuse label
attached on the inside of fuse box
lid.
Front
Rear
Front
Rear
Front
Driver’s side
Passenger’s side
High
Low
:Second row
Third row
1:
2:
3:
4:
Touring models
Touring models LED(Amber) (H11) (H11)
(D2S)
Front/Rear
Spare
Front/Rear
Spare
(Amber)
Front
Rear
LX models
:
LED
U.S. Touring Elite and Canadian Touring models
4 4
4 21, 3
2
10/07/17 11:06:18 31TK8600_694
2011 Odyssey
