2011 HONDA FIT bulb
[x] Cancel search: bulbPage 67 of 356

High Temperature Indicator
This indicator monitors the
temperature of the engine coolant. It
normally comes on when you turn the
ignition switch to the ON (II) position
and goes off after a few seconds. In
normal driving conditions, this
indicator should not blink or stay on. In
severe driving conditions, such as very
hot weather or a long period of uphill
driving, this indicator may blink. This
means the engine coolant temperature
is high. If the indicator begins to blink
while you are driving, be sure to slow
down to prevent overheating. If the
indicator stays on, pull safely to the
side of the road and turn off the engine.
See page 303 for instructions and
precautions on checking the engine's
cooling system.
Do not drive the vehicle while the
indicator is on or the engine may bedamaged.Low Temperature Indicator
This indicator monitors the
temperature of the engine coolant. If
there is no problem, this indicator
comes on when the engine is cold. If
it comes on when the engine is warm
(normal operating temperature),
have the vehicle inspected by your
dealer as soon as possible.Turn Signal and
Hazard WarningIndicators
The left or right turn signal indicator
blinks when you signal a lane change
or turn. If an indicator does not blink
or blinks rapidly, it usually means
one of the turn signal bulbs is burned
out (see pages 266 and 268). Replace
the bulb as soon as possible, since
other drivers cannot see that you aresignaling.
When you press the hazard warning
button, both turn signal indicators
and all turn signals on the outside of
the vehicle flash.
CONTINUED
Instrument Panel Indicators
63
Instruments and Controls
Main MenuTable of Contents
Page 268 of 356
Clutch Fluid
Manual Transmission only
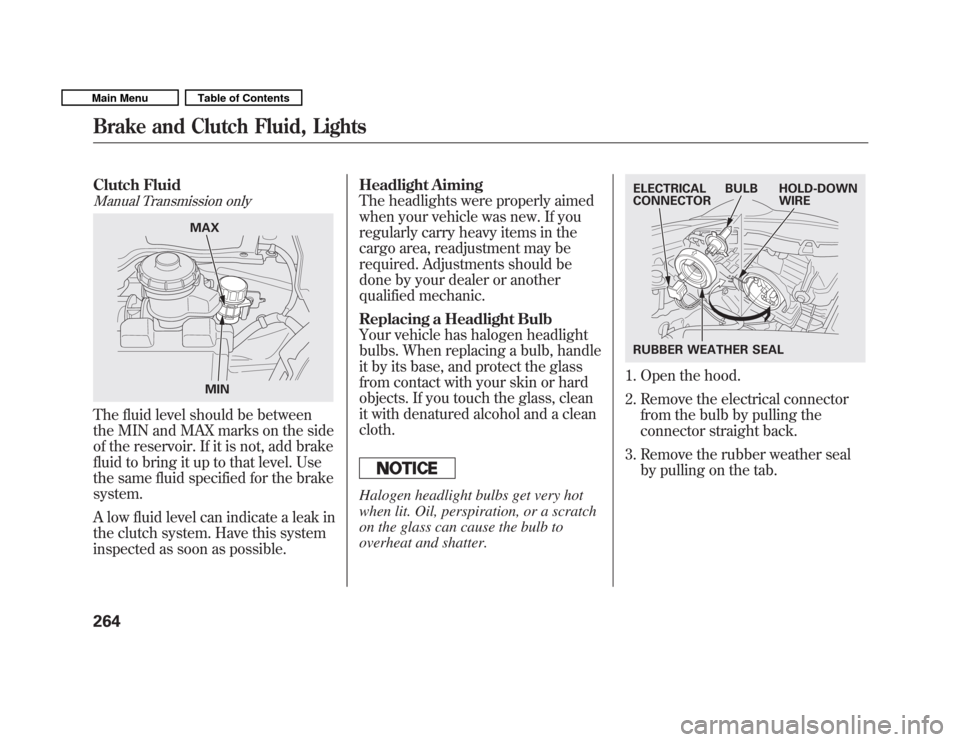
The fluid level should be between
the MIN and MAX marks on the side
of the reservoir. If it is not, add brake
fluid to bring it up to that level. Use
the same fluid specified for the brakesystem.
A low fluid level can indicate a leak in
the clutch system. Have this system
inspected as soon as possible.Headlight Aiming
The headlights were properly aimed
when your vehicle was new. If you
regularly carry heavy items in the
cargo area, readjustment may be
required. Adjustments should be
done by your dealer or another
qualified mechanic.
Replacing a Headlight Bulb
Your vehicle has halogen headlight
bulbs. When replacing a bulb, handle
it by its base, and protect the glass
from contact with your skin or hard
objects. If you touch the glass, clean
it with denatured alcohol and a cleancloth.
Halogen headlight bulbs get very hot
when lit. Oil, perspiration, or a scratch
on the glass can cause the bulb to
overheat and shatter.
1. Open the hood.
2. Remove the electrical connector
from the bulb by pulling the
connector straight back.
3. Remove the rubber weather seal by pulling on the tab.
MAX
MIN
BULB
ELECTRICAL
CONNECTOR
RUBBER WEATHER SEAL HOLD-DOWN WIRE
Brake and Clutch Fluid, Lights
264
Main MenuTable of Contents
Page 269 of 356
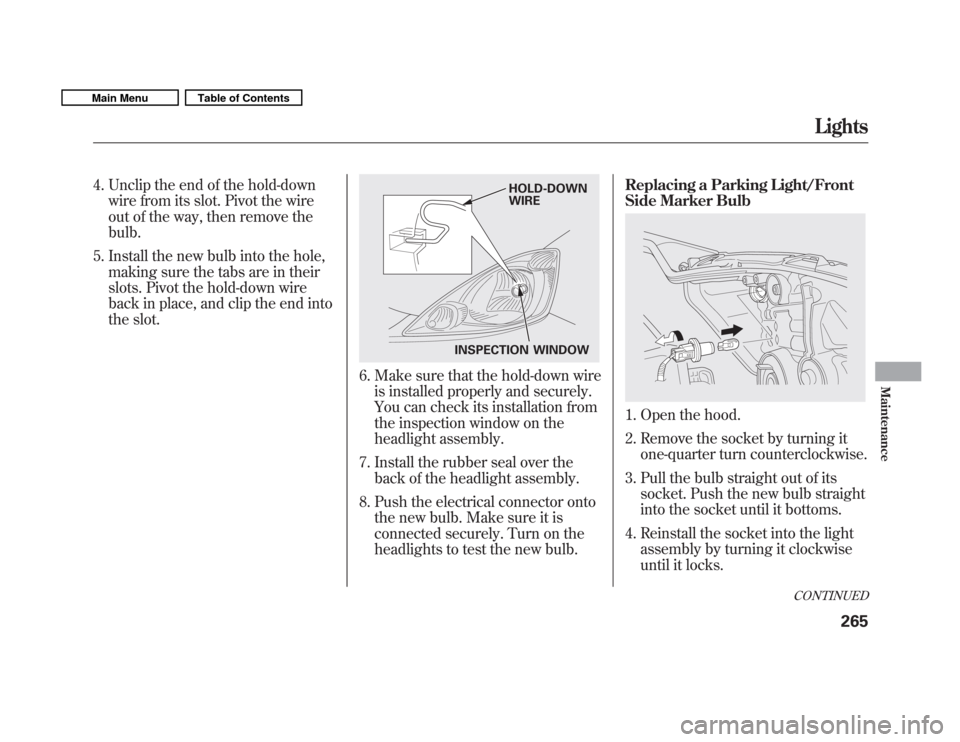
4. Unclip the end of the hold-downwire from its slot. Pivot the wire
out of the way, then remove thebulb.
5. Install the new bulb into the hole, making sure the tabs are in their
slots. Pivot the hold-down wire
back in place, and clip the end into
the slot.
6. Make sure that the hold-down wire
is installed properly and securely.
You can check its installation from
the inspection window on the
headlight assembly.
7. Install the rubber seal over the back of the headlight assembly.
8. Push the electrical connector onto the new bulb. Make sure it is
connected securely. Turn on the
headlights to test the new bulb. Replacing a Parking Light/Front
Side Marker Bulb
1. Open the hood.
2. Remove the socket by turning it
one-quarter turn counterclockwise.
3. Pull the bulb straight out of its socket. Push the new bulb straight
into the socket until it bottoms.
4. Reinstall the socket into the light assembly by turning it clockwise
until it locks.
INSPECTION WINDOW HOLD-DOWN WIRE
CONTINUED
Lights
265
Maintenance
Main MenuTable of Contents
Page 270 of 356
5. Turn on the lights to make surethe new bulb is working. Replacing a Front Turn Signal
Light Bulb
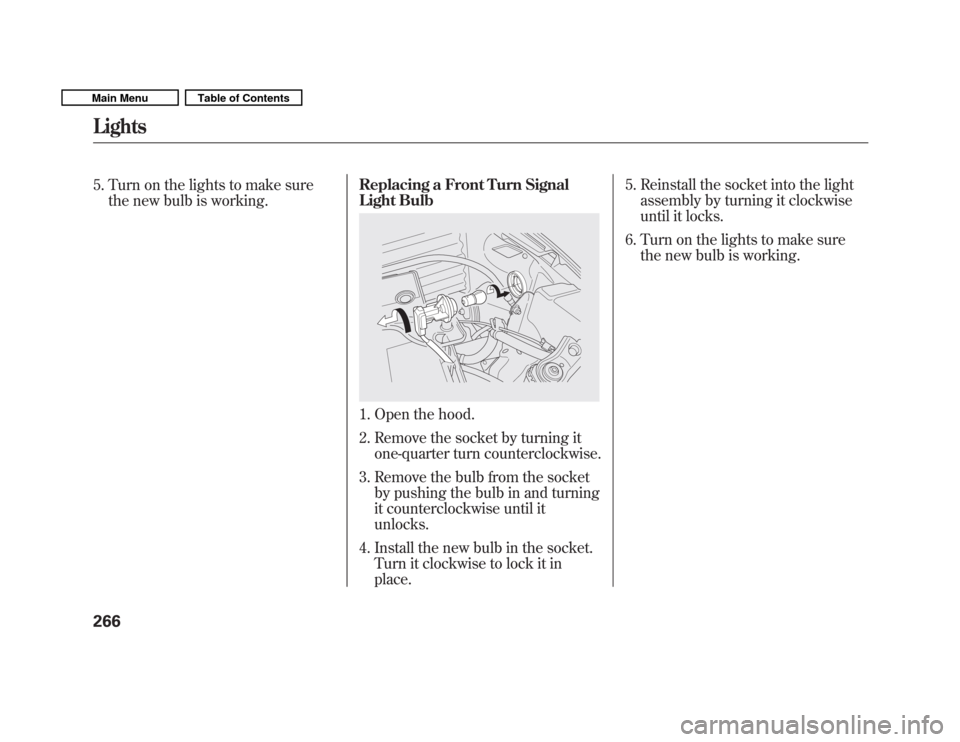
1. Open the hood.
2. Remove the socket by turning it
one-quarter turn counterclockwise.
3. Remove the bulb from the socket by pushing the bulb in and turning
it counterclockwise until it unlocks.
4. Install the new bulb in the socket. Turn it clockwise to lock it in place. 5. Reinstall the socket into the light
assembly by turning it clockwise
until it locks.
6. Turn on the lights to make sure the new bulb is working.
Lights
266
Main MenuTable of Contents
Page 271 of 356
Replacing a Fog Light Bulb
On Sport model
The fog lights use halogen bulbs.
When replacing a bulb, handle it
carefully. See page 264 for moreinformation.
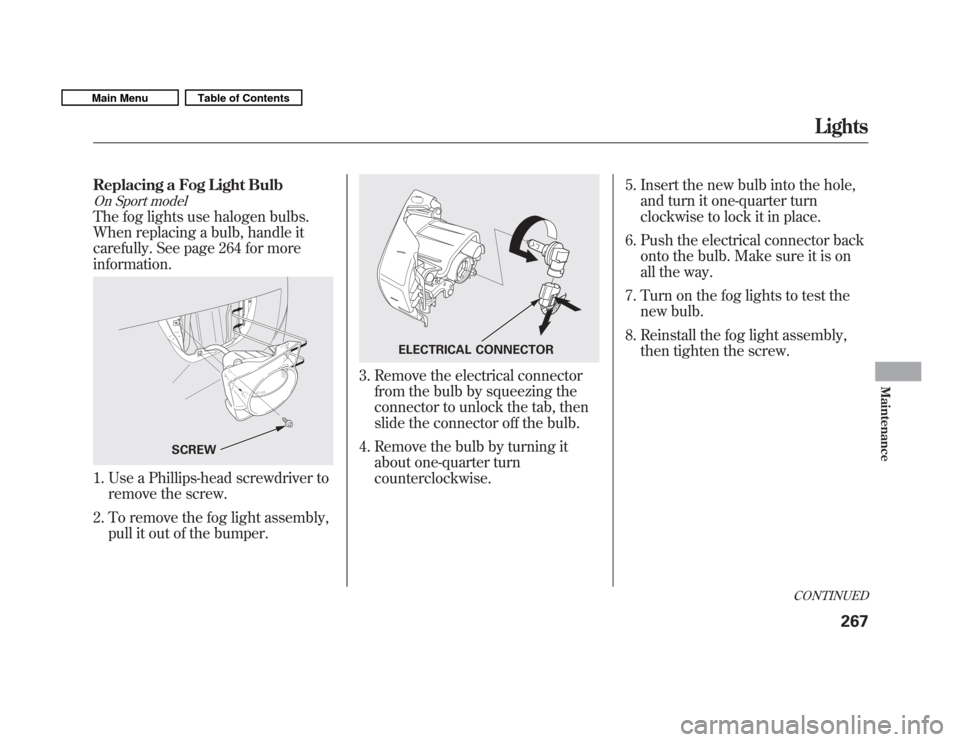
1. Use a Phillips-head screwdriver toremove the screw.
2. To remove the fog light assembly, pull it out of the bumper.
3. Remove the electrical connectorfrom the bulb by squeezing the
connector to unlock the tab, then
slide the connector off the bulb.
4. Remove the bulb by turning it about one-quarter turncounterclockwise. 5. Insert the new bulb into the hole,
and turn it one-quarter turn
clockwise to lock it in place.
6. Push the electrical connector back onto the bulb. Make sure it is on
all the way.
7. Turn on the fog lights to test the new bulb.
8. Reinstall the fog light assembly, then tighten the screw.
SCREW
ELECTRICAL CONNECTOR
CONTINUED
Lights
267
Maintenance
Main MenuTable of Contents
Page 272 of 356
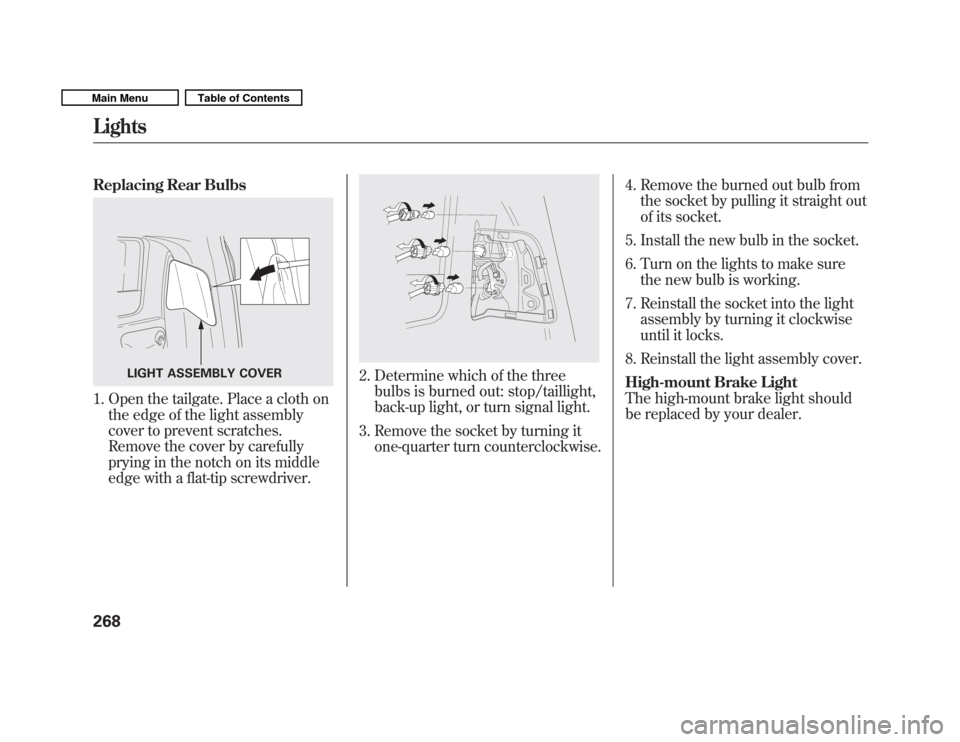
Replacing Rear Bulbs
1. Open the tailgate. Place a cloth onthe edge of the light assembly
cover to prevent scratches.
Remove the cover by carefully
prying in the notch on its middle
edge with a flat-tip screwdriver.
2. Determine which of the threebulbs is burned out: stop/taillight,
back-up light, or turn signal light.
3. Remove the socket by turning it one-quarter turn counterclockwise. 4. Remove the burned out bulb from
the socket by pulling it straight out
of its socket.
5. Install the new bulb in the socket.
6. Turn on the lights to make sure the new bulb is working.
7. Reinstall the socket into the light assembly by turning it clockwise
until it locks.
8. Reinstall the light assembly cover.
High-mount Brake Light
The high-mount brake light should
be replaced by your dealer.LIGHT ASSEMBLY COVER
Lights
268
Main MenuTable of Contents
Page 343 of 356
A
Accessories andModifications .......................... 208
ACCESSORY (Ignition Key
Position) ................................... 80
Accessory Power Socket ............106
Additives, Engine Oil .................256
Adjusting the Steering Wheel ......77
Advanced Airbags ........................26
Airbag (SRS) ............................ 9, 22
Air Conditioning System ............110
Usage ...................................... 112
Air Pressure, Tires ..............275, 276
Alcohol in Gasoline ....................200
Antifreeze ................................... 258
Anti-lock Brakes (ABS) Indicator ............................ 62, 233
Operation ................................ 233
Anti-theft, Audio System .............192
Anti-theft Steering Column Lock ......................................... 80
Audio Antenna ........................... 270
Auto Door Locking .......................83
Auto Door Locking/Unlocking ....83 Auto Door Unlocking
...................
86
Automatic Seat Belt Tensioners ...20
Automatic Speed Control ...........195
Automatic Transmission ............221
Capacity, Fluid ........................321
Checking Fluid Level ..............261
Paddle Shifters ........................226
Shifting ................................... 221
Shift Lever Position
Indicators ............................ 221
Shift Lever Positions ...............222
Shift Lock Release ...................225
Automatic Transmission Fluid ...261
Auxiliary Input Jack ...................191
Average Fuel Economy ................70
B
Battery Charging System
Indicator ........................ 60, 305
Jump Starting .......................... 301
Maintenance ........................... 281
Specifications .......................... 322
Before Driving ........................... 199Belts, Seat
................................
8, 18
Beverage Holders ......................106
Booster Seats ............................... 50
Brakes
Anti-lock Brakes (ABS) ...........233
Break-in, New Linings .............200
Bulb Replacement ...................268
Fluid ....................................... 263
Parking ................................... 103
System Design ........................232
System Indicator ...............60, 307
Wear Indicators .......................232
Braking System .......................... 232
Break-in, New Vehicle ................200
Brightness Control,
Instruments .............................. 76
CONTINUED
Index
I
INDEX
Main Menu
Page 344 of 356
Bulb ReplacementBack-up Lights ........................268
Brake Lights ........................... 268
Fog Lights ............................... 267
Front Parking Lights ...............265
Front Side Marker Lights ........265
Front Turn Signal Lights .........266
Headlights .............................. 264
High-mount Brake Light .........268
Rear Bulbs .............................. 268
Specifications .......................... 321
Taillights ................................. 268
Turn Signal Lights ..........266, 268
Bulbs, Halogen .......................... 264
C
Capacities Chart .........................321
Carbon Monoxide Hazard ............53
Cargo ......................................... 210
Cargo Hooks .............................. 214
Cargo, How to Carry ..................210
Carrying Cargo .......................... 210
CAUTION, Explanation of ............iii
CD Care ..................................... 187CD Error Messages
............
128, 157
CD Player ........................... 122, 149
Ceiling Light .............................. 107
Certification Label ......................318
Chains, Tires .............................. 280
Changing a Flat Tire ..................287
Changing Oil How to .................................... 256
When to .................................. 247
Charging System Indicator ........................... 60, 305
Check Fuel Cap Indicator .............70
Checklist, Before Driving ...........217
Childproof Door Locks .................83
Child Safety .................................. 34
Booster Seats ........................... 50
Child Seats .................... 39, 40, 41
Important Safety Reminders .....38
Infants ...................................... 39
Larger Children .......................49
LATCH ..................................... 43
Risks with Airbags ...................35
Small Children ......................... 40
Tethers .................................... 47
Warning Labels ........................36
Where Should a Child Sit? ........35Child Seats
............................. 34, 41
LATCH Anchorage Points ........43
Tether Anchorage Points .........47
Cleaning the Seat Belts ..............269
Clock .......................................... 193
Clutch Fluid ............................... 263
Code, Audio System ...................192
CO in the Exhaust ................53, 328
Cold Weather, Starting in ...........218
Compact Spare Tire ....................286
Controls, Instruments and ............57
Coolant
Adding .................................... 258
Checking ................................ 204
Proper Solution .......................258
Temperature Indicator .............63
Crankcase Emissions Control System ................................... 328
Cruise Control Indicator ...............65
Cruise Control Operation ...........195
Cruise Main Indicator ..................65
Cup Holders ............................... 106
Customer Service .......................334
Index
II
Main Menu