Page 76 of 356
�1: To use the horn, press the center pad of the steering wheel.
� 2: If equipped.
� 3: Only on vehicles equipped with navigation system. Refer to the navigation system manual.
PADDLE SHIFTER
(DOWNSHIFT)�2
(P. 226)
HEADLIGHTS/
TURN SIGNAL/
FOG LIGHTS
� 2
(P. 74)
NAVIGATION SYSTEM
VOICE CONTROL BUTTONS
�3
STEERING WHEELADJUSTMENTS
(P. 77) CRUISE CONTROL BUTTONS�
2
(P. 195) AUXILIARY INPUT JACK
(P. 191)
ACCESSORY POWER SOCKET
(P. 106)
PASSENGER AIRBAG OFF INDICATOR
(P. 31)
REAR WINDOW DEFOGGER/
HEATED MIRROR BUTTON
�
2
(P. 76/102)
WINDSHIELD WIPERS/WASHERS
(P. 73)
HAZARD WARNING BUTTON
(P. 76)
PADDLE SHIFTER(UPSHIFT)
�
2
(P. 226)
INSTRUMENT PANEL
BRIGHTNESS
(P. 76)
REMOTE AUDIO CONTROL BUTTONS
� 2
(P. 190)
VEHICLE STABILITY
ASSIST (VSA) SYSTEM
OFF SWITCH
�2
(P. 236)
Vehicle with navigation system is shown. HORN
�
1
Controls Near the Steering Wheel
72
Main MenuTable of Contents
Page 80 of 356
 position and
the light switch is on.
Turn the knob on the lower part of the")
Instrument Panel Brightness
You can change the instrument panel
brightness only when the ignition
switch is in the ON (II) position and
the light switch is on.
Turn the knob on the lower part of the
instrument panel to adjust thebrightness.
You will hear a beep when maximum
or minimum brightness is reached.
You will also hear a beep when the
maximum level is canceled by turning
the knob a click to the left.Hazard Warning ButtonPush the button to turn on the
hazard warning lights (four-way
flashers). This causes all four outside
turn signals and both turn indicators
in the instrument panel to flash. Use
the hazard warning lights if you need
to park in a dangerous area near
heavy traffic, or if your vehicle isdisabled.
Rear Window DefoggerThe rear window defogger will clear
fog, frost, and thin ice from the
window. Push the defogger button to
turn it on and off. The indicator in the
button comes on to show the
defogger is on. You must manually
shut off the rear window defogger
when it is no longer needed.
INSTRUMENT PANEL BRIGHTNESS
CONTROL KNOB
Instrument Panel Brightness, Hazard Warning Button, Rear Window Defogger
76
Main MenuTable of Contents
Page 97 of 356
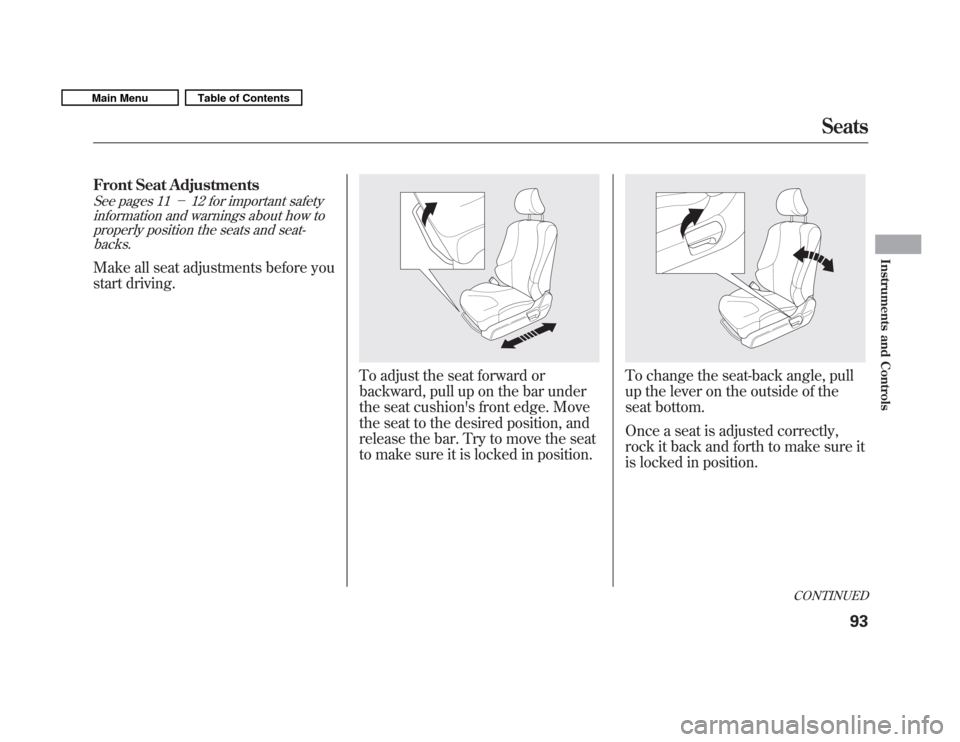
Front Seat Adjustments
See pages 11�12 for important safety
information and warnings about how to properly position the seats and seat-
backs.
Make all seat adjustments before you
start driving.
To adjust the seat forward or
backward, pull up on the bar under
the seat cushion's front edge. Move
the seat to the desired position, and
release the bar. Try to move the seat
to make sure it is locked in position.To change the seat-back angle, pull
up the lever on the outside of the
seat bottom.
Once a seat is adjusted correctly,
rock it back and forth to make sure it
is locked in position.
CONTINUED
Seats
93
Instruments and Controls
Main MenuTable of Contents
Page 98 of 356
Armrest
On Sport model and Canadian LX model
The driver's seat has an armrest on
the side of the seat-back. To use,
pivot it down.Rear Seat Adjustments
You can adjust the angle of the rear
seat-backs separately. To change the
seat-back angle, pull up the release
lever on the outer side of the seat-back.Head Restraints
See page 13 for important safety
information and a warning aboutimproperly positioning head restraints.
Your vehicle is equipped with head
restraints in all seating positions to
help protect you and your
passengers from the likelihood of
whiplash and other injuries.
They are most effective when you
adjust them so the center of the back
of the occupant's head rests against
the center of the restraint.
RELEASE LEVER
Seats
94
Main MenuTable of Contents
Page 286 of 356

WARNING:Battery posts,
terminals, and related accessories
contain lead and lead compounds.
Wash your hands after handling.
If you need to connect the battery to
a charger, disconnect both cables to
prevent damaging your vehicle's
electrical system. Always disconnect
the negative ( �) cable first, and
reconnect it last.
On vehicles without navigation system
If your vehicle's battery is
disconnected, or goes dead, the time
setting is lost. To reset the time, see
page 193.
If your vehicle's battery is
disconnected, or goes dead, the
audio system may disable itself. The
next time you turn on the radio, you
will see ‘‘ENTER CODE ’’in the
frequency display. Use the preset
buttons to enter the code (see page192).
The battery gives off explosive
hydrogen gas during normaloperation.
A spark or flame can cause the
battery to explode with enough
force to kill or seriously hurtyou.
Wear protective clothing and a
face shield, or have a skilled
technician do the batterymaintenance.
On vehicles with navigation system
The navigation system will also
disable itself. The next time you turn
on the ignition switch, the system
will require you to enter ‘‘ENTER
CODE ’’before it can be used. Refer
to the navigation system manual.
Checking the Battery
282
Main MenuTable of Contents
Page 291 of 356

Except all Canadian models withautomatic transmission
If you have a flat tire while driving,
stop in a safe place to change it.
Drive slowly along the shoulder until
you get to an exit or an area to stop
that is far away from the traffic lanes.The vehicle can easily roll off
the jack, seriously injuring
anyone underneath.
Follow the directions for
changing a tire exactly, and
never get under the vehicle
when it is supported only by thejack.
1. Park the vehicle on firm, level, and non-slippery ground. Put the
transmission in Park (automatic)
or reverse (manual). Apply the
parking brake.
2. Turn on the hazard warning lights, and turn the ignition switch to the
LOCK (0) position. Have all
passengers get out of the vehicle
while you change the tire.
3. Lift the rear center head restraint.
4. Open the tailgate. Raise the cargo area floor lid by lifting it up with
the back of the strap. To keep the
floor lid open, hook the looped
side of the strap to the legs of the
rear center head restraint.
5. Take the tool kit out of the spare tire.
FLOOR LID LOOP
SPARE TIRE
TOOL KIT JACK STRAP
CONTINUED
Changing a Flat Tire
287
Taking Care of the Unexpected
Main MenuTable of Contents
Page 307 of 356

The high temperature indicator
should be off under most conditions.
If the engine coolant temperature
gets higher than normal, the
indicator will blink. If it stays on, you
should determine the reason (hot
day, driving up a steep hill, etc.).
If the vehicle overheats, you should
take immediate action. The only
indication may be the high
temperature indicator blinking or
remaining on. Or you may see steam
or spray coming from under thehood.
Driving with the high temperature
indicator on can cause serious damage
to your engine.
Steam and spray from an
overheated engine can
seriously scald you.
Do not open the hood if steam
is coming out.
1. Safely pull to the side of the road. Put the transmission in neutral
(manual) or Park (automatic), and
set the parking brake. Turn off all
accessories, and turn on the
hazard warning lights.
2. If you see steam and/or spray coming from under the hood, turn
off the engine. Wait until you see
no more signs of steam or spray,
then open the hood. 3. If you do not see steam or spray,
leave the engine running, and
check the high temperature
indicator. If the high heat is due to
overloading, the engine should
start to cool down almost
immediately. If it does, wait until
the high temperature indicator
goes off, then continue driving.
4. If the high temperature indicator stays on, turn off the engine.
CONTINUED
If the Engine Overheats
303
Taking Care of the Unexpected
Main MenuTable of Contents
Page 309 of 356

Low Oil Pressure Indicator
This indicator should never
come on when the engine is
running. If it starts flashing or stays
on, the oil pressure has dropped very
low or lost pressure. Serious engine
damage is possible, and you should
take immediate action.
Running the engine with low oil
pressure can cause serious mechanical
damage almost immediately. Turn off
the engine as soon as you can safely get
the vehicle stopped. 1. Safely pull off the road, and shut
off the engine. Turn on the hazard
warning lights.
2. Let the vehicle sit for a minute. Open the hood, and check the oil
level (see page 204). An engine
very low on oil can lose pressure
during cornering and other drivingmaneuvers.
3. If necessary, add oil to bring the level back to the full mark on the
dipstick (see page 255).
4. Start the engine, and watch the oil pressure indicator. If it does not go
out within 10 seconds, turn off the
engine. There is a mechanical
problem that needs to be repaired
before you can continue driving(see Emergency Towing on page
313). Charging System Indicator
If the charging system
indicator comes on brightly
when the engine is running, the
battery is not being charged.
Immediately turn off all electrical
accessories. Try not to use other
electrically operated controls such as
the power windows. Keep the engine
running; starting the engine will
discharge the battery rapidly.
Go to a service station or garage
where you can get technicalassistance.
Low Oil Pressure Indicator, Charging System Indicator
305
Taking Care of the Unexpected
Main MenuTable of Contents