Page 9 of 445
�Î �Î�Î
�Î
�Î �Î �Î
�Î
�Î �Î�Î
To use the horn, press the center pad of the steering wheel.
If equipped.
Ref er to the navigation system manual.
1:2:3:
Your Vehicle at a Glance
4
SHIFT LEVER
HORN
BLUETOOTH HANDSFREELINK SYSTEM
VOICE CONTROL BUTTONS AUDIO SYSTEM
AUDIO SYSTEM
(P.194)
(P.80/115) (P.315)
(P.269)
(P.81)
HEADLIGHTS/
TURN SIGNALS
(P.76)
MIRROR CONTROLS
REMOTE AUDIO CONTROLS
(P.255)
STEERING WHEEL
ADJUSTMENTS
PARKING BRAKE PEDAL
(P.81)
NAVIGATION SYSTEM
VOICE CONTROL SWITCHES
(P.115)
VEHICLE STABILITY
ASSIST (VSA) SYSTEM
OFF SWITCH
(P.325)
CLOCK
(P.259)
(P.145, 157)
INSTRUMENT PANEL BRIGHTNESS
(P.79)
HAZARD WARNING
BUTTON (P.79)
PASSENGER AIRBAG
OFF INDICATOR
(P.33)
WINDSHIELD
WIPERS/WASHERS
(P.75)
(P.266)
CRUISE CONTROL
BUTTONS SEAT HEATER SWITCHES
(P.111)
(P.123)
ACCESSORY POWER SOCKET
REAR WINDOW DEFOGGER BUTTON/
HEATED MIRRORS BUTTON
1
2 2 2
2
3 22
Main Menu
Page 18 of 445

If you sit too close to the steering
wheel or dashboard, you can be
seriously injured by an inf lating f ront
airbag, or by striking the steering
wheel or dashboard.Adjust the driver’s seat-back to a
comf ortable, upright position,
leaving ample space between your
chest and the airbag cover in the
center of the steering wheel.
Passengers with adjustable seat-
backs should also adjust their seat-
back to a comf ortable, upright
position.
If you cannot get f ar enough away
f rom the steering wheel and still
reach the controls, we recommend
that you investigate whether some
type of adaptive equipment may help.
The National Highway Traffic Safety
Administration and Transport
Canada recommend that drivers
allow at least 10 inches (25 cm)
between the center of the steering
wheel and the chest. In addition to
adjusting the seat, you can adjust the
steering wheel up and down, and in
and out (see page ).
Once your seat is adjusted correctly,
rock it back and f orth to make sure
the seat is locked in position.
See page f or how to adjust a
f ront seat (power adjustment) and
page f or a manual adjustment.
81
97
98
On vehicles with manual adjustable seats
CONT INUED
Adjust the Seat-Backs
3.
Protecting A dults and T eens
Driver and Passenger Saf ety
13
Sitting too close to a front
airbag can result in serious
injury or death if the front
airbags inflate.
Always sit as far back from the
front airbags as possible.
Main MenuTable of Contents
Page 64 of 445

This section gives inf ormation about
the controls and displays that
contribute to the daily operation of
your vehicle. All the essential
controls are within easy reach............................
Control Locations . 60
............................
Instrument Panel . 61 ..........
Instrument Panel Indicators . 62
.............................................
Gauges . 68
....................
Inf ormation Display . 69
...................................
Trip Meter . 69
................
Instant Fuel Economy . 70
..............
Average Fuel Economy . 70
...........................................
Range . 70
.....................................
Odometer . 71
..................................
Fuel Gauge . 71
...................
Temperature Gauge . 71
Outside Temperature
..................................
Indicator . 71
..........
Check Fuel Cap Message . 73
...............
Maintenance Minder . 73
Controls Near the Steering
...........................................
Wheel . 74
.
Windshield Wipers and Washers . 75
.........
Turn Signals and Headlights . 76
........
Instrument Panel Brightness . 79
.................
Hazard Warning Button . 79
.................
Rear Window Def ogger . 80
.................................
Parking Brake . 81
..........
Steering Wheel Adjustment . 81
...............................
Keys and Locks . 82
........................
Immobilizer System . 83
................................
Ignition Switch . 84 ......................................
Door Locks . 85
......................
Power Door Locks . 85
.
Auto Door Locking/Unlocking . 86
..............
Childproof Door Locks . 91
.......................
Remote Transmitter . 92
............................................
Tailgate . 95
.................................................
Seats . 97
..................................
Seat Heaters . 111
............................
Power Windows . 112
.......................................
Moonroof . 113
...........................................
Mirrors . 114
.........
Interior Convenience Items . 116
............
Dual Deck Cargo Shelf . 117
.....................
Beverage Holders . 119
.............................
Center Table . 120
......................
Lower Glove Box . 120
......................
Upper Glove Box . 121
............................
Vanity Mirror . 121
...................................
Sun Visor . 122
....................
Sunglasses Holder . 122
................
Conversation Mirror . 123
........
Accessory Power Sockets . 123
.............
Console Compartment . 124
..................................
Coat Hook . 125
.......................
Seat Under Tray . 125
...............................
Interior Lights . 126
Instruments and Controls
Inst rument s and Cont rols
59
TM
Main Menu
Page 79 of 445
�Î �Î�Î
�Î
�Î
�Î
�Î �Î �Î�Î �Î
To use the horn, press the center pad of the steering wheel.
If equipped.
Ref er to the navigation system manual.
1:2:3:
Controls Near the Steering Wheel
74
PARKING BRAKE PEDAL
HORN
REMOTE AUDIO CONTROLS
STEERING WHEEL
ADJUSTMENTS HEATED MIRROR BUTTON
NAVIGATION SYSTEM
VOICE CONTROL BUTTONS
BLUETOOTH HANDSFREELINK SYSTEM
VOICE CONTROL BUTTONS
(P.325)
(P.255) (P.81)
(P.269)
(P.81)
(P.123)
(P.266)
(P.76)
ACCESSORY POWER SOCKET(P.111)
MIRROR CONTROLS (P.115) HEADLIGHTS/
TURN SIGNALS
VEHICLE STABILITY
ASSIST (VSA) SYSTEM
OFF SWITCH
SEAT HEATER SWITCHESREAR WINDOW DEFOGGER BUTTON (P.80)
(P.115)
HAZARD WARNING
BUTTON
PASSENGER AIRBAG
OFF INDICATOR
INSTRUMENT PANEL BRIGHTNESS
(P.79)
WINDSHIELD
WIPERS/WASHERS
(P.75)
(P.33)
CRUISE CONTROL BUTTONS (P.79)
(P.194)
(P.315)
(P.145, 157) CLOCK
(P.259)
AUDIO SYSTEM
AUDIO SYSTEM
SHIFT LEVER1
2
2
3 2 22 2
Main MenuTable of Contents
Page 102 of 445
�µ
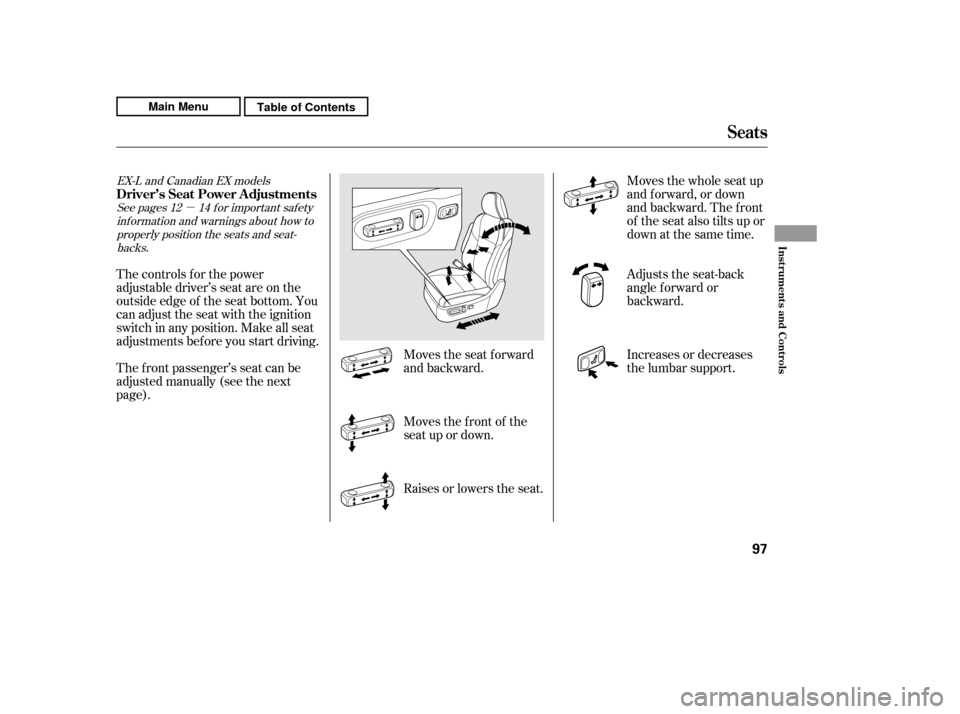
See pages f or important saf ety
inf ormation and warnings about how to
properly position the seats and seat- backs.
EX-L and Canadian EX models
12 14
The controls f or the power
adjustable driver’s seat are on the
outside edge of the seat bottom. You
can adjust the seat with the ignition
switch in any position. Make all seat
adjustments bef ore you start driving.
The f ront passenger’s seat can be
adjusted manually (see the next
page). Moves the seat forward
and backward.
Moves the f ront of the
seat up or down.
Raises or lowers the seat.Moves the whole seat up
and f orward, or down
and backward. The f ront
of the seat also tilts up or
down at the same time.
Adjusts the seat-back
angle f orward or
backward.
Increases or decreases
the lumbar support.
Driver’s Seat Power A djustments
Seats
Inst rument s and Cont rols
97
Main MenuTable of Contents
Page 103 of 445
�µ
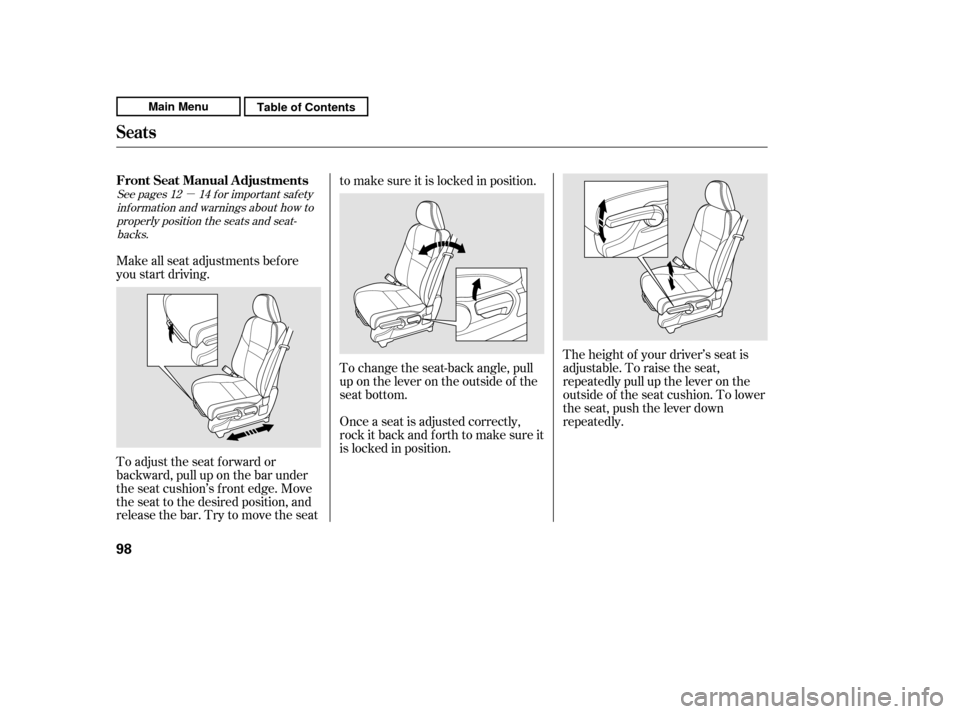
The height of your driver’s seat is
adjustable. To raise the seat,
repeatedly pull up the lever on the
outside of the seat cushion. To lower
the seat, push the lever down
repeatedly.
Make all seat adjustments bef ore
you start driving.
To adjust the seat f orward or
backward, pull up on the bar under
the seat cushion’s f ront edge. Move
the seat to the desired position, and
releasethebar.Trytomovetheseat to make sure it is locked in position.
Once a seat is adjusted correctly,
rock it back and f orth to make sure it
is locked in position.
To change the seat-back angle, pull
up on the lever on the outside of the
seat bottom.
See pages f or important saf ety
inf ormation and warnings about how toproperly position the seats and seat-
backs. 12 14
Seats
FrontSeatManualAdjustments
98
Main MenuTable of Contents
Page 104 of 445
Each front seat has an armrest on
thesideof theseat-back.Touseit,
pivotitdown.
To adjust the seats forward and
backward, pull up on the lever under
the seat cushion. Af ter moving the
seat, make sure it is locked into
position.
The angle of each rear seat-back can
be adjusted separately. To change
the seat-back angle of the rear seat-
back, pull up on the release lever on
the top of the seat-back. Move the
seat-back to the desired position, then release the lever. Make sure
the seat-back latches in the new
position.
Make sure all rear shoulder belts are
positioned in f ront of the rear seat-
backs af ter you adjust the rear seats.
When using the center seating
position, adjust the lef t and right side
of the rear seats to the same position.
CONT INUED
Armrests
Rear Seat Adjustments
Seats
Inst rument s and Cont rols
99
FRONT
Main MenuTable of Contents
Page 109 of 445

You can recline the seat-backs on the
f ront seats so they are level with the
rear seat cushions, making a large
cushioned area. To do this:Adjust the rear seats as f ar back
as possible.
Remove the f ront head restraints
(see page ), and store them
securely.
Only the passenger’s side can be
level as f ollows. Adjust the f ront seats f orward as
f ar as possible. Pull up the seat-
back angle adjustment lever and
pivot the seat-back backward until
it is level with the rear seat
cushion.
The seat-back of the power
adjustable driver’s seat cannot be
level. Do not push the seat-back
down f orcibly.
Adjust the rear seat-back to the
desired position.
Reverse this procedure to return the
f ront and rear seats to the upright
position. Make sure you install the
head restraints and securely lock the
seats before driving.
When you return the seat-back to its
upright position, hold the seat-back
to keep it f rom going up too quickly.
1. 2.
4.
3.
102
EX-L and Canadian EX models
EX-L and Canadian EX models
Reclining the Front Seats
Seats
104
SLIDE BAR SEAT-BACK ANGLE
ADJUSTMENT LEVER
Main MenuTable of Contents