Page 370 of 445
If your seat belts get dirty, use a sof t
brush with a mixture of mild soap
and warm water to clean them. Do
not use bleach, dye, or cleaning
solvents. Let the belts air-dry bef ore
you use the vehicle.
Press the brake pedal to make
sure the new bulb is working.
Put the socket back into the light
assembly, and turn it clockwise to
lock it in place.
Put the cover back on the light
assembly. Push it in until it locks
in place.
Dirt build-up in the loops of the seat
belt anchors can cause the belts to
retract slowly. Wipe the insides of
the loops with a clean cloth
dampened in mild soap and warm
water or isopropyl alcohol.
This light should be replaced by your
dealer.
5. 6. 7.
Cleaning the Seat Belts
Replacing a Rear License Plate
Light Bulb
Lights, Cleaning the Seat Belts
Maint enance
365
LOOP
Main MenuTable of Contents
Page 380 of 445

�´
CONT INUED
Tires marked ‘‘M S’’ or ‘‘All
Season’’ on the sidewall have an all-
weather tread design suitable for
most winter driving conditions.
For the best perf ormance in snowy
or icy conditions, you should install
snow tires or tire chains. They may
be required by local laws under
certain conditions.
If you mount snow tires on your
vehicle, make sure they are radial
tires of the same size and load range
as original tires. Mount snow tires on
all f our wheels. The traction
provided by snow tires on dry roads
maybelowerthanyouroriginaltires.
Check with the tire dealer f or
maximum speed recommendations.Mount tire chains on your tires when
required by driving conditions or
local laws. Install them only on the
f ront tires.
Because your vehicle has limited tire
clearance, Honda strongly
recommends using the chains listed
below, made by Security Chain
Company (SCC).
Cable-type: SCC Radial Chain
TC2111MM
Tires
Winter Driving
Snow T ires
T ire ChainsMaint enance
375
Using the wrong chains, or not
properly installing chains, can
damage the brake lines and
cause a crash in which you can
be seriously injured or killed.
Follow all instructions in this
owner’s manual regarding the
selection and use of tire chains.
Main MenuTable of Contents
Page 381 of 445

When installing cables, f ollow the
manuf acturer’s instructions, and
mount them as tight as you can.
Make sure they are not contacting
the brake lines or suspension. Drive
slowly with them installed. If you
hear them coming into contact with
the body or chassis, stop and
investigate. Remove them as soon as
you begin driving on cleared roads.Clean the wheels as you would the
rest of the exterior. Wash them with
thesamesolution,andrinsethem
thoroughly.
Aluminum alloy wheels have a
protective clear-coat that keeps the
aluminum f rom corroding and
tarnishing. Cleaning the wheels with
harsh chemicals (including some
commercial wheel cleaners) or a stif f
brush can damage the clear-coat. To
clean the wheels, use a mild
detergent and a sof t brush or sponge.
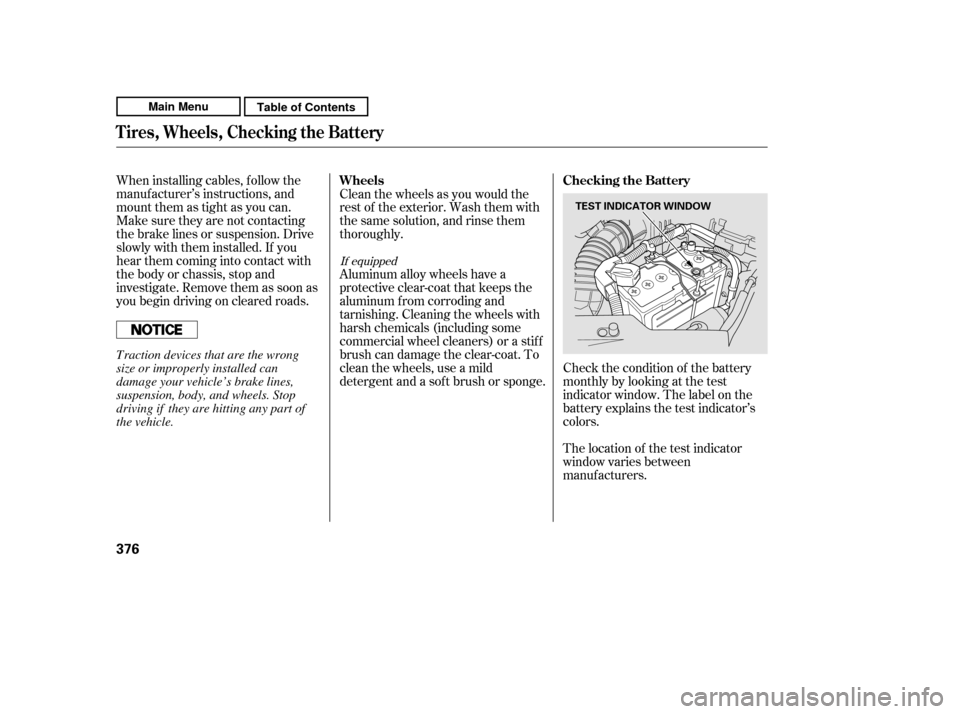
Check the condition of the battery
monthlybylookingatthetest
indicator window. The label on the
battery explains the test indicator’s
colors.
The location of the test indicator
window varies between
manuf acturers.
If equipped
Wheels Checking the Battery
T ires, Wheels, Checking the Battery
376
TEST INDICATOR WINDOW
Traction devices that are the wrong
size or improperly installed can
damage your vehicle’s brake lines,
suspension, body, and wheels. Stop
driving if they are hitting any part of
the vehicle.
Main MenuTable of Contents
Page 383 of 445

Leave the parking brake off. Put
the transmission in Park.
Block the rear wheels.
If the vehicle is to be stored f or a
longer period, it should be
supported on jackstands so the
tires are of f the ground.
Leave one window open slightly (if
the vehicle is being stored
indoors).
Disconnect the battery.
If your vehicle’s battery is
disconnected, or goes dead, the time
setting may be lost. To reset the time,
see page .
If your vehicle’s battery is
disconnected, or goes dead, the
audio system will disable itself . The
nexttimeyouturnontheradio,you
may see ‘‘ENTER CODE’’ in the
f requency display. Use the preset
buttons to enter the code (see page
).
The navigation system will also
disableitself.Thenexttimeyouturn
on the ignition switch, the system
will require you to enter a PIN
bef ore it can be used. Ref er to the
navigation system manual. Cleantheinterior.Makesurethe
carpeting, floor mats, etc., are
completely dry.
Wash and dry the exterior
completely.
Fill the f uel tank.
If you need to park your vehicle f or
an extended period (more than 1
month), there are several things you
should do to prepare it f or storage.
Proper preparation helps prevent
deterioration and makes it easier to
get your vehicle back on the road. If
possible, store your vehicle indoors.
259
258On vehicles without navigation system
On vehicles with navigation system
Checking the Battery, Vehicle Storage
Vehicle Storage
378
Main MenuTable of Contents
Page 386 of 445

This section covers the more
common problems that motorists
experience with their vehicles. It
gives you inf ormation about how to
safely evaluate the problem and what
to do to correct it. If the problem has
stranded you on the side of the road,
you may be able to get going again.
If not, you will also f ind instructions
on getting your vehicle towed.......................
Compact Spare Tire . 382
....................
Changing a Flat Tire . 383
.............
If the Engine Won’t Start . 388
................................
Jump Starting . 390
..............
If the Engine Overheats . 392
.........
Low Oil Pressure Indicator . 394
..........
Charging System Indicator . 394
.......
Malf unction Indicator Lamp . 395
...............
Brake System Indicator . 396
..............................................
Fuses . 397
..............................
Fuse Locations . 401
......................
Emergency Towing . 403
Taking Care of the Unexpected
T aking Care of t he Unexpect ed
381
Main Menu
Page 388 of 445

If you have a f lat tire while driving,
stop in a saf e place to change it.
Drive slowly along the shoulder until
you get to an exit or an area to stop
that is far away from the traffic lanes.Park the vehicle on f irm, level, and
non-slippery ground. Put the
transmission in Park. Apply the
parking brake.
If you are towing a trailer, unhitch
the trailer. Turn on the hazard warning lights,
and turn the ignition switch to the
LOCK (0) position. Have all
passengers get out of the vehicle
while you change the tire.
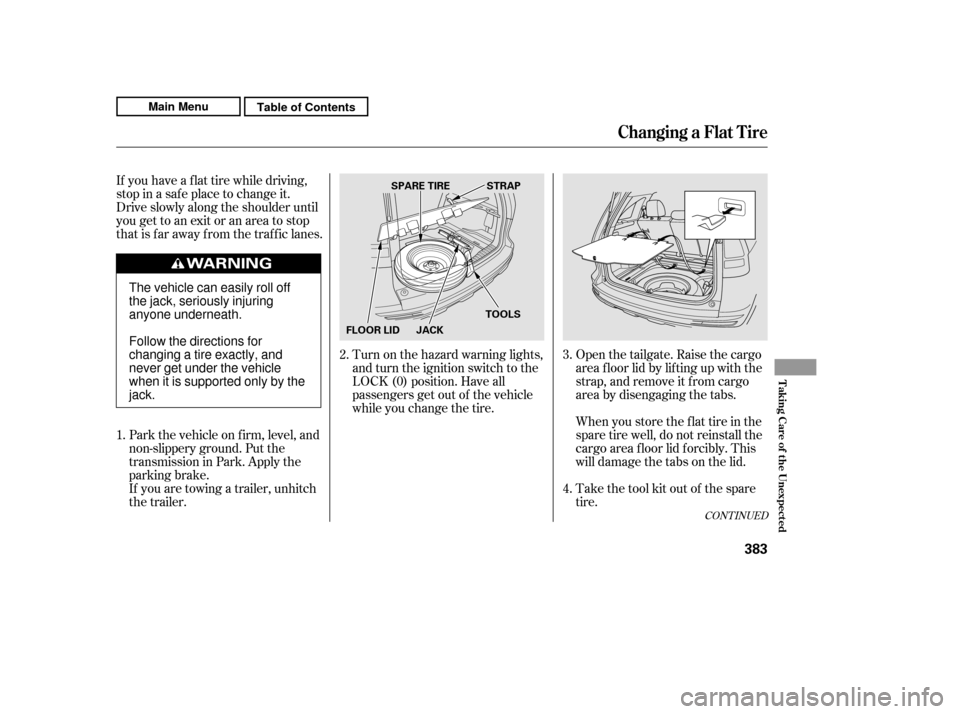
Open the tailgate. Raise the cargo
area f loor lid by lif ting up with the
strap, and remove it f rom cargo
area by disengaging the tabs.
When you store the f lat tire in the
spare tire well, do not reinstall the
cargo area f loor lid f orcibly. This
will damage the tabs on the lid.
Take the tool kit out of the spare
tire.
1. 2.
3. 4.
CONT INUED
Changing a Flat T ire
T aking Care of t he Unexpect ed
383
JACK
SPARE TIRE
TOOLSSTRAP
FLOOR LID
The vehicle can easily roll off
the jack, seriously injuring
anyone underneath.
Follow the directions for
changing a tire exactly, and
never get under the vehicle
when it is supported only by thejack.
Main MenuTable of Contents
Page 390 of 445
CONT INUED
Use the extension and the wheel
nut wrench as shown to raise the
vehicle until the f lat tire is of f the
ground.
Remove the wheel nuts, then
remove the f lat tire. Handle the
wheel nuts caref ully; they may be
hot f rom driving. Place the f lat tire
on the ground with the outside
surf ace facing up.Bef ore mounting the spare tire,
wipeanydirtoff themounting
surface of the wheel and hub with
a clean cloth. Wipe the hub
carefully;itmaybehotfrom
driving.Put on the spare tire. Put the
wheel nuts back on f inger-tight,
then tighten them in a crisscross
pattern with the wheel nut wrench
until the wheel is f irmly against
the hub. Do not try to tighten the
wheel nuts f ully.
Lower the vehicle to the ground,
and remove the jack.
9.
10. 11.
13.
12.
Changing a Flat T ire
T aking Care of t he Unexpect ed
385
EXTENSION
BRAKE HUB
WHEEL NUT WRENCH
Main MenuTable of Contents
Page 395 of 445

�´�´
Although this seems like a simple
procedure, you should take several
precautions.
Open the hood, and check the
physical condition of the battery.
In very cold weather, check the
condition of the electrolyte. If it
seems slushy or f rozen, do not try
jump starting until it thaws.
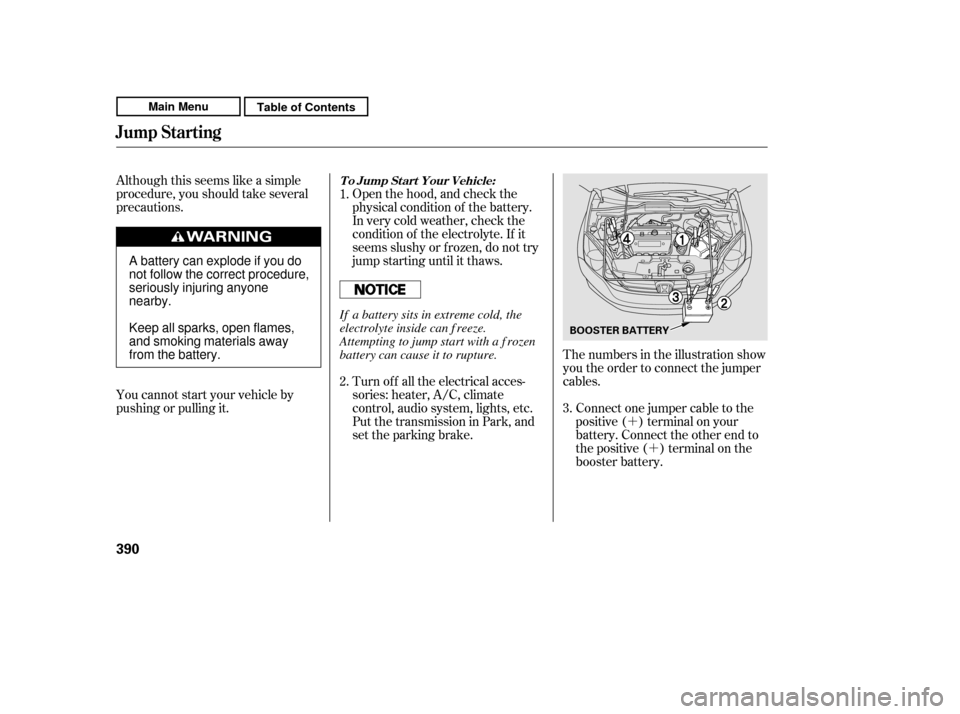
Connect one jumper cable to the
positive ( ) terminal on your
battery. Connect the other end to
the positive ( ) terminal on the
booster battery.
The numbers in the illustration show
you the order to connect the jumper
cables.
You cannot start your vehicle by
pushing or pulling it.
Put the transmission in Park, and
set the parking brake.
Turn of f all the electrical acces-
sories: heater, A/C, climate
control, audio system, lights, etc.
1. 2.
3.
To Jump Start Your Vehicle:
Jump St art ing
390
BOOSTER BATTERY
A battery can explode if you do
not follow the correct procedure,
seriously injuring anyonenearby.
Keep all sparks, open flames,
and smoking materials away
from the battery.If a battery sits in extreme cold, the
electrolyte inside can f reeze.
Attempting to jump start with a f rozen
battery can cause it to rupture.
Main MenuTable of Contents