Page 83 of 445

With the headlight switch in the of f
or position, the high beam
headlights and the high beam
indicator come on with reduced
brightness when you turn the
ignition switch to the ON (II)
position and release the parking
brake. They remain on until you turn
the ignition switch of f , even if you
set the parking brake.
Even with the automatic lighting
f eature turned on, we recommend
thatyouturnonthelightsmanually
when driving at night or in a dense
f og, or when you enter dark areas
such as long tunnels or parking
f acilities.
Do not leave the light switch in
AUTO if you will not be driving the
vehicle f or an extended period (a
weekormore).Youshouldalsoturn
of f the lights if you plan to leave the
engine idling or of f f or a long time. The automatic lighting f eature is
controlledbyasensorlocatedontop
of the dashboard. Do not cover this
sensor or spill liquids on it.The headlights revert to normal
operation when you turn them on
with the switch.
Turn Signals and Headlights
Daytime Running L ights
78
LIGHT SENSOR
Main MenuTable of Contents
Page 86 of 445

Push the lever under the steering
column all the way down.
Make any steering wheel adjustment
bef ore you start driving.
To apply the parking brake, push the
pedal down with your f oot. To
release it, push on the pedal again.
The parking brake indicator on the
instrument panel should go out when
the parking brake is f ully released
(see page ). Move the steering wheel up or
down, and in or out, so it points
toward your chest, not toward
your f ace. Make sure you can see
the instrument panel gauges and
indicators.
1. 2.
62
CONT INUED
Parking Brake Steering Wheel A djustment
Parking Brake, Steering Wheel A djustment
Inst rument s and Cont rols
81
PARKING BRAKE PEDAL
Adjusting the steering wheel
position while driving may
cause you to lose control of the
vehicle and be seriously injured
inacrash.
Adjust the steering wheel only
when the vehicle is stopped.
Driving the vehicle with the parking
brake applied can damage the rear
brakes and hubs. A beeper will sound if
the vehicle is driven with the parking
brake on.
Main MenuTable of Contents
Page 91 of 445

When you customize the setting,
make sure your vehicle is parked
saf ely, the engine is of f , and the
parking brake is applied. Make all
settings bef ore you start driving.The auto door locking f eature has
three possible settings:
The auto door locking is
deactivated all the time.
The doors and tailgate lock when
the vehicle speed reaches 10 mph
(15 km/h).
Your vehicle has customizable
settings f or the doors and tailgate to
automatically lock and unlock. There
are default settings for each of these
f eatures. You can turn of f or change
the settings for these features as
described on the f ollowing pages. The doors and tailgate lock
whenever you move the shif t lever
out of the Park (P) position.
This is the def ault setting.
If you f orget and leave the key in the
ignition switch, lockout prevention
will not allow you to lock the driver’s
door.
With any door and the tailgate open
and the key in the ignition, locking
with the master door lock switch is
disabled. The lock tab on the driver’s
door is not disabled if the driver’s
door is closed. Pulling the driver’s
lock tab rearward will lock all doors
and the tailgate. If you try to lock an
open driver’s door by pulling the lock
tab rearward, the lock tab on the
driver’s door pops out and unlocks
the driver’s door.
L ockout Prevent ionA uto Door L ocking/Unlocking A uto Door L ocking
Door L ocks
86
Main MenuTable of Contents
Page 93 of 445

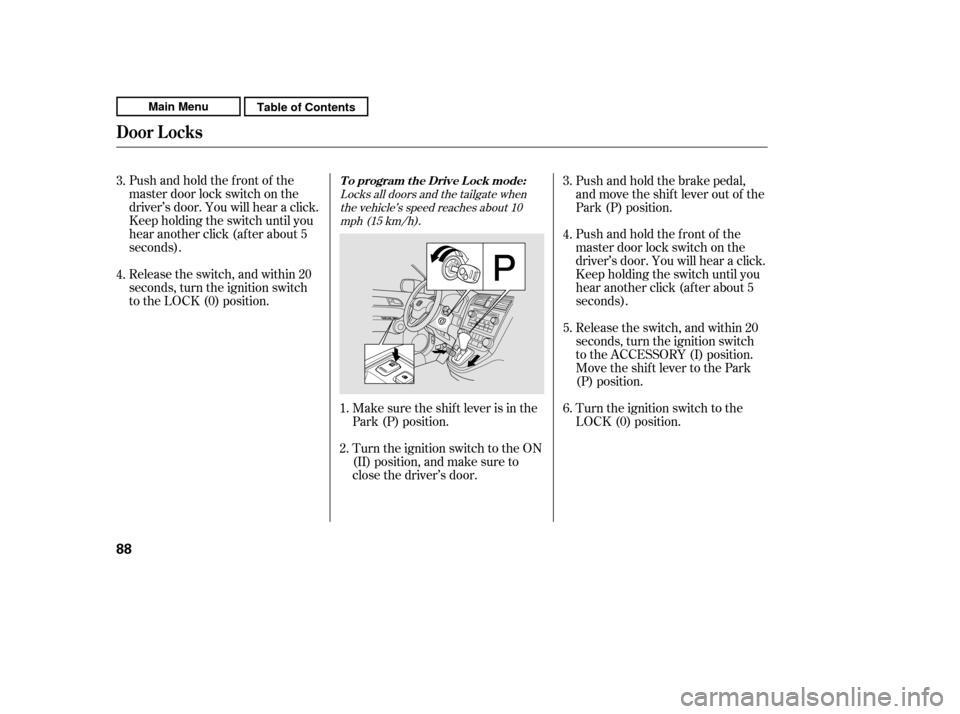
Pushandholdthefrontof the
master door lock switch on the
driver’s door. You will hear a click.
Keep holding the switch until you
hear another click (after about 5
seconds).Make sure the shif t lever is in the
Park (P) position.
Turn the ignition switch to the ON
(II) position, and make sure to
close the driver’s door.Push and hold the brake pedal,
and move the shif t lever out of the
Park (P) position.
Pushandholdthefrontof the
master door lock switch on the
driver’s door. You will hear a click.
Keep holding the switch until you
hear another click (after about 5
seconds).
Turn the ignition switch to the
LOCK (0) position.
Release the switch, and within 20
seconds, turn the ignition switch
to the LOCK (0) position.
Release the switch, and within 20
seconds, turn the ignition switch
to the ACCESSORY (I) position.
Move the shift lever to the Park
(P) position.
1.
3.
2.3.
4. 4. 5. 6.
Locks all doors and the tailgate when
the vehicle’s speed reaches about 10mph (15 km/h).
T o program t he Drive L ock mode:
Door L ocks
88
Main MenuTable of Contents
Page 94 of 445

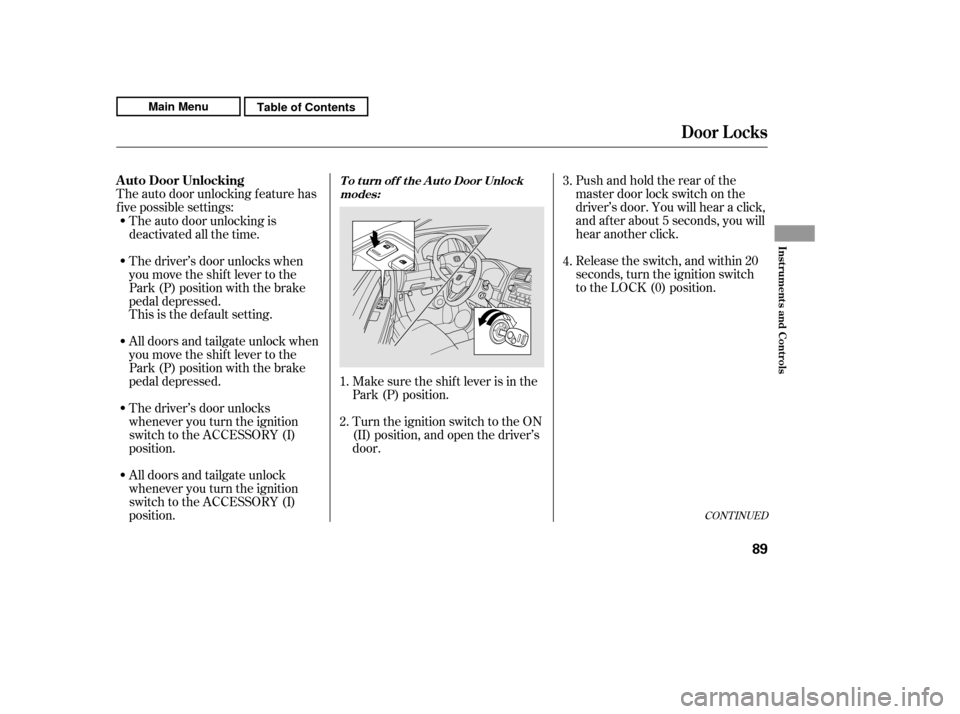
The auto door unlocking f eature has
f ive possible settings:Make sure the shif t lever is in the
Park (P) position.
Turn the ignition switch to the ON
(II) position, and open the driver’s
door.Pushandholdtherearof the
master door lock switch on the
driver’s door. You will hear a click,
and after about 5 seconds, you will
hear another click.
Release the switch, and within 20
seconds, turn the ignition switch
to the LOCK (0) position.
All doors and tailgate unlock when
you move the shif t lever to the
Park (P) position with the brake
pedal depressed.
All doors and tailgate unlock
whenever you turn the ignition
switch to the ACCESSORY (I)
position.
The driver’s door unlocks
whenever you turn the ignition
switch to the ACCESSORY (I)
position.
The auto door unlocking is
deactivated all the time.
The driver’s door unlocks when
you move the shif t lever to the
Park (P) position with the brake
pedal depressed.
This is the def ault setting.
1. 2. 3. 4.
CONT INUED
A uto Door UnlockingT o t urn of f t he A ut o Door Unlock
modes:
Door L ocks
Inst rument s and Cont rols
89
Main MenuTable of Contents
Page 95 of 445

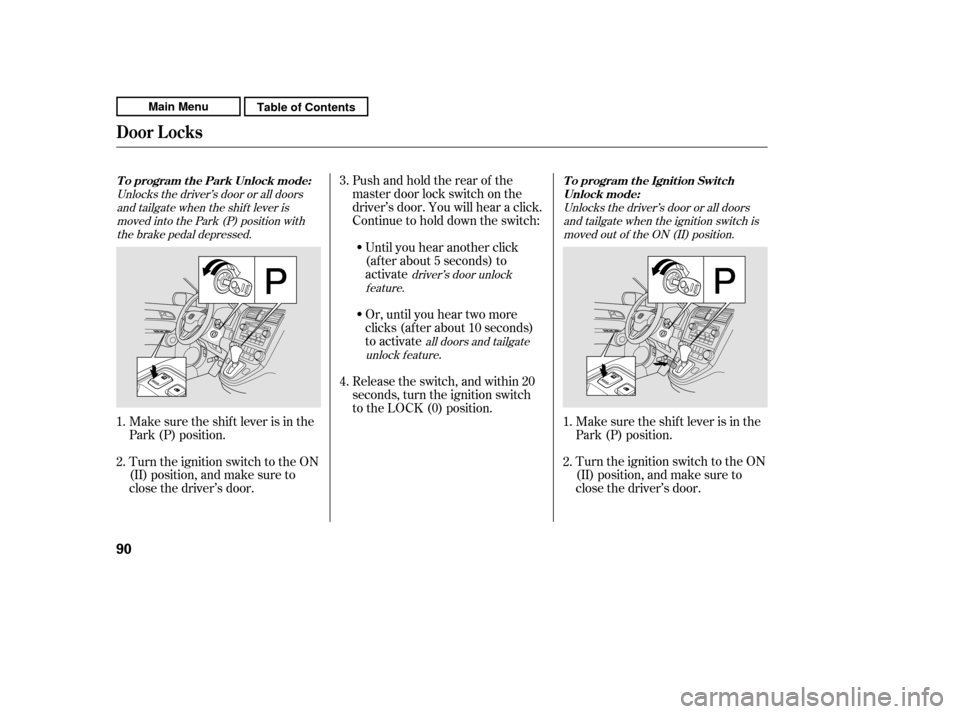
Unlocks the driver’s door or all doorsand tailgate when the ignition switch is
moved out of the ON (II) position.
driver’s door unlock
feature.
all doors and tailgate
unlock f eature
Unlocks the driver’s door or all doors
and tailgate when the shif t lever is
moved into the Park (P) position withthe brake pedal depressed.
Make sure the shif t lever is in the
Park (P) position.
Turn the ignition switch to the ON
(II) position, and make sure to
close the driver’s door.
Pushandholdtherearof the
master door lock switch on the
driver’s door. You will hear a click.
Continue to hold down the switch:
Until you hear another click
(af ter about 5 seconds) to
activate
Or, until you hear two more
clicks (af ter about 10 seconds)
to activate
.
Release the switch, and within 20
seconds, turn the ignition switch
to the LOCK (0) position.
Turn the ignition switch to the ON
(II) position, and make sure to
close the driver’s door.
Make sure the shif t lever is in the
Park (P) position.
1. 2.
1.2. 3. 4.
T o program t he Ignit ion Swit ch
Unlock mode:
To program the Park Unlock mode:
Door L ocks
90
Main MenuTable of Contents
Page 96 of 445

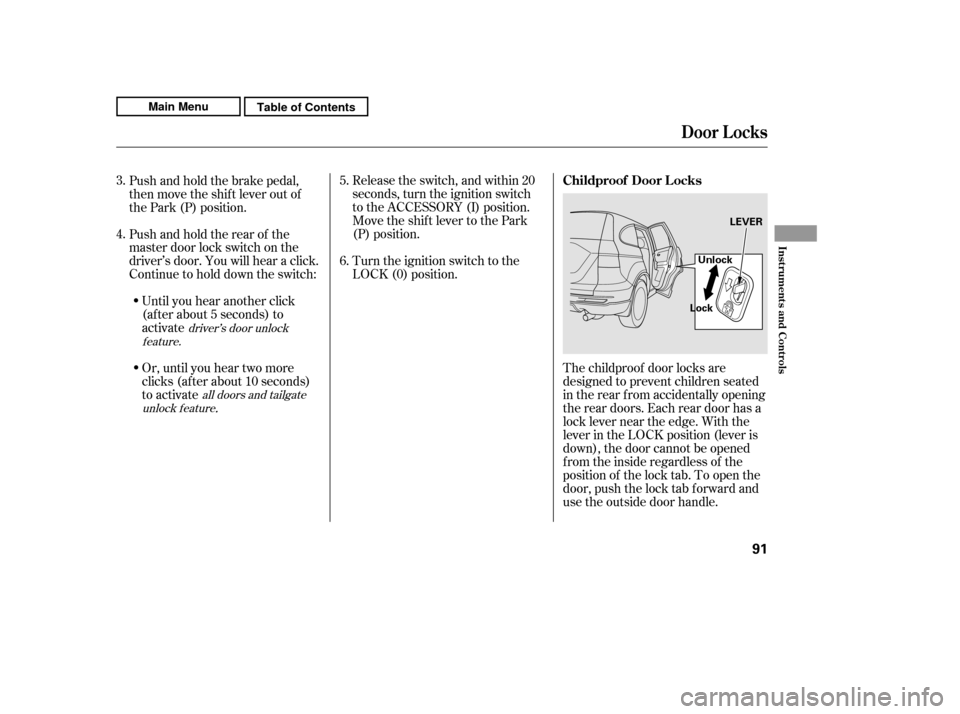
The childproof door locks are
designed to prevent children seated
in the rear f rom accidentally opening
the rear doors. Each rear door has a
lock lever near the edge. With the
lever in the LOCK position (lever is
down), the door cannot be opened
fromtheinsideregardlessof the
position of the lock tab. To open the
door, push the lock tab f orward and
use the outside door handle.
Turn the ignition switch to the
LOCK (0) position.
Push and hold the brake pedal,
then move the shift lever out of
the Park (P) position.
Pushandholdtherearof the
master door lock switch on the
driver’s door. You will hear a click.
Continue to hold down the switch:
Until you hear another click
(af ter about 5 seconds) to
activate
Or, until you hear two more
clicks (af ter about 10 seconds)
to activate
.
Release the switch, and within 20
seconds, turn the ignition switch
to the ACCESSORY (I) position.
Move the shift lever to the Park
(P) position.
3. 4. 5. 6.
driver’s door unlock
feature.
all doors and tailgate
unlock f eature
Childproof Door L ocks
Door L ocks
Inst rument s and Cont rols
91
LEVER
Lock Unlock
Main MenuTable of Contents
Page 112 of 445
When any seat-back is f olded down,
do not use the dual deck cargo shelf
(if equipped).
Make sure all items in the cargo area
are secured. Loose items can f ly
f orward and cause injury if you have
to brake hard (See
on page ).The lef t and right rear seats can be
f olded up separately to make room
for cargo.
To f old the rear seat f orward:
Remove any items from the seat
beforeyoufolduptheseatcushion.
Pull up the bar under the seat
cushion and slide the rear seat
backward. The rear seat will not
foldforwardunlessitisasfar
back as it will go. Lower the center seat-back bef ore
f olding the passenger’s side seat
forward.
Follow steps 1 through 4 on pages
and f or f olding down the
seat-back.
1. 2.
304 105 106
CONT INUED
Carrying CargoFolding the Rear Seat Forward
Seats
Inst rument s and Cont rols
107
SLIDE BARS
Main MenuTable of Contents