2011 HONDA CR-V flat tire
[x] Cancel search: flat tirePage 71 of 445

This indicator normally comes on f or
a f ew seconds when you turn the
ignition switch to the ON (II)
position. If it comes on while driving,
it indicates that one or more of your
vehicle’s tires are signif icantly low
on pressure.
If this happens, pull to the side of the
road when it is saf e, check which tire
has lost pressure, and determine the
cause. If it is because of a f lat tire,
replace the flat tire with the compact
spare (see page ), and have the
f lat tire repaired as soon as possible.
If two or more tires are underinf lated,
call a prof essional towing service
(see page ). For more
inf ormation, see page .This indicator normally comes on f or
a f ew seconds when you turn the
ignition switch to the ON (II)
position.
This indicator reminds you that the
exterior lights are on. It comes on
when the light switch is in either the
or position. If you turn the
ignition switch to the ACCESSORY
(I) or LOCK (0) position without
turning of f the light switch, this
indicator will stay on. A reminder
chime will also sound when you open
the driver’s door.
If this indicator comes on and stays
on at any other time, or if it does not
come on when you turn the ignition
switch to the ON (II) position, there
is a problem with the TPMS. With
this indicator on, the low tire
pressure indicator will not come on
when a tire loses pressure. Take the
vehicle to your dealer to have the
system checked. For more
inf ormation, see page .
This indicator will also come on
when the light switch is in AUTO
andthelightsturnonautomatically.
382
403 326 327
EX-L models
Low Tire Pressure
Indicator
Tire Pressure Monitoring
System (T PMS) IndicatorLights On Indicator
Instrument Panel Indicators
66
Main MenuTable of Contents
Page 332 of 445

For example, if you check and f ill
your tires in a warm area, then drive
in extremely cold weather, the tire
pressure will be lower than
measured and could be underinf lated
and cause the low tire pressure
indicator to come on. Or, if you
check and adjust your tire pressure
in cooler conditions, and drive into
extremely hot conditions, the tire
maybecomeoverinflated.However,
the low tire pressure indicator will
not come on if the tires are
overinf lated.
Refer to page for tire inflation
guidelines.When you restart the vehicle with
thecompactsparetire,theTPMS
indicator may also come on and stay
on after driving several miles
(kilometers).
Although your tire pressure is
monitored, you must manually check
thetirepressuresmonthly.
Each tire, including the spare, should
be checked monthly when cold, and
set to the recommended inf lation
pressure as specif ied on the tire information label and in the owner’s
manual (see page ).
This indicator comes on and stays on
if there is a problem with the tire
pressure monitoring system.
If this happens, the system will shut
of f and no longer monitor tire
pressures. Have the system checked
by your dealer as soon as possible.
If the low tire pressure indicator or
TPMS indicator comes on, the VSA
system automatically turns on even if
the VSA system is turned of f by
pressing the VSA OFF switch (see
page ). If this happens, you
cannot turn the VSA system of f by
pressing the VSA OFF switch again.
370 371
325
Tire Pressure Monitoring System (TPMS)
Tire Pressure Monitoring
System (T PMS) Indicator
Driving
327
Main MenuTable of Contents
Page 333 of 445

As required by the FCC:This device complies with Part 15 of theFCC rules. Operation is subject to thef ollowing two conditions: (1) This device may not cause harmf ul interf erence, and(2) this device must accept anyinterf erence received, including
interf erence that may cause undesiredoperation.
Changes or modif ications not expresslyapproved by the party responsible f or
compliance could void the user’sauthority to operate the equipment.
This device complies with IndustryCanada Standard RSS-210.Operation is subject to the f ollowing two conditions: (1) this device may not cause
interf erence, and (2) this device mustaccept any interf erence that may causeundesired operation of the device.
If you have a f lat tire, the low tire
pressure indicator will come on.
Replace the flat tire with the
compact spare tire (see page ).
Each wheel (except the compact
sparetirewheel)isequippedwitha
tire pressure sensor. You must use
TPMS specif ic wheels. It is
recommended that you always have
your tires serviced by your dealer or
qualif ied technician. The low tire pressure indicator or
the TPMS indicator will go off, after
several miles (kilometers) driving,
when you replace the spare tire with
the specif ied regular tire equipped
with the tire pressure monitor sensor.
Never use a puncture-repairing agent
in a f lat tire. If used, you will have to
replace the tire pressure sensor.
Havetheflattirerepairedbyyour
dealer as soon as possible.
After you replace the flat tire with
thecompactsparetire,thelowtire
pressure indicator stays on. This is
normal; the system is not monitoring
the spare tire pressure. Manually
check the spare tire pressure to be
sure it is correct. Af ter several miles
(kilometers) driving with the
compact spare tire, the TPMS
indicator comes on and the low tire
pressure indicator goes of f . 382
Tire Pressure Monitoring System (TPMS)
Changing a T ire with T PMS
328
Main MenuTable of Contents
Page 375 of 445

To saf ely operate your vehicle, your
tires must be the proper type and
size, in good condition with adequate
tread, and correctly inf lated.
The f ollowing pages give more
detailed inf ormation on how to take
care of your tires and what to do
when they need to be replaced.Keeping the tires properly inf lated
provides the best combination of
handling, tread lif e, and riding
comf ort.
Underinf lated tires wear unevenly,
adversely affect handling and fuel
economy, and are more likely to
fail from being overheated.
Overinf lated tires can make your
vehicleridemoreharshly,are
more prone to damage f rom road
hazards, and wear unevenly. The tire pressure monitoring system
(TPMS) warns you when a tire
pressure is low. See page f or
more inf ormation.
Even though your vehicle is
equipped with TPMS, we
recommend that you visually check
your tires every day. If you think a
tire might be low, check it
immediately with a tire gauge.
326
Inf lation Guidelines
Tires
370
Using tires that are excessively
worn or improperly inflated can
cause a crash in which you can
be seriously hurt or killed.
Follow all instructions in this
owner’s manual regarding tire
inflation and maintenance.
Main MenuTable of Contents
Page 386 of 445

This section covers the more
common problems that motorists
experience with their vehicles. It
gives you inf ormation about how to
safely evaluate the problem and what
to do to correct it. If the problem has
stranded you on the side of the road,
you may be able to get going again.
If not, you will also f ind instructions
on getting your vehicle towed.......................
Compact Spare Tire . 382
....................
Changing a Flat Tire . 383
.............
If the Engine Won’t Start . 388
................................
Jump Starting . 390
..............
If the Engine Overheats . 392
.........
Low Oil Pressure Indicator . 394
..........
Charging System Indicator . 394
.......
Malf unction Indicator Lamp . 395
...............
Brake System Indicator . 396
..............................................
Fuses . 397
..............................
Fuse Locations . 401
......................
Emergency Towing . 403
Taking Care of the Unexpected
T aking Care of t he Unexpect ed
381
Main Menu
Page 387 of 445

Replace the tire when you can see
the tread wear indicator bars. The
replacement tire should be the same
sizeanddesign,mountedonthe
same wheel. The spare tire is not
designed to be mounted on a regular
wheel, and the spare wheel is not
designed f or mounting a regular tire.
Do not mount snow chains on the
compact spare tire.
Use the compact spare tire as a
temporary replacement only. Get
your regular tire repaired or replaced,
and put it back on your vehicle as
soon as you can.
Check the air pressure of the
compact spare tire every time you
check the other tires. It should be
inf lated to:
Follow these precautions:
Never exceed 50 mph (80 km/h).
This tire gives a harsher ride and
less traction on some road
surf aces. Use greater caution
while driving. Do not use your compact spare
tire on another vehicle unless it is
thesamemakeandmodel.
The low tire pressure indicator
comes on and stays on af ter you
replace the flat tire with the
compact spare tire. Af ter several
miles (kilometers) driving with the
compact spare tire, the TPMS
indicator comes on and the low
tire pressure indicator goes of f .
Compact Spare Tire
382
INDICATOR LOCATION MARK
TREAD WEAR INDICATOR BAR
60 psi (420 kPa , 4.2 kgf/cm)
Main MenuTable of Contents
Page 388 of 445

If you have a f lat tire while driving,
stop in a saf e place to change it.
Drive slowly along the shoulder until
you get to an exit or an area to stop
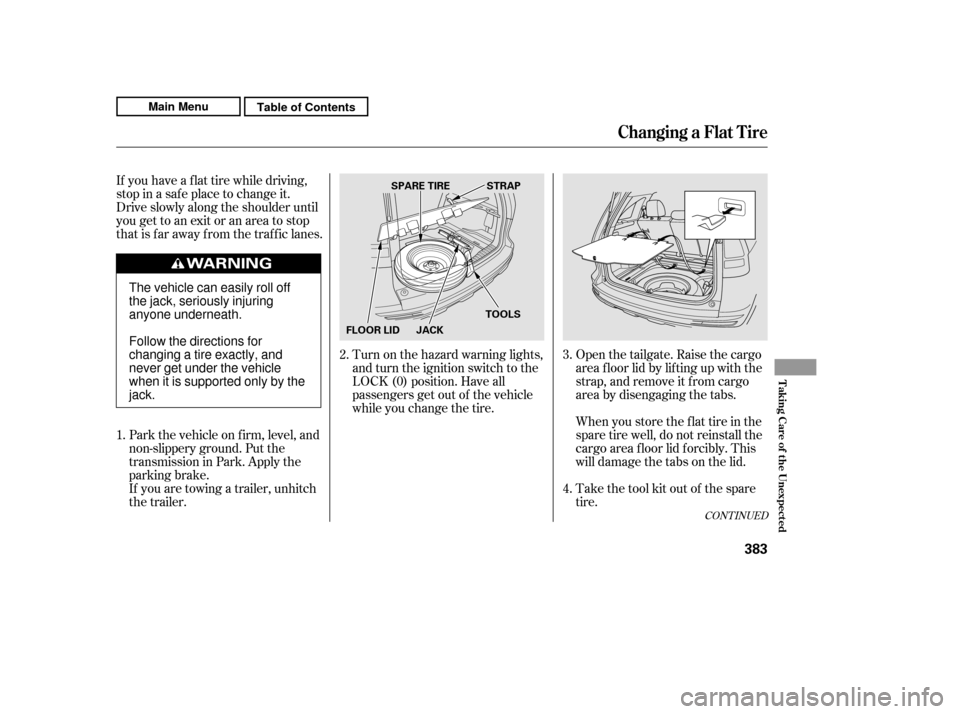
that is far away from the traffic lanes.Park the vehicle on f irm, level, and
non-slippery ground. Put the
transmission in Park. Apply the
parking brake.
If you are towing a trailer, unhitch
the trailer. Turn on the hazard warning lights,
and turn the ignition switch to the
LOCK (0) position. Have all
passengers get out of the vehicle
while you change the tire.
Open the tailgate. Raise the cargo
area f loor lid by lif ting up with the
strap, and remove it f rom cargo
area by disengaging the tabs.
When you store the f lat tire in the
spare tire well, do not reinstall the
cargo area f loor lid f orcibly. This
will damage the tabs on the lid.
Take the tool kit out of the spare
tire.
1. 2.
3. 4.
CONT INUED
Changing a Flat T ire
T aking Care of t he Unexpect ed
383
JACK
SPARE TIRE
TOOLSSTRAP
FLOOR LID
The vehicle can easily roll off
the jack, seriously injuring
anyone underneath.
Follow the directions for
changing a tire exactly, and
never get under the vehicle
when it is supported only by thejack.
Main MenuTable of Contents
Page 389 of 445

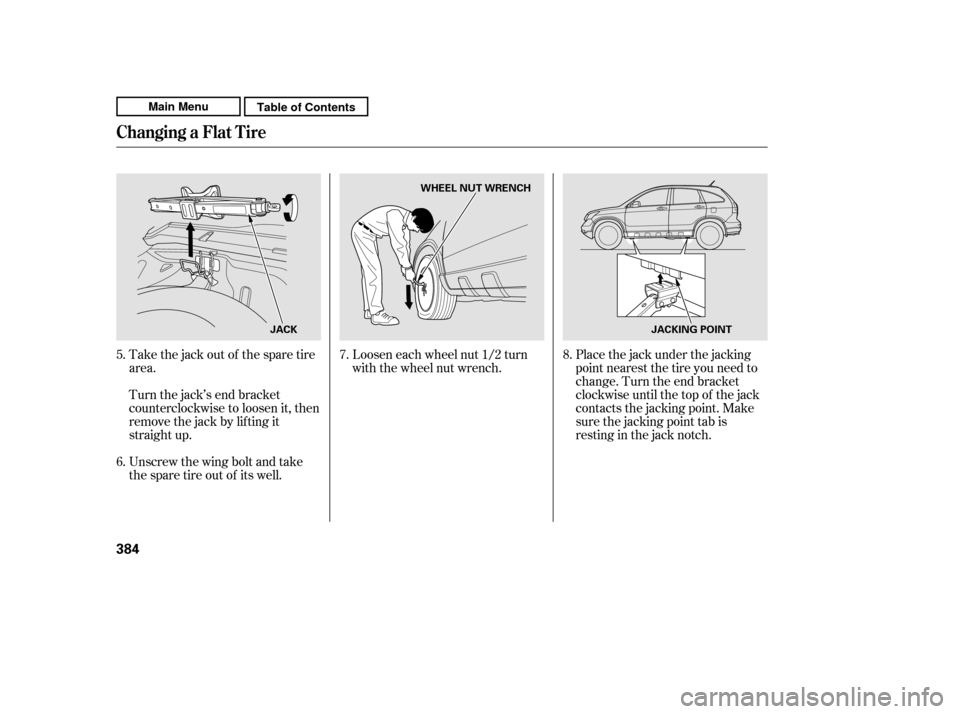
Take the jack out of the spare tire
area.
Turn the jack’s end bracket
counterclockwise to loosen it, then
remove the jack by lif ting it
straight up.
Unscrew the wing bolt and take
the spare tire out of its well.Loosen each wheel nut 1/2 turn
with the wheel nut wrench.
Placethejackunderthejacking
point nearest the tire you need to
change. Turn the end bracket
clockwise until the top of the jack
contacts the jacking point. Make
sure the jacking point tab is
restinginthejacknotch.
6.
5.
7.8.
Changing a Flat T ire
384
JACKWHEEL NUT WRENCH
JACKING POINT
Main MenuTable of Contents