Page 8 of 369
�Î�Î
�Î
�Î
�Î
�Π���ΠOnly on vehicles equipped with navigation system. Ref er to the navigati on system manual.
To use the horn, press the center pad of the steering wheel.
Canadian model only
1: 2:3:4: If equipped
Your Vehicle at a Glance
4 PASSENGER AIRBAG OFF
INDICATOR
HAZARD WARNING BUTTON
REAR WINDOW DEFOGGER
HORN
HEADLIGHTS/TURN SIGNAL WINDSHIELD WIPERS/WASHERS
(P. 74)
(P. 73)
(P. 76)
(P. 76)
HEATED MIRRORS(P. 214)
(P. 99)
CRUISE CONTROL
BUTTONS
NAVIGATION SYSTEM VOICE
CONTROL BUTTONS (P. 217)
INSTRUMENT PANEL
BRIGHTNESS BUTTONS
(P. 75)
DISPLAY CHANGE
BUTTON
(P. 66)
SEL/RESET BUTTON
(P. 65)
VEHICLE STABILITY ASSIST
(VSA
) SYSTEM OFF SWITCH
(P. 271)
REMOTE AUDIO CONTROLS
(P. 210)
(P. 217)
HOOD RELEASE HANDLE
(P. 244)
BLUETOOTH HANDSFREELINK
SYSTEM VOICE CONTROL
BUTTONS
STEERING WHEEL
ADJUSTMENT (P. 77)
Vehicle with navigation system is shown. (P. 31)
1
3
4
2
4
Main Menu
Page 76 of 369
�Î�Î
�Î
�Î �Î
�Π���ΠOnly on vehicles equipped with navigation system, ref er to the navigati on system manual.
To use the horn, press the center pad of the steering wheel.
1:2:3:4: If equipped
Canadian model only
Controls Near the Steering Wheel
72 HORN
Vehicle with navigation system is shown. CRUISE CONTROL
BUTTONS
WINDSHIELD WIPERS/WASHERS
(P. 75) (P. 74)
(P. 73)
(P. 76)
HEATED MIRRORS
(P. 214)
NAVIGATION SYSTEM VOICE
CONTROL BUTTONS (P. 217) (P. 76)
DISPLAY CHANGE
BUTTON
(P. 66)
(P. 99)
HEADLIGHTS/TURN SIGNAL
STEERING WHEEL
ADJUSTMENT
(P. 217)
HOOD RELEASE HANDLE
(P. 244)
INSTRUMENT PANEL
BRIGHTNESS
SEL/RESET BUTTON
PASSENGER AIRBAG OFF
INDICATOR
HAZARD WARNING BUTTON
REAR WINDOW DEFOGGER
BLUETOOTH HANDSFREELINK
SYSTEM VOICE CONTROL
BUTTONS
VEHICLE STABILITY ASSIST
(VSA
) SYSTEM OFF SWITCH
(P. 65)
(P. 271)
(P. 77)
REMOTE AUDIO CONTROLS
(P. 210)
(P. 31)
1 3
4
4 2
Main Menu
Page 98 of 369

This reduces the distance between
the restraint and the occupant’s head.
It also helps protect the occupants
against the likelihood of whiplash
and injuries to the neck and upper
spine.
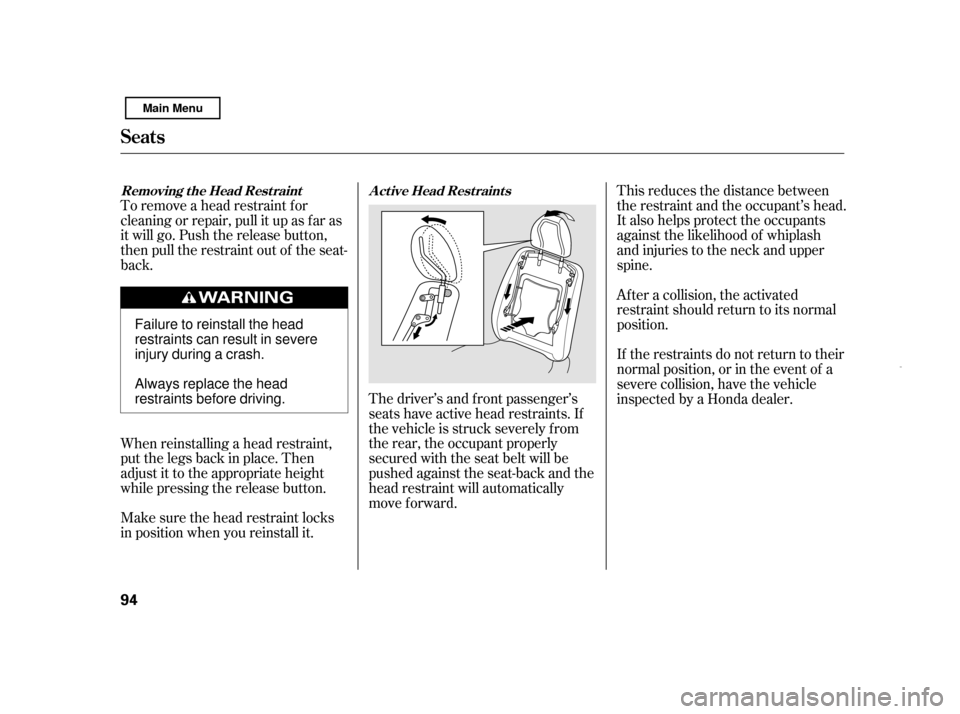
The driver’s and f ront passenger’s
seats have active head restraints. If
the vehicle is struck severely f rom
the rear, the occupant properly
secured with the seat belt will be
pushed against the seat-back and the
head restraint will automatically
move forward.
To remove a head restraint f or
cleaning or repair, pull it up as f ar as
it will go. Push the release button,
then pull the restraint out of the seat-
back.
When reinstalling a head restraint,
put the legs back in place. Then
adjust it to the appropriate height
while pressing the release button.
Make sure the head restraint locks
in position when you reinstall it.
If the restraints do not return to their
normal position, or in the event of a
severe collision, have the vehicle
inspected by a Honda dealer.
Af ter a collision, the activated
restraint should return to its normal
position.A ct ive Head Rest raint s
Removing t he Head Rest raint
Seats
94 Failure to reinstall the head
restraints can result in severe
injury during a crash.
Always replace the head
restraints before driving.
Main Menu
Page 217 of 369

The security system helps to protect
your vehicle and valuables f rom thef t.
The horn sounds and a combination
of headlights (low beam), parking
lights, side marker lights, and
taillights f lash if someone attempts
to break into your vehicle or remove
the radio. This alarm continues f or 2
minutes, then it stops. To reset an
activated system before the 2
minutes have elapsed, unlock the
driver’s door with the key or the
remote transmitter.
The security system automatically
sets 15 seconds after you lock the
doors, hood, and trunk. For the
system to activate, you must lock the
doors f rom the outside with the key,
driver’s lock tab, door lock master
switch, or remote transmitter. The
security system indicator on the
instrument panel starts blinking
immediately to show you the system
is setting itself .Once the security system is set,
opening any door, the trunk, or the
hood without using the key or the
remote transmitter will cause the
alarm to be activated. It will also be
activated if the audio unit is removed
f rom the dashboard or the wiring is
cut.
With the system set, you can still
open the trunk with the master key
or the remote transmitter without
triggering the alarm. The alarm willsound if the trunk lock is f orced, or
the trunk is opened with the trunk
release handle.
The security system will not set if
the hood, trunk, or either door is not
f ully closed. If the system will not set,
turn the ignition switch to the ON
(II) position, and check the
indicators on the instrument panel.
Close either door or the trunk
indicatedonthedisplay.Checkthe
hood visually since it is not part of
the display, and shut it if necessary.
To see if the system is set
af ter you exit the vehicle, press the
LOCK button on the remote
transmitter within 5 seconds. If the
system is set, the horn will beep
once.
Do not attempt to alter this system
or add other devices to it.
Security System
Features
213
NOTE:
SECURITY SYSTEM INDICATOR
Main Menu
Page 248 of 369

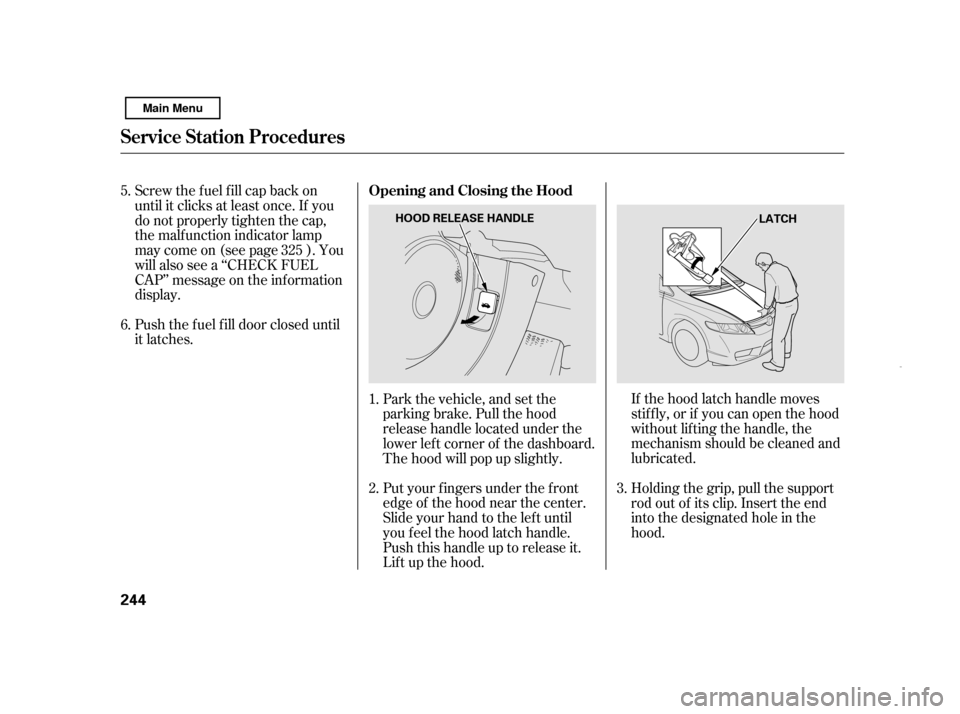
If the hood latch handle moves
stif f ly, or if you can open the hood
without lifting the handle, the
mechanism should be cleaned and
lubricated.
Put your f ingers under the f ront
edge of the hood near the center.
Slide your hand to the lef t until
you f eel the hood latch handle.
Push this handle up to release it.
Lif t up the hood.
Push the f uel f ill door closed until
it latches.
Screw the fuel fill cap back on
until it clicks at least once. If you
do not properly tighten the cap,
the malf unction indicator lamp
maycomeon(seepage ).You
will also see a ‘‘CHECK FUEL
CAP’’ message on the inf ormation
display.
Holding the grip, pull the support
rod out of its clip. Insert the end
into the designated hole in thehood.
Park the vehicle, and set the
parking brake. Pull the hood
release handle located under the
lower lef t corner of the dashboard.
The hood will pop up slightly.
2.
1.
3.
5. 6.
325
Service Station Procedures
Opening and Closing the Hood
244 LATCH
HOOD RELEASE HANDLE
Main Menu