Page 66 of 369
The engine can be severely damaged
if this indicator f lashes or stays on
when the engine is running. For
more inf ormation, see page .
If this indicator comes on when the
engine is running, the battery is not
being charged. For more inf ormation,
see page .
See page . This indicator normally comes on f or
a f ew seconds when you turn the
ignition switch to the ON (II)
position. If it comes on at any other
time, it indicates a problem in the
integrated motor assist (IMA)
system. With the IMA indicator on,
the vehicle may not accelerate as it
normally does. Have the vehicle
checked by the dealer as soon as
possible.
See pages and .
This indicator comes on when the
security system is set. For more
inf ormation, see page .
213 325
323
324 264 265
Instrument Panel Indicators
Security System Indicator Malf unction Indicator
Lamp
L ow Oil Pressure
Indicator
Charging System
IndicatorIMA System Indicator
A uto Idle Stop Indicator
62 SECURITY SYSTEM INDICATOR
Main Menu
Page 67 of 369

If you turn the steering wheel to the
f ull lef t or right position repeatedly
while stopping or driving at very low
speed, you may f eel slightly harder
steering due to overheating of the
steering gearbox.For more inf ormation, see page .
Continuously driving under those
conditions could damage the power
steering system.
This indicator normally comes on
when you turn the ignition switch to
the ON (II) position and goes of f
af ter the engine starts. If it comes on
at any other time, there is a problem
in the electric power steering system.
If this happens, stop the vehicle in a
saf e place, and turn of f the engine.
Reset the system by restarting the
engine. The indicator will not turn
of f immediately. If it does not go of f
after driving a short distance, or
comes back on again while driving,
take the vehicle to your dealer to
have it checked. With the indicator
on, the EPS may be of f , making the
vehicle harder to steer. This indicator normally comes on f or
a f ew seconds when you turn the
ignition switch to the ON (II)
position. When the brake system
indicator (amber) is on, there is a
problem with the Cooperative
Control with Regenerative Brake,
Creep Aid System or Brake Assist
(the normal brake operates properly).
Have your vehicle checked by your
dealer.
326
Electric Power Steering
(EPS) Indicator
Brake System
Indicator
(A mber)
Instrument Panel Indicators
Inst rument s and Cont rols
63
U.S. Canada
Main Menu
Page 68 of 369
This indicator normally comes on f or
a f ew seconds when you turn the
ignition switch to the ON (II)
position.
If itcomesonandstaysonatany
other time, there is a problem with
the VSA system. Take your vehicle
to a dealer to have it checked.
Without VSA, your vehicle still has
normal driving ability, but will not
have VSA traction and stability
enhancement.This indicator has three f unctions:
This indicator normally comes on f or
a f ew seconds when you turn the
ignition switch to the ON (II)
position. For more inf ormation, see
page .
It comes on along with the VSA
system indicator if there is a
problem with the VSA system.
It flashes when VSA is active (see
page ).
Itcomesonasareminderthatyou
have turned off the vehicle
stability assist (VSA) system.
1. 2. 3.
270
270
If equipped If equipped
Vehicle Stability Assist
(VSA ) System Indicator VSA A ctivation Indicator
Instrument Panel Indicators
64
Main Menu
Page 69 of 369
To switch the information display
between the odometer, trip meter,
outside temperature, and engine oil
lif e and maintenance item code(s),
press the SEL/RESET button
repeatedly.
The odometer shows the total
distance your vehicle has been
driven. It measures miles in U.S.
models and kilometers in Canadian
models. It is illegal under U.S.
federal law and Canadian provincial/
territorial regulations to disconnect,
reset, or alter the odometer with the
intent to change the number of miles
or kilometers indicated.
Odometer
Gauges
Inst rument s and Cont rols
65
TRIP METER
SEL/RESET BUTTON DISPLAY CHANGE BUTTON TACHOMETER
INSTRUMENT PANEL BRIGHTNESS CONTROL BUTTONS INFORMATION
DISPLAY
FUEL GAUGE
SPEEDOMETER
INSTANT FUEL ECONOMY/
TEMPERATURE GAUGE
ODOMETER/OUTSIDE
TEMPERATURE INDICATOR
Main Menu
Page 73 of 369
 position. This
inf ormation helps to keep you")
The inf ormation display in the
instrument panel shows you the
engine oil lif e and maintenance
service items when the ignition
switch is in the ON (II) position. This
inf ormation helps to keep you aware
of the periodic maintenance your
vehicle needs f or continued trouble-
f ree driving. Ref er to page f or
more inf ormation.
Your vehicle’s onboard diagnostic
system will detect a loose or missing
f uel f ill cap as an evaporative system
leak. The f irst time a leak is detected
a ‘‘CHECK FUEL CAP’’ message
appears on the inf ormation display.
Turn the engine of f , and conf irm the
f uel f ill cap is installed. If it is, loosen
it, then retighten it until it clicks at
least once. The message should go
off after several days of normal
driving once you tighten or replace
the f uel f ill cap. To scroll to another
display, press the SEL/RESET
button. The ‘‘CHECK FUEL CAP’’
message will appear each time you
restart the engine until the system
turns the message of f . If the system still detects a leak in
the vehicle’s evaporative emissions
system, the malf unction indicator
lamp (MIL) comes on. If the f uel f ill
cap was not already tightened, turn
the engine of f , and check or
retighten the f uel f ill cap until it
clicks at least once. The MIL should
go off after several days of normal
driving once the cap is tightened or
replaced. If the MIL does not go of f ,
have your vehicle inspected by a
dealer. For more inf ormation, see
page .
325 277
Maintenance Minder
Check Fuel Cap Message
Gauges
Inst rument s and Cont rols
69
TM
Main Menu
Page 76 of 369
�Î�Î
�Î
�Î �Î
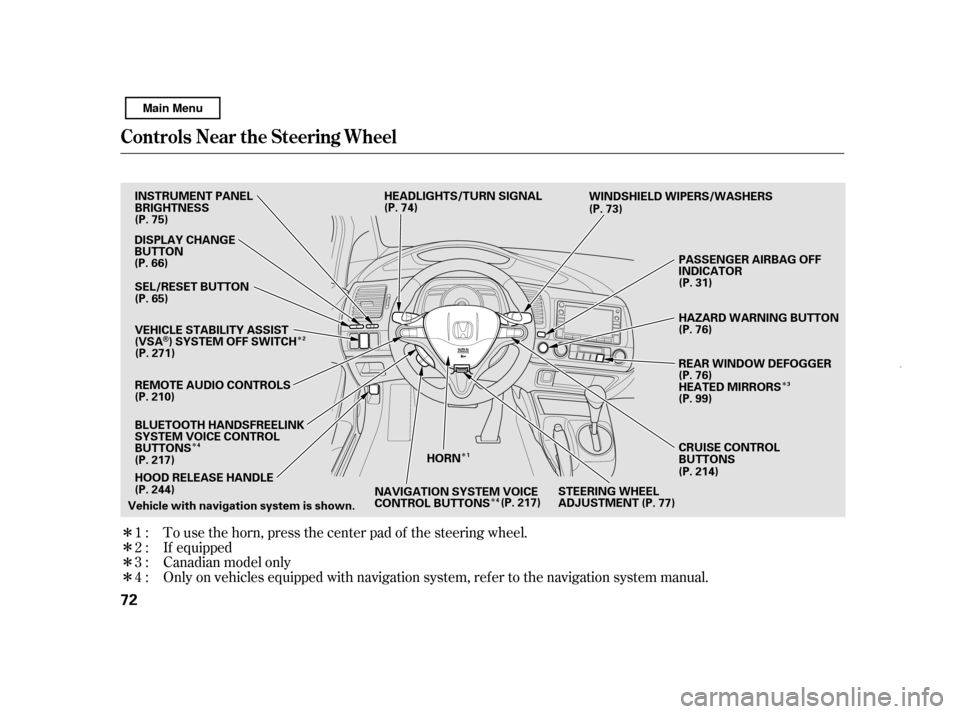
�Π���ΠOnly on vehicles equipped with navigation system, ref er to the navigati on system manual.
To use the horn, press the center pad of the steering wheel.
1:2:3:4: If equipped
Canadian model only
Controls Near the Steering Wheel
72 HORN
Vehicle with navigation system is shown. CRUISE CONTROL
BUTTONS
WINDSHIELD WIPERS/WASHERS
(P. 75) (P. 74)
(P. 73)
(P. 76)
HEATED MIRRORS
(P. 214)
NAVIGATION SYSTEM VOICE
CONTROL BUTTONS (P. 217) (P. 76)
DISPLAY CHANGE
BUTTON
(P. 66)
(P. 99)
HEADLIGHTS/TURN SIGNAL
STEERING WHEEL
ADJUSTMENT
(P. 217)
HOOD RELEASE HANDLE
(P. 244)
INSTRUMENT PANEL
BRIGHTNESS
SEL/RESET BUTTON
PASSENGER AIRBAG OFF
INDICATOR
HAZARD WARNING BUTTON
REAR WINDOW DEFOGGER
BLUETOOTH HANDSFREELINK
SYSTEM VOICE CONTROL
BUTTONS
VEHICLE STABILITY ASSIST
(VSA
) SYSTEM OFF SWITCH
(P. 65)
(P. 271)
(P. 77)
REMOTE AUDIO CONTROLS
(P. 210)
(P. 31)
1 3
4
4 2
Main Menu
Page 78 of 369

�µ
�µ �µ
Turn signal
Of f
Parking and interior lights
Headlights
High beams
Flashhighbeams Push down on the
lever to signal a lef t turn and up to
signal a right turn. To signal a lane
change, push lightly on the lever,
and hold it. The lever will return to
center when you release it or
complete a turn.
Turning the switch to
the ‘‘ ’’ position turns on the
parking lights, taillights,
instrument panel lights, side-
marker lights, and rear license
plate lights.
When the light switch is in the
‘‘ ’’ or ‘‘ ’’ position, the
lights on indicator comes on as a
reminder. This indicator stays on
if you leave the light switch on and
turn the ignition switch to the
ACCESSORY (I) or the LOCK (0)
position.
Turning the switch to the ‘‘ ’’
position turns on the headlights. If you leave the lights on with the
key removed f rom the ignition
switch, you will hear a reminder
chime when you open the driver’s
door.
Push the lever
f orward and the high beam
indicator will come on (see page ). Pull it back to return to low
beams.
To f lash the high beams, pull the
lever back lightly, then release it.
The high beams will stay on as
long as you hold the lever back.
1.2.3.4.5.6. 60
Turn Signals and Headlights
Turn Signal
Headlights
High Beams
74
Main Menu
Page 79 of 369

�´�µ
The buttons under the lef t side vent
control the brightness of the
instrument panel. Push the or
button to adjust the brightness.
With the headlight switch of f or in
the position, the high beam
headlights come on with reduced
brightness when you turn the
ignition switch to the ON (II)
position and release the parking
brake. They remain on until you turn
the ignition switch of f , even if you
set the parking brake.
The headlights revert to normal
operation when you turn them on
with the switch.
There are six brightness levels.
When you push either button, the
inf ormation display indicates the
current level. You will hear a tone
when you reach the maximum or
minimum brightness. The display
returns to the odometer 5 seconds af ter you stop adjusting the
brightness.
To reduce glare at night, the
instrument panel illumination dims
when you turn the light switch to the
or position.
The center of each meter (upper and
lower) illuminates with reduced
brightness when you unlock and
open the driver’s door, and then goes
back to the selected brightness when
you turn the ignition switch to the
ON (II) position.
If you insert the key but do not turn
the ignition switch to the ON (II)
position, the illumination turns of f in
about 10 seconds.
Daytime Running L ights Instrument Panel Brightness
Headlights, Instrument Panel Brightness
Inst rument s and Cont rols
75
INSTRUMENT PANEL BRIGHTNESS
CONTROL BUTTONS
Main Menu


position.
If itcomesonandstaysonatany
other time, there is a problem with
the VSA system. Take")
,
press the SEL/RESET button
repeatedly.
The odometer shows")