Page 42 of 369

�µ
If they do, they
could be very seriously injured in a
crash. If you are not wearing a
seat belt in a crash, you could be
thrown forward and crush the
child against the dashboard or a
seat-back. If you are wearing a
seat belt, the child can be torn
from your arms and be seriously
hurt or killed.
During a crash, the
belt could press deep into the child
and cause serious or f atal injuries.
This can prevent
children f rom accidentally f alling
out (see page ). Even very young
children learn how to unlock
vehicle doors, turn on the ignition
switch, and open the trunk, which
can lead to accidental injury or
death. Children
who play in vehicles can
accidentally get trapped inside.
Teach your children not to play in
or around vehicles. Know how to
operate the emergency trunk
opener and decide if your children
should be shown how to use this
feature(seepage ).
For example, infants and small
childrenleftinavehicleonahot
day can die f rom heatstroke. A
child lef t alone with the key in the
ignition switch can accidentally set
the vehicle in motion, possibly
injuring themselves or others. If a child wraps a loose
seat belt around their neck, they
can be seriously or f atally injured.
(See pages and f or how to
activate and deactivate the
lockable retractor.)
Leaving children without
adult supervision is illegal in most
states and Canadian provinces,
and can be very hazardous. 45 46
82 88
Additional Saf ety Precautions
Never let two children use the
same seat belt .
Neverholdaninfantorchildon
your lap.
Never put a seat belt over yourselfand a child.
Use t he childproof door locks t oprevent children f rom opening t he rear doors. K eep vehicle keys and remot e
transmitters out of the reach ofchildren.
L ock all doors and t he t runk when
your vehicle is not in use.
Make sure any unused seat belt
t hat a child can reach is buckled,the lockable retractor is activated, and the belt is f ully retracted andlocked.
Do not leave children alone in avehicle.
Protecting Children General Guidelines
38
Main Menu
Page 57 of 369
These labels are in the locations
shown. They warn you of potential
hazards that could cause serious
injury or death. Read these labels
caref ully.
If a label comes of f or becomes hard
to read (except for the U.S.
dashboard label which may be
removed by the owner), contact your
dealer f or a replacement.
CONT INUED
U.S. modelsCanadian models
U.S. models only
Saf ety L abels
Driver and Passenger Saf ety
53
DASHBOARD
RADIATOR CAP SUN VISORS
Main Menu
Page 110 of 369

Airf low is divided between
the f loor vents and def roster vents at
the base of the windshield.
Air f lows f rom the def roster
vents at the base of the windshield.
When you select , the system
automatically switches to fresh air
mode and turns on the A/C.
In AUTO mode, the system controls
the airf low direction automatically
between the dashboard vents and
the f loor vents.
This button turns the air
conditioning on and of f . The
indicatorinthebuttonisonwhen
the A/C is on.
When the recirculation indicator is
on, air f rom the vehicle’s interior is
sent throughout the system again.
Select recirculation mode when
driving through dusty or smoky
conditions, then return to fresh air
mode.
The outside air intakes f or the
heating and cooling system are at
the base of the windshield. Keep this
area clear of leaves and other debris.
When the f resh air indicator is on,
air is brought in f rom the outside of
the vehicle. Thesystemshouldbeleftinfresh
air mode under almost all conditions.
Keeping the system in recirculation
mode, particularly with the A/C of f ,
can cause the windows to fog up.
Use the mode control buttons to
select the vents air flows from. Some
air will f low f rom the dashboard
corner vents in all modes.
Air flows from the center
and corner vents in the dashboard.
Airf low is divided between
the vents in the dashboard and the
f loor vents.
Air f lows f rom the f loor
vents. When you select , the
system automatically switches to
f resh air mode.
Air Conditioning (A/C) Button
Recirculation Button
Fresh Air Button
Mode Control Button
Climat e Cont rol
106
Main Menu
Page 112 of 369

To clear the windows f aster, you can
close the dashboard corner vents by
rotating the wheel below each vent.
This sends more warm air to the
windshield def roster vents. Once the
windshield is clear, select f resh air
mode to avoid f ogging the windows.
For your saf ety, make sure you have
a clear view through all the windows
bef ore driving.
Select . When you select
, the system automatically
switches to f resh air mode and
turns on the A/C. The A/C
indicator will not come on, if it was
previously of f .
Select .
Set the f an and temperature
controls to maximum level.
Set the f an to the desired speed, or
high f or f aster def rosting.
Select . When you select
, the system automatically
switches to f resh air mode and
turns on the A/C. The A/C
indicator will not come on, if it was
previously of f .
Adjust the temperature so the
airflow f eels warm.
Select to help clear the
rear window.
To increase airf low to the
windshield, close the corner vents.
To remove f og f rom the inside of the
windows: 1.2. 3. 4.5.
1. 2. 3.
Climat e Cont rol
T o Def og and Def rost T o Remove Exterior Frost or Ice
From the Windows
108
Main Menu
Page 113 of 369
Press the OFF button. However, a
lack of airf low can cause the
windowstofogup.Youshouldkeep
the fan on at all times so stale air and
moisture do not build up in the
interior and cause f ogging.To regulate the interior temperature
and humidity, the climate control
system has two sensors. A sunlight
sensor is located in the top of the
dashboard and a temperature/
humidity sensor is next to the
steering column. Do not cover the
sensors or spill any liquid on them.
To Turn Everything Off Sunlight, Temperature, and
Humidity Sensors
Climat e Cont rol
Features
109
SUNLIGHT SENSOR TEMPERATURE/HUMIDITY SENSOR
Main Menu
Page 217 of 369
, parking
lights, side marker lights, and
taillights f lash if")
The security system helps to protect
your vehicle and valuables f rom thef t.
The horn sounds and a combination
of headlights (low beam), parking
lights, side marker lights, and
taillights f lash if someone attempts
to break into your vehicle or remove
the radio. This alarm continues f or 2
minutes, then it stops. To reset an
activated system before the 2
minutes have elapsed, unlock the
driver’s door with the key or the
remote transmitter.
The security system automatically
sets 15 seconds after you lock the
doors, hood, and trunk. For the
system to activate, you must lock the
doors f rom the outside with the key,
driver’s lock tab, door lock master
switch, or remote transmitter. The
security system indicator on the
instrument panel starts blinking
immediately to show you the system
is setting itself .Once the security system is set,
opening any door, the trunk, or the
hood without using the key or the
remote transmitter will cause the
alarm to be activated. It will also be
activated if the audio unit is removed
f rom the dashboard or the wiring is
cut.
With the system set, you can still
open the trunk with the master key
or the remote transmitter without
triggering the alarm. The alarm willsound if the trunk lock is f orced, or
the trunk is opened with the trunk
release handle.
The security system will not set if
the hood, trunk, or either door is not
f ully closed. If the system will not set,
turn the ignition switch to the ON
(II) position, and check the
indicators on the instrument panel.
Close either door or the trunk
indicatedonthedisplay.Checkthe
hood visually since it is not part of
the display, and shut it if necessary.
To see if the system is set
af ter you exit the vehicle, press the
LOCK button on the remote
transmitter within 5 seconds. If the
system is set, the horn will beep
once.
Do not attempt to alter this system
or add other devices to it.
Security System
Features
213
NOTE:
SECURITY SYSTEM INDICATOR
Main Menu
Page 221 of 369
�µ�µ
Bluetooth
handsf reelink.honda.
com
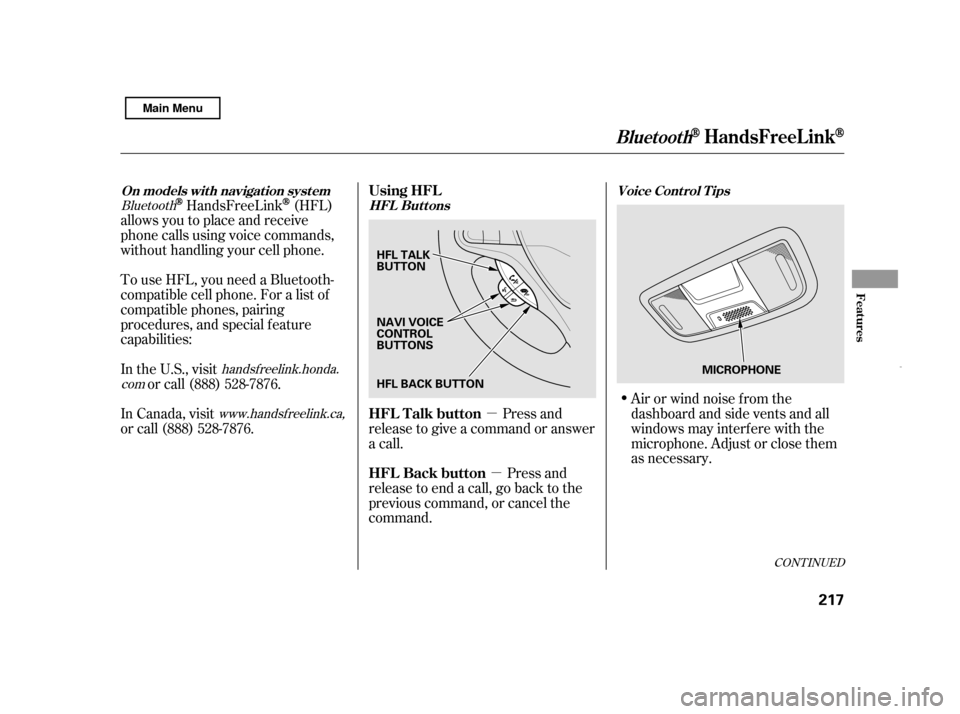
www.handsfreelink.ca,HandsFreeLink(HFL)
allows you to place and receive
phone calls using voice commands,
without handling your cell phone.
To use HFL, you need a Bluetooth-
compatible cell phone. For a list of
compatible phones, pairing
procedures, and special f eature
capabilities:
In the U.S., visit
or call (888) 528-7876.
Press and
release to give a command or answer
a call.
Press and
release to end a call, go back to the
previous command, or cancel the
command. Airorwindnoisefromthe
dashboard and side vents and all
windows may interfere with the
microphone. Adjust or close them
as necessary.
In Canada, visit
or call (888) 528-7876.
CONT INUED
On models wit h navigat ion syst em
HFL ButtonsVoice Cont rol T ips
BluetoothHandsFreeL ink
Using HFL
HFL Talk button
HFL Back button
Features
217
HFL TALK
BUTTON
MICROPHONE
NAVI VOICE
CONTROL
BUTTONS
HFL BACK BUTTON
Main Menu
Page 248 of 369

If the hood latch handle moves
stif f ly, or if you can open the hood
without lifting the handle, the
mechanism should be cleaned and
lubricated.
Put your f ingers under the f ront
edge of the hood near the center.
Slide your hand to the lef t until
you f eel the hood latch handle.
Push this handle up to release it.
Lif t up the hood.
Push the f uel f ill door closed until
it latches.
Screw the fuel fill cap back on
until it clicks at least once. If you
do not properly tighten the cap,
the malf unction indicator lamp
maycomeon(seepage ).You
will also see a ‘‘CHECK FUEL
CAP’’ message on the inf ormation
display.
Holding the grip, pull the support
rod out of its clip. Insert the end
into the designated hole in thehood.
Park the vehicle, and set the
parking brake. Pull the hood
release handle located under the
lower lef t corner of the dashboard.
The hood will pop up slightly.
2.
1.
3.
5. 6.
325
Service Station Procedures
Opening and Closing the Hood
244 LATCH
HOOD RELEASE HANDLE
Main Menu