Page 94 of 400

�µ
�µ Avoid dropping or throwing the
transmitter.
Protect the transmitter from
extreme temperature.
Do not immerse the transmitter in
any liquid.
If you lose a transmitter, the
replacement needs to be
reprogrammed by your dealer.
The ceiling light and the door
activated spotlights (if equipped)
come on when you press the
UNLOCK button if the lights are in
the door activated position. If you do
not open either door within 30
seconds, the light(s) will f ade out. If
you relock the doors with the remote
transmitter before 30 seconds have
elapsed, the light(s) will go of f
immediately.
If you do not open either door within
30 seconds, the doors automatically
relock, and the security system (if
equipped) sets. You cannot unlock it
if the key is in the ignition switch. Press this
button f or about 1 second to open
the trunk. You cannot open the trunk
if the key is in the ignition switch.
Press and hold this
button for about 2 seconds to attract
attention: the horn will sound and
the exterior lights will f lash f or about
30 seconds. To cancel panic mode,
press any other button on the remote
transmitter, or turn the ignition
switch to the ON (II) position.
EX, EX-L, Si and Canadian SE models Remote Transmitter Care
T RUNK REL EA SE
PA NIC
Remote Transmitter
90
Main Menu
Page 95 of 400
If it takes several pushes on the
button to lock or unlock the doors,
replace the battery as soon as
possible.
Battery type: CR1616Inside the transmitter, separate
the inner cover f rom the keypad
by releasing the two tabs on the
cover.
To replace the battery:
Remove the screw at the base of
the transmitter with a small
Phillips-head screwdriver. Separate the transmitter by prying
its middle seam with your
f ingernail.
Be caref ul when removing
this screw as the head of the screw
can strip out.
1.
2.3.
CONT INUED
Replacing the Transmitter
Battery
Remote Transmitter
Inst rument s and Cont rols
91
NOTE:
SCREW
Model with trunk release is shown. BATTERY
TAB
Main Menu
Page 97 of 400
Youcanopenthetrunkintwoways:Pull the trunk release handle to
the lef t of the driver’s seat. Keep the trunk lid closed at all times
while driving to avoid damaging the
lid, and to prevent exhaust gas f rom
getting into the interior. See
on page .
Press and hold the trunk release
button on the remote transmitter. Usethemasterkeytoopenthe
trunk lock. The valet key does not
work in this lock.
To close the trunk, press down on
the trunk lid. 52
CONT INUED
On EX, EX-L, Si and Canadian SE
models On U.S. DX and LX models, and
Canadian DX-G model
Carbon
Monoxide Hazard
Trunk
Inst rument s and Cont rols
93
MASTER KEY
TRUNK RELEASE HANDLE Pull
U.S. DX and LX, Canadian DX-G
Main Menu
Page 98 of 400
To protect items in the trunk when
you need to give the key to someone
else:Lock the trunk release handle
with the master key.
Give the person the valet key. Even if the trunk release lever is
locked with the master key, you can
open the trunk with the remote
transmitter.
As a saf ety f eature, your vehicle has
a release lever on the trunk latch so
the trunk can be opened f rom the
inside.
To open the trunk, push the release
leverinthedirectionindicatedbythe
arrow.
Parents should decide if their
children should be shown how to use
this f eature. For more inf ormation
about child saf ety, see page .
1. 2.
36
On EX, EX-L, Si and Canadian SEEmergency T runk Opener
Trunk
94
MASTER KEY
Main Menu
Page 99 of 400
�µ
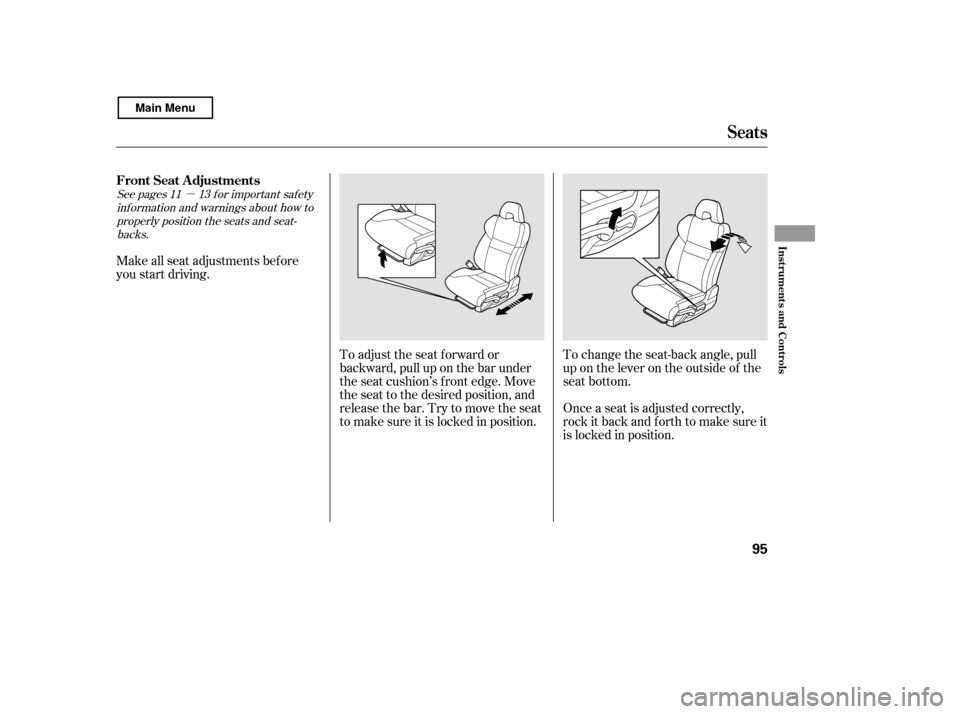
To change the seat-back angle, pull
up on the lever on the outside of the
seat bottom.
Make all seat adjustments bef ore
you start driving.
To adjust the seat f orward or
backward, pull up on the bar under
the seat cushion’s f ront edge. Move
the seat to the desired position, and
releasethebar.Trytomovetheseat
to make sure it is locked in position.Once a seat is adjusted correctly,
rock it back and f orth to make sure it
is locked in position.
See pages f or important saf ety
inf ormation and warnings about how toproperly position the seats and seat-
backs. 11 13
FrontSeatAdjustments
Seats
Inst rument s and Cont rols
95
Main Menu
Page 103 of 400

When a passenger is seated in the
rear center seating position, the
center head restraint should be
adjusted up or down, to match the
passenger’s height.To remove a f ront or rear center
head restraint f or cleaning or repair,
pull it up as f ar as it will go. Push the
release button, then pull the restraint
out of the seat-back.
To remove a rear outer head
restraint, do as f ollows.
Unlock the seat-back from inside
the trunk by pulling the release
(see page ), then f old it
f orward slightly to make a space between the rear window and the
head restraint.
Pull the restraint up as f ar as it will
go, push the release button, then
pull the restraint out of the seat-
back.
Push the seat-back firmly against
the trunk panel to lock it upright.
1. 2. 3.
102
CONT INUED
Removing t he Head Rest raint
Seats
Inst rument s and Cont rols
99
Rear Center Position LEG
SEAT-BACK Rear Outer Position
SEAT-BACK RELEASE BUTTON
RELEASE BUTTON
Failure to reinstall the head
restraints can result in severe
injury during a crash.
Always replace the head
restraints before driving.
Main Menu
Page 104 of 400

This reduces the distance between
the restraint and the occupant’s head.
It also helps protect the occupants
against the likelihood of whiplash
and injuries to the neck and upper
spine.
Af ter a collision, the activated
restraint should return to its normal
position.
If the restraints do not return to their
normal position, or in the event of a
severe collision, have the vehicle
inspected by a Honda dealer.
The driver’s and f ront passenger’s
seats have active head restraints. If
the vehicle is struck severely f rom
the rear, the occupant properly
secured with the seat belt will be
pushed against the seat-back and the
head restraint will automatically
move forward.
When reinstalling a head restraint,
put the legs back in place. Then
adjust it to the appropriate height
while pressing the release button.
Make sure the head restraint locks
in position when you reinstall it.
When reinstalling the rear outer
head restraints, also f ollow the step 1
of the removing procedure. Make
sure to lock the seat-back upright
af ter reinstalling the head restraints.
Seats
A ct ive Head Rest raint s
100
Main Menu
Page 106 of 400

Make sure all rear shoulder belts are
positioned in f ront of the rear seat-
back, and the center shoulder belt is
re-positioned in the guide whenever
the seat-back is in its upright position.
Be sure there are no twists in any
shoulder belt.
Do not put any heavy items on the
seat-back when it is folded down.
Make sure all items in the trunk, or
items extending through the opening
into the back seat, are secured.
Looseitemscanflyforwardand
cause injury if you have to brake
hard. See on page.
Never drive with the seat-back
f olded down and the trunk lid open.
See on
page .
Make sure that the folded seat-back
does not press against the f ront
passenger’s seat, as this could cause
the weight sensors to work
improperly.
If the rear head restraints get caught
on the f ront seat backs and you
cannot fold down the rear seat-back
f ully, you can remove the head
restraints (see page ).
Make sure the removed head
restraints are securely stored.
To lock the seat-back upright, push it
f irmly against the trunk panel. Make
sure it is latched in place by pulling
on the top of the seat.
To release the seat-back, pull the
release under the trunk panel. Push
the seat-back down, then let go of
the release.
For 60/40 split rear f old-down seat
models, a release is located on each
side of the trunk.
For f ull rear f old-down seat models,
the release is located on the driver’s
side of the trunk. 99
26352
Seats
Carrying Cargo
Carbon Monoxide Hazard
102
RELEASE
Main Menu