Page 76 of 400
�Î
�Î �Î
�Î
�Î
�Î �Î
�Î �Î
�Î
�Î
�Î �Î�Î
To use the horn, press the center pad of the steering wheel.
If equipped.
Only on vehicles equipped with navigation system. Ref er to the navigati
on system manual.
1:2:3:
Controls Near the Steering Wheel
72
HORN
STEERING WHEEL
ADJUSTMENTS
(P.219)
REMOTE AUDIO CONTROLS CRUISE CONTROL
BUTTONS(P.224)
NAVIGATION SYSTEM VOICE CONTROL BUTTONS
VEHICLE STABILITY
ASSIST (VSA) SYSTEM
OFF SWITCH
(P.283)
BLUETOOTH
HANDSFREELINK
SYSTEM VOICE
CONTROL
(P.227)
(P.108)
INSTRUMENT PANEL
BRIGHTNESS
(P.76)
HEADLIGHTS/FOG LIGHTS /TURN SIGNALS
(P.74, 75)
MIRROR CONTROLS
REAR WINDOW DEFOGGER
(P.77)
HEATED MIRRORS
(P.109)
HAZARD WARNING BUTTON
(P.77)
ACCESSORY POWER SOCKET
(P.112)
AUXILIARY INPUT JACK
(P.220)
(P.30)
PASSENGER’S AIRBAG
OFF INDICATOR
AUDIO SYSTEM
WINDSHIELD WIPERS/WASHERS
(P.73)
(P.123)
(P.78)
1
2 2
3
2 2
2 2
2
2
Main Menu
Page 81 of 400

Make sure the rear window is clear
and you have good visibility bef ore
starting to drive.
The rear window def ogger will clear
fog, frost, and thin ice from the
window. Push the def ogger button to
turn it on and off. The indicator in
the button comes on to show the
def ogger is on. If you do not turn it
of f , the def ogger will shut itself of f
af ter about 15 minutes. It also shuts
of f when you turn of f the ignition
switch. You have to turn the
def ogger on again when you restart
the vehicle. The def ogger and antenna wires on
the inside of the rear window can be
accidentally damaged. When
cleaning the glass, always wipe side-
to-side.
Pushthebuttontoturnonthe
hazard warning lights (f our-way
flashers). This causes all four
outside turn signals and both turn
indicators in the instrument panel to
f lash. Use the hazard warning lights
if you need to park in a dangerous
area near heavy traffic, or if your
vehicle is disabled. Pushing this button also turns the
mirror heaters on or of f . For more
inf ormation, see page .
109
On U.S. EX-L, Canadian SE, EX-L and
Si models
Rear Window Def ogger
Hazard Warning Button
Hazard Warning Button, Rear Window Def ogger
Inst rument s and Cont rols
77
U.S. EX-L, Canadian SE, EX-L, Si
Main Menu
Page 103 of 400

When a passenger is seated in the
rear center seating position, the
center head restraint should be
adjusted up or down, to match the
passenger’s height.To remove a f ront or rear center
head restraint f or cleaning or repair,
pull it up as f ar as it will go. Push the
release button, then pull the restraint
out of the seat-back.
To remove a rear outer head
restraint, do as f ollows.
Unlock the seat-back from inside
the trunk by pulling the release
(see page ), then f old it
f orward slightly to make a space between the rear window and the
head restraint.
Pull the restraint up as f ar as it will
go, push the release button, then
pull the restraint out of the seat-
back.
Push the seat-back firmly against
the trunk panel to lock it upright.
1. 2. 3.
102
CONT INUED
Removing t he Head Rest raint
Seats
Inst rument s and Cont rols
99
Rear Center Position LEG
SEAT-BACK Rear Outer Position
SEAT-BACK RELEASE BUTTON
RELEASE BUTTON
Failure to reinstall the head
restraints can result in severe
injury during a crash.
Always replace the head
restraints before driving.
Main Menu
Page 108 of 400
 position to raise or lower either
window. To open a window, push the
switchdownandholdit.Releasethe
switch when you want the window to
stop. Pull back on t")
�µ
Turn the ignition switch to the ON
(II) position to raise or lower either
window. To open a window, push the
switchdownandholdit.Releasethe
switch when you want the window to
stop. Pull back on the switch and
hold it to close the window. To open or close the driver’s window
partially, push down or pull back on
the window switch lightly and hold it.
The window will stop when you
release the switch.
To close the driver’s window f ully,
pull back the window switch f irmly,
then release it. The window
automatically goes all the way up. To
stop the window f rom going all the
way up, push down on the window
switch brief ly. To open the driver’s
window f ully, push the window
switch f irmly down, then release it.
The window automatically goes
down all the way. To stop the
window f rom going all the way down,
pull back on the window switch
brief ly.
The driver’s armrest has a master
power window control panel. To
open the passenger’s window, push
down on the switch and hold it down
until the window reaches the desired
position. To close the window, pull
back on the window switch. Release
the switch when the window gets to
the position you want.
Except DX and Canadian DX-G
Power Windows
AUTO
104
MAIN SWITCH
DRIVER’S WINDOW SWITCH
Closing a power window on
someone’s hands or fingers can
cause serious injury.
Make sure your passengers are
away from the windows before
closing them.
Main Menu
Page 109 of 400

�µIf your vehicle’s battery is
disconnected or goes dead, or the
driver’s window f use is removed, the
AUTO f unction could be disabled. If
the power window system needs to
be reset af ter reconnecting the
battery or installing the f use, do this:
Start the engine. Push down and
hold the driver’s window switch
until the window is f ully open.
Pull and hold the driver’s window
switch to close the window
completely, then hold the switch
f or about 2 seconds.
If the power windows do not operate
properly af ter resetting, have your
vehicle checked by your dealer.
When you push the MAIN switch in,
the switch is OFF, and the
passenger’s window cannot be raised
or lowered. To cancel this f eature,
push on the switch again to get it to
pop out. Keep the MAIN switch off
whenyouhavechildreninthe
vehicle so they do not injure
themselves by operating the window
unintentionally.
If the driver’s
window runs into any obstacle while
it is closing automatically, it will
reverse direction, and then stop. To
close the window, remove the
obstacle, then use the window switch
again.
Auto reverse stops sensing when the
window is almost closed. You should
always check that all passengers and
objects are away from the window
bef ore closing it.
The driver’s window auto
reverse f unction is disabled when
you continuously pull up the switch.
Thewindowsoperateforupto10
minutes after you turn off the
ignition switch. Opening either door
cancels this f unction. 1. 2.
Except DX and Canadian DX-G
All models
Power Windows
AUTO REVERSE
Inst rument s and Cont rols
105
NOTE:
Main Menu
Page 113 of 400
To apply the parking brake, pull the
lever up f ully. To release it, pull up
slightly, push the button, and lower
the lever. The parking brake
indicator on the instrument panel
should go out when the parking
brake is f ully released (see page ).
The outside mirrors are heated to
remove fog and frost. With the
ignition switch in the ON (II)
position, turn on the heaters by
pressing the rear window def ogger
button. The indicator in the button
comesonasareminder.Pressthe
button again to turn the heaters and
the def ogger of f .
60EX-L model in the U.S.
SE, EX-L and Si models in Canada
Power Mirror Heaters Parking Brake
Mirrors, Parking Brake
Inst rument s and Cont rols
109
PARKING BRAKE LEVER
REAR WINDOW DEFOGGER/
HEATED MIRROR BUTTON
Driving the vehicle with the parking
brake applied can damage the rear
brakes and hubs. A beeper will sound if
the vehicle is driven with the parking
brake on.
Main Menu
Page 118 of 400
To use the sun visor, pull it down.
Whenusingthesunvisorforthe
side window, remove the support rod
f rom the clip, and swing it out.
Make sure you put the sun visor
back in place when you are getting
into or out of the vehicle.Af ter both doors are closed tightly,
the light dims slightly, then f ades out
in about 30 seconds.
The ceiling light (with the switch in
the center position) comes on when
you remove the key f rom the ignition
switch. If you do not open a door, the
light stays on, then f ades out in
about 30 seconds.
If you leave either door open without
the key in the ignition switch, the
ceiling light goes of f af ter 3 minutes.
The ceiling light has a three-position
switch: ON, Door Activated, and
OFF. In the Door Activated (center)
position, the light comes on when
you:
Open either door.
Unlock the doors with the key or
the remote transmitter.
Sun Visor Ceiling L ight
Interior Convenience Items, Interior L ights
114
SUN VISOR
OFF
ON
DOOR ACTIVATED
Main Menu
Page 122 of 400
�Î
�Î
�Î
�Î
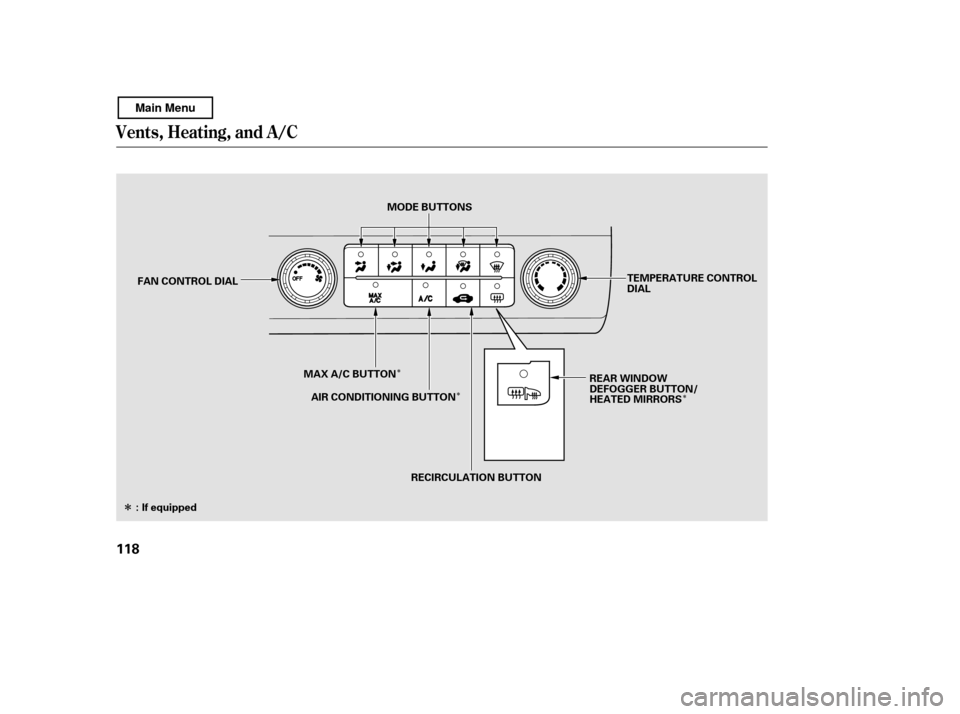
Vents, Heating, and A/C
118
MODE BUTTONS
REAR WINDOW
DEFOGGER BUTTON/
HEATED MIRRORS
FAN CONTROL DIAL
TEMPERATURE CONTROL
DIAL
MAX A/C BUTTON AIR CONDITIONING BUTTON
: If equipped RECIRCULATION BUTTON
Main Menu