2011 GMC SIERRA 1500 climate control
[x] Cancel search: climate controlPage 28 of 594
Black plate (22,1)GMC Sierra Owner Manual - 2011
1-22 In Brief
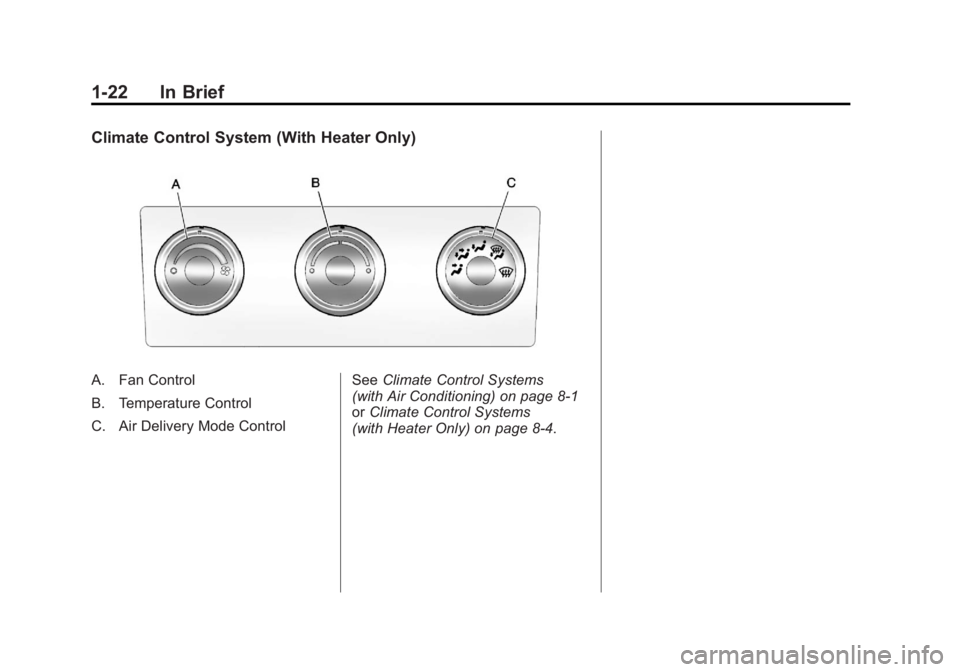
Climate Control System (With Heater Only)
A. Fan Control
B. Temperature Control
C. Air Delivery Mode ControlSee
Climate Control Systems
(with Air Conditioning) on page 8‑1
or Climate Control Systems
(with Heater Only) on page 8‑4.
Page 29 of 594
Black plate (23,1)GMC Sierra Owner Manual - 2011
In Brief 1-23
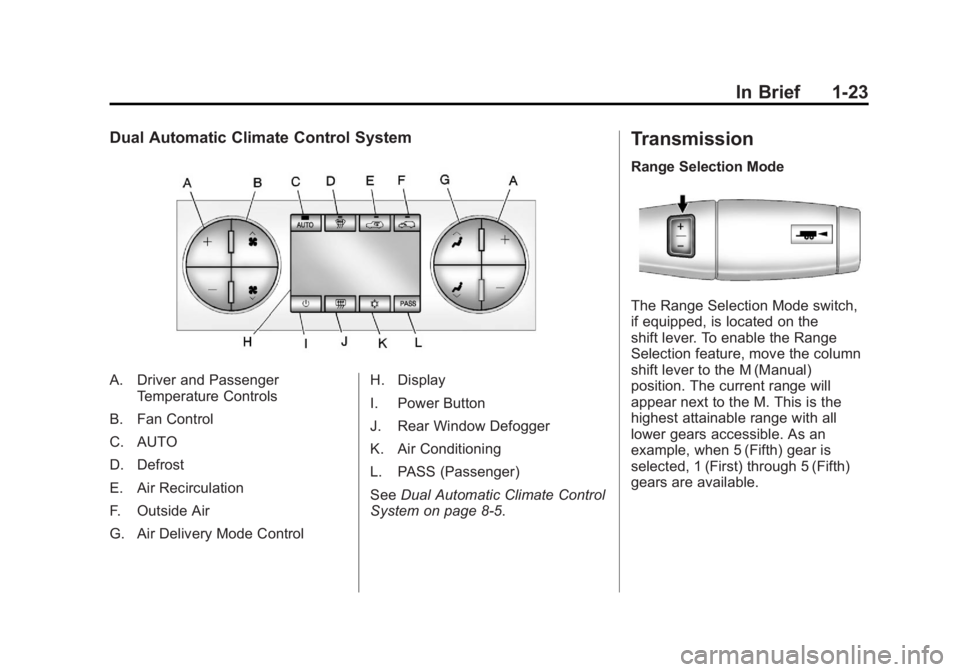
Dual Automatic Climate Control System
A. Driver and PassengerTemperature Controls
B. Fan Control
C. AUTO
D. Defrost
E. Air Recirculation
F. Outside Air
G. Air Delivery Mode Control H. Display
I. Power Button
J. Rear Window Defogger
K. Air Conditioning
L. PASS (Passenger)
See
Dual Automatic Climate Control
System on page 8‑5.
Transmission
Range Selection Mode
The Range Selection Mode switch,
if equipped, is located on the
shift lever. To enable the Range
Selection feature, move the column
shift lever to the M (Manual)
position. The current range will
appear next to the M. This is the
highest attainable range with all
lower gears accessible. As an
example, when 5 (Fifth) gear is
selected, 1 (First) through 5 (Fifth)
gears are available.
Page 38 of 594

Black plate (32,1)GMC Sierra Owner Manual - 2011
1-32 In Brief
Power Outlets
Accessory power outlets can be
used to plug in electrical equipment,
such as a cell phone, MP3
player, etc.
The vehicle may have two
accessory power outlets located
below the climate control system,
or may have one accessory power
outlet and one cigarette lighter.
The cigarette lighter is designed
to fit only in the receptacle closest
to the driver.
There may be another accessory
power outlet in the rear cargo area.
If the vehicle has a floor console,
there is an accessory power outlet
inside the storage bin and one on
the rear of the floor console.
The accessory power outlets are
powered, even when the ignition is
in LOCK/OFF. Continuing to use
power outlets while the ignition is in
LOCK/OFF may cause the vehicle's
battery to run down.
SeePower Outlets on page 5‑10.
Universal Remote System
This system provides a way
to replace up to three remote
control transmitters used to
activate devices such as garage
door openers, security systems,
and home automation devices.
Read the instructions completely
before attempting to program the
transmitter. Because of the steps
involved, it may be helpful to
have another person assist with
programming the transmitter.
SeeUniversal Remote System on
page 5‑61.
Sunroof
Extended Cab
The sunroof switch is located on the
headliner above the rearview mirror.
Vent: From the closed position,
press and hold the rear of the switch
to vent the sunroof.
Open: From the vent position,
press and hold the rear of the switch
to open the sunroof.
Close: Press and hold the front of
the switch to close the sunroof.
Page 49 of 594
Black plate (5,1)GMC Sierra Owner Manual - 2011
Keys, Doors and Windows 2-5
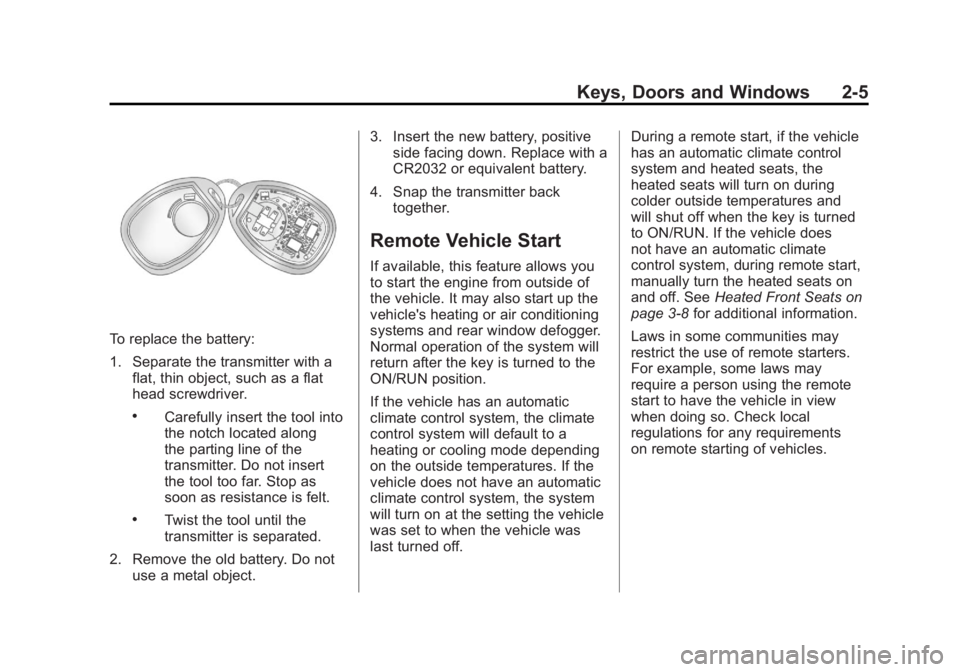
To replace the battery:
1. Separate the transmitter with aflat, thin object, such as a flat
head screwdriver.
.Carefully insert the tool into
the notch located along
the parting line of the
transmitter. Do not insert
the tool too far. Stop as
soon as resistance is felt.
.Twist the tool until the
transmitter is separated.
2. Remove the old battery. Do not use a metal object. 3. Insert the new battery, positive
side facing down. Replace with a
CR2032 or equivalent battery.
4. Snap the transmitter back together.
Remote Vehicle Start
If available, this feature allows you
to start the engine from outside of
the vehicle. It may also start up the
vehicle's heating or air conditioning
systems and rear window defogger.
Normal operation of the system will
return after the key is turned to the
ON/RUN position.
If the vehicle has an automatic
climate control system, the climate
control system will default to a
heating or cooling mode depending
on the outside temperatures. If the
vehicle does not have an automatic
climate control system, the system
will turn on at the setting the vehicle
was set to when the vehicle was
last turned off. During a remote start, if the vehicle
has an automatic climate control
system and heated seats, the
heated seats will turn on during
colder outside temperatures and
will shut off when the key is turned
to ON/RUN. If the vehicle does
not have an automatic climate
control system, during remote start,
manually turn the heated seats on
and off. See
Heated Front Seats on
page 3‑8 for additional information.
Laws in some communities may
restrict the use of remote starters.
For example, some laws may
require a person using the remote
start to have the vehicle in view
when doing so. Check local
regulations for any requirements
on remote starting of vehicles.
Page 61 of 594
Black plate (17,1)GMC Sierra Owner Manual - 2011
Keys, Doors and Windows 2-17
Manual Foldaway
Manually fold the mirrors inward
to prevent damage when going
through an automatic car wash.
To fold, pull the mirror toward the
vehicle. Push the mirror outward,
to return to its original position.
Automatic Dimming
If equipped with an automatic
dimming mirror, the driver outside
mirror adjusts for the glare of
the headlamps behind you.
SeeAutomatic Dimming Rearview
Mirror on page 2‑18.
Turn Signal Indicator
The vehicle may also have a
turn signal indicator on the mirror.
An arrow on the mirror flashes in the
direction of the turn or lane change.
Heated Mirrors
For vehicles with heated mirrors:
<(Rear Window Defogger):
Press to heat the mirrors. If the
vehicle has a towing mirror, only the
upper glass of the mirror is heated.
The lower convex part of the towing
mirror is not heated.
Depending on the vehicle's features,
see “Rear Window Defogger”
under Climate Control Systems
(with Air Conditioning) on page 8‑1
or Climate Control Systems (with
Heater Only) on page 8‑4 orDual
Automatic Climate Control System
on page 8‑5 for more information.
Park Tilt Mirrors
If the vehicle has the memory
package, the passenger and/or
driver mirror tilts to a preselected
position when the vehicle is in
R (Reverse). This feature lets the
driver view the curb when parallel
parking. The mirror(s) return to the
original position when the vehicle
is shifted out of R (Reverse),
or the ignition is turned off or to
OFF/LOCK.
Turn this feature on or off through
the Driver Information Center (DIC).
SeeVehicle Personalization (with
DIC Buttons) on page 5‑52 for more
information.
Page 156 of 594
Black plate (8,1)GMC Sierra Owner Manual - 2011
5-8 Instruments and Controls
To calibrate the compass, use the
following procedure:
Compass Calibration Procedure
1. Before calibrating the compass,make sure the compass zone
is set to the variance zone in
which the vehicle is located.
See “Compass Variance (Zone)
Procedure” earlier in this
section.
Do not operate any switches
such as window, sunroof,
climate controls, or seats during
the calibration procedure.
2. Press the vehicle information button until PRESS
VTO
CALIBRATE COMPASS
displays. Or, if the vehicle
does not have DIC buttons,
press the trip odometer
reset stem until CALIBRATE
COMPASS displays. 3. Press the set/reset button to
start the compass calibration.
Or, if the vehicle does not have
DIC buttons, press and hold
the trip odometer reset stem
for two seconds to start the
compass calibration.
4. The DIC will display CALIBRATING: DRIVE IN
CIRCLES. Drive the vehicle
in tight circles at less than
8 km/h (5 mph) to complete the
calibration. The DIC will display
CALIBRATION COMPLETE
for a few seconds when the
calibration is complete. The DIC
display will then return to the
previous menu.
Clock
AM-FM Radio and AM‐FM
Radio with CD Player
To set the clock:
1. Turn the ignition key to
ACC/ACCESSORY or ON/RUN,
then press the
Obutton to turn
the radio on.
2. Press the
Hbutton until the hour
numbers begin to flash, then
turn the
fknob to increase or
decrease the hour.
3. Press the
Hbutton until the
minute numbers begin to flash,
then turn the
fknob to increase
or decrease the minutes.
Page 158 of 594
Black plate (10,1)GMC Sierra Owner Manual - 2011
5-10 Instruments and Controls
MP3 Radio with a Six-Disc CD
Player
To set the time and date:
1. Turn the ignition key toACC/ACCESSORY or ON/RUN,
then press the
Obutton to turn
the radio on.
2. Press the MENU button and then the softkey under the
Htab
to display HR, MIN, MM, DD,
YYYY (hour, minute, month, day,
and year).
3. Press the softkey located under any one of the tabs to change
that setting.
4. To increase the time or date, do one of the following:
.Press the softkey below the
selected tab.
.Press the¨SEEK button.
.Press the\FWD button.
.Turn thefknob clockwise. 5. To decrease the time or date, do
one of the following:
.Press the©SEEK button.
.Press thesREV button.
.Turn thefknob
counterclockwise.
To change the time default setting
from 12 hour to 24 hour or to change
the date default setting from month/
day to day/month:
1. Press the MENU button and then the softkey under
the
Htab.
2. Press the softkey located below the forward arrow tab. 12H, 24H,
the date MM/DD (month and
day), and DD/MM (day and
month) displays.
3. Press the softkey located below the desired option.
4. Press the MENU button again to apply the desired option, or let
the screen time out.
Power Outlets
Accessory power outlets can
be used to plug in electrical
equipment, such as a cell phone,
MP3 player, etc.
The vehicle may have two
accessory power outlets located
below the climate control system,
or may have one accessory power
outlet and one cigarette lighter.
The cigarette lighter is designed
to fit only in the receptacle closest
to the driver.
There may be another accessory
power outlet in the rear cargo area.
If the vehicle has a floor console,
there is an accessory power outlet
inside the storage bin and one on
the rear of the floor console.
Remove the cover to access and
replace when not in use.
Page 189 of 594

Black plate (41,1)GMC Sierra Owner Manual - 2011
Instruments and Controls 5-41
When the remaining oil life is low,
the CHANGE ENGINE OIL SOON
message will appear on the display.
See“CHANGE ENGINE OIL SOON”
under Engine Oil Messages on
page 5‑45. You should change
the oil as soon as you can.
See Engine Oil on page 10‑7.
In addition to the engine oil life
system monitoring the oil life,
additional maintenance is
recommended in the Maintenance
Schedule in this manual.
See Scheduled Maintenance on
page 11‑2 for more information.
Remember, you must reset the
OIL LIFE display after each oil
change. It will not reset itself. Also,
be careful not to reset the OIL LIFE
display accidentally at any time
other than when the oil has just
been changed. It cannot be reset
accurately until the next oil change.
To reset the engine oil life system,
see Engine Oil Life System on
page 10‑11.Vehicle Messages
Messages displayed on the DIC
indicate the status of the vehicle
or some action may be needed
to correct a condition. Multiple
messages may appear one after
another.
The messages that do not
require immediate action can be
acknowledged and cleared by
pressing
V(Set/Reset) or the
trip odometer reset stem.
The messages that require
immediate action cannot be cleared
until that action is performed.
All messages should be taken
seriously and clearing the message
does not correct the problem.
The following are the possible
messages and some information
about them.
Battery Voltage and
Charging Messages
BATTERY LOW START
VEHICLE
When the vehicle’ s battery is
severely discharged, this message
will display and four chimes
will sound. Start the vehicle
immediately. If the vehicle is not
started and the battery continues
to discharge, the climate controls,
heated seats, and audio systems
will shut off and the vehicle may
require a jump start. These systems
will function again after the vehicle
is started.