2011 GMC SAVANA PASSENGER spare wheel
[x] Cancel search: spare wheelPage 346 of 414
Black plate (74,1)GMC Savana Owner Manual - 2011
10-74 Vehicle Care
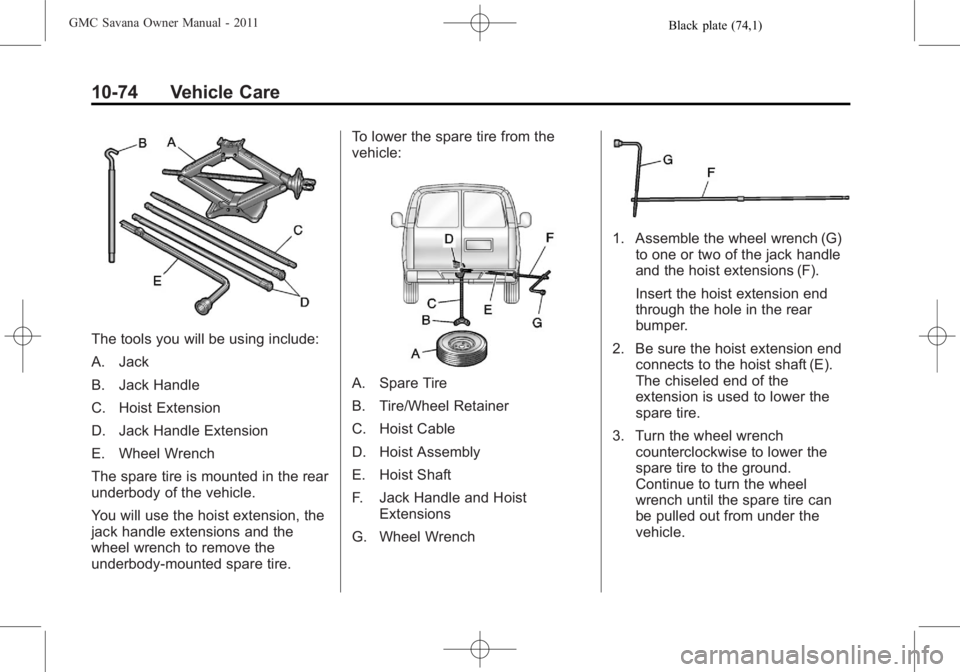
The tools you will be using include:
A. Jack
B. Jack Handle
C. Hoist Extension
D. Jack Handle Extension
E. Wheel Wrench
The spare tire is mounted in the rear
underbody of the vehicle.
You will use the hoist extension, the
jack handle extensions and the
wheel wrench to remove the
underbody‐mounted spare tire.To lower the spare tire from the
vehicle:
A. Spare Tire
B. Tire/Wheel Retainer
C. Hoist Cable
D. Hoist Assembly
E. Hoist Shaft
F. Jack Handle and Hoist
Extensions
G. Wheel Wrench
1. Assemble the wheel wrench (G) to one or two of the jack handle
and the hoist extensions (F).
Insert the hoist extension end
through the hole in the rear
bumper.
2. Be sure the hoist extension end connects to the hoist shaft (E).
The chiseled end of the
extension is used to lower the
spare tire.
3. Turn the wheel wrench counterclockwise to lower the
spare tire to the ground.
Continue to turn the wheel
wrench until the spare tire can
be pulled out from under the
vehicle.
Page 347 of 414
Black plate (75,1)GMC Savana Owner Manual - 2011
Vehicle Care 10-75
If the spare tire does not lower to
the ground, the secondary latch
is engaged causing the tire not
to lower. SeeSecondary Latch
System on page 10‑81.
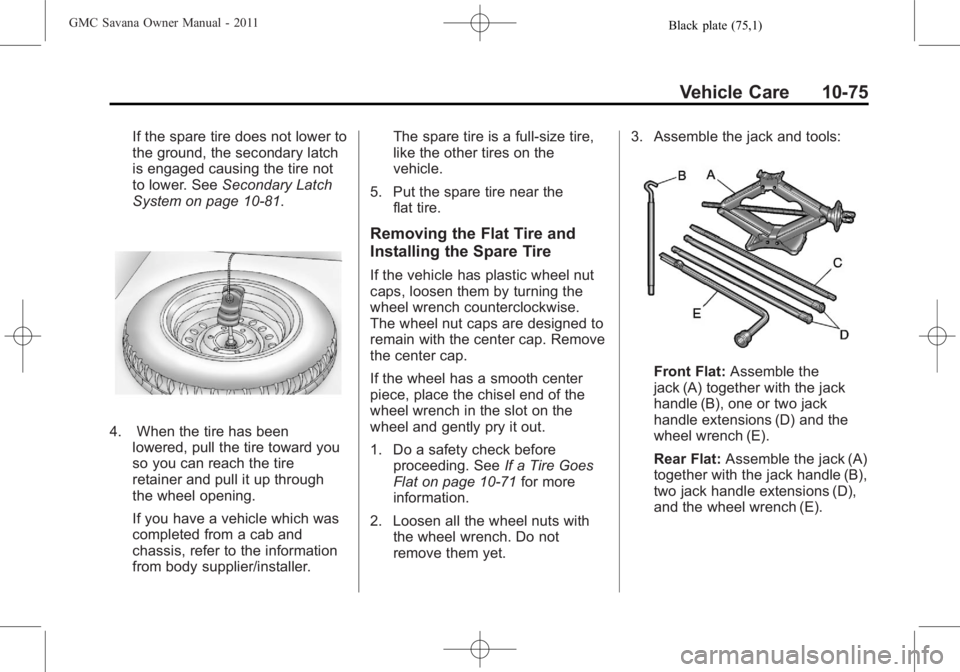
4. When the tire has been lowered, pull the tire toward you
so you can reach the tire
retainer and pull it up through
the wheel opening.
If you have a vehicle which was
completed from a cab and
chassis, refer to the information
from body supplier/installer. The spare tire is a full‐size tire,
like the other tires on the
vehicle.
5. Put the spare tire near the flat tire.
Removing the Flat Tire and
Installing the Spare Tire
If the vehicle has plastic wheel nut
caps, loosen them by turning the
wheel wrench counterclockwise.
The wheel nut caps are designed to
remain with the center cap. Remove
the center cap.
If the wheel has a smooth center
piece, place the chisel end of the
wheel wrench in the slot on the
wheel and gently pry it out.
1. Do a safety check beforeproceeding. See If a Tire Goes
Flat on page 10‑71 for more
information.
2. Loosen all the wheel nuts with the wheel wrench. Do not
remove them yet. 3. Assemble the jack and tools:
Front Flat:
Assemble the
jack (A) together with the jack
handle (B), one or two jack
handle extensions (D) and the
wheel wrench (E).
Rear Flat: Assemble the jack (A)
together with the jack handle (B),
two jack handle extensions (D),
and the wheel wrench (E).
Page 349 of 414
Black plate (77,1)GMC Savana Owner Manual - 2011
Vehicle Care 10-77
{WARNING
Raising the vehicle with the jack
improperly positioned can
damage the vehicle and even
make the vehicle fall. To help
avoid personal injury and vehicle
damage, be sure to fit the jack lift
head into the proper location
before raising the vehicle.
5. Raise the vehicle by turning the wheel wrench clockwise. Raise
the vehicle far enough off the
ground so there is enough room
for the spare tire to fit.
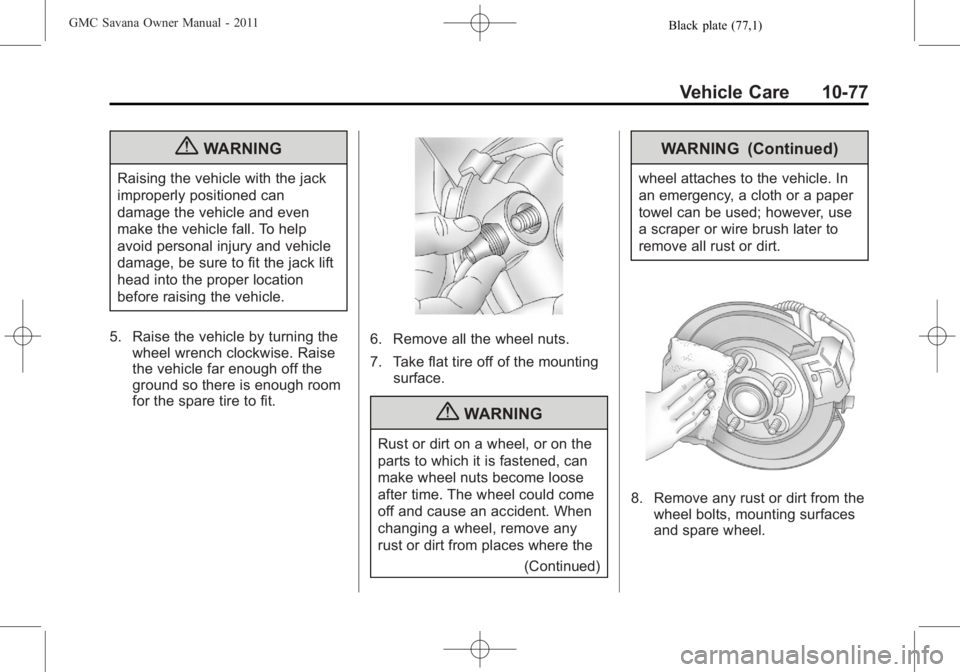
6. Remove all the wheel nuts.
7. Take flat tire off of the mountingsurface.
{WARNING
Rust or dirt on a wheel, or on the
parts to which it is fastened, can
make wheel nuts become loose
after time. The wheel could come
off and cause an accident. When
changing a wheel, remove any
rust or dirt from places where the
(Continued)
WARNING (Continued)
wheel attaches to the vehicle. In
an emergency, a cloth or a paper
towel can be used; however, use
a scraper or wire brush later to
remove all rust or dirt.
8. Remove any rust or dirt from thewheel bolts, mounting surfaces
and spare wheel.
Page 352 of 414
Black plate (80,1)GMC Savana Owner Manual - 2011
10-80 Vehicle Care
Storing a Flat or Spare Tire
and Tools
{WARNING
Storing a jack, a tire, or other
equipment in the passenger
compartment of the vehicle could
cause injury. In a sudden stop or
collision, loose equipment could
strike someone. Store all these in
the proper place.
1. Put the tire on the ground at the rear of the vehicle with the valve
stem pointed down.
2. Pull the retaining bar through thecenter of the wheel, making sure
it is properly attached.
3. Pull the wheel toward the rear of the vehicle, keeping the cable
tight.
4. Put the chisel end of the hoist extension on an angle through
the hole in the rear door frame,
above the bumper.
5. Raise the tire fully against the underside of the vehicle.
Continue turning the wheel
wrench until the tire is secure and the cable is tight. The spare
tire hoist cannot be
overtightened.
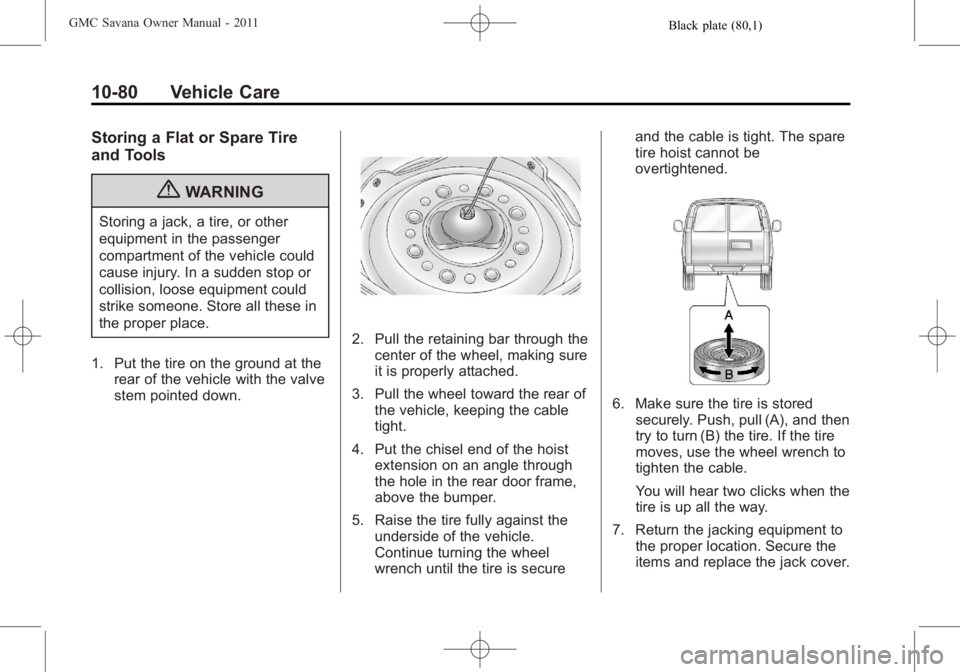
6. Make sure the tire is stored
securely. Push, pull (A), and then
try to turn (B) the tire. If the tire
moves, use the wheel wrench to
tighten the cable.
You will hear two clicks when the
tire is up all the way.
7. Return the jacking equipment to the proper location. Secure the
items and replace the jack cover.
Page 354 of 414
Black plate (82,1)GMC Savana Owner Manual - 2011
10-82 Vehicle Care
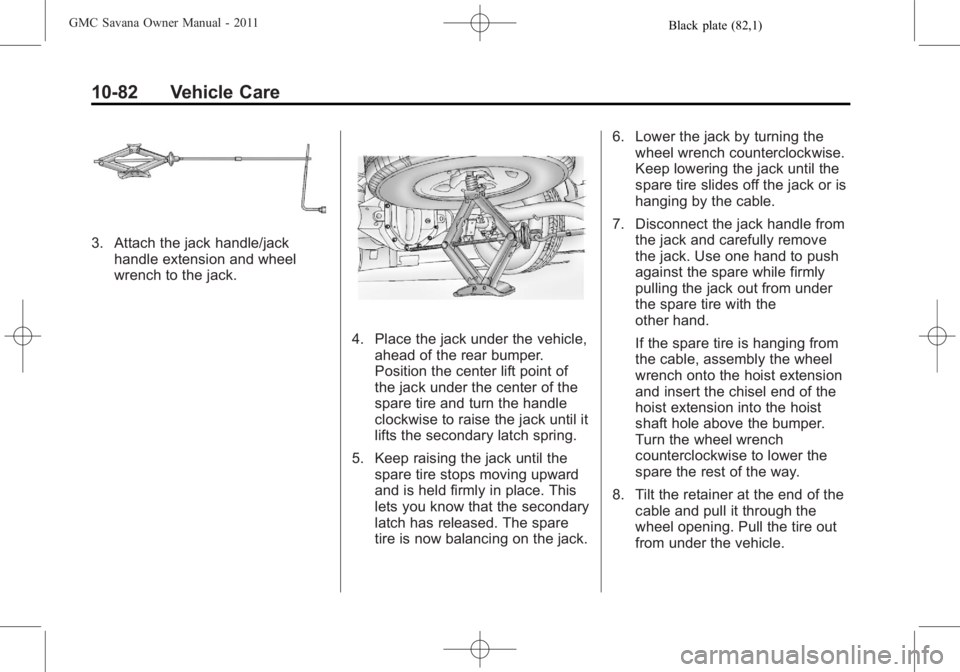
3. Attach the jack handle/jackhandle extension and wheel
wrench to the jack.
4. Place the jack under the vehicle,ahead of the rear bumper.
Position the center lift point of
the jack under the center of the
spare tire and turn the handle
clockwise to raise the jack until it
lifts the secondary latch spring.
5. Keep raising the jack until the spare tire stops moving upward
and is held firmly in place. This
lets you know that the secondary
latch has released. The spare
tire is now balancing on the jack. 6. Lower the jack by turning the
wheel wrench counterclockwise.
Keep lowering the jack until the
spare tire slides off the jack or is
hanging by the cable.
7. Disconnect the jack handle from the jack and carefully remove
the jack. Use one hand to push
against the spare while firmly
pulling the jack out from under
the spare tire with the
other hand.
If the spare tire is hanging from
the cable, assembly the wheel
wrench onto the hoist extension
and insert the chisel end of the
hoist extension into the hoist
shaft hole above the bumper.
Turn the wheel wrench
counterclockwise to lower the
spare the rest of the way.
8. Tilt the retainer at the end of the cable and pull it through the
wheel opening. Pull the tire out
from under the vehicle.
Page 355 of 414
Black plate (83,1)GMC Savana Owner Manual - 2011
Vehicle Care 10-83
Notice:If you drive away before
the spare tire or secondary
latch system cable has been
reinstalled, you could damage the
vehicle. Always reinstall this
cable before driving the vehicle.
9. If the cable is hanging under
the vehicle, turn the wheel
wrench in the hoist shaft hole in
the bumper clockwise to raise
the cable back up.
Have the hoist assembly inspected
as soon as you can. You will not be
able to store a spare or flat tire
using the hoist assembly until it has
been repaired or replaced.
To continue changing the flat tire,
return to Step 4 of “Storing a Flat or
Spare Tire and Tools” underTire
Changing on page 10‑73.Full-Size Spare Tire
This vehicle, when new, may have
had a fully-inflated spare tire.
A spare tire may lose air over time,
so check its inflation pressure
regularly. See Tire Pressure on
page 10‑57 andVehicle Load Limits
on page 9‑12 for information
regarding proper tire inflation and
loading the vehicle. For instruction
on how to remove, install or store a
spare tire, see “Removing the Flat
Tire and Installing the Spare Tire”
and “Storing a Flat or Spare Tire
and Tools” underTire Changing on
page 10‑73. After installing the spare tire on the
vehicle, you should stop as soon as
possible and make sure the spare is
correctly inflated. The spare tire is
made to perform well at speeds
up to 112 km/h (70 mph) at the
recommended inflation pressure, so
you can finish your trip.
Have the damaged or flat road tire
repaired or replaced as soon as you
can and installed back onto the
vehicle. This way, a spare tire will
be available in case you need it
again. Do not mix tires and wheels
of different sizes, because they will
not fit. Keep the spare tire and its
wheel together.
Page 413 of 414
Black plate (11,1)GMC Savana Owner Manual - 2011
INDEX i-11
TiresBuying New Tires . . . . . . . . . . . 10-66
Chains . . . . . . . . . . . . . . . . . . . . . . 10-71
Changing . . . . . . . . . . . . . . . . . . . 10-73
Different Size . . . . . . . . . . . . . . . 10-67
Dual Rotation . . . . . . . . . . . . . . . 10-64
Full-Size Spare . . . . . . . . . . . . . 10-83
If a Tire Goes Flat . . . . . . . . . . 10-71
Inflation Monitor System . . . . 10-59
Inspection . . . . . . . . . . . . . . . . . . 10-63
Messages . . . . . . . . . . . . . . . . . . . . 5-38
Pressure Light . . . . . . . . . . . . . . . . 5-25
Pressure Monitor System . . . 10-58
Rotation . . . . . . . . . . . . . . . . . . . . 10-63
Secondary Latch System . . . 10-81
Sidewall Labeling . . . . . . . . . . . 10-51
Terminology and
Definitions . . . . . . . . . . . . . . . . . 10-54
Uniform Tire Quality Grading . . . . . . . . . . . . . . . . . . . 10-68
Wheel Alignment and Tire
Balance . . . . . . . . . . . . . . . . . . . 10-69 Tires (cont.)
Wheel Replacement . . . . . . . . 10-70
When It Is Time for New
Tires . . . . . . . . . . . . . . . . . . . . . . 10-65
Tow/Haul Mode . . . . . . . . . . . . . . . . 9-34
Tow/Haul Mode Light . . . . . . . . . . 5-24
Towing Driving Characteristics . . . . . . . . 9-48
Equipment . . . . . . . . . . . . . . . . . . . . 9-56
General Information . . . . . . . . . . 9-48
Recreational Vehicle . . . . . . . . 10-88
Trailer . . . . . . . . . . . . . . . . . . . . . . . . 9-52
Vehicle . . . . . . . . . . . . . . . . . . . . . 10-88
Trailer
Tow Mirrors . . . . . . . . . . . . . . . . . . . 2-14
Trailer Towing . . . . . . . . . . . . . . . . . 9-52
Transmission Automatic . . . . . . . . . . . . . . . 9-27, 9-31
Fluid, Automatic . . . . . 10-12, 10-14
Messages . . . . . . . . . . . . . . . . . . . . 5-39
Transportation Program, Courtesy . . . . . . . . . . . . . . . . . . . . . 13-8
Trip Odometer . . . . . . . . . . . . . . . . . 5-12
Turn and Lane-Change
Signals . . . . . . . . . . . . . . . . . . . . . . . . 6-5U
Uniform Tire QualityGrading . . . . . . . . . . . . . . . . . . . . . 10-68
Using This Manual . . . . . . . . . . . . . . . . iv
V
Vehicle Canadian Owners . . . . . . . . . . . . . . . iii
Control . . . . . . . . . . . . . . . . . . . . . . . . 9-3
IdentificationNumber (VIN) . . . . . . . . . . . . . . . 12-1
Load Limits . . . . . . . . . . . . . . . . . . . 9-12
Messages . . . . . . . . . . . . . . . . . . . . 5-32
Personalization . . . . . . . . . . . . . . . 5-40
Reminder Messages . . . . . . . . . . 5-40
Remote Start . . . . . . . . . . . . . . . . . . 2-5
Security . . . . . . . . . . . . . . . . . . . . . . 2-12
Towing . . . . . . . . . . . . . . . . . . . . . . 10-88
Vehicle Care Tire Pressure . . . . . . . . . . . . . . . 10-57
Vehicle Identification Service Parts IdentificationLabel . . . . . . . . . . . . . . . . . . . . . . . . 12-1