Page 45 of 295

WARNING:Always remember to turn on your headlamps at
dusk or during inclement weather. The Daytime Running Lamp
(DRL) system does not activate the tail lamps and generally may not
provide adequate lighting during these conditions. Failure to activate
your headlamps under these conditions may result in a collision.
PANEL DIMMER CONTROL
Use to adjust the brightness of the
instrument panel and all applicable
switches in the vehicle during
headlamp and parking lamp
operation.
Move the control from left to right
to increase the brightness. Move the control from right to left to reduce
the brightness.
AIMING THE HEADLAMPS
The headlamps on your vehicle are properly aimed at the assembly plant.
If your vehicle has been in an accident, the alignment of your headlamps
should be checked by your authorized dealer.
Vertical aim adjustment
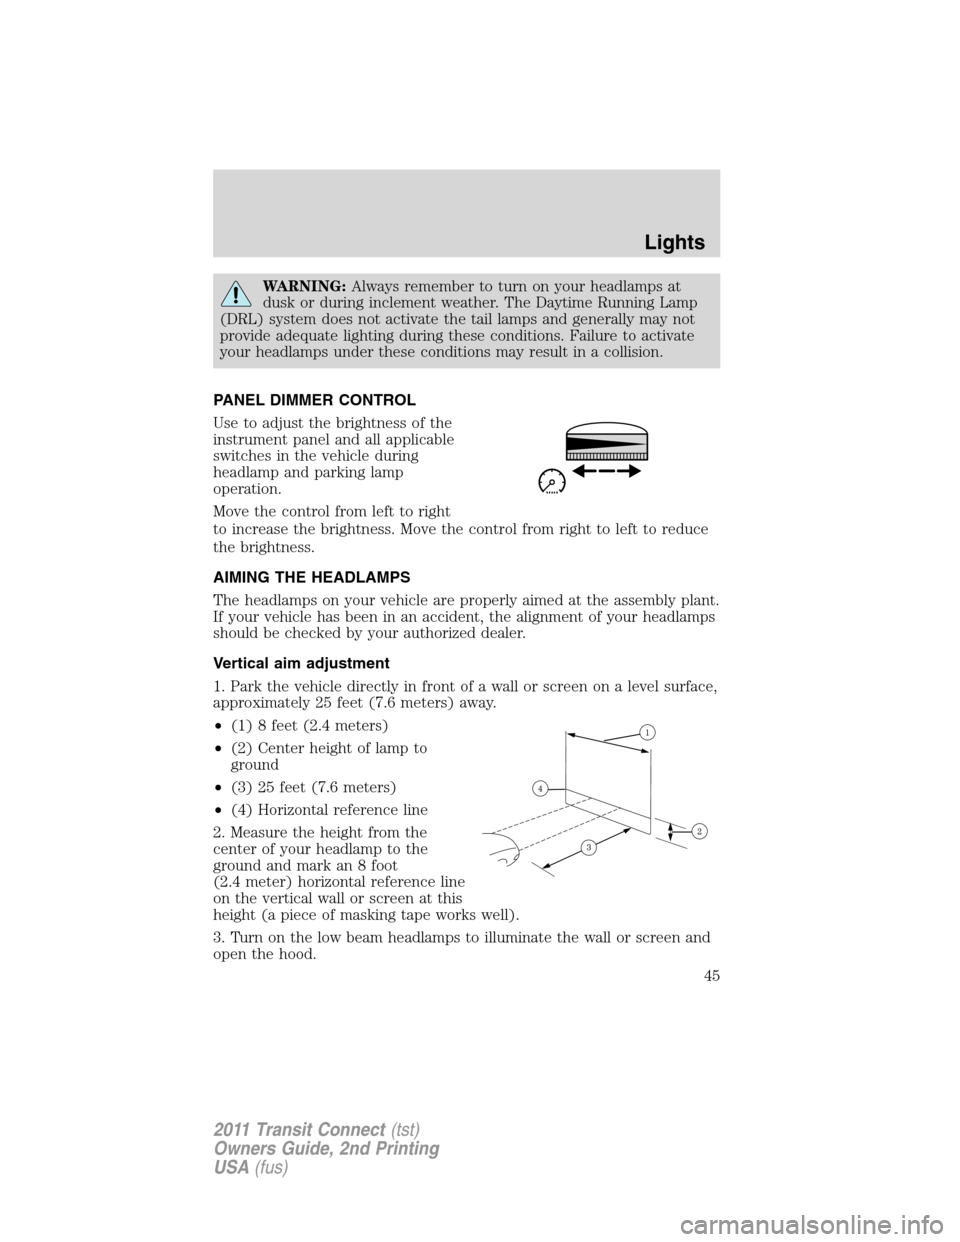
1. Park the vehicle directly in front of a wall or screen on a level surface,
approximately 25 feet (7.6 meters) away.
•(1) 8 feet (2.4 meters)
•(2) Center height of lamp to
ground
•(3) 25 feet (7.6 meters)
•(4) Horizontal reference line
2. Measure the height from the
center of your headlamp to the
ground and mark an 8 foot
(2.4 meter) horizontal reference line
on the vertical wall or screen at this
height (a piece of masking tape works well).
3. Turn on the low beam headlamps to illuminate the wall or screen and
open the hood.
Lights
45
2011 Transit Connect(tst)
Owners Guide, 2nd Printing
USA(fus)
Page 50 of 295
Replacing reading bulbs
1. Open the reading lamp assembly.
2. Pull the bulb straight out and
replace it.
3. After the bulb has been replaced,
close the lamp assembly.
Install in reverse order.
Replacing exterior bulbs
Check the operation of all bulbs frequently.
Replacing headlamp bulbs
1. Make sure the headlamp control
is in the off position and open the
hood.
2. Pull off the bulb cap.
3. Disconnect electrical connector
from the bulb.
4. Twist off the bulb retainer ring by
turning it counterclockwise.
Install in reverse order.
WARNING:Handle a halogen headlamp bulb carefully and keep
out of children’s reach. Grasp the bulb by only its plastic base
and do not touch the glass. The oil from your hand could cause the
bulb to break the next time the headlamps are operated.
Note:If the bulb is accidentally touched, it should be cleaned with
rubbing alcohol before being used.
Lights
50
2011 Transit Connect(tst)
Owners Guide, 2nd Printing
USA(fus)
Page 51 of 295
Replacing front parking lamp bulbs
1. Make sure the headlamp control
is in the off position.
2. Turn the cover counterclockwise
and remove it.
3. Remove the bulb and the bulb
socket.
4. Pull the bulb straight out.
Install in reverse order.
Replacing front turn signal bulbs
1. Make sure the headlamp control
is in the off position and open the
hood.
2. Remove the bulb socket from the
lamp assembly by turning it
counterclockwise.
Lights
51
2011 Transit Connect(tst)
Owners Guide, 2nd Printing
USA(fus)
Page 226 of 295
OPENING THE HOOD
1. Lift and swivel the hood badge
back.
2. Insert the key and turn it to the
left to release the primary latch.
Then, turn they key to the right to
release the secondary latch and lift
the hood.
Note:To prevent damage to, or loss
of the key, remove the key
immediately after opening the hood
and swivel the badge back.
3. Lift the hood and support it with
the prop rod.
Maintenance and Specifications
226
2011 Transit Connect(tst)
Owners Guide, 2nd Printing
USA(fus)
Page 229 of 295

To prolong the life of the wiper blades, it is highly recommended to
scrape off the ice on the windshield before turning on the wipers. The
layer of ice has many sharp edges and can damage the micro edge of the
wiper rubber element.
Rear window wiper blades (if equipped)
Refer toChanging the wiper bladesin this section and follow the same
procedure given for checking and changing the wiper blades.
ENGINE OIL
Checking the engine oil
Refer to thescheduled maintenance informationfor the appropriate
intervals for checking the engine oil.
1. Make sure the vehicle is on level ground.
2. Turn the engine off and wait 15 minutes for the oil to drain into the
oil pan.
3. Set the parking brake and ensure the gearshift is securely latched in P
(Park)
4. Open the hood. Protect yourself from engine heat.
5. Locate and carefully remove the engine oil level dipstick.
6. Wipe the dipstick clean. Insert the dipstick fully, then remove it again.
•If the oil level isbetween the
MIN and MAX marks, the oil
level is acceptable.DO NOT
ADD OIL.
•If the oil level is below the MIN
mark, add enough engine oil to
raise the level within the MIN and
MAX range. Refer toAdding
engine oilin this chapter.
•Oil levels above MAX mark
may cause engine damage.If
the engine is overfilled, some oil
must be removed from the engine
by an authorized dealer.
7. Put the dipstick back in and ensure it is fully seated.
Maintenance and Specifications
229
2011 Transit Connect(tst)
Owners Guide, 2nd Printing
USA(fus)