2011 FORD SUPER DUTY radiator
[x] Cancel search: radiatorPage 93 of 441
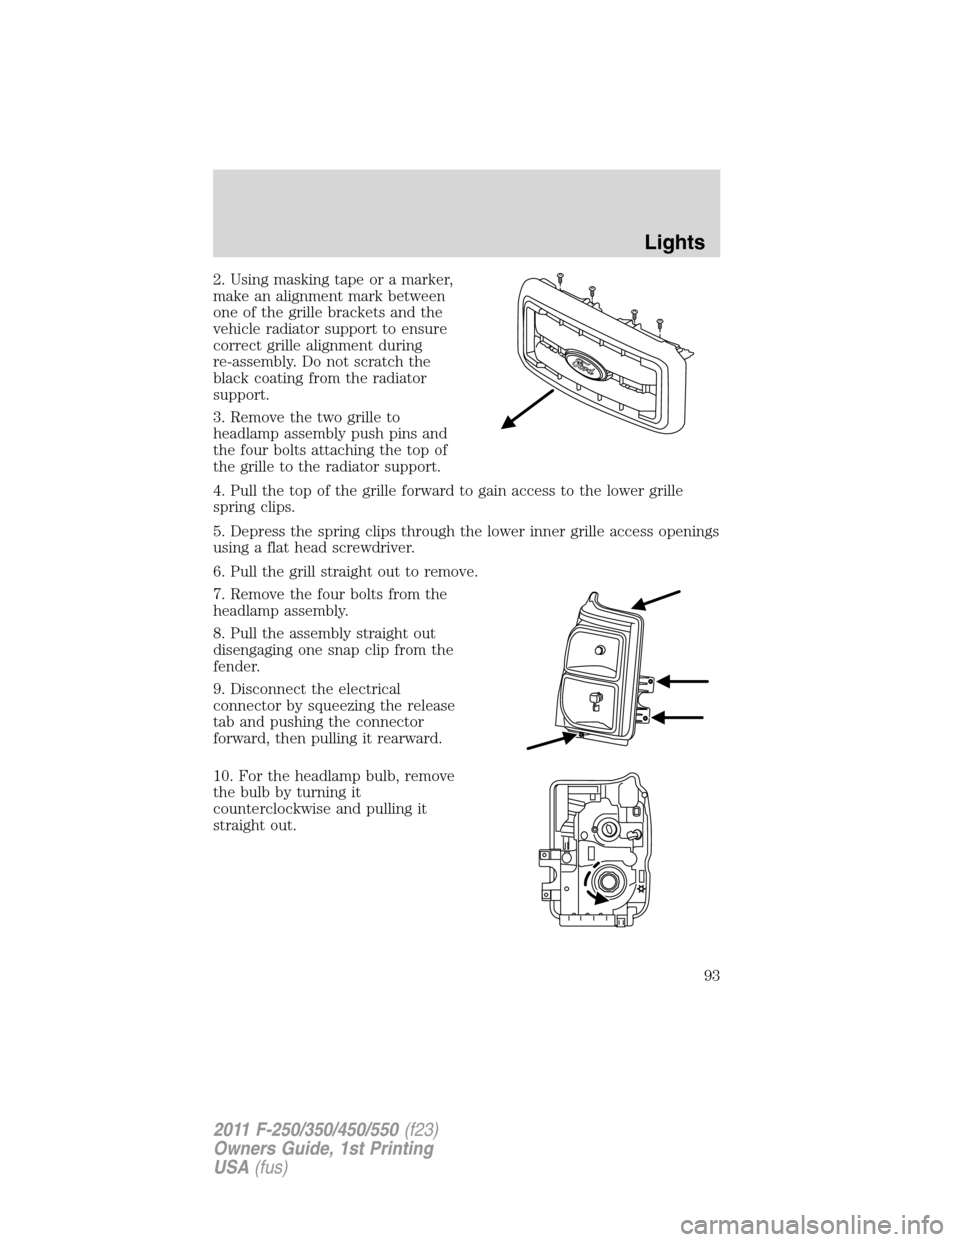
2. Using masking tape or a marker,
make an alignment mark between
one of the grille brackets and the
vehicle radiator support to ensure
correct grille alignment during
re-assembly. Do not scratch the
black coating from the radiator
support.
3. Remove the two grille to
headlamp assembly push pins and
the four bolts attaching the top of
the grille to the radiator support.
4. Pull the top of the grille forward to gain access to the lower grille
spring clips.
5. Depress the spring clips through the lower inner grille access openings
using a flat head screwdriver.
6. Pull the grill straight out to remove.
7. Remove the four bolts from the
headlamp assembly.
8. Pull the assembly straight out
disengaging one snap clip from the
fender.
9. Disconnect the electrical
connector by squeezing the release
tab and pushing the connector
forward, then pulling it rearward.
10. For the headlamp bulb, remove
the bulb by turning it
counterclockwise and pulling it
straight out.
Lights
93
2011 F-250/350/450/550(f23)
Owners Guide, 1st Printing
USA(fus)
Page 306 of 441
WARNING:If you are driving in slippery conditions that require
tire cables, then it is critical that you drive cautiously. Keep
speeds down, allow for longer stopping distances and avoid aggressive
steering to reduce the chances of a loss of vehicle control which can
lead to serious injury or death. If the rear end of the vehicle slides
while cornering, steer in the direction of the slide until you regain
control of the vehicle.
Maintenance and Modifications
The suspension and steering systems on your vehicle have been designed
and tested to provide predictable performance whether loaded or empty
and durable load carrying capability. For this reason, Ford Motor
Company strongly recommends that you do not make modifications such
as adding or removing parts (such as lift kits or stabilizer bars) or by
using replacement parts not equivalent to the original factory equipment.
Any modifications to a vehicle that raise the center of gravity can make
it more likely the vehicle will roll over as a result of a loss of control.
Ford Motor Company recommends that caution be used with any vehicle
equipped with a high load or device (such as ladder racks or pickup box
cover).
Failure to maintain your vehicle properly may void the warranty, increase
your repair cost, reduce vehicle performance and operational capabilities
and adversely affect driver and passenger safety. Frequent inspection of
vehicle chassis components is recommended if the vehicle is subjected to
heavy off-road usage.
VEHICLE USED AS A STATIONARY POWER SOURCE
Auxiliary equipment called power take-off, or PTO, is often added to the
engine or transmission to operate utility equipment. Examples include a
wheel-lift for tow trucks, cranes, tools for construction or tire service,
and pumping fluids. PTO applications draw auxiliary horsepower from
the powertrain, often while the vehicle is stationary. In this condition,
there is limited cooling air flow through the radiator and around the
vehicle that normally occurs when a vehicle is moving. The aftermarket
PTO system installer, having the most knowledge of the final application,
is responsible for determining whether additional chassis heat protection
or powertrain cooling is required, and alerting the user to the safe and
proper operation.
Driving
306
2011 F-250/350/450/550(f23)
Owners Guide, 1st Printing
USA(fus)
Page 308 of 441
•The Total Accessory Reserve Capacity (TARC) is shown on the lower
right side of the vehicle’s Safety Compliance Certification Label. This
applies to Ford-completed vehicles of 10,000 lb. (4,536 kg) GVWR or
less. This is the weight of permanently-attached auxiliary equipment,
such as snowplow frame-mounting hardware, that can be added to the
vehicle and satisfy Ford compliance certification to FMVSS. Exceeding
this weight may require the auxiliary equipment installer additional
safety certification responsibility. The Front Accessory Reserve
Capacity (FARC) is added for customer convenience.
•Rear ballast weight behind the rear axle may be required to prevent
exceeding the FGAWR, and provide front-to-rear weight balance for
proper braking and steering.
•Front wheel toe may require re-adjustment to prevent premature
uneven tire wear. Specifications are found in the FordWorkshop
Manual.
•Headlight aim may require re-adjustment.
•The tire air pressures recommended for general driving are found on
the vehicle’s Safety Certification Label. The maximum cold inflation
pressure for the tire and associated load rating is imprinted on the tire
sidewall. Tire air pressure may require re-adjustment within these
pressure limits to accommodate the additional weight of the snowplow
installation.
•Federal and some local regulations require additional exterior lamps
for snowplow-equipped vehicles. Consult your authorized dealer for
additional information.
Operating the vehicle with the snowplow attached
Do not use your vehicle for snow removal until it has been driven at
least 500 miles (800 km).
The attached snowplow blade restricts airflow to the radiator, and may
cause the engine to run at a higher temperature: Attention to engine
temperature is especially important when outside temperatures are
above freezing. Angle the blade to maximize airflow to the radiator and
monitor engine temperature to determine whether a left or right angle
provides the best performance.
Follow the severe duty schedule in yourscheduled maintenance
informationfor engine oil and transmission fluid change intervals.
Driving
308
2011 F-250/350/450/550(f23)
Owners Guide, 1st Printing
USA(fus)
Page 372 of 441
WARNING:Do not put engine coolant in the windshield washer
fluid container. If sprayed on the windshield, engine coolant
could make it difficult to see through the windshield.
•DO NOT MIXdifferent colors or types of coolant in your vehicle.
Make sure the correct coolant is used.DO NOT MIXrecycled coolant
and new (unused) coolant together in the vehicle. Mixing of engine
coolants may harm your engine’s cooling system. The use of an
improper coolant may harm engine and cooling system components
and may void the warranty. Refer toMaintenance product
specifications and capacitiesin this chapter.
Note:Do not use stop leak pellets or cooling system sealants/additives
as they can cause damage to the engine cooling and/or heating systems.
This damage would not be covered under your vehicle’s warranty.
•A large amount of water without engine coolant may be added, in case
of emergency, to reach a vehicle service location. In this instance, the
cooling system must be drained and refilled with a 50/50 mixture of
engine coolant and distilled water as soon as possible. Water alone
(without engine coolant) can cause engine damage from corrosion,
overheating or freezing.
•Do not use alcohol, methanol, brine or any engine coolants
mixed with alcohol or methanol antifreeze (coolant).Alcohol
and other liquids can cause engine damage from overheating or
freezing.
•Do not add extra inhibitors or additives to the coolant.These
can be harmful and compromise the corrosion protection of the engine
coolant.
For vehicles with overflow coolant systems with a non-pressurized cap
on the coolant recovery system, add coolant to the coolant recovery
reservoir when the engine is cool. Add the proper mixture of coolant and
distilled water to the FULL COLD level. For all other vehicles which have
a coolant degas system with a pressurized cap, or if it is necessary to
remove the coolant pressure relief cap on the radiator of a vehicle with
an overflow system, follow these steps to add engine coolant.
WARNING:To reduce the risk of personal injury, make sure the
engine is cool before unscrewing the coolant pressure relief cap.
The cooling system is under pressure; steam and hot liquid can come
out forcefully when the cap is loosened slightly.
Maintenance and Specifications
372
2011 F-250/350/450/550(f23)
Owners Guide, 1st Printing
USA(fus)
Page 373 of 441
Add the proper mixture of coolant and water to the cooling system by
following these steps:
1. Before you begin, turn the engine off and let it cool.
2. When the engine is cool, wrap a thick cloth around the coolant
pressure relief cap on the coolant reservoir (a translucent plastic bottle).
Slowly turn cap counterclockwise (left) until pressure begins to release.
3. Step back while the pressure releases.
4. When you are sure that all the pressure has been released, use the
cloth to turn it counterclockwise and remove the cap.
5. Fill the coolant reservoir slowly with the proper coolant mixture, to
within the COLD FILL RANGE or the FULL COLD level on the reservoir.
If you removed the radiator cap in an overflow system, fill the radiator
until the coolant is visible and radiator is almost full.
6. Replace the cap. Turn until tightly installed. Cap must be tightly
installed to prevent coolant loss.
After any coolant has been added, check the coolant concentration (refer
toChecking engine coolant). If the concentration is not 50/50
(protection to –34°F/–36°C), drain some coolant and adjust the
concentration. It may take several drains and additions to obtain a 50/50
coolant concentration.
Whenever coolant has been added, the coolant level in the coolant
reservoir should be checked the next few times you drive the vehicle. If
necessary, add enough 50/50 concentration of engine coolant and
distilled water to bring the liquid level to the proper level.
If you have to add more than 1.0 quart (1.0 liter) of engine coolant per
month, have your authorized dealer check the engine cooling system.
Your cooling system may have a leak. Operating an engine with a low
level of coolant can result in engine overheating and possible engine
damage.
Recycled engine coolant
Ford Motor Company does NOT recommend the use of recycled engine
coolant since a Ford-approved recycling process is not yet available.
Used engine coolant should be disposed of in an appropriate
manner. Follow your community’s regulations and standards for recycling
and disposing of automotive fluids.
Maintenance and Specifications
373
2011 F-250/350/450/550(f23)
Owners Guide, 1st Printing
USA(fus)
Page 418 of 441
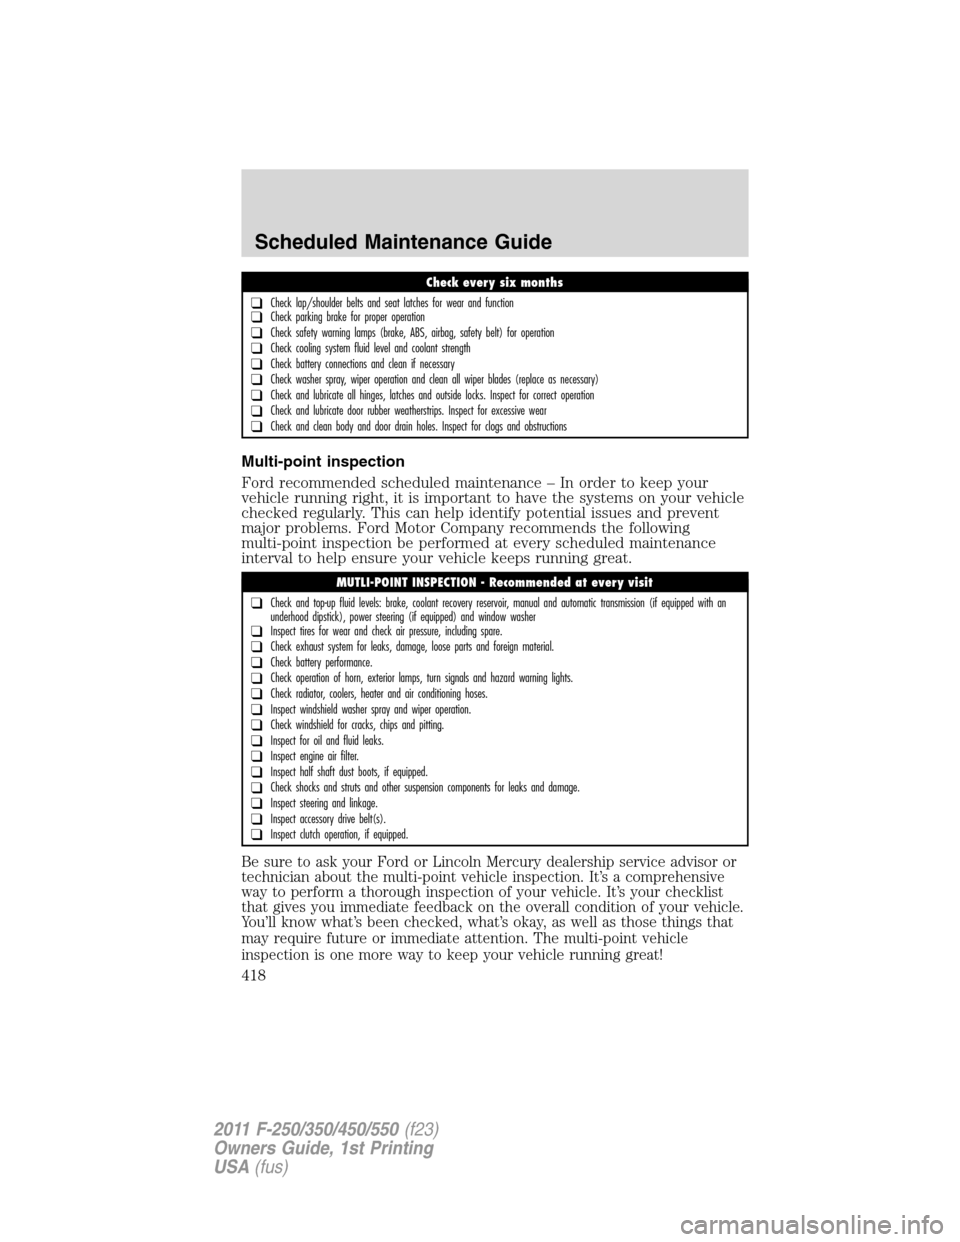
Multi-point inspection
Ford recommended scheduled maintenance – In order to keep your
vehicle running right, it is important to have the systems on your vehicle
checked regularly. This can help identify potential issues and prevent
major problems. Ford Motor Company recommends the following
multi-point inspection be performed at every scheduled maintenance
interval to help ensure your vehicle keeps running great.
Be sure to ask your Ford or Lincoln Mercury dealership service advisor or
technician about the multi-point vehicle inspection. It’s a comprehensive
way to perform a thorough inspection of your vehicle. It’s your checklist
that gives you immediate feedback on the overall condition of your vehicle.
You’ll know what’s been checked, what’s okay, as well as those things that
may require future or immediate attention. The multi-point vehicle
inspection is one more way to keep your vehicle running great!
Check every six months
❑Check lap/shoulder belts and seat latches for wear and function❑Check parking brake for proper operation
❑Check safety warning lamps (brake, ABS, airbag, safety belt) for operation
❑Check cooling system fluid level and coolant strength
❑Check battery connections and clean if necessary
❑Check washer spray, wiper operation and clean all wiper blades (replace as necessary)
❑Check and lubricate all hinges, latches and outside locks. Inspect for correct operation
❑Check and lubricate door rubber weatherstrips. Inspect for excessive wear
❑Check and clean body and door drain holes. Inspect for clogs and obstructions
MUTLI-POINT INSPECTION - Recommended at every visit
❑Check and top-up fluid levels: brake, coolant recovery reservoir, manual and automatic transmission (if equipped with an
underhood dipstick), power steering (if equipped) and window washer
❑Inspect tires for wear and check air pressure, including spare.
❑Check exhaust system for leaks, damage, loose parts and foreign material.
❑Check battery performance.
❑Check operation of horn, exterior lamps, turn signals and hazard warning lights.
❑Check radiator, coolers, heater and air conditioning hoses.
❑Inspect windshield washer spray and wiper operation.
❑Check windshield for cracks, chips and pitting.
❑Inspect for oil and fluid leaks.
❑Inspect engine air filter.
❑Inspect half shaft dust boots, if equipped.
❑Check shocks and struts and other suspension components for leaks and damage.
❑Inspect steering and linkage.
❑Inspect accessory drive belt(s).
❑Inspect clutch operation, if equipped.
Scheduled Maintenance Guide
418
2011 F-250/350/450/550(f23)
Owners Guide, 1st Printing
USA(fus)