Page 39 of 302

Flash-to-pass
Pull toward you slightly to activate
and release to deactivate.
Daytime running lamps (DRL) (if equipped)
The daytime running light system turns the headlamps on with a
reduced light output.
To activate:
•the ignition must be in the on position and
•the headlamp system is in the off position or parking lamp position.
WARNING:Always remember to turn on your headlamps at
dusk or during inclement weather. The daytime running light
(DRL) system does not activate your tail lamps and generally may not
provide adequate lighting during these conditions. Failure to activate
your headlamps under these conditions may result in a collision.
PANEL DIMMER CONTROL
Use to adjust the brightness of the
instrument panel and all applicable
switches in the vehicle during
headlamp and parking lamp
operation.
Move the control up or down to
adjust the intensity of the panel
lighting.
Move the control to the full upright
position, past detent, to turn on the
interior lamps.
Lights
39
2011 Ranger(ran)
Owners Guide, 1st Printing
USA(fus)
Page 44 of 302
Replacing headlamp bulbs/front park bulbs/turn signal bulbs
To remove the bulb(s):
1. Make sure the headlamp switch is
in the off position, then open the
hood.
2. At the back of the headlamp, pry
up the two retainer pins to release
the headlamp assembly from the
vehicle and pull headlamp forward.
3. Disconnect the electrical
connector from the bulb by pulling
rearward.
4. Remove the bulb retaining ring by
rotating it counterclockwise and
slide the ring off the plastic base.
5. Remove the old bulb by pulling it
straight out of the lamp.
WARNING:Handle a halogen headlamp bulb carefully and keep
out of children’s reach. Grasp the bulb only by its plastic base
and do not touch the glass. The oil from your hand could cause the
bulb to break the next time the headlamps are operated.
Install the new bulb(s) in reverse order.
Lights
44
2011 Ranger(ran)
Owners Guide, 1st Printing
USA(fus)
Page 49 of 302
TILT STEERING WHEEL (IF EQUIPPED)
To adjust the steering wheel:
1. Pull and hold the steering wheel
release control toward you.
2. Move the steering wheel up or
down until you find the desired
location.
3. Release the steering wheel
release control. This will lock the
steering wheel in position.
WARNING:Never adjust the steering wheel when the vehicle is
moving.
CENTER CONSOLE (IF EQUIPPED)
Your vehicle may be equipped with a
variety of console features. These
include:
•Utility compartment with
cassette/compact disc storage
•Cupholders
•Flip-up armrest
WARNING:Use only soft
cups in the cupholder. Hard
objects can injure you in a
collision.
Driver Controls
49
2011 Ranger(ran)
Owners Guide, 1st Printing
USA(fus)
Page 50 of 302

AUXILIARY POWER POINT (12V DC)
Power outlets are designed for accessory plugs only. Do not insert
any other object in the power outlet as this will damage the
outlet and blow the fuse. Do not hang any type of accessory or
accessory bracket from the plug. Improper use of the power
outlet can cause damage not covered by your warranty.
The auxiliary power points are located on the instrument panel.
Do not use the power point for operating the cigarette lighter element (if
equipped).
To prevent the fuse from being blown, do not use the power point(s)
over the vehicle capacity of 12V DC/180W. If the power point or cigar
lighter socket is not working, a fuse may have blown. Refer toFuses and
relaysin theRoadside Emergencieschapter for fuse ratings and
information on checking and replacing fuses.
To have full capacity usage of your power point, the engine is required to
be running to avoid unintentional discharge of the battery. To prevent
the battery from being discharged:
•do not use the power point longer than necessary when the engine is
not running,
•do not leave battery chargers, video game adapters, computers and
other devices plugged in overnight or when the vehicle is parked for
extended periods.
Always keep the power point caps closed when not being used.
POWER WINDOWS (IF EQUIPPED)
WARNING:Do not leave children unattended in the vehicle and
do not let children play with the power windows. They may
seriously injure themselves.
WARNING:When closing the power windows, you should verify
they are free of obstructions and ensure that children and/or
pets are not in the proximity of the window openings.
Driver Controls
50
2011 Ranger(ran)
Owners Guide, 1st Printing
USA(fus)
Page 51 of 302

Press and pull the window switches
to open and close windows.
•Press down (to the first detent)
and hold the switch to open.
•Pull up and hold the switch to
close.
One-touch down
Allows the driver’s window to open fully without holding the control
down. Press the switch completely down to the second detent and
release quickly. The window will open fully. Momentarily press the switch
to any position to stop the window operation.
INTERIOR MIRROR
The interior rear view mirror has two pivot points on the support arm
which lets you adjust the mirror up or down and from side to side.
WARNING:Do not adjust the mirror while the vehicle is in
motion.
EXTERIOR MIRRORS
Power side view mirrors (if equipped)
WARNING:Do not adjust the mirror while the vehicle is in
motion.
To adjust your mirrors:
1. Rotate the control clockwise to
adjust the right mirror and rotate
the control counterclockwise to
adjust the left mirror.
2. Move the control in the direction
you wish to tilt the mirror.
3. Return to the center position to lock mirrors in place.
Driver Controls
51
2011 Ranger(ran)
Owners Guide, 1st Printing
USA(fus)
Page 52 of 302
Fold-away mirrors
Pull the side mirrors in carefully
when driving through a narrow
space, like an automatic car wash.
SPEED CONTROL (IF EQUIPPED)
With speed control set, you can maintain a set speed without keeping
your foot on the accelerator pedal.
WARNING:Do not use the speed control in heavy traffic or on
roads that are winding, slippery or unpaved.
Using speed control
The speed controls are located on the steering wheel. The following
buttons work with speed control:
ON:Press to turn system on.
OFF:Press to turn system off.
RES (Resume):Press to resume a
set speed.
SET+:Press to set the speed or
increase the set speed.
CST- (Coast):Press to decrease
the set speed.
Setting speed control
1. Press and release ON.
2. Accelerate to the desired speed.
3. Press and release SET+.
4. Take your foot off the accelerator pedal.
5. The indicator light
on the instrument cluster will turn on.
Driver Controls
52
2011 Ranger(ran)
Owners Guide, 1st Printing
USA(fus)
Page 54 of 302
POSITIVE RETENTION FLOOR MAT (IF EQUIPPED)
WARNING:Do not install additional floor mats on top of the
factory installed floor mats as they may interfere with the
accelerator or the brake pedals.
Position the floor mat so that the
eyelet is over the pointed end of the
retention post and rotate forward to
lock in. Make sure that the mat does
not interfere with the operation of
the accelerator or the brake pedal.
To remove the floor mat, reverse the
installation procedure.
BEDRAILS (IF EQUIPPED)
•This bedrail is for appearance use only.
WARNING:To help prevent injury, do not use bedrail to retain
cargo.
•Retain cargo with the pickup tiedown hooks.
Driver Controls
54
2011 Ranger(ran)
Owners Guide, 1st Printing
USA(fus)
Page 62 of 302

FRONT SEATING
WARNING:Reclining the seatback can cause an occupant to
slide under the seat’s safety belt, resulting in severe personal
injuries in the event of a collision.
WARNING:Do not pile cargo higher than the seatbacks to
reduce the risk of injury in a collision or sudden stop.
WARNING:Before returning the seatback to its original
position, make sure that cargo or any objects are not trapped
behind the seatback. After returning the seatback to its original
position, pull on the seatback to ensure that it has fully latched. An
unlatched seat may become dangerous in the event of a sudden stop or
collision.
Adjustable head restraints
Your vehicle is equipped with front row outboard head restraints that are
vertically adjustable.
WARNING:To minimize the risk of neck injury in the event of a
crash, the driver and passenger occupants should not sit in
and/or operate the vehicle, until the head restraint is placed in its
proper position. The driver should never adjust the head restraint
while the vehicle is in motion.
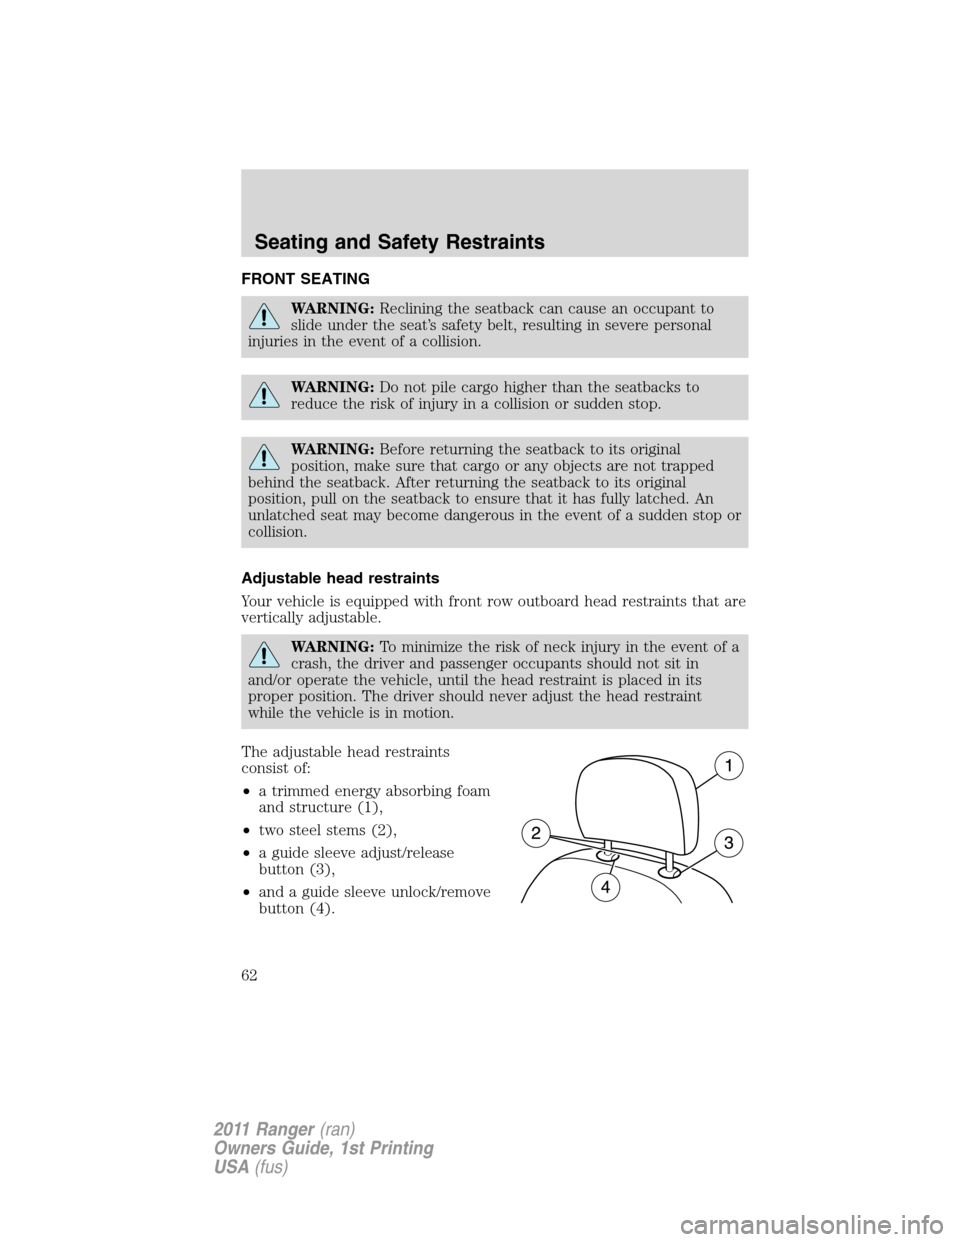
The adjustable head restraints
consist of:
•a trimmed energy absorbing foam
and structure (1),
•two steel stems (2),
•a guide sleeve adjust/release
button (3),
•and a guide sleeve unlock/remove
button (4).
Seating and Safety Restraints
62
2011 Ranger(ran)
Owners Guide, 1st Printing
USA(fus)