Page 76 of 449

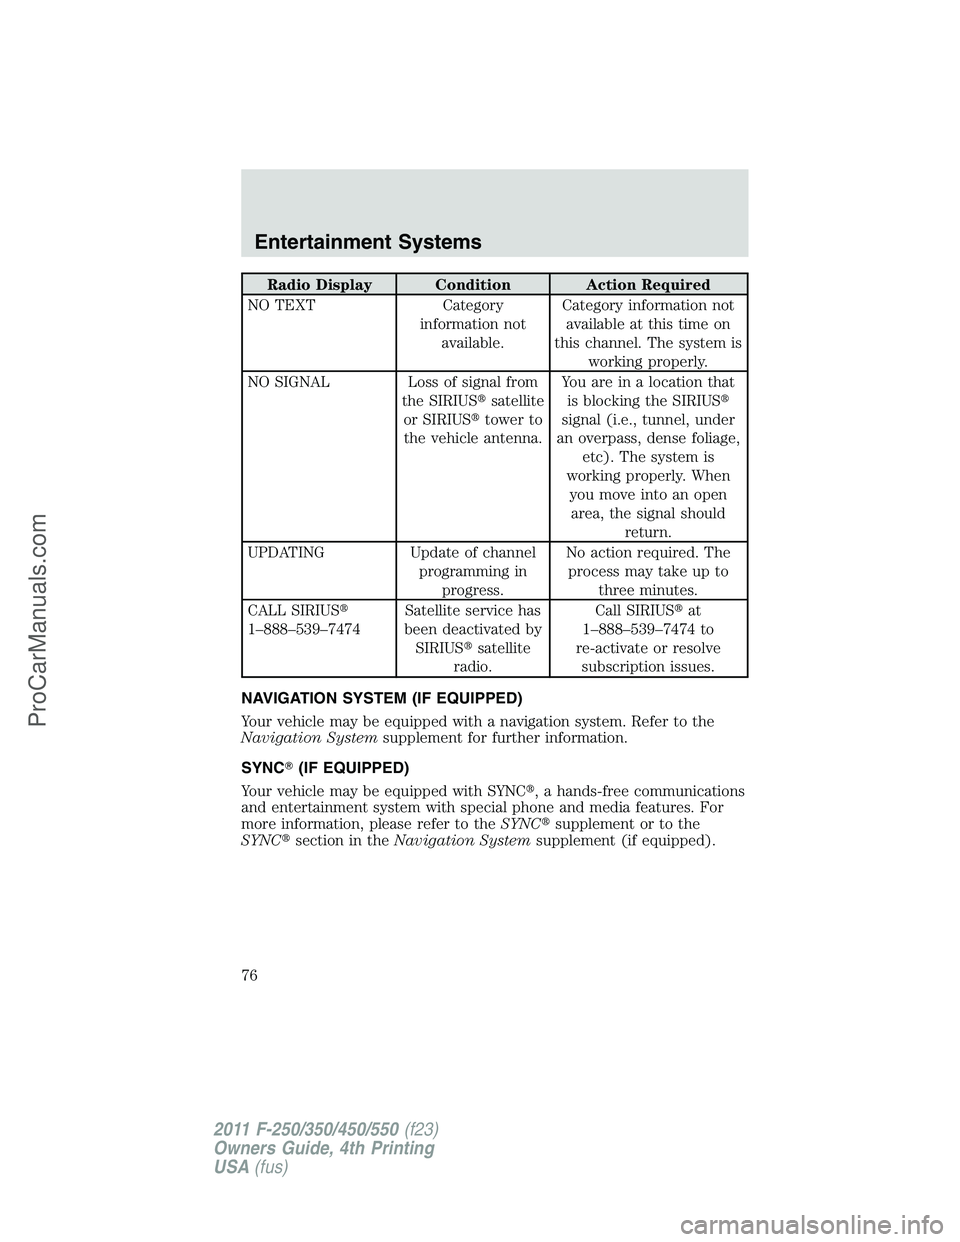
Radio Display Condition Action Required
NO TEXT Category
information not
available.Category information not
available at this time on
this channel. The system is
working properly.
NO SIGNAL Loss of signal from
the SIRIUS�satellite
or SIRIUS�tower to
the vehicle antenna.Youareinalocationthat
is blocking the SIRIUS�
signal (i.e., tunnel, under
an overpass, dense foliage,
etc). The system is
working properly. When
you move into an open
area, the signal should
return.
UPDATING Update of channel
programming in
progress.No action required. The
process may take up to
three minutes.
CALL SIRIUS�
1–888–539–7474Satellite service has
been deactivated by
SIRIUS�satellite
radio.Call SIRIUS�at
1–888–539–7474 to
re-activate or resolve
subscription issues.
NAVIGATION SYSTEM (IF EQUIPPED)
Your vehicle may be equipped with a navigation system. Refer to the
Navigation Systemsupplement for further information.
SYNC�(IF EQUIPPED)
Your vehicle may be equipped with SYNC�, a hands-free communications
and entertainment system with special phone and media features. For
more information, please refer to theSYNC�supplement or to the
SYNC�section in theNavigation Systemsupplement (if equipped).
Entertainment Systems
76
2011 F-250/350/450/550(f23)
Owners Guide, 4th Printing
USA(fus)
ProCarManuals.com
Page 79 of 449

If you are driving during extreme high ambient temperatures and idling
for extended periods of time in gear, it is recommended to run the A/C
in the MAX A/C position, adjust the blower fan speed to the lowest
setting and put the vehicle’s transmission into the P (Park) position to
continue to receive cool air from your A/C system.
For maximum cooling performance (MAX A/C):
•Select MAX A/C.
(Panel) and(panel/floor) modes:
•Move the temperature control to the coolest setting.
•Select A/C and
(recirculated air). Use recirculated air with A/C
to provide colder airflow.
•Set the fan to the highest speed initially, then adjust to maintain
comfort.
To aid in side window defogging/demisting in cold weather:
1. Select
(panel/floor).
2. Select A/C.
3. Adjust the temperature control to maintain comfort.
4. Set the fan speed to the highest setting.
5. Direct the outer instrument panel vents towards the side windows.
To increase airflow to the outer instrument panel vents, close the vents
located in the middle of the instrument panel.
Climate Controls
79
2011 F-250/350/450/550(f23)
Owners Guide, 4th Printing
USA(fus)
ProCarManuals.com
Page 83 of 449

•To improve the A/C cool down, drive with the windows slightly open
for 2-3 minutes after start up or until the vehicle has been “aired out”.
•A small amount of air may be felt from the floor vent regardless of the
air distribution setting that is selected.
During extreme high ambient temperatures when idling stationary for
extended periods of time in gear, it is recommended to run the A/C in
the max A/C position, reduce blower fan speed from the highest setting
and put the vehicle’s transmission into the P (Park) gear position
(automatic transmission only) to continue to receive cool air from your
A/C system.
For maximum cooling performance:
•Automatic operation:
1. Press AUTO for full automatic operation.
2. Do not override A/C or
(recirculated air).
3. Set the temperature to 60°F (16°C).
•Manual operation:
1. Select MAX A/C.
2. Select
(recirculated air). Use(recirculated air) with A/C to
provide colder airflow.
3. Set the temperature to 60°F (16°C).
4. Set highest fan speed initially, then adjust to maintain comfort.
To aid in side window defogging/demisting in cold weather:
1. Select
(panel/floor).
2. Select A/C.
3. Adjust the temperature control to maintain comfort.
4. Set the fan speed to the highest setting.
5. Direct the outer instrument panel vents towards the side windows.
To increase airflow to the outer instrument panel vents, close the vents
located in the middle of the instrument panel.
Climate Controls
83
2011 F-250/350/450/550(f23)
Owners Guide, 4th Printing
USA(fus)
ProCarManuals.com
Page 87 of 449
4. Turn the headlamp control to the autolamp position. The headlamps
will turn on.
5. Wait the desired amount of time for the exit delay you want (up to
three minutes), then turn the headlamps off.
Fog lamp control (if equipped)
The headlamp control also operates
the fog lamps. The fog lamps can be
turned on only when the headlamp
control is in the
,or
position and the high beams are not
turned on.
Pull headlamp control towards you
to turn fog lamps on. The fog lamp
indicator light
will illuminate.
High beams
Pull the lever fully past the detent
to activate. Pull the lever fully again
to deactivate.
Flash-to-pass
Pull toward you slightly to activate
and release to deactivate.
Lights
87
2011 F-250/350/450/550(f23)
Owners Guide, 4th Printing
USA(fus)
ProCarManuals.com
Page 89 of 449

Vertical aim adjustment
The headlamps on your vehicle can only be vertically adjusted. Your
vehicle does not require horizontal aim adjustments.
To adjust the headlamps:
1. Park the vehicle directly in front of a wall or screen on a level surface,
approximately 25 feet (7.6 meters) away.
•(1) 8 feet (2.4 meters)
•(2) Center height of lamp to ground
•(3) 25 feet (7.6 meters)
•(4) Horizontal reference line
2. Measure the height from the
center of your headlamp (indicated
by a 3.0 mm circle on the lens) to
the ground and mark an 8 foot
(2.4 meter) horizontal reference line
on the vertical wall or screen at this
height (a piece of masking tape
works well).
3. Turn on the low beam headlamps
to illuminate the wall or screen and open the hood. Cover one of the
headlamps so no light from that lamp hits the wall.
4. On the wall or screen you will
observe a light pattern with a
distinct horizontal edge towards the
right. If this edge is not at the
horizontal reference line, the beam will need to be adjusted so the edge
is at the same height as the horizontal reference line.
5. Locate the vertical adjuster on
each headlamp, then use a #2
Philips head to turn the adjuster
either counterclockwise (to adjust
down) or clockwise (to adjust up)
aligning the upper edge of the light
pattern up to the horizontal line.
6. Repeat Steps 3–5 for the other
headlamp.
7. Close the hood and turn off the lamps.
Lights
89
2011 F-250/350/450/550(f23)
Owners Guide, 4th Printing
USA(fus)
ProCarManuals.com
Page 97 of 449

MULTI-FUNCTION LEVER
Windshield wiper:Rotate the end
of the control away from you to
increase the speed of the wipers;
rotate towards you to decrease the
speed of the wipers.
Speed dependent wipers:When the wiper control is set on the
intermittent settings, the speed of the wipers will automatically adjust
with the vehicle speed. The faster your vehicle is travelling the faster the
wipers will go.
Windshield washer:Press the end
of the stalk:
•briefly: causes a single swipe of
the wipers without washer fluid.
•a quick press and hold: the
wipers will swipe three times with
washer fluid.
•a long press and hold: the wipers and washer fluid will be activated for
up to 10 seconds.
Courtesy wipe feature:One extra wipe will occur a few seconds after
washing the front window to clear any excess washer fluid remaining on
the windshield.
Note:Do not operate the washer when the washer reservoir is empty.
This may cause the washer pump to overheat. Check the washer fluid
level frequently. Do not operate the wipers when the windshield is dry.
This may scratch the glass, damage the wiper blades and cause the wiper
motor to burn out. Before operating the wiper on a dry windshield,
always use the windshield washer. In freezing weather, be sure the wiper
blades are not frozen to the windshield before operating the wipers.
Windshield wiper rainlamp feature (if equipped with autolamp)
When the windshield wipers are turned on during daylight, and the
headlamp control is in the autolamp position, the exterior lamps will turn
on after a brief delay and will remain on until the wipers are turned off.
o
o
Driver Controls
97
2011 F-250/350/450/550(f23)
Owners Guide, 4th Printing
USA(fus)
ProCarManuals.com
Page 107 of 449

Note:If the power fold/telescope mirror glass appears loose or vibrates
when driving, it is possible that the mirrors have been manually folded or
telescoped. To minimize the vibration, ensure that the mirrors are
electronically folded and telescoped in/out with the switches on the door
trim panel. If the power fold mirrors are out of sync, electronically
powerfold the mirrors to re-sync the motors. This will cause a loud
“click” and the mirrors will jerk during re-synchronization. This is
normal.
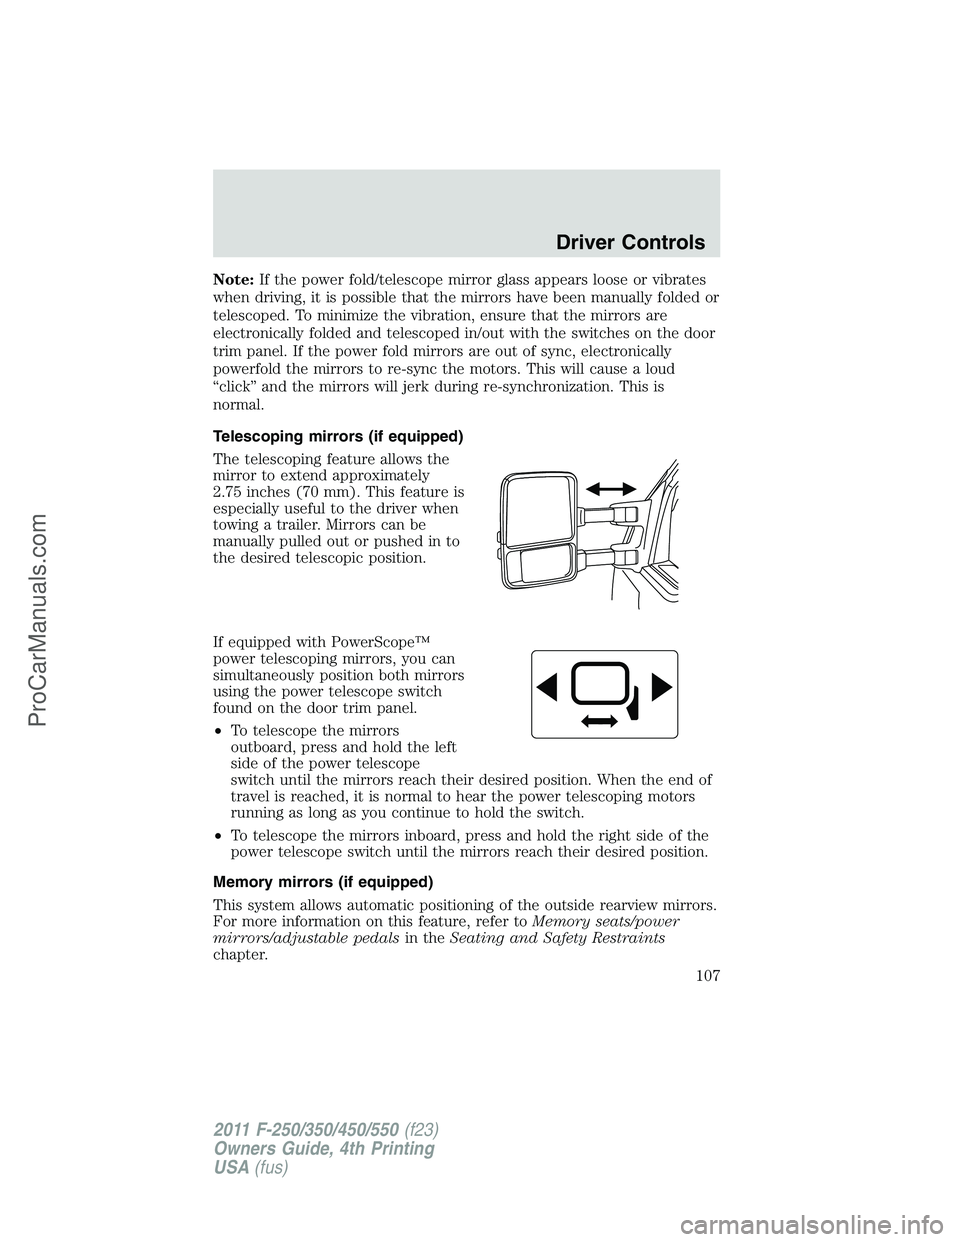
Telescoping mirrors (if equipped)
The telescoping feature allows the
mirror to extend approximately
2.75 inches (70 mm). This feature is
especially useful to the driver when
towing a trailer. Mirrors can be
manually pulled out or pushed in to
the desired telescopic position.
If equipped with PowerScope™
power telescoping mirrors, you can
simultaneously position both mirrors
using the power telescope switch
found on the door trim panel.
•To telescope the mirrors
outboard, press and hold the left
side of the power telescope
switch until the mirrors reach their desired position. When the end of
travel is reached, it is normal to hear the power telescoping motors
running as long as you continue to hold the switch.
•To telescope the mirrors inboard, press and hold the right side of the
power telescope switch until the mirrors reach their desired position.
Memory mirrors (if equipped)
This system allows automatic positioning of the outside rearview mirrors.
For more information on this feature, refer toMemory seats/power
mirrors/adjustable pedalsin theSeating and Safety Restraints
chapter.
Driver Controls
107
2011 F-250/350/450/550(f23)
Owners Guide, 4th Printing
USA(fus)
ProCarManuals.com
Page 108 of 449

Mirror-mounted side turn signal indicator (if equipped)
When the vehicle turn signals are
activated, the outer portion of the
mirror housing will blink amber.
The turn signal feature can be seen
by other drivers who may approach
from the rear of the vehicle.
Clearance lamps (if equipped)
Illuminates when the headlamps or
parking lamps are switched on.
This provides additional visibility of
your vehicle to other drivers on the
road.
POWER ADJUSTABLE FOOT PEDALS (IF EQUIPPED)
The accelerator and brake pedal
should only be adjusted when the
vehicle is stopped and the gearshift
lever is in the P (Park) position.
The control is located on the left
side of the steering column. Press
and hold the rear of the control to
move the pedals toward you. Press
and hold the front of the control to
move the pedals away from you.
WARNING:Never adjust the accelerator and brake pedal with
feet on the pedals while the vehicle is moving.
Driver Controls
108
2011 F-250/350/450/550(f23)
Owners Guide, 4th Printing
USA(fus)
ProCarManuals.com