Page 333 of 449
1. Turn engine off and block the
wheel that is diagonally opposite of
the flat tire using the wheel chock,
if equipped.If the vehicle is a
4x4,lock the manual hub on the
wheel.
2. Remove the jack, jack handle, lug wrench and spare tire from the
stowage locations.
3. Use the tip of the lug wrench to remove any wheel trim.
4. Loosen each wheel lug nut one-half turn counterclockwise but do not
remove them until the wheel is raised off the ground.
The following steps apply to F–250/F–350 Single Rear Wheel
(SRW) vehicles only:
5. Insert the hooked end of the jack
handle into the jack and use the
handle to slide the jack under the
vehicle.
6. Position the jack according to the
following guides:
•Front (4x2)
Roadside Emergencies
333
2011 F-250/350/450/550(f23)
Owners Guide, 4th Printing
USA(fus)
ProCarManuals.com
Page 335 of 449

Never use the front or rear
differential as a jacking point.
WARNING:To lessen the
risk of personal injury, do
not put any part of your body
under the vehicle while changing a
tire. Do not start the engine when
your vehicle is on the jack. The
jack is only meant for changing
the tire.
7. Turn the jack handle clockwise
until the wheel is completely off the
ground and high enough to install
the spare tire.
8. Remove the lug nuts with the lug
wrench.
9. Replace the flat tire with the
spare tire, making sure the valve
stem is facing outward for all front wheels and single rear wheel vehicles.
If replacing an inboard rear tire on dual rear wheel vehicles, the valve
stem must be facing outward. If replacing the outboard wheel, the valve
stem must be facing inward. Reinstall the lug nuts until the wheel is
snug against the hub. Do not fully tighten the lug nuts until the wheel
has been lowered.
10. Lower the wheel by turning the jack handle counterclockwise.
Go to Step 19.
The following steps apply to F–350 Dual Rear Wheel (DRW) and
F–450/F–550 vehicles only:
11. Slide the notched end of the
jack handle over the release valve
and use the handle to slide the jack
under the vehicle. Make sure the
valve is closed by turning it
clockwise.
12. Position the jack according to
the following guides:
Roadside Emergencies
335
2011 F-250/350/450/550(f23)
Owners Guide, 4th Printing
USA(fus)
ProCarManuals.com
Page 344 of 449

Do not attempt to push-start your automatic transmission
vehicle. Automatic transmissions do not have push-start
capability. Attempting to push-start a vehicle with an automatic
transmission may cause transmission damage.
Preparing your vehicle
When the battery is disconnected or a new battery is installed, the
automatic transmission must relearn its shift strategy. As a result, the
transmission may have firm and/or soft shifts. This operation is
considered normal and will not affect function or durability of the
transmission. Over time, the adaptive learning process will fully update
transmission operation.
1.Use only a 12–volt supply to start your vehicle.
2. Do not disconnect the battery of the disabled vehicle as this could
damage the vehicle’s electrical system.
3. Park the booster vehicle close to the hood of the disabled vehicle
making sure the two vehiclesdo nottouch. Set the parking brake on
both vehicles and stay clear of the engine cooling fan and other moving
parts.
4. Check all battery terminals and remove any excessive corrosion before
you attach the battery cables. Ensure that vent caps are tight and level.
5. Turn the heater fan on in both vehicles to protect from any electrical
surges. Turn all other accessories off.
Connecting the jumper cables
Note:In the illustration, the vehicle on the bottom is used to designate
the assisting (boosting) battery.
Roadside Emergencies
344
2011 F-250/350/450/550(f23)
Owners Guide, 4th Printing
USA(fus)
ProCarManuals.com
Page 345 of 449
 jumper
cable to the positive (+) terminal of
the discharged battery.
2. Connect the other end of the
positive (+) cable to the positive
(+) terminal of the assisting batter")
1. Connect the positive (+) jumper
cable to the positive (+) terminal of
the discharged battery.
2. Connect the other end of the
positive (+) cable to the positive
(+) terminal of the assisting battery.
3. Connect the negative (-) cable to
the negative (-) terminal of the
assisting battery.
4. Make the final connection of the
negative (-) cable to an exposed
metal part of the stalled vehicle’s
engine, away from the battery and
the carburetor/fuel injection system.
Note:Do not attach the negative (-) cable to fuel lines, engine rocker
covers, the intake manifold or electrical components as grounding points.
WARNING:Do not connect the end of the second cable to the
negative (-) terminal of the battery to be jumped. A spark may
cause an explosion of the gases that surround the battery.
Ensure that the cables are clear of fan blades, belts, moving parts of both
engines, or any fuel delivery system parts.
Jump starting
1. Start the engine of the booster vehicle and run the engine at
moderately increased speed.
2. Start the engine of the disabled vehicle.
3. Once the disabled vehicle has been started, run both engines for an
additional three minutes before disconnecting the jumper cables.
+–
+–
2
3
14
Roadside Emergencies
345
2011 F-250/350/450/550(f23)
Owners Guide, 4th Printing
USA(fus)
ProCarManuals.com
Page 346 of 449
Removing the jumper cables
Remove the jumper cables in the reverse order that they were
connected.
Note:In the illustration, the vehicle on the bottom is used to designate
the assisting (boosting) battery.
1. Remove the jumper cable from
the ground metal surface.
2. Remove the jumper cable on the
negative (-) terminal of the booster
vehicle’s battery.
3. Remove the jumper cable from
the positive (+) terminal of the
booster vehicle’s battery.
4. Remove the jumper cable from
the positive (+) terminal of the
disabled vehicle’s battery.
After the disabled vehicle has been started and the jumper cables
removed, allow it to idle for several minutes so the engine computer can
relearn its idle conditions.
+–
+–
DA
B
C
4D1
2
3
Roadside Emergencies
346
2011 F-250/350/450/550(f23)
Owners Guide, 4th Printing
USA(fus)
ProCarManuals.com
Page 354 of 449

The use of leaded fuel in your vehicle without proper conversion may
damage the effectiveness of your emission control system and may cause
engine knocking or serious engine damage. Ford Motor Company/Ford of
Canada is not responsible for any damage caused by use of improper
fuel. Using leaded fuel may also result in difficulty importing your vehicle
back into the U.S.
If your vehicle must be serviced while you are traveling or living in
Asia-Pacific Region, Sub-Saharan Africa, U.S. Virgin Islands, Central
America, the Caribbean, and Israel, contact the nearest authorized
dealer. If the authorized dealer cannot help you, contact:
FORD MOTOR COMPANY
FORD EXPORT OPERATIONS & GLOBAL INITIATIVES
1555 Fairlane Drive
Fairlane Business Park #3
Allen Park, Michigan 48101
U.S.A.
Telephone: (313) 594-4857
For customers in Guam, the Commonwealth of the Northern Mariana
Islands (CNMI), America Samoa, and the U.S. Virgin Islands, please feel
free to call our Toll-Free Number: (800) 841-FORD (3673).
FAX: (313) 390-0804
Email: [email protected]
If your vehicle must be serviced while you are traveling or living in
Puerto Rico, contact the nearest authorized dealer. If the authorized
dealer cannot help you, contact:
Ford International Business Development Inc.
Customer Relationship Center
P.O. Box 11957
Caparra Heights Station
San Juan, Puerto Rico 00922-1957
Telephone: (800) 841-FORD (3673)
FAX: (313) 390-0804
Email: [email protected]
www.ford.com.pr
Customer Assistance
354
2011 F-250/350/450/550(f23)
Owners Guide, 4th Printing
USA(fus)
ProCarManuals.com
Page 358 of 449
 colored trim, such as grain")
WAXING
•Wash the vehicle first.
•Use a quality wax that does not contain abrasives.
•Do not allow paint sealant to come in contact with any non-body
(low-gloss black) colored trim, such as grained door handles, roof
racks, bumpers, side moldings, mirror housings or the windshield cowl
area. The paint sealant will “gray” or stain the parts over time.
PAINT CHIPS
Your authorized dealer has touch-up paint to match your vehicle’s color.
Take your color code (printed on a sticker in the driver’s door jamb) to
your authorized dealer to ensure you get the correct color.
•Remove particles such as bird droppings, tree sap, insect deposits, tar
spots, road salt and industrial fallout before repairing paint chips.
•Always read the instructions before using the products.
ALUMINUM WHEELS AND WHEEL COVERS
Aluminum wheels and wheel covers are coated with a clearcoat paint
finish. In order to maintain their shine:
•Clean weekly with Motorcraft�Wheel and Tire Cleaner, which is
available from your authorized dealer. Heavy dirt and brake dust
accumulation may require agitation with a sponge. Rinse thoroughly
with a strong stream of water.
•Never apply any cleaning chemical to hot or warm wheel rims or
covers.
•Some automatic car washes may cause damage to the finish on your
wheel rims or covers. Industrial-strength (heavy-duty) cleaners, or
cleaning chemicals, in combination with brush agitation to remove
brake dust and dirt, could wear away the clearcoat finish over time.
•Do not use hydrofluoric acid-based or high caustic-based wheel
cleaners, steel wool, fuels or strong household detergent.
•To remove tar and grease, use Motorcraft�Bug and Tar Remover ,
available from your authorized dealer.
ENGINE
Engines are more efficient when they are clean because grease and dirt
buildup keep the engine warmer than normal. When washing:
•Take care when using a power washer to clean the engine. The
high-pressure fluid could penetrate the sealed parts and cause
damage.
Cleaning
358
2011 F-250/350/450/550(f23)
Owners Guide, 4th Printing
USA(fus)
ProCarManuals.com
Page 359 of 449
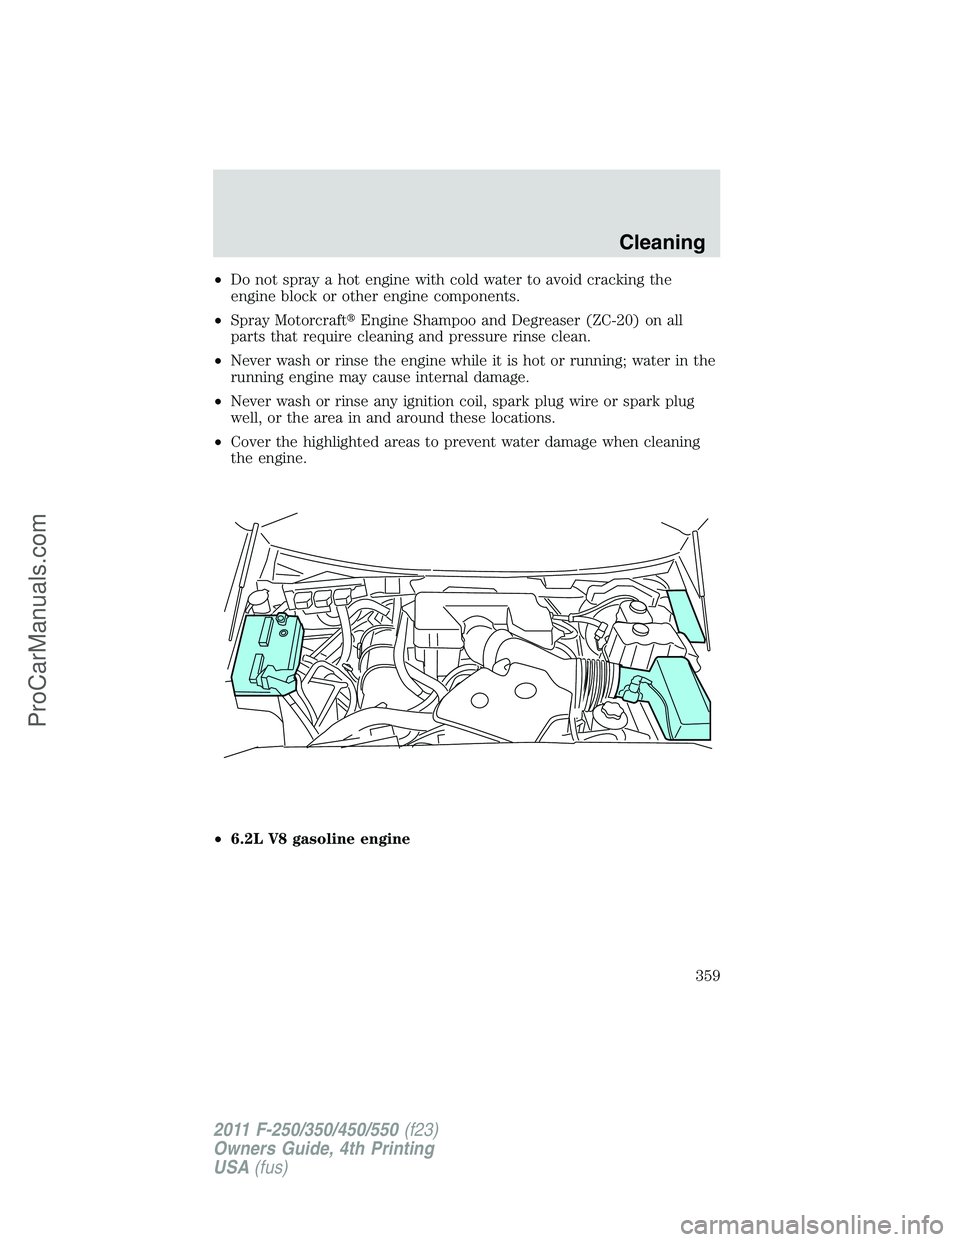
•Do not spray a hot engine with cold water to avoid cracking the
engine block or other engine components.
•Spray Motorcraft�Engine Shampoo and Degreaser (ZC-20) on all
parts that require cleaning and pressure rinse clean.
•Never wash or rinse the engine while it is hot or running; water in the
running engine may cause internal damage.
•Never wash or rinse any ignition coil, spark plug wire or spark plug
well, or the area in and around these locations.
•Cover the highlighted areas to prevent water damage when cleaning
the engine.
•6.2L V8 gasoline engine
Cleaning
359
2011 F-250/350/450/550(f23)
Owners Guide, 4th Printing
USA(fus)
ProCarManuals.com

 bat")