Page 58 of 156
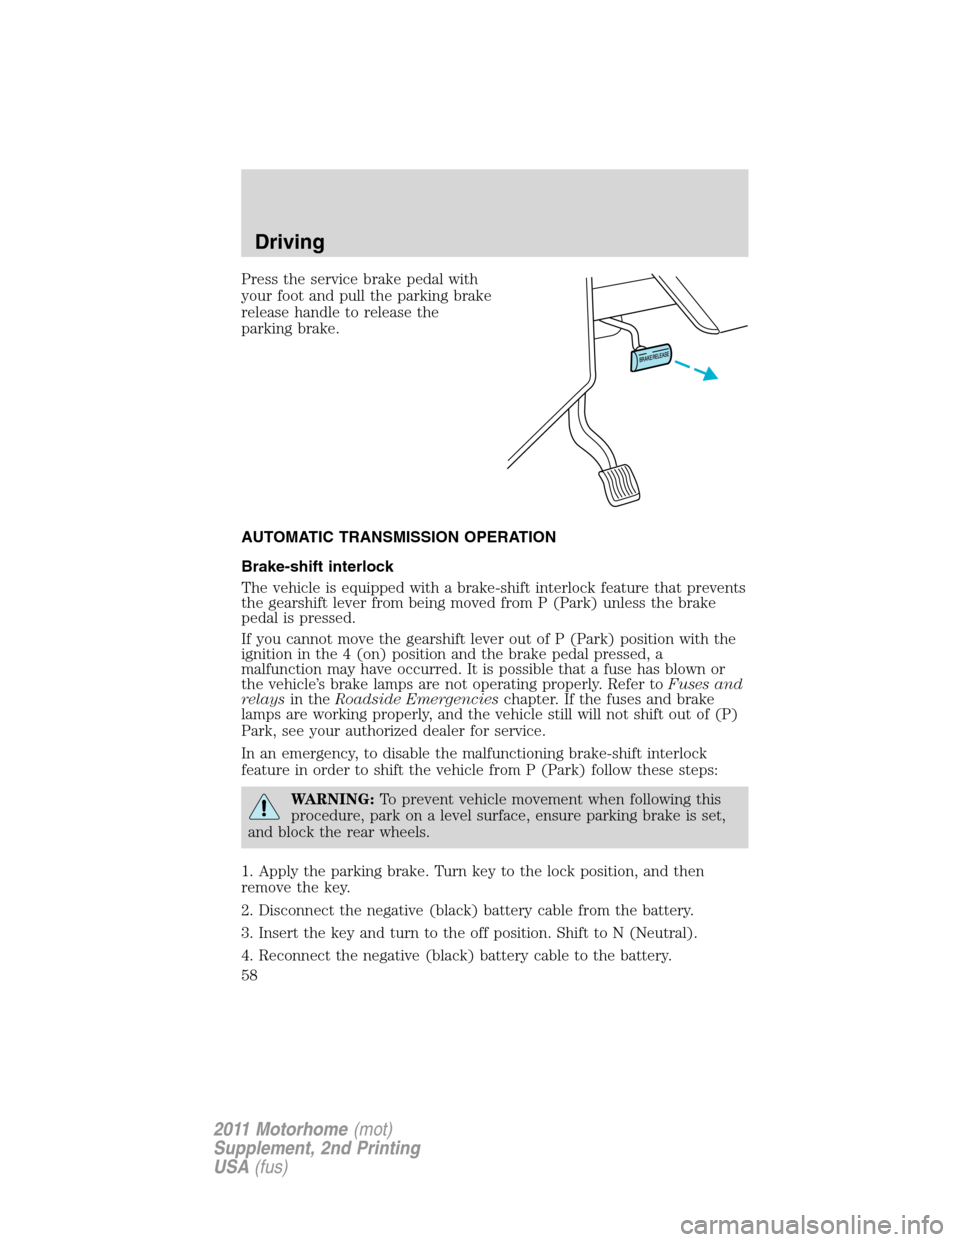
Press the service brake pedal with
your foot and pull the parking brake
release handle to release the
parking brake.
AUTOMATIC TRANSMISSION OPERATION
Brake-shift interlock
The vehicle is equipped with a brake-shift interlock feature that prevents
the gearshift lever from being moved from P (Park) unless the brake
pedal is pressed.
If you cannot move the gearshift lever out of P (Park) position with the
ignition in the 4 (on) position and the brake pedal pressed, a
malfunction may have occurred. It is possible that a fuse has blown or
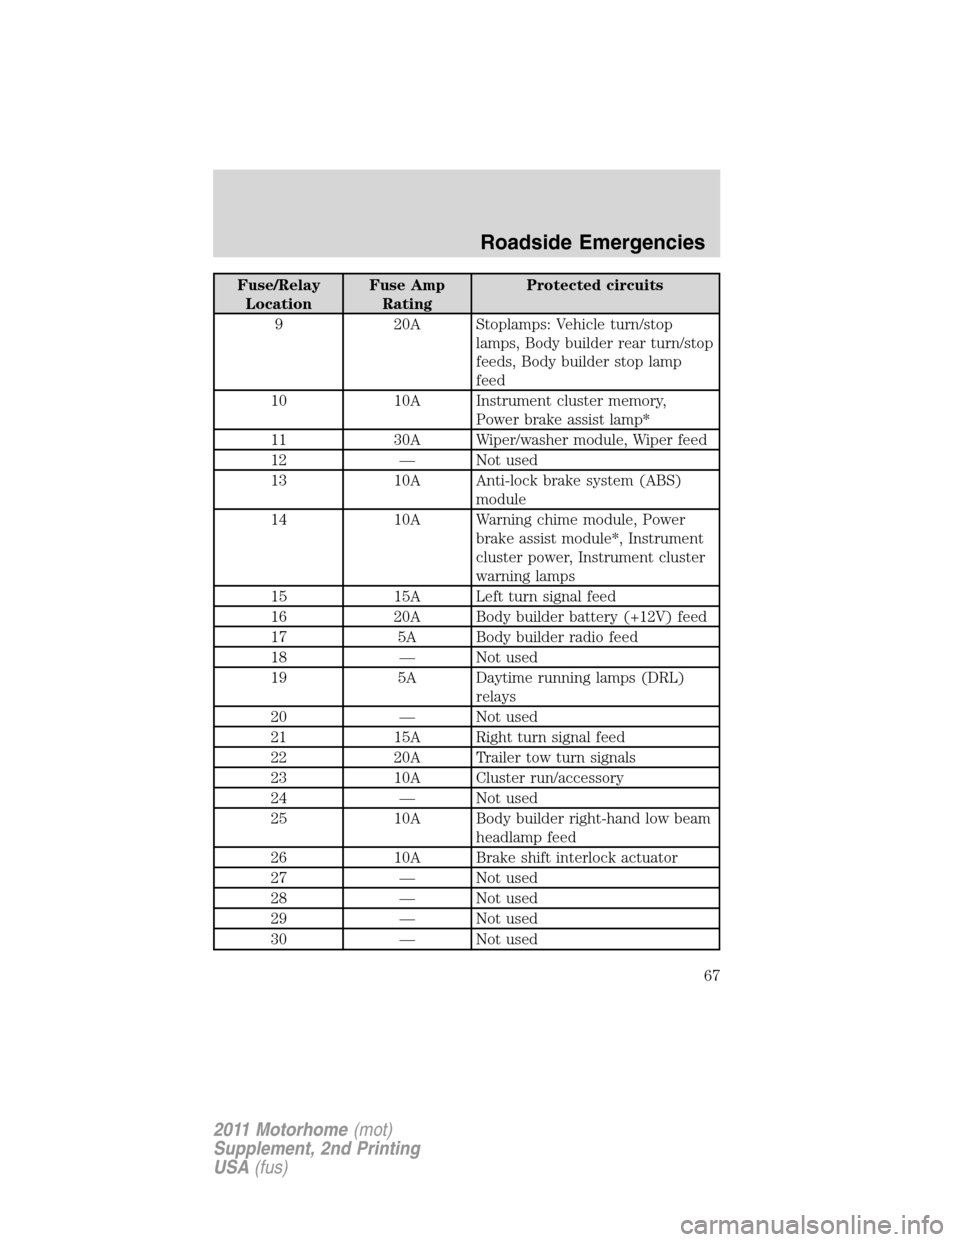
the vehicle’s brake lamps are not operating properly. Refer toFuses and
relaysin theRoadside Emergencieschapter. If the fuses and brake
lamps are working properly, and the vehicle still will not shift out of (P)
Park, see your authorized dealer for service.
In an emergency, to disable the malfunctioning brake-shift interlock
feature in order to shift the vehicle from P (Park) follow these steps:
WARNING:To prevent vehicle movement when following this
procedure, park on a level surface, ensure parking brake is set,
and block the rear wheels.
1. Apply the parking brake. Turn key to the lock position, and then
remove the key.
2. Disconnect the negative (black) battery cable from the battery.
3. Insert the key and turn to the off position. Shift to N (Neutral).
4. Reconnect the negative (black) battery cable to the battery.
Driving
58
2011 Motorhome(mot)
Supplement, 2nd Printing
USA(fus)
Page 59 of 156
5. Start the vehicle.
See your authorized dealer for service immediately.
WARNING:If your brake lamps are not working properly or if
you have disconnected the vehicle battery cables, the vehicle
brake lamps and hazard flashers may not properly warn traffic of a
vehicle breakdown or approaching danger, which can increase the risk
of serious injury or death. To minimize the risk of serious injury or
death, be aware of your surroundings, use other hazard signaling
devices if available, and move the vehicle to a safe location away from
traffic as soon as possible.
WARNING:Do not drive your vehicle until you verify that the
brake lamps are working.
WARNING:Always set the parking brake fully and make sure
the gearshift is latched in P (Park). Turn the ignition to the lock
position and remove the key whenever you leave your vehicle.
WARNING:If the parking brake is fully released, but the brake
warning lamp remains illuminated, the brakes may not be
working properly. See your authorized dealer.
Understanding the shift positions of the 5–speed automatic
transmission
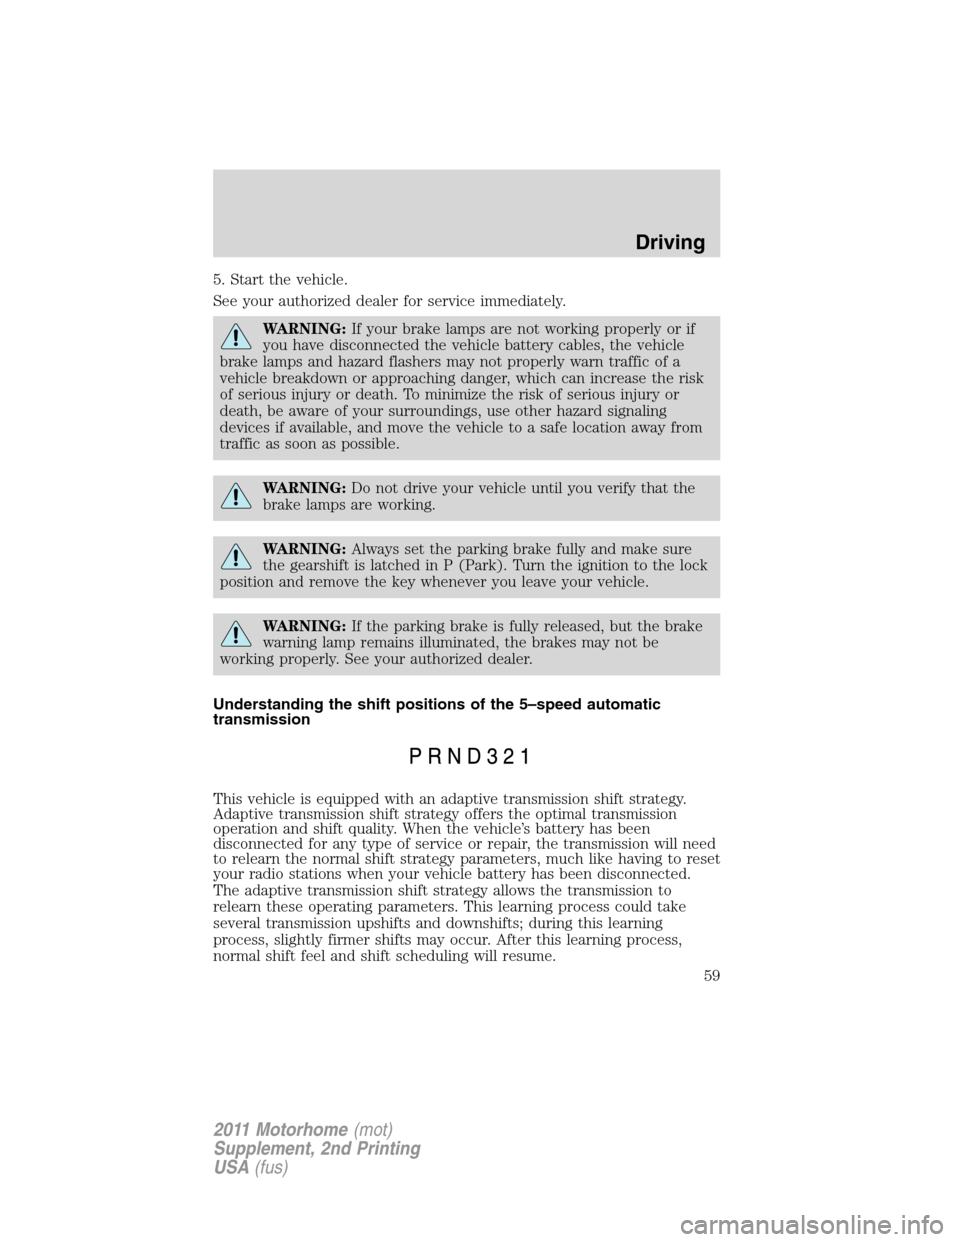
This vehicle is equipped with an adaptive transmission shift strategy.
Adaptive transmission shift strategy offers the optimal transmission
operation and shift quality. When the vehicle’s battery has been
disconnected for any type of service or repair, the transmission will need
to relearn the normal shift strategy parameters, much like having to reset
your radio stations when your vehicle battery has been disconnected.
The adaptive transmission shift strategy allows the transmission to
relearn these operating parameters. This learning process could take
several transmission upshifts and downshifts; during this learning
process, slightly firmer shifts may occur. After this learning process,
normal shift feel and shift scheduling will resume.
Driving
59
2011 Motorhome(mot)
Supplement, 2nd Printing
USA(fus)
Page 60 of 156
P (Park)
This position locks the transmission and prevents the rear wheels from
turning.
To put your vehicle in gear:
1. Start the engine
2. Press the brake pedal
3. Move the gearshift lever into the desired gear
To put your vehicle in P (Park):
1. Come to a complete stop
2. Move the gearshift lever and securely latch it in P (Park)
WARNING:Always set the parking brake fully and make sure
the gearshift is latched in P (Park). Turn the ignition to the lock
position and remove the key whenever you leave your vehicle.
R (Reverse)
With the gearshift lever in R (Reverse), the vehicle will move backward.
Always come to a complete stop before shifting into and out of R
(Reverse).
N (Neutral)
With the gearshift lever in N (Neutral), the vehicle can be started and is
free to roll. Hold the brake pedal down while in this position.
D (Overdrive) with tow/haul off
D (Overdrive) with tow/haul off is the normal driving position for the
best fuel economy. The overdrive function allows automatic upshifts and
downshifts through gears one through five.
D (Overdrive) with tow/haul on
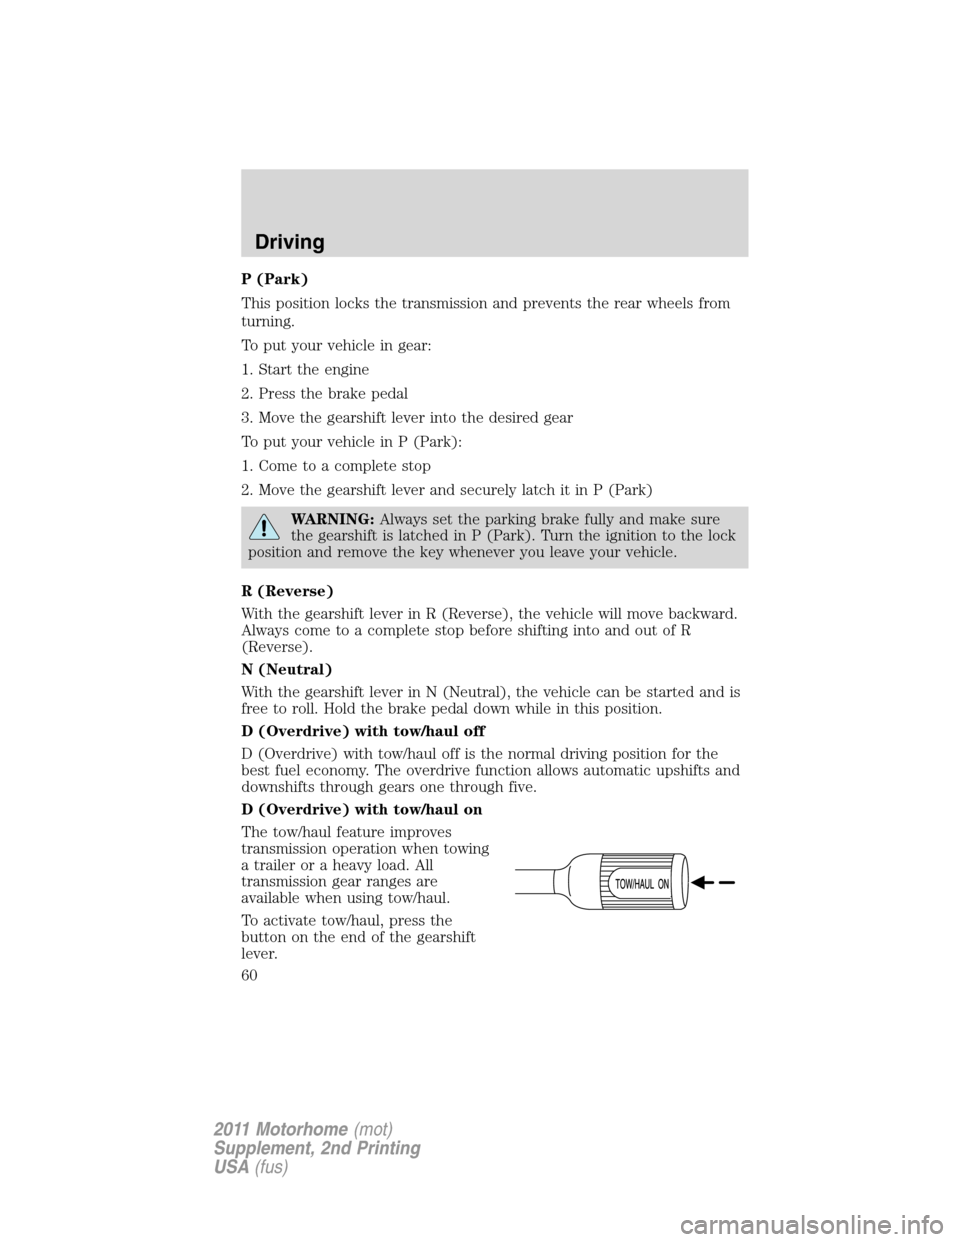
The tow/haul feature improves
transmission operation when towing
a trailer or a heavy load. All
transmission gear ranges are
available when using tow/haul.
To activate tow/haul, press the
button on the end of the gearshift
lever.
Driving
60
2011 Motorhome(mot)
Supplement, 2nd Printing
USA(fus)
Page 61 of 156
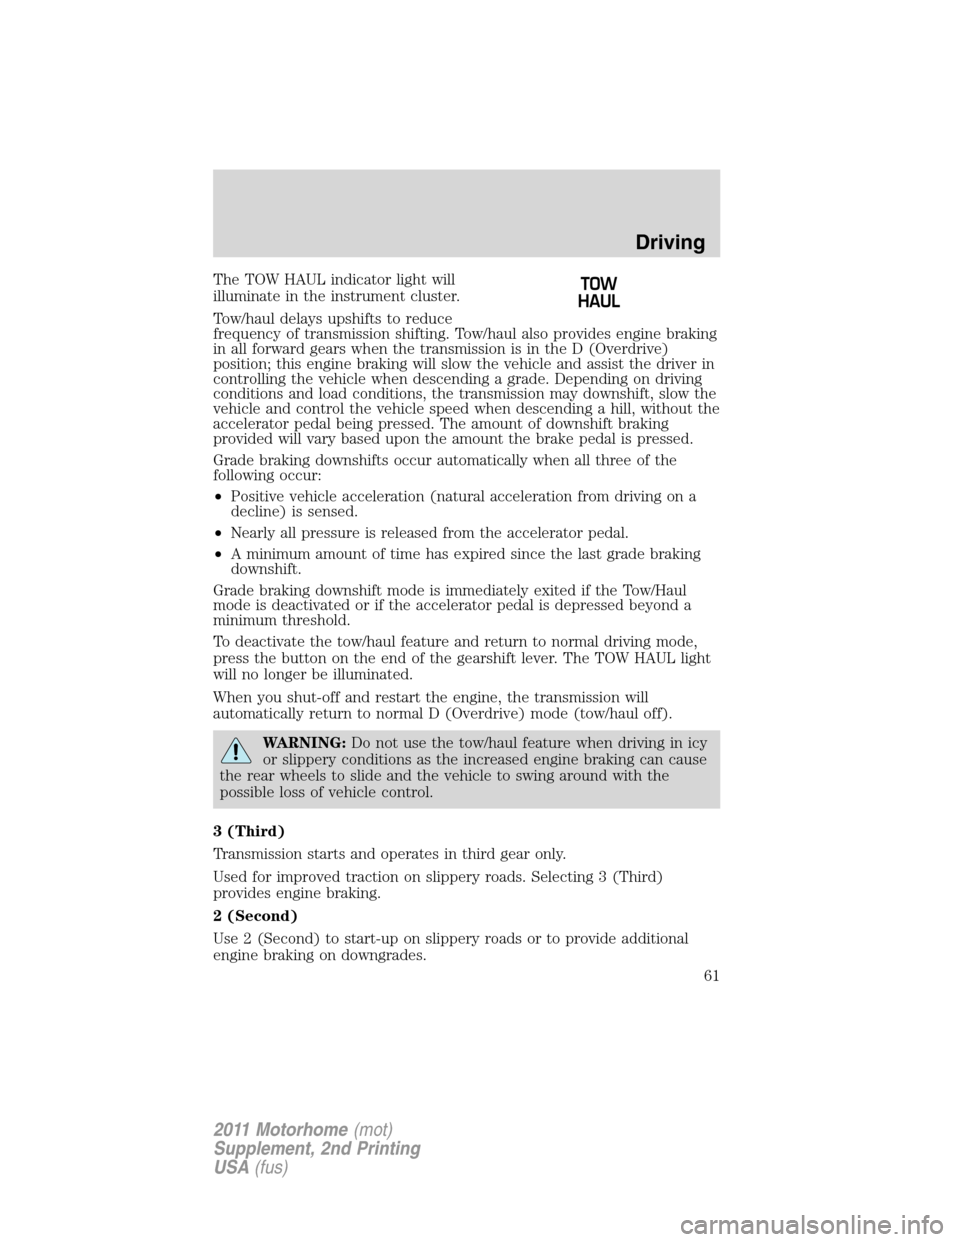
The TOW HAUL indicator light will
illuminate in the instrument cluster.
Tow/haul delays upshifts to reduce
frequency of transmission shifting. Tow/haul also provides engine braking
in all forward gears when the transmission is in the D (Overdrive)
position; this engine braking will slow the vehicle and assist the driver in
controlling the vehicle when descending a grade. Depending on driving
conditions and load conditions, the transmission may downshift, slow the
vehicle and control the vehicle speed when descending a hill, without the
accelerator pedal being pressed. The amount of downshift braking
provided will vary based upon the amount the brake pedal is pressed.
Grade braking downshifts occur automatically when all three of the
following occur:
•Positive vehicle acceleration (natural acceleration from driving on a
decline) is sensed.
•Nearly all pressure is released from the accelerator pedal.
•A minimum amount of time has expired since the last grade braking
downshift.
Grade braking downshift mode is immediately exited if the Tow/Haul
mode is deactivated or if the accelerator pedal is depressed beyond a
minimum threshold.
To deactivate the tow/haul feature and return to normal driving mode,
press the button on the end of the gearshift lever. The TOW HAUL light
will no longer be illuminated.
When you shut-off and restart the engine, the transmission will
automatically return to normal D (Overdrive) mode (tow/haul off).
WARNING:Do not use the tow/haul feature when driving in icy
or slippery conditions as the increased engine braking can cause
the rear wheels to slide and the vehicle to swing around with the
possible loss of vehicle control.
3 (Third)
Transmission starts and operates in third gear only.
Used for improved traction on slippery roads. Selecting 3 (Third)
provides engine braking.
2 (Second)
Use 2 (Second) to start-up on slippery roads or to provide additional
engine braking on downgrades.
Driving
61
2011 Motorhome(mot)
Supplement, 2nd Printing
USA(fus)
Page 67 of 156
Fuse/Relay
LocationFuse Amp
RatingProtected circuits
9 20A Stoplamps: Vehicle turn/stop
lamps, Body builder rear turn/stop
feeds, Body builder stop lamp
feed
10 10A Instrument cluster memory,
Power brake assist lamp*
11 30A Wiper/washer module, Wiper feed
12 — Not used
13 10A Anti-lock brake system (ABS)
module
14 10A Warning chime module, Power
brake assist module*, Instrument
cluster power, Instrument cluster
warning lamps
15 15A Left turn signal feed
16 20A Body builder battery (+12V) feed
17 5A Body builder radio feed
18 — Not used
19 5A Daytime running lamps (DRL)
relays
20 — Not used
21 15A Right turn signal feed
22 20A Trailer tow turn signals
23 10A Cluster run/accessory
24 — Not used
25 10A Body builder right-hand low beam
headlamp feed
26 10A Brake shift interlock actuator
27 — Not used
28 — Not used
29 — Not used
30 — Not used
Roadside Emergencies
67
2011 Motorhome(mot)
Supplement, 2nd Printing
USA(fus)
Page 69 of 156
Fuse/Relay
LocationFuse Amp
RatingProtected circuits
F6 — Not used
F7 — Not used
F8 — Not used
F9 — Not used
F10 — Not used
F11 — Not used
F12 — Not used
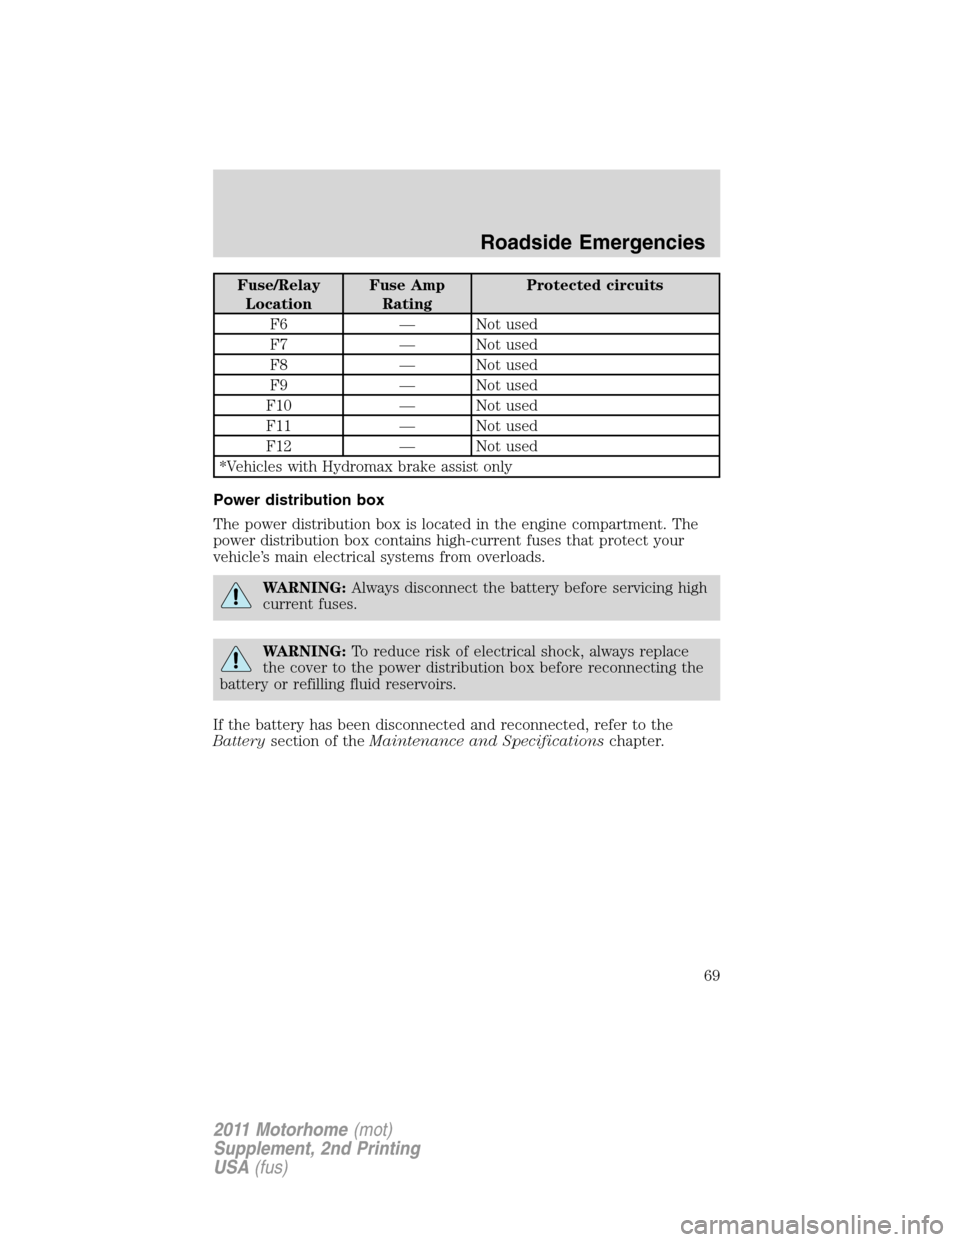
*Vehicles with Hydromax brake assist only
Power distribution box
The power distribution box is located in the engine compartment. The
power distribution box contains high-current fuses that protect your
vehicle’s main electrical systems from overloads.
WARNING:Always disconnect the battery before servicing high
current fuses.
WARNING:To reduce risk of electrical shock, always replace
the cover to the power distribution box before reconnecting the
battery or refilling fluid reservoirs.
If the battery has been disconnected and reconnected, refer to the
Batterysection of theMaintenance and Specificationschapter.
Roadside Emergencies
69
2011 Motorhome(mot)
Supplement, 2nd Printing
USA(fus)
Page 71 of 156
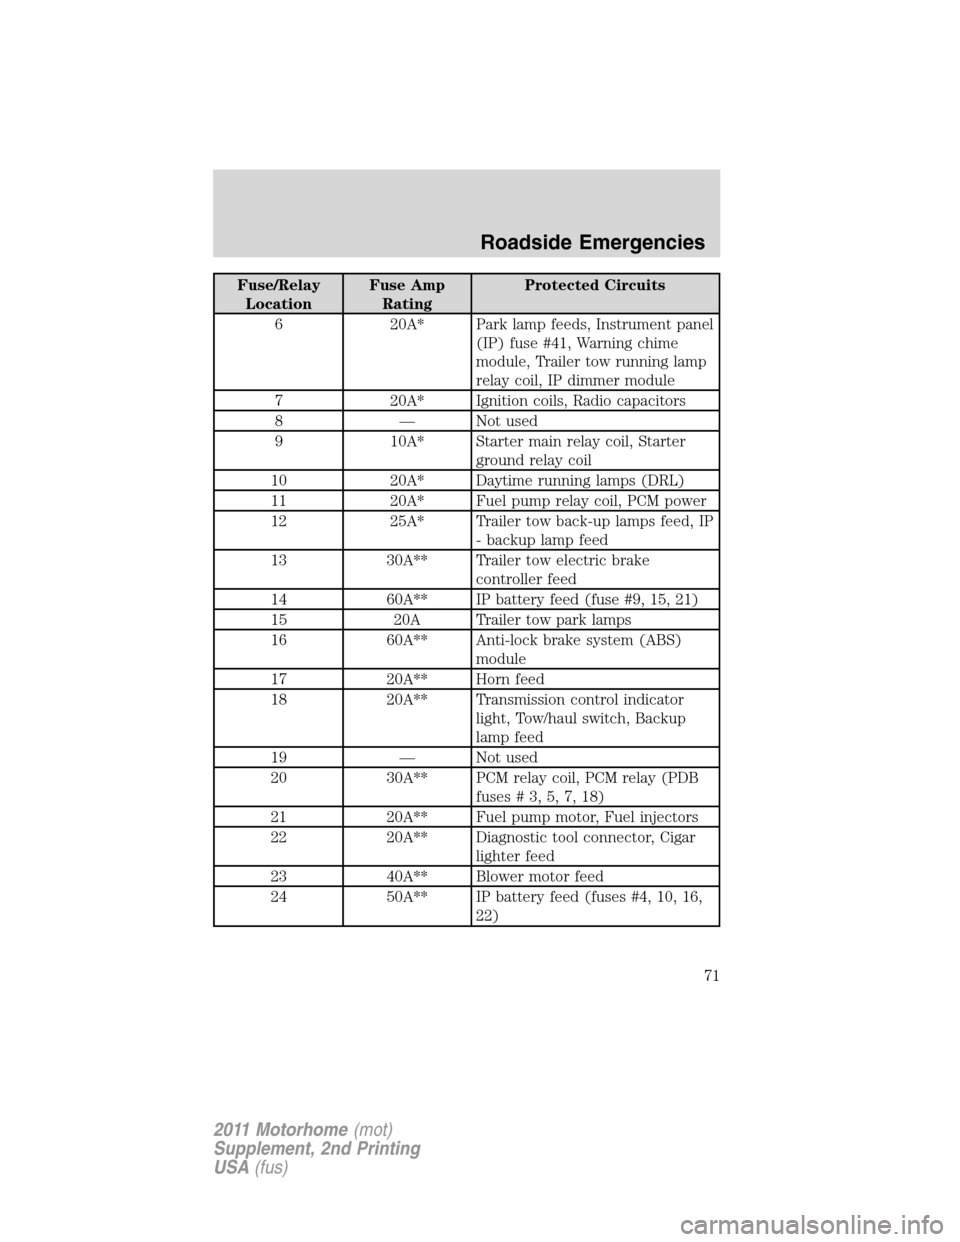
Fuse/Relay
LocationFuse Amp
RatingProtected Circuits
6 20A* Park lamp feeds, Instrument panel
(IP) fuse #41, Warning chime
module, Trailer tow running lamp
relay coil, IP dimmer module
7 20A* Ignition coils, Radio capacitors
8 — Not used
9 10A* Starter main relay coil, Starter
ground relay coil
10 20A* Daytime running lamps (DRL)
11 20A* Fuel pump relay coil, PCM power
12 25A* Trailer tow back-up lamps feed, IP
- backup lamp feed
13 30A** Trailer tow electric brake
controller feed
14 60A** IP battery feed (fuse #9, 15, 21)
15 20A Trailer tow park lamps
16 60A** Anti-lock brake system (ABS)
module
17 20A** Horn feed
18 20A** Transmission control indicator
light, Tow/haul switch, Backup
lamp feed
19 — Not used
20 30A** PCM relay coil, PCM relay (PDB
fuses#3,5,7,18)
21 20A** Fuel pump motor, Fuel injectors
22 20A** Diagnostic tool connector, Cigar
lighter feed
23 40A** Blower motor feed
24 50A** IP battery feed (fuses #4, 10, 16,
22)
Roadside Emergencies
71
2011 Motorhome(mot)
Supplement, 2nd Printing
USA(fus)
Page 73 of 156
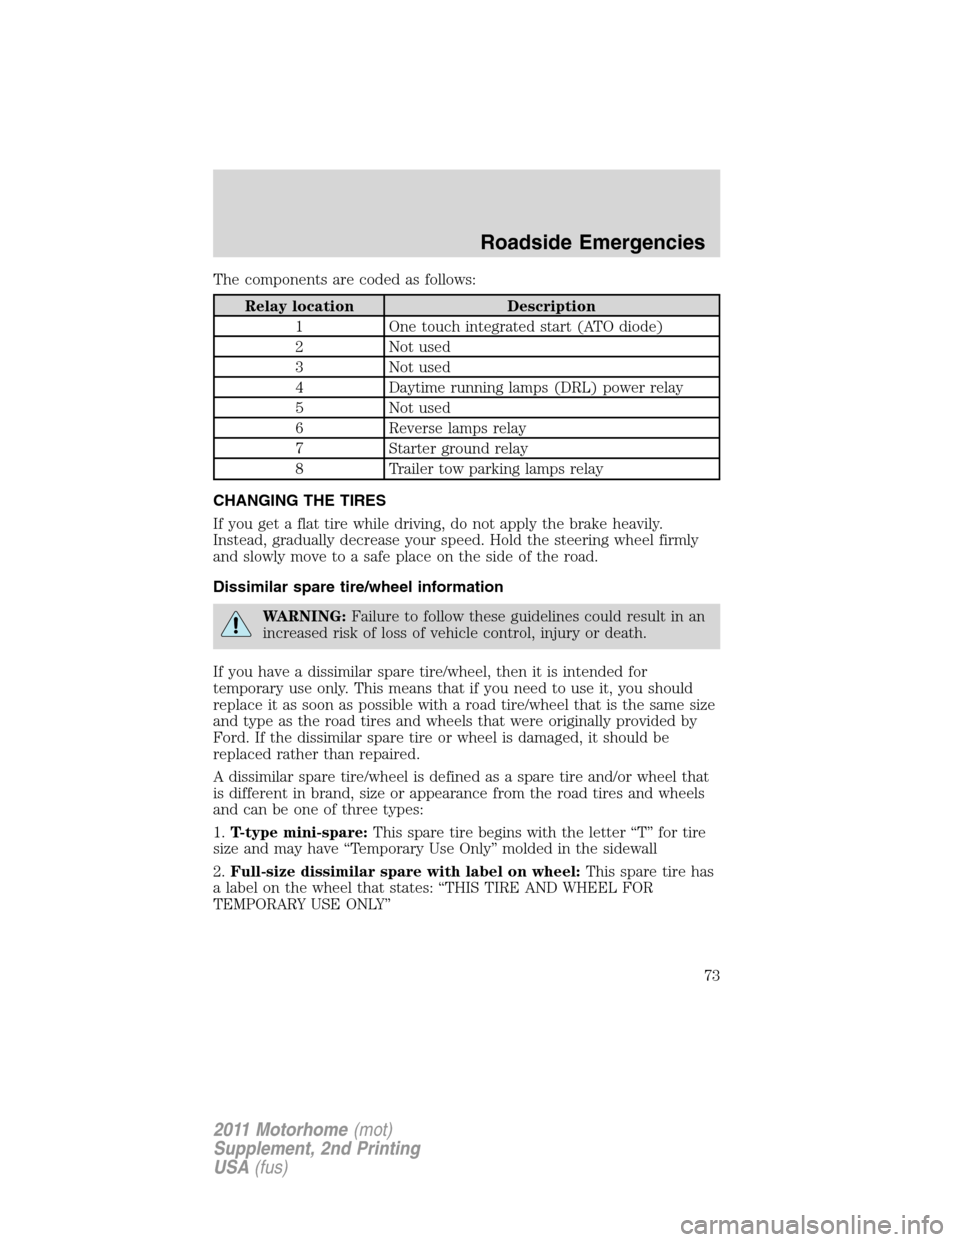
The components are coded as follows:
Relay location Description
1 One touch integrated start (ATO diode)
2 Not used
3 Not used
4 Daytime running lamps (DRL) power relay
5 Not used
6 Reverse lamps relay
7 Starter ground relay
8 Trailer tow parking lamps relay
CHANGING THE TIRES
If you get a flat tire while driving, do not apply the brake heavily.
Instead, gradually decrease your speed. Hold the steering wheel firmly
and slowly move to a safe place on the side of the road.
Dissimilar spare tire/wheel information
WARNING:Failure to follow these guidelines could result in an
increased risk of loss of vehicle control, injury or death.
If you have a dissimilar spare tire/wheel, then it is intended for
temporary use only. This means that if you need to use it, you should
replace it as soon as possible with a road tire/wheel that is the same size
and type as the road tires and wheels that were originally provided by
Ford. If the dissimilar spare tire or wheel is damaged, it should be
replaced rather than repaired.
A dissimilar spare tire/wheel is defined as a spare tire and/or wheel that
is different in brand, size or appearance from the road tires and wheels
and can be one of three types:
1.T-type mini-spare:This spare tire begins with the letter “T” for tire
size and may have “Temporary Use Only” molded in the sidewall
2.Full-size dissimilar spare with label on wheel:This spare tire has
a label on the wheel that states: “THIS TIRE AND WHEEL FOR
TEMPORARY USE ONLY”
Roadside Emergencies
73
2011 Motorhome(mot)
Supplement, 2nd Printing
USA(fus)