Page 71 of 156
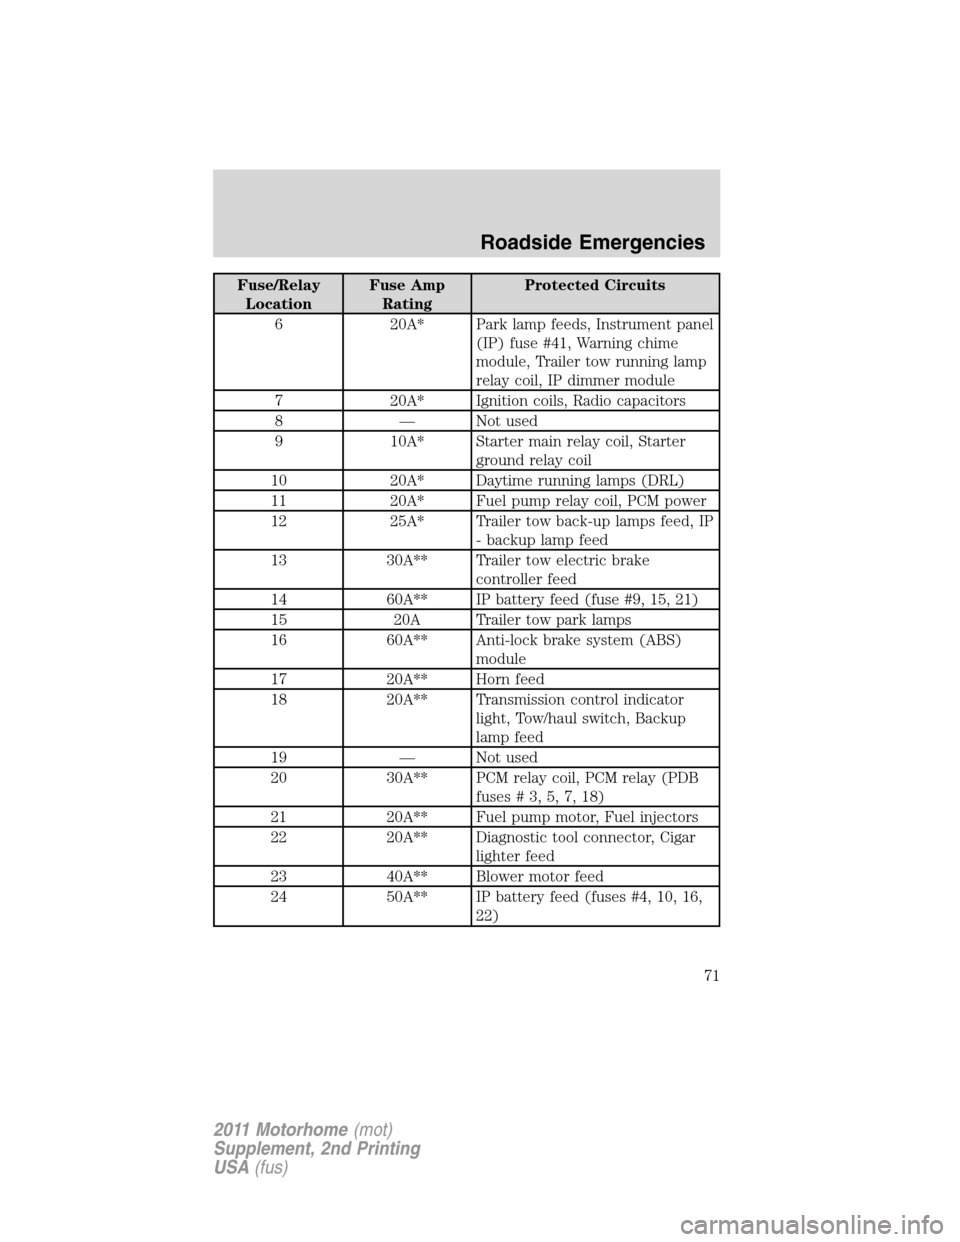
Fuse/Relay
LocationFuse Amp
RatingProtected Circuits
6 20A* Park lamp feeds, Instrument panel
(IP) fuse #41, Warning chime
module, Trailer tow running lamp
relay coil, IP dimmer module
7 20A* Ignition coils, Radio capacitors
8 — Not used
9 10A* Starter main relay coil, Starter
ground relay coil
10 20A* Daytime running lamps (DRL)
11 20A* Fuel pump relay coil, PCM power
12 25A* Trailer tow back-up lamps feed, IP
- backup lamp feed
13 30A** Trailer tow electric brake
controller feed
14 60A** IP battery feed (fuse #9, 15, 21)
15 20A Trailer tow park lamps
16 60A** Anti-lock brake system (ABS)
module
17 20A** Horn feed
18 20A** Transmission control indicator
light, Tow/haul switch, Backup
lamp feed
19 — Not used
20 30A** PCM relay coil, PCM relay (PDB
fuses#3,5,7,18)
21 20A** Fuel pump motor, Fuel injectors
22 20A** Diagnostic tool connector, Cigar
lighter feed
23 40A** Blower motor feed
24 50A** IP battery feed (fuses #4, 10, 16,
22)
Roadside Emergencies
71
2011 Motorhome(mot)
Supplement, 2nd Printing
USA(fus)
Page 78 of 156
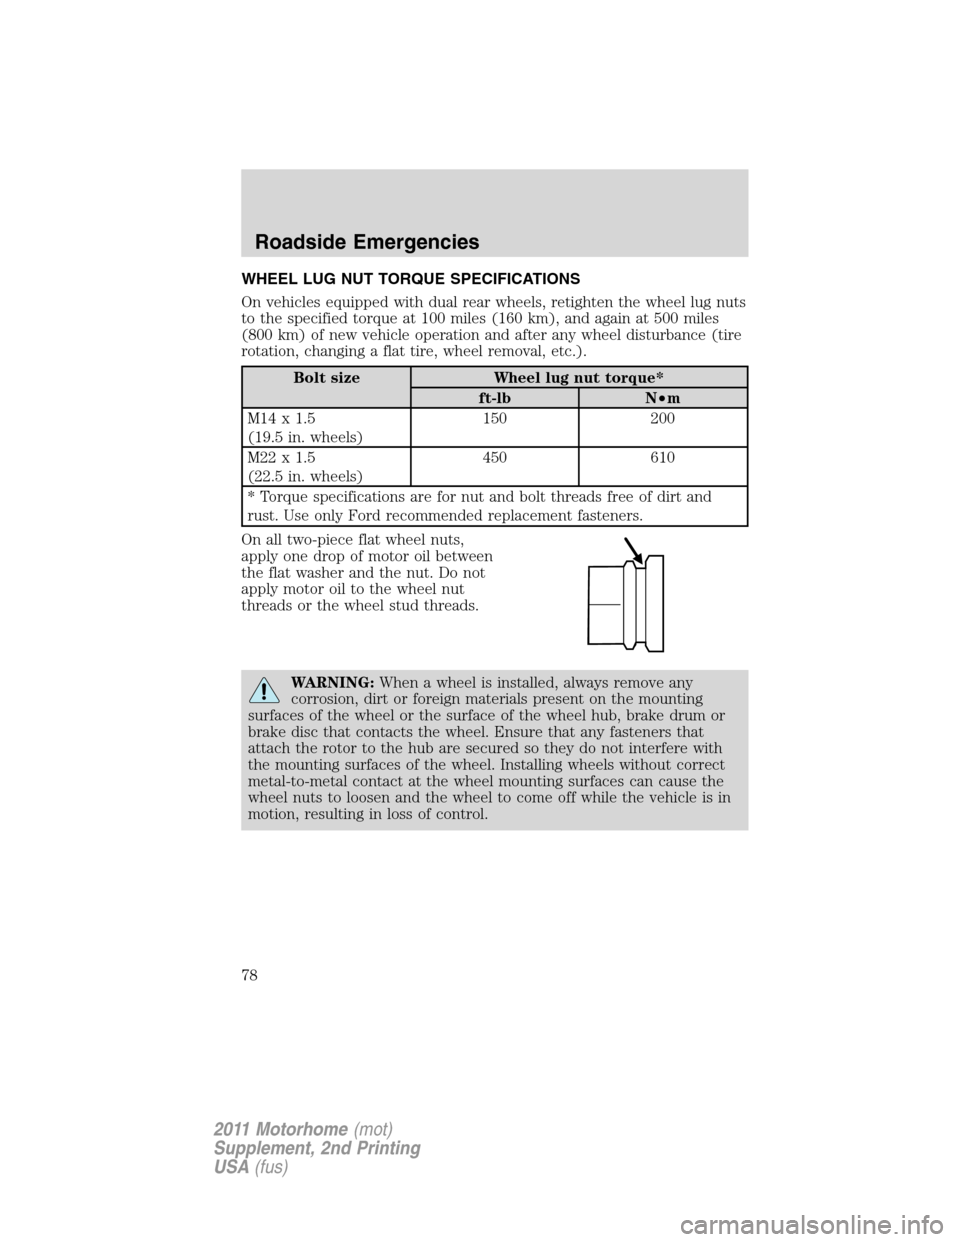
WHEEL LUG NUT TORQUE SPECIFICATIONS
On vehicles equipped with dual rear wheels, retighten the wheel lug nuts
to the specified torque at 100 miles (160 km), and again at 500 miles
(800 km) of new vehicle operation and after any wheel disturbance (tire
rotation, changing a flat tire, wheel removal, etc.).
Bolt size Wheel lug nut torque*
ft-lb N•m
M14x1.5
(19.5 in. wheels)150 200
M22x1.5
(22.5 in. wheels)450 610
* Torque specifications are for nut and bolt threads free of dirt and
rust. Use only Ford recommended replacement fasteners.
On all two-piece flat wheel nuts,
apply one drop of motor oil between
the flat washer and the nut. Do not
apply motor oil to the wheel nut
threads or the wheel stud threads.
WARNING:When a wheel is installed, always remove any
corrosion, dirt or foreign materials present on the mounting
surfaces of the wheel or the surface of the wheel hub, brake drum or
brake disc that contacts the wheel. Ensure that any fasteners that
attach the rotor to the hub are secured so they do not interfere with
the mounting surfaces of the wheel. Installing wheels without correct
metal-to-metal contact at the wheel mounting surfaces can cause the
wheel nuts to loosen and the wheel to come off while the vehicle is in
motion, resulting in loss of control.
Roadside Emergencies
78
2011 Motorhome(mot)
Supplement, 2nd Printing
USA(fus)
Page 90 of 156
CLEANING THE WHEELS
•Clean weekly with Motorcraft�Wheel and Tire Cleaner (ZC-37–A),
which is available from your dealer. Heavy dirt and brake dust
accumulation may require agitation with a sponge. Rinse thoroughly
with a strong stream of water.
•Never apply any cleaning chemical to hot or warm wheel rims or
covers.
•Some automatic car washes may cause damage to the finish on your
wheel rims or covers. Chemical-strength cleaners, or cleaning
chemicals, in combination with brush agitation to remove brake dust
and dirt, could wear away the clearcoat finish over time.
•Do not use hydrofluoric acid-based or high caustic-based wheel
cleaners, steel wool, fuels or strong household detergent.
•To remove tar and grease, use Motorcraft�Bug and Tar Remover
(ZC-42), available from your dealer.
ENGINE
Engines are more efficient when they are clean because grease and dirt
buildup keep the engine warmer than normal. When washing:
•Take care when using a power washer to clean the engine. The
high-pressure fluid could penetrate the sealed parts and cause
damage.
•Do not spray a hot engine with cold water to avoid cracking the
engine block or other engine components.
•Spray Motorcraft�Engine Shampoo and Degreaser (ZC-20) on all
parts that require cleaning and pressure rinse clean. In Canada, use
Motorcraft�Engine Shampoo (CXC-66-A).
•Never wash or rinse the engine while it is hot or running; water in the
running engine may cause internal damage.
•Never wash or rinse any ignition coil, spark plug wire or spark plug
well, or the area in and around these locations.
UNDERBODY
Flush the complete underside of your vehicle frequently. Keep body and
door drain holes free from packed dirt.
Cleaning
90
2011 Motorhome(mot)
Supplement, 2nd Printing
USA(fus)
Page 92 of 156
IDENTIFYING COMPONENTS IN THE ENGINE COMPARTMENT
6.8L V10 engine
1. Engine coolant reservoir
2. Engine oil filler cap
3. Automatic transmission fluid dipstick
4. Power distribution box
5. Air filter assembly
6. Engine oil dipstick
7. Brake fluid reservoir
8. Power steering fluid reservoir
12345678
Maintenance and Specifications
92
2011 Motorhome(mot)
Supplement, 2nd Printing
USA(fus)
Page 93 of 156
6.8L V10 engine (commercial stripped chassis)
1. Engine coolant reservoir
2. Engine oil filler cap
3. Automatic transmission fluid dipstick
4. Power distribution box
5. Engine oil dipstick
6. Brake fluid reservoir
7. Air filter assembly
8. Power steering fluid reservoir
ENGINE OIL
Checking the engine oil
Refer toscheduled maintenance informationfor the appropriate
intervals for checking the engine oil.
1. Make sure the vehicle is on level ground.
2. Turn the engine off and wait 15 minutes for the oil to drain into the
oil pan.
13425786
Maintenance and Specifications
93
2011 Motorhome(mot)
Supplement, 2nd Printing
USA(fus)
Page 94 of 156
3. Set the parking brake and ensure the gearshift is securely latched in P
(Park).
4. Open the hood. Protect yourself from engine heat.
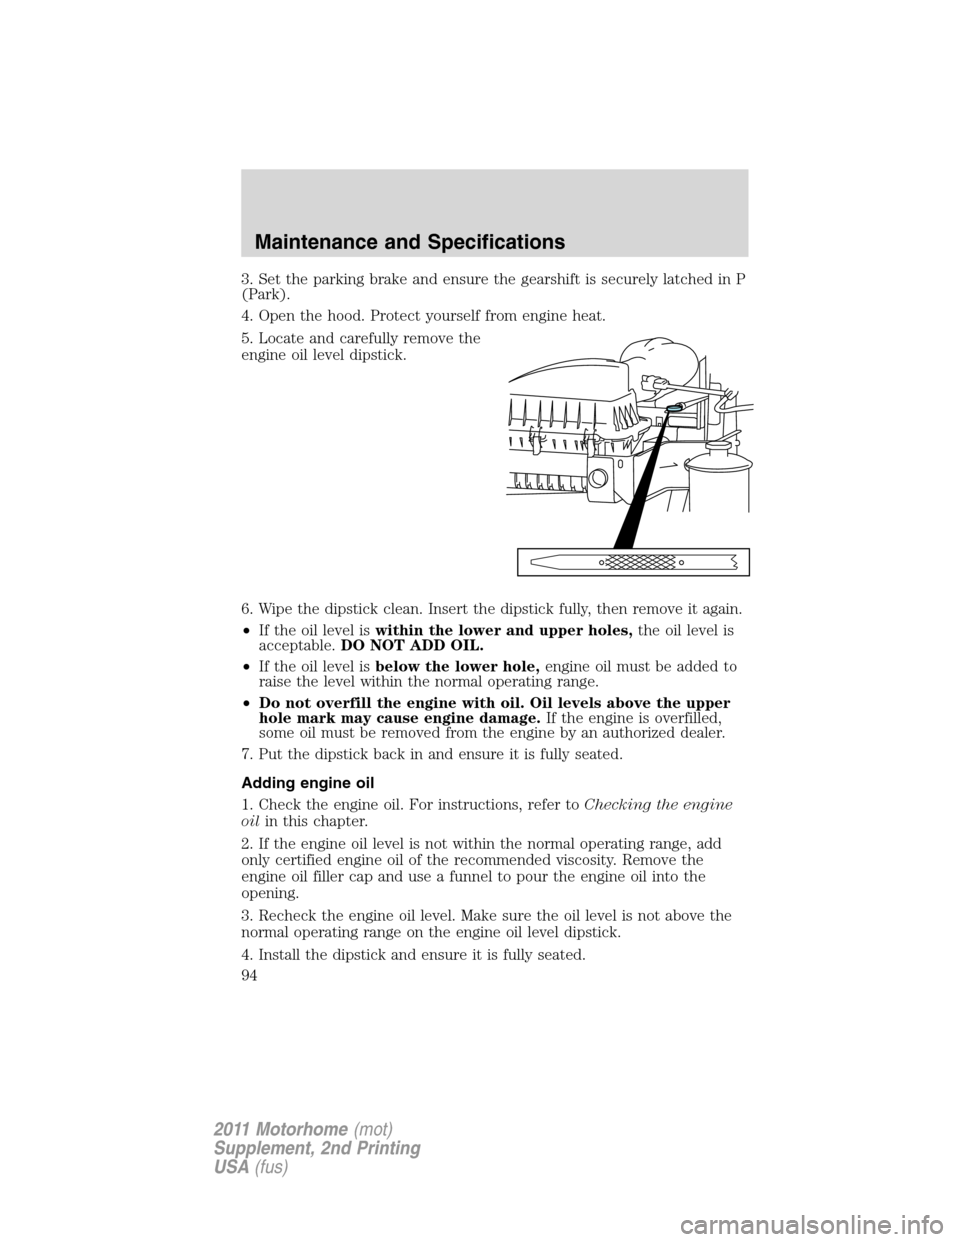
5. Locate and carefully remove the
engine oil level dipstick.
6. Wipe the dipstick clean. Insert the dipstick fully, then remove it again.
•If the oil level iswithin the lower and upper holes,the oil level is
acceptable.DO NOT ADD OIL.
•If the oil level isbelow the lower hole,engine oil must be added to
raise the level within the normal operating range.
•Do not overfill the engine with oil. Oil levels above the upper
hole mark may cause engine damage.If the engine is overfilled,
some oil must be removed from the engine by an authorized dealer.
7. Put the dipstick back in and ensure it is fully seated.
Adding engine oil
1. Check the engine oil. For instructions, refer toChecking the engine
oilin this chapter.
2. If the engine oil level is not within the normal operating range, add
only certified engine oil of the recommended viscosity. Remove the
engine oil filler cap and use a funnel to pour the engine oil into the
opening.
3. Recheck the engine oil level. Make sure the oil level is not above the
normal operating range on the engine oil level dipstick.
4. Install the dipstick and ensure it is fully seated.
Maintenance and Specifications
94
2011 Motorhome(mot)
Supplement, 2nd Printing
USA(fus)
Page 95 of 156
5. Fully install the engine oil filler cap by turning the filler cap clockwise
until three clicks can be heard.
To avoid possible oil loss, DO NOT operate the vehicle with the
engine oil level dipstick and/or the engine oil filler cap removed.
Engine oil and filter recommendations
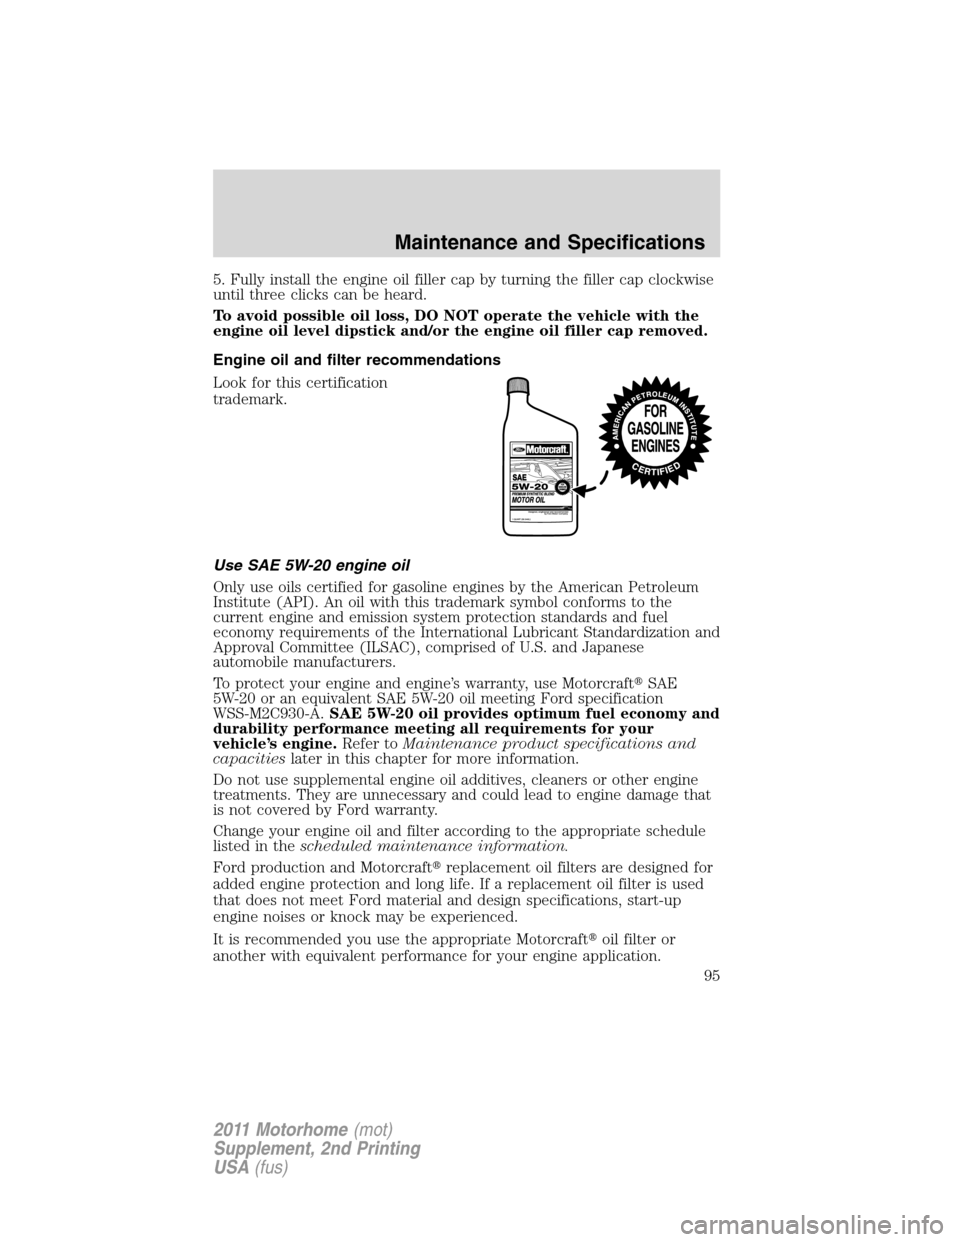
Look for this certification
trademark.
Use SAE 5W-20 engine oil
Only use oils certified for gasoline engines by the American Petroleum
Institute (API). An oil with this trademark symbol conforms to the
current engine and emission system protection standards and fuel
economy requirements of the International Lubricant Standardization and
Approval Committee (ILSAC), comprised of U.S. and Japanese
automobile manufacturers.
To protect your engine and engine’s warranty, use Motorcraft�SAE
5W-20 or an equivalent SAE 5W-20 oil meeting Ford specification
WSS-M2C930-A.SAE 5W-20 oil provides optimum fuel economy and
durability performance meeting all requirements for your
vehicle’s engine.Refer toMaintenance product specifications and
capacitieslater in this chapter for more information.
Do not use supplemental engine oil additives, cleaners or other engine
treatments. They are unnecessary and could lead to engine damage that
is not covered by Ford warranty.
Change your engine oil and filter according to the appropriate schedule
listed in thescheduled maintenance information.
Ford production and Motorcraft�replacement oil filters are designed for
added engine protection and long life. If a replacement oil filter is used
that does not meet Ford material and design specifications, start-up
engine noises or knock may be experienced.
It is recommended you use the appropriate Motorcraft�oil filter or
another with equivalent performance for your engine application.
Maintenance and Specifications
95
2011 Motorhome(mot)
Supplement, 2nd Printing
USA(fus)
Page 98 of 156
•If you do not allow the engine to relearn its idle trim, the idle
quality of your vehicle may be adversely affected until the idle
trim is eventually relearned.
If the battery has been disconnected or a new battery has been installed,
the clock and the preset radio stations must be reset once the battery is
reconnected.
•Always dispose of automotive
batteries in a responsible manner.
Follow your local authorized
standards for disposal. Call your
local authorized recycling center
to find out more about recycling
automotive batteries.
ENGINE COOLANT
Checking engine coolant
The concentration and level of engine coolant should be checked at the
intervals listed inscheduled maintenance information.The coolant
concentration should be maintained at 50/50 coolant and distilled water.
Coolant concentration testing is possible with a hydrometer or antifreeze
tester. The level of coolant should be maintained at the FULL COLD
level or within the COLD FILL RANGE in the coolant reservoir. If the
level falls below, add coolant per the instructions in theAdding engine
coolantsection.
Your vehicle was factory-filled with a 50/50 engine coolant and water
concentration. If the concentration of coolant falls below 40% or above
60%, the engine parts could become damaged or not work properly.A
50/50 mixture of coolant and water provides the following:
•Improved freeze protection.
•Improved boiling protection .
•Protection against rust and other forms of corrosion.
•Proper function of calibrated gauges.
L
E
A
D
RETURN
RECYCLE
Maintenance and Specifications
98
2011 Motorhome(mot)
Supplement, 2nd Printing
USA(fus)