Page 3 of 449
Seating and Safety Restraints 160
Seating 160
Personal Safety System™ 180
Safety belt system 184
Airbags 197
Child restraints 211
Tires, Wheels and Loading 232
Tire information 235
Tire inflation 237
Tire Pressure Monitoring System (TPMS) 250
Vehicle loading 255
Trailer towing 262
Recreational towing 265
Driving 267
Starting 267
Brakes 274
AdvanceTrac�277
Hill descent control 283
Transmission operation 288
Reverse sensing system 294
Rear-view camera system 296
Roadside Emergencies 325
Getting roadside assistance 325
Hazard flasher control 326
Fuel pump shut-off 327
Fuses and relays 327
Changing tires 336
Temporary mobility kit 344
Wheel lug nut torque 352
Jump starting 354
Wrecker towing 357
Table of Contents
2
2011 Explorer(exp)
Owners Guide, 1st Printing
USA(fus)
Page 343 of 449

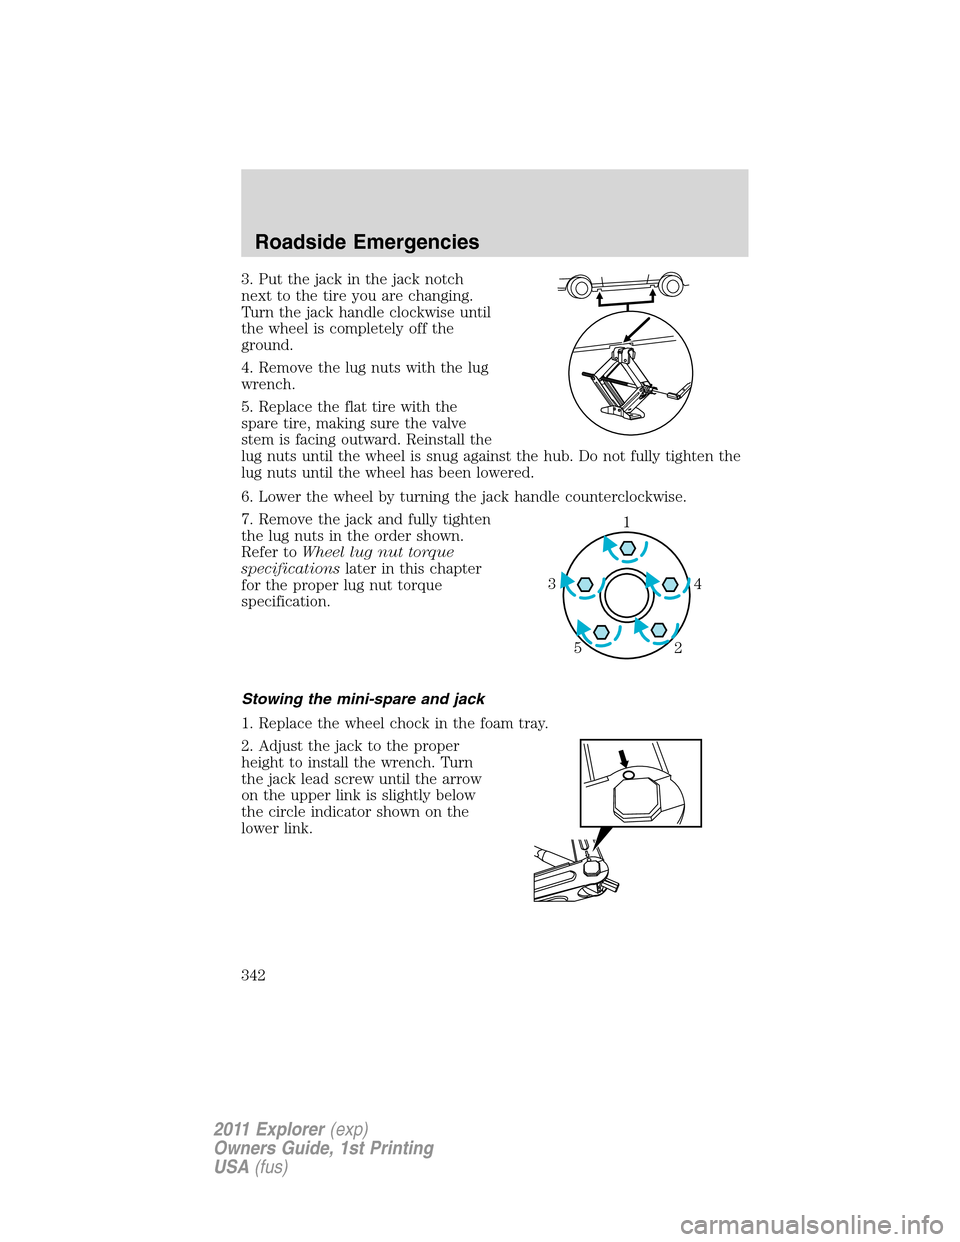
3. Put the jack in the jack notch
next to the tire you are changing.
Turn the jack handle clockwise until
the wheel is completely off the
ground.
4. Remove the lug nuts with the lug
wrench.
5. Replace the flat tire with the
spare tire, making sure the valve
stem is facing outward. Reinstall the
lug nuts until the wheel is snug against the hub. Do not fully tighten the
lug nuts until the wheel has been lowered.
6. Lower the wheel by turning the jack handle counterclockwise.
7. Remove the jack and fully tighten
the lug nuts in the order shown.
Refer toWheel lug nut torque
specificationslater in this chapter
for the proper lug nut torque
specification.
Stowing the mini-spare and jack
1. Replace the wheel chock in the foam tray.
2. Adjust the jack to the proper
height to install the wrench. Turn
the jack lead screw until the arrow
on the upper link is slightly below
the circle indicator shown on the
lower link.
1
4 3
2 5
Roadside Emergencies
342
2011 Explorer(exp)
Owners Guide, 1st Printing
USA(fus)
Page 353 of 449
3. Wrap the clear tube around the
compressor housing.
Note:If you experience any difficulties with the removal or installation
of the sealant canister, consult your Ford Motor Company authorized
dealer for assistance.
Be sure to check the sealant
compound’s “use by” date regularly.
The “use by” date is on the lower
right hand corner of the label
located on the sealant canister
(bottle). The sealant canister should be replaced after four years.
WHEEL LUG NUT TORQUE SPECIFICATIONS
Retighten the lug nuts to the specified torque within 100 miles (160 km)
after any wheel disturbance (rotation, flat tire, wheel removal, etc.).
Lug nut socket
size/Bolt sizeWheel lug nut torque*
ft-lb N•m
Lug nut socket size:
3�4
inch (19 mm) hex
Bolt size:1�2x20100 135
* Torque specifications are for nut and bolt threads free of dirt and
rust. Use only Ford recommended replacement fasteners.
Roadside Emergencies
352
2011 Explorer(exp)
Owners Guide, 1st Printing
USA(fus)