Page 13 of 449
These are some of the symbols you may see on your vehicle.
Vehicle Symbol Glossary
Safety Alert
See Owner’s Guide
Fasten Safety BeltAirbag - Front
Airbag - SideChild Seat Lower
Anchor
Child Seat Tether
AnchorBrake System
Anti-Lock Brake SystemParking Brake System
Brake Fluid -
Non-Petroleum BasedParking Aid System
Stability Control SystemSpeed Control
Master Lighting SwitchHazard Warning Flasher
Fog Lamps-FrontFuse Compartment
Fuel Pump ResetWindshield Wash/Wipe
Windshield
Defrost/DemistRear Window
Defrost/Demist
Introduction
12
2011 Explorer(exp)
Owners Guide, 1st Printing
USA(fus)
Page 20 of 449

Low washer fluid (RTT):
Illuminates when the windshield
washer fluid is low.
Turn signal:Illuminates when the
left or right turn signal or the
hazard lights are turned on. If the
indicators flash faster, check for a burned out bulb.
High beams:Illuminates when the
high beam headlamps are turned on.
Fog lamps:Illuminates when the
fog lamps are turned on.
Grade assist (if equipped):
Illuminates when grade assist is
turned on.
Transmission Tow/Haul Feature
(RTT) (if equipped):Displays
when the Tow/Haul feature has been
activated. Refer to theDriving
chapter for transmission function and operation. If the light flashes
steadily, have the system serviced immediately, damage to the
transmission could occur.
Hill descent (if equipped):
Illuminates when hill descent is
turned on.
Terrain management (if
equipped):Illuminates when a
terrain management mode is
selected. SeeTerrain management
in theDrivingchapter for more
information.
Instrument Cluster
19
2011 Explorer(exp)
Owners Guide, 1st Printing
USA(fus)
Page 66 of 449

Operating tips
•To reduce fog build-up on the windshield during humid weather,
select
(defrost) or(floor/defrost).
•To reduce humidity build-up inside the vehicle, do not drive with the
system off or with
(recirculated air) engaged and A/C off.
•Do not put objects under the front seats that will interfere with the
airflow to the back seats.
•Remove any snow, ice or leaves from the air intake area at the base of
the windshield.
•To improve the time to reach comfort in hot weather, drive with the
windows slightly open for 2-3 minutes after start-up or until the
vehicle has been “aired out.”
•A small amount of air may be felt from the floor vent regardless of the
air distribution setting that is selected.
For maximum cooling performance in MAX A/C mode:
1. Select MAX A/C.
2. Move temperature control selector to the coolest setting.
3. Set the fan to the highest speed initially. As the interior starts to cool
down, adjust the fan speed to maintain comfort.
To aid in side window defogging/demisting in cold weather:
1. Select
(panel/floor).
2. Select A/C.
3. Adjust the temperature control to maintain comfort.
4. Set the fan speed to the highest setting.
5. Direct the outer instrument panel vents toward the side windows.
To increase airflow to the outer instrument panel vents, close the vents
located in the middle of the instrument panel.
Climate Controls
65
2011 Explorer(exp)
Owners Guide, 1st Printing
USA(fus)
Page 69 of 449

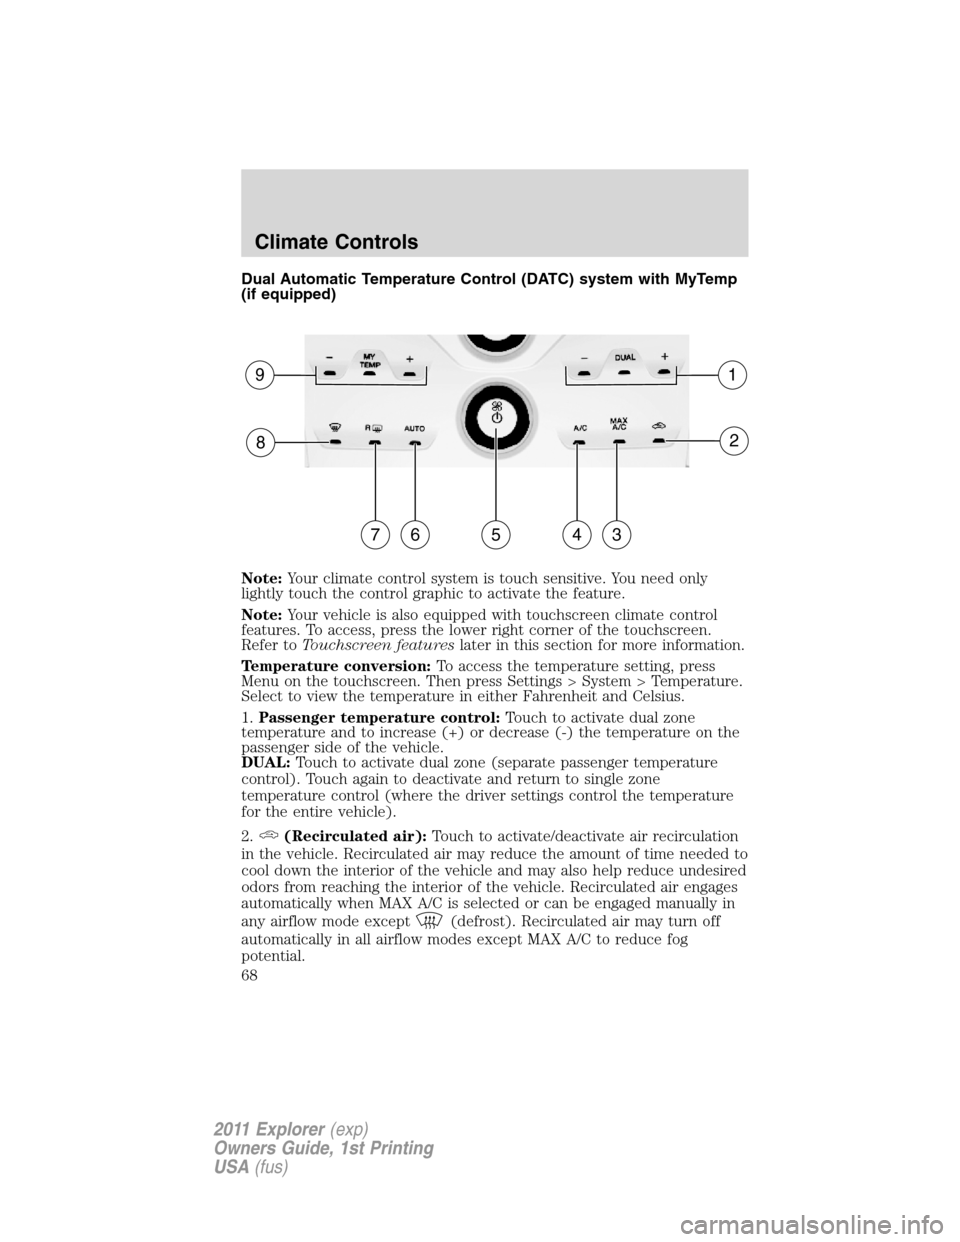
Dual Automatic Temperature Control (DATC) system with MyTemp
(if equipped)
Note:Your climate control system is touch sensitive. You need only
lightly touch the control graphic to activate the feature.
Note:Your vehicle is also equipped with touchscreen climate control
features. To access, press the lower right corner of the touchscreen.
Refer toTouchscreen featureslater in this section for more information.
Temperature conversion:To access the temperature setting, press
Menu on the touchscreen. Then press Settings > System > Temperature.
Select to view the temperature in either Fahrenheit and Celsius.
1.Passenger temperature control:Touch to activate dual zone
temperature and to increase (+) or decrease (-) the temperature on the
passenger side of the vehicle.
DUAL:Touch to activate dual zone (separate passenger temperature
control). Touch again to deactivate and return to single zone
temperature control (where the driver settings control the temperature
for the entire vehicle).
2.
(Recirculated air):Touch to activate/deactivate air recirculation
in the vehicle. Recirculated air may reduce the amount of time needed to
cool down the interior of the vehicle and may also help reduce undesired
odors from reaching the interior of the vehicle. Recirculated air engages
automatically when MAX A/C is selected or can be engaged manually in
any airflow mode except
(defrost). Recirculated air may turn off
automatically in all airflow modes except MAX A/C to reduce fog
potential.
82
91
76435
Climate Controls
68
2011 Explorer(exp)
Owners Guide, 1st Printing
USA(fus)
Page 71 of 449

Operating tips
•To reduce fog build-up on the windshield during humid weather,
select
(defrost) or(floor/defrost).
•To reduce humidity build-up inside the vehicle, do not drive with the
system off or with
(recirculated air) engaged and A/C off.
•Do not put objects under the front seats that will interfere with the
airflow to the back seats.
•Remove any snow, ice or leaves from the air intake area at the base of
the windshield.
•To improve the A/C cool down, drive with the windows slightly open
for 2-3 minutes after start-up or until the vehicle has been “aired out.”
•A small amount of air may be felt from the floor vent regardless of the
air distribution setting that is selected.
For maximum cooling performance:
•Automatic operation:
1. Press AUTO for full automatic operation.
2. Do not override A/C or
(recirculated air).
3. Set the temperature to 60°F (16°C).
•Manual operation:
1. Select MAX A/C.
2. Select
(panel) or(panel/floor).
3. Select
(recirculated air) to provide colder airflow.
4. Set the temperature to 60°F (16°C).
5. Set highest fan setting initially, then adjust to maintain comfort.
To aid in side window defogging/demisting in cold weather:
1. Select
(panel/floor).
2. Select A/C.
3. Adjust the temperature control to maintain comfort.
4. Set the fan speed to the highest setting.
5. Direct the outer instrument panel vents towards the side windows.
To increase airflow to the outer instrument panel vents, close the vents
located in the middle of the instrument panel.
Climate Controls
70
2011 Explorer(exp)
Owners Guide, 1st Printing
USA(fus)
Page 79 of 449
3. Rotate the headlamp control to the off position.
4. Turn the vehicle on.
5. Turn the vehicle off.
6. Turn the headlamp control to the autolamp position (the headlights
should turn on).
7. Turn the headlamp control to the off position when the desired delay
time (up to three minutes) has been reached.
Fog lamp control
Press the top of the control, located
on the instrument panel, to activate
the fog lamps. The fog lamp
indicator will illuminate when the
fog lamps are on. Press the top of
the control again to deactivate the
fog lamps.
The fog lamps will only operate with
the parking lamps or headlamps on.
When the high beams are activated,
the fog lamps will not operate.
High beams
Pull the lever fully past the detent
to activate. Pull the lever fully again
to deactivate.
Flash-to-pass
Pull toward you slightly to activate
and release to deactivate.
Lights
78
2011 Explorer(exp)
Owners Guide, 1st Printing
USA(fus)
Page 81 of 449

Dome lamp control
Use to manually turn the dome lamp
on.
•Press the control. This will turn
on the interior courtesy lights.
The lights will remain on until the
control is pressed again.
Dome lamp control (with fog lamps)
Use to manually turn the dome lamp
on.
•Press the bottom of the control.
This will turn on the interior
courtesy lights. The lights will
remain on until the control is
pressed again.
AIMING THE HEADLAMPS
The headlamps on your vehicle are properly aimed before leaving the
assembly plant. If your vehicle is involved in an accident or if you have
problems fixing the alignment of your headlamps, have them checked by
a qualified service technician.
Headlamp aim adjustment
The headlamps on your vehicle can only be vertically adjusted. Your
vehicle does not require horizontal aim adjustments.
To adjust the headlamps:
1. Park your vehicle on a level surface about 25 feet (7.6 meters) away
from a vertical plain surface (3). Check your headlamp alignment at
night or in a dark area so that you can see the headlamp beam pattern.
Lights
80
2011 Explorer(exp)
Owners Guide, 1st Printing
USA(fus)
Page 86 of 449

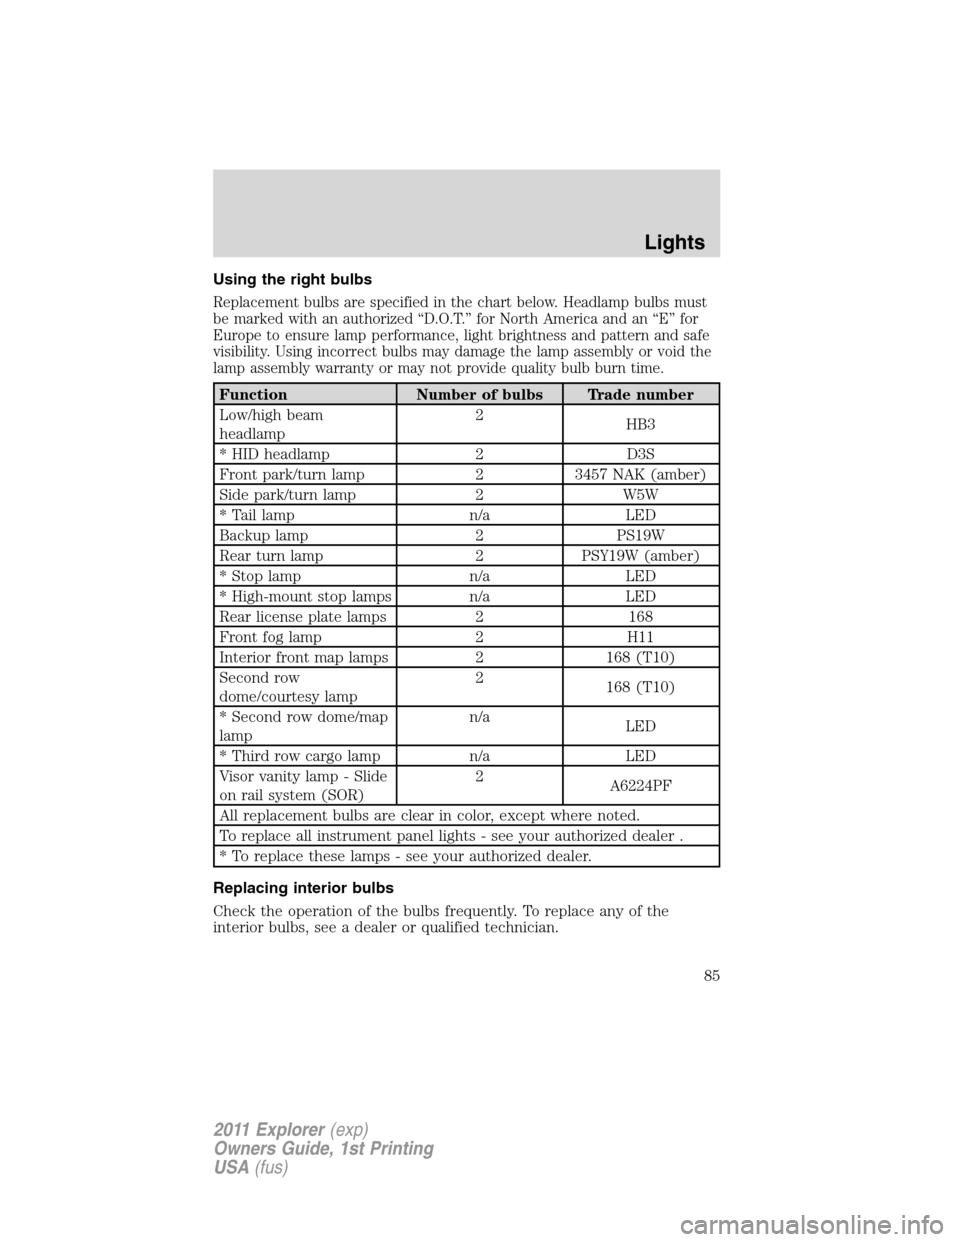
Using the right bulbs
Replacement bulbs are specified in the chart below. Headlamp bulbs must
be marked with an authorized “D.O.T.” for North America and an “E” for
Europe to ensure lamp performance, light brightness and pattern and safe
visibility. Using incorrect bulbs may damage the lamp assembly or void the
lamp assembly warranty or may not provide quality bulb burn time.
Function Number of bulbs Trade number
Low/high beam
headlamp2
HB3
* HID headlamp 2 D3S
Front park/turn lamp 2 3457 NAK (amber)
Side park/turn lamp 2 W5W
* Tail lamp n/a LED
Backup lamp 2 PS19W
Rear turn lamp 2 PSY19W (amber)
* Stop lamp n/a LED
* High-mount stop lamps n/a LED
Rear license plate lamps 2 168
Front fog lamp 2 H11
Interior front map lamps 2 168 (T10)
Second row
dome/courtesy lamp2
168 (T10)
* Second row dome/map
lampn/a
LED
* Third row cargo lamp n/a LED
Visor vanity lamp - Slide
on rail system (SOR)2
A6224PF
All replacement bulbs are clear in color, except where noted.
To replace all instrument panel lights - see your authorized dealer .
* To replace these lamps - see your authorized dealer.
Replacing interior bulbs
Check the operation of the bulbs frequently. To replace any of the
interior bulbs, see a dealer or qualified technician.
Lights
85
2011 Explorer(exp)
Owners Guide, 1st Printing
USA(fus)