Page 248 of 363
HAZARD FLASHER CONTROL
The hazard flasher is located on the
steering column, just behind the
steering wheel. The hazard flashers
will operate when the ignition is in
any position or if the key is not in
the ignition.
Press the flasher control and all
front and rear direction signals will
flash. Press the flasher control again
to turn them off. Use it when your
vehicle is disabled and is creating a
safety hazard for other motorists.
Note:With extended use, the flasher may run down your low voltage
(underhood) battery.
FUEL PUMP/HIGH VOLTAGE SHUT-OFF SWITCHES
The fuel pump shut-off switch stops the electric fuel pump from sending
fuel to the engine and the high voltage shut-off switch shuts off power
from the high voltage battery when your vehicle receives a substantial
physical jolt.
After an accident, if the engine does not start, one or both of the
switches may have been activated.
Roadside Emergencies
248
2011 Escape Hybrid(ehv)
Owners Guide, 2nd Printing
USA(fus)
Page 253 of 363

Fuse/Relay
LocationFuse Amp
RatingProtected Circuits
32 10A Rear video camera module
33 10A Not used (spare)
34 5A Not used (spare)
35 10A Four wheel drive, Electronic power assist
steering (EPAS), 110V inverter module,
Park aid module, Active park assist
module
36 5A Passive anti-theft system (PATS)
transceiver
37 10A Not used (spare)
38 20A Subwoofer/Amp (premium radio)
39 20A Radio, Radio amplifier (navigation)
40 20A Front power point
41 15A Driver/passenger door lock switches,
Auto dimming mirror, Compass, Ambient
lighting, Moon roof, Camera display in
mirror
42 10A Not used (spare)
43 10A Rear wiper logic, Heated seats relay,
Instrument cluster
44 10A Not used (spare)
45 5A Front wiper logic, Blower motor relay
46 7.5A Occupant classification system (OCS),
Passenger airbag deactivation indicator
(PADI)
47 30A Circuit
BreakerPower windows
48 — Delayed accessory relay
Power distribution box
The power distribution box is located in the engine compartment. The
power distribution box contains high-current fuses that protect your
vehicle’s main electrical systems from overloads.
Roadside Emergencies
253
2011 Escape Hybrid(ehv)
Owners Guide, 2nd Printing
USA(fus)
Page 257 of 363
Auxiliary relay box
The relay box is located in the engine compartment on the radiator
support bracket.
Fuse/Relay
locationFuse amp
ratingDescription
Relay — Electric vacuum pump (solid state)
1 — Not used
2 — Not used
3 — Not used
4 5A* Vacuum pump monitor
5 — Not used
6 — Not used
* Mini fuses **Cartridge fuse
CHANGING THE TIRES
If you get a flat tire while driving, do not apply the brake heavily.
Instead, gradually decrease your speed. Hold the steering wheel firmly
and slowly move to a safe place on the side of the road.
Roadside Emergencies
257
2011 Escape Hybrid(ehv)
Owners Guide, 2nd Printing
USA(fus)
Page 260 of 363
When driving with the full-size dissimilar spare tire/wheel additional
caution should be given to:
•Towing a trailer
•Driving vehicles equipped with a camper body
•Driving vehicles with a load on the cargo rack
Drive cautiously when using a full-size dissimilar spare tire/wheel and
seek service as soon as possible.
Stopping and securing the vehicle
1. Park on a level surface, set the
parking brake and activate the
hazard flashers.
2. Place gearshift lever in P (Park)
and turn engine off.
Removing the jack and tools
The jack and tools are located in the
right rear of the cargo area behind
an access panel.
BRAKE RELEASE P
Roadside Emergencies
260
2011 Escape Hybrid(ehv)
Owners Guide, 2nd Printing
USA(fus)
Page 266 of 363

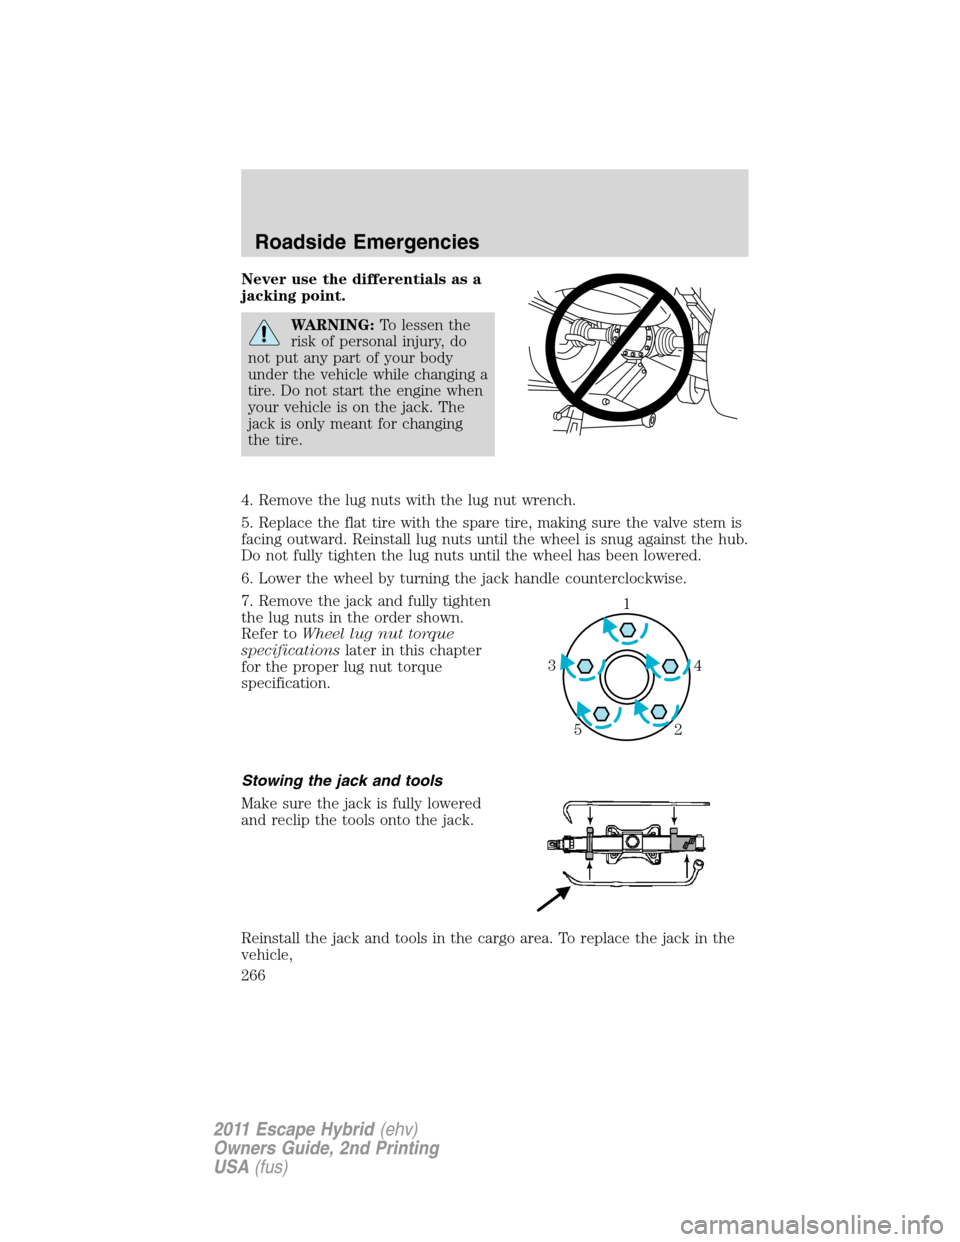
Never use the differentials as a
jacking point.
WARNING:To lessen the
risk of personal injury, do
not put any part of your body
under the vehicle while changing a
tire. Do not start the engine when
your vehicle is on the jack. The
jack is only meant for changing
the tire.
4. Remove the lug nuts with the lug nut wrench.
5. Replace the flat tire with the spare tire, making sure the valve stem is
facing outward. Reinstall lug nuts until the wheel is snug against the hub.
Do not fully tighten the lug nuts until the wheel has been lowered.
6. Lower the wheel by turning the jack handle counterclockwise.
7. Remove the jack and fully tighten
the lug nuts in the order shown.
Refer toWheel lug nut torque
specificationslater in this chapter
for the proper lug nut torque
specification.
Stowing the jack and tools
Make sure the jack is fully lowered
and reclip the tools onto the jack.
Reinstall the jack and tools in the cargo area. To replace the jack in the
vehicle,
1
4 3
2 5
Roadside Emergencies
266
2011 Escape Hybrid(ehv)
Owners Guide, 2nd Printing
USA(fus)
Page 270 of 363

Preparing your vehicle
If your low voltage (underhood) battery becomes disconnected or
disabled for any reason, the vehicle controller must relearn the engine’s
operating characteristics in order to operate it at maximum efficiency.
This relearning process occurs the first time the vehicle is driven after
reconnecting the low voltage battery. If the learning procedure does not
have time to complete during the drive, the engine will continue to
operate for 3-5 seconds after you turn the ignition off to complete the
relearning process. This is a normal condition and will not re-occur until
the low voltage battery is disconnected again. Refer toLow voltage
(underhood) batteryin theMaintenance and Specificationchapter
for more information.
1.Use only a 12–volt supply to start your vehicle.
2. Do not disconnect the battery of the disabled vehicle as this could
damage the vehicle’s electrical system.
3. Park the booster vehicle close to the hood of the disabled vehicle
making sure the two vehiclesdo nottouch. Set the parking brake on
both vehicles and stay clear of the engine cooling fan and other moving
parts.
4. Check all battery terminals and remove any excessive corrosion before
you attach the battery cables. Ensure that vent caps are tight and level.
5. Turn the heater fan on in both vehicles to protect from any electrical
surges. Turn all other accessories off.
Connecting the jumper cables
Note:In the illustration, the vehicle on the bottom is used to designate
the assisting (boosting) battery.
Roadside Emergencies
270
2011 Escape Hybrid(ehv)
Owners Guide, 2nd Printing
USA(fus)
Page 271 of 363

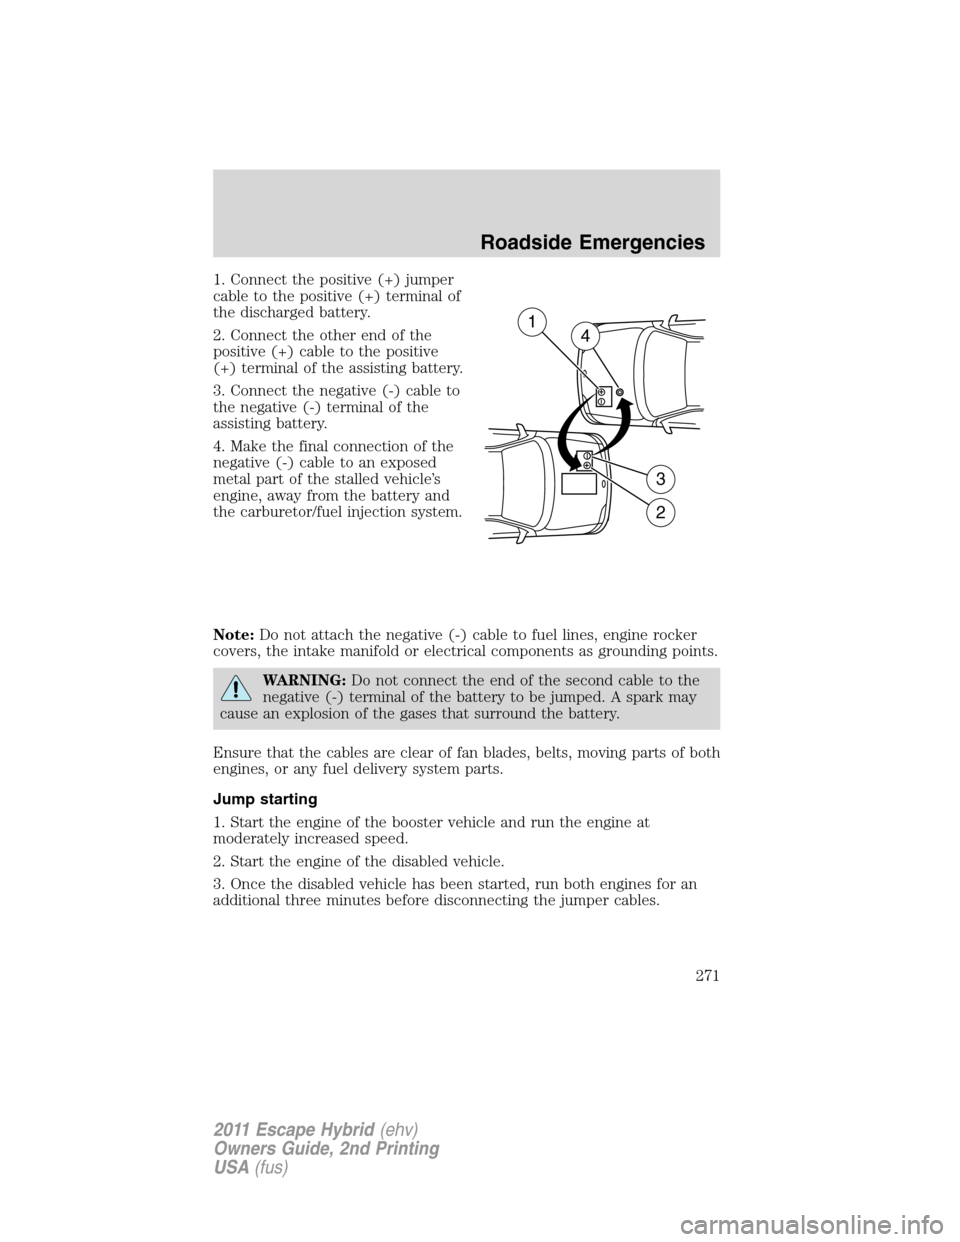
1. Connect the positive (+) jumper
cable to the positive (+) terminal of
the discharged battery.
2. Connect the other end of the
positive (+) cable to the positive
(+) terminal of the assisting battery.
3. Connect the negative (-) cable to
the negative (-) terminal of the
assisting battery.
4. Make the final connection of the
negative (-) cable to an exposed
metal part of the stalled vehicle’s
engine, away from the battery and
the carburetor/fuel injection system.
Note:Do not attach the negative (-) cable to fuel lines, engine rocker
covers, the intake manifold or electrical components as grounding points.
WARNING:Do not connect the end of the second cable to the
negative (-) terminal of the battery to be jumped. A spark may
cause an explosion of the gases that surround the battery.
Ensure that the cables are clear of fan blades, belts, moving parts of both
engines, or any fuel delivery system parts.
Jump starting
1. Start the engine of the booster vehicle and run the engine at
moderately increased speed.
2. Start the engine of the disabled vehicle.
3. Once the disabled vehicle has been started, run both engines for an
additional three minutes before disconnecting the jumper cables.
+–
+–
2
3
14
Roadside Emergencies
271
2011 Escape Hybrid(ehv)
Owners Guide, 2nd Printing
USA(fus)
Page 272 of 363
Removing the jumper cables
Remove the jumper cables in the reverse order that they were
connected.
Note:In the illustration, the vehicle on the bottom is used to designate
the assisting (boosting) battery.
1. Remove the jumper cable from
the ground metal surface.
2. Remove the jumper cable on the
negative (-) terminal of the booster
vehicle’s battery.
3. Remove the jumper cable from
the positive (+) terminal of the
booster vehicle’s battery.
4. Remove the jumper cable from
the positive (+) terminal of the
disabled vehicle’s battery.
After the disabled vehicle has been started and the jumper cables
removed, allow it to idle for several minutes so the engine computer can
relearn its idle conditions.
+–
+–
DA
B
C
4D1
2
3
Roadside Emergencies
272
2011 Escape Hybrid(ehv)
Owners Guide, 2nd Printing
USA(fus)