2011 FORD CROWN VICTORIA Specifications
[x] Cancel search: SpecificationsPage 163 of 333
SNOW TIRES AND CHAINS
WARNING:Snow tires must be the same size, load index, speed
rating as those originally provided by Ford. Use of any tire or
wheel not recommended by Ford can affect the safety and
performance of your vehicle, which could result in an increased risk of
loss of vehicle control, vehicle rollover, personal injury and death.
Additionally, the use of non-recommended tires and wheels could
cause steering, suspension, axle or transfer case/power transfer unit
failure.
The tires on your vehicle have all-weather treads to provide traction in
rain and snow. However, in some climates, you may need to use snow
tires and chains. If you need to use chains, it is recommended that steel
wheels (of the same size and specifications) be used, as chains may chip
aluminum wheels.
Note:The suspension insulation and bumpers will help prevent vehicle
damage. Do not remove these components from your vehicle when using
snow tires and chains.
Follow these guidelines when using snow tires and chains:
•If possible, avoid fully loading your vehicle.
•Use only cable type chains offered by Ford Motor Company as an
accessory or equivalent. Using SAE Class S or other conventional link
type chains may cause damage to the vehicle’s wheel house and/or
body.
•Install chains securely, verifying that the chains do not touch any
wiring, brake lines or fuel lines.
•Do not exceed 30 mph (48 km/h) with tire cables on your vehicle.
•Drive cautiously. If you hear the chains rub or bang against your
vehicle, stop and retighten the chains. If this does not work, remove
the chains to prevent damage to your vehicle.
•Remove the tire chains when they are no longer needed. Do not use
tire chains on dry roads.
VEHICLE LOADING – WITH AND WITHOUT A TRAILER
This section will guide you in the proper loading of your vehicle and/or
trailer, to keep your loaded vehicle weight within its design rating
capability, with or without a trailer. Properly loading your vehicle will
provide maximum return of vehicle design performance. Before loading
Tires, Wheels and Loading
163
2011 Crown Victoria(cro)
Owners Guide, 3rd Printing
USA(fus)
Page 170 of 333
calculation would be: 635 kg - (2 x 99 kg) - (12 x 45 kg) = 635 - 198 -
540 = -103 kg. You will need to reduce the load weight by at least
240 lb. (104 kg). If you remove 3-100 lb. (45 kg) cement bags, then
the load calculation would be:
1,400 - (2 x 220) - (9 x 100) = 1,400 - 440 - 900 = 60 lb. Now you
have the load capacity to transport the cement and your friend home.
In metric units, the calculation would be: 635 kg - (2 x 99 kg) - (9 x
45 kg) = 635 - 198 - 405 = 32 kg.
The above calculations also assume that the loads are positioned in your
vehicle in a manner that does not overload the Front or the Rear Gross
Axle Weight Rating specified for your vehicle on the Safety Compliance
Certification Label found on the edge of the driver’s door.
TRAILER TOWING
Trailer towing puts additional loads on your vehicle’s engine,
transmission, axle, brakes, tires and suspension. For your safety and to
maximize vehicle performance, be sure to use the proper equipment
while towing.
Note:Long wheel based vehicles are NOT rated for towing.
Follow these guidelines to ensure safe towing:
•Do not tow a trailer until your vehicle has been driven at least
1,000 miles (1,600 km).
•Consult your local motor vehicle laws for towing a trailer.
•Refer to the instructions included with towing accessories for the
proper installation and adjustment specifications.
•Thoroughly prepare your vehicle for towing. Refer toPreparing to
towin this chapter.
•Stay within your vehicle’s load limits.
•Use extra caution when driving while trailer towing. Refer toDriving
while you towin this chapter.
•Service your vehicle more frequently if you tow a trailer. Refer to
Special operating conditionsin your scheduled maintenance.
Your loaded trailer should weigh no more than 1,500 lb (680 kg). The
GCW of your vehicle and trailer should not exceed 6,600 lb (2,993 kg).
For load specification terms found on the label and instructions on
calculating your vehicle’s load, refer toVehicle loading - with and
without a trailerin this chapter. Remember to figure in the tongue load
of your loaded vehicle when figuring the total weight.
Tires, Wheels and Loading
170
2011 Crown Victoria(cro)
Owners Guide, 3rd Printing
USA(fus)
Page 171 of 333
WARNING:Do not exceed the GVWR or the GAWR specified on
the certification label.
WARNING:Towing trailers beyond the maximum recommended
gross trailer weight exceeds the limit of the vehicle and could
result in engine damage, transmission damage, structural damage, loss
of vehicle control, vehicle rollover and personal injury.
Preparing to tow
Use the proper equipment for towing a trailer and make sure it is
properly attached to your vehicle. Contact your authorized dealer or a
reliable trailer dealer as soon as possible if you require assistance.
Hitches
Do not use a hitch that clamps onto the vehicle’s bumper; use a
load-carrying hitch. You must distribute the load in your trailer so that
10–15% of the total weight of the trailer is on the tongue.
Safety chains
Always connect the trailer’s safety chains to the frame or hook retainers
of the vehicle hitch. To connect the trailer’s safety chains, cross the
chains under the trailer tongue and allow slack for turning corners.
If you use a rental trailer, follow the instructions that the rental agency
gives to you.
Do not attach safety chains to the bumper.
Trailer brakes
Electric brakes and manual, automatic or surge-type trailer brakes are
safe if installed properly and adjusted to the manufacturer’s
specifications. The trailer brakes must meet local and Federal
regulations.
WARNING:Do not connect a trailer’s hydraulic brake system
directly to your vehicle’s brake system. Your vehicle may not
have enough braking power and your chances of having a collision
greatly increase.
The braking system of the tow vehicle is rated for operation at the
GVWR not GCWR.
Tires, Wheels and Loading
171
2011 Crown Victoria(cro)
Owners Guide, 3rd Printing
USA(fus)
Page 172 of 333
Trailer lamps
Trailer lamps are required on most towed vehicles. Make sure all running
lights, brake lights, turn signals and hazard lights are working. Contact
your authorized dealer or trailer rental agency for proper instructions
and equipment for hooking-up trailer lamps.
Driving while you tow
When towing a trailer:
•Do not drive faster than 70 mph (113 km/h) during the first 500 miles
(800 km) of trailer towing and don’t make full-throttle starts.
•Turn off the speed control. The speed control may shut off
automatically when you are towing on long, steep grades.
•Use a lower gear to eliminate excessive shifting and assist in
transmission cooling. For additional information, refer toAutomatic
transmission operationin theDrivingchapter.
•Allow more distance for stopping with a trailer attached; anticipate
stops and brake gradually.
Trailer towing tips
•Practice turning, stopping and backing-up before starting on a trip to
get the feel of the vehicle-trailer combination. When turning, make
wider turns so the trailer wheels will clear curbs and other obstacles.
•To aid in engine/transmission cooling and A/C efficiency during hot
weather while stopped in traffic, place the gearshift lever in P (Park).
•After you have traveled 50 miles (80 km), thoroughly check your
hitch, electrical connections and trailer wheel lug nuts.
•If you are driving down a long or steep hill, shift to a lower gear. Do
not apply the brakes continuously, as they may overheat and become
less effective.
•If you will be towing a trailer frequently in hot weather, hilly
conditions, at GCWR, or any combination of these factors, consider
refilling your rear axle with synthetic gear lube if not already so
equipped. Refer to theMaintenance and Specificationschapter for
the lubricant specification. Remember that regardless of the rear axle
lube used, do not tow a trailer for the first 1,000 miles (1,600 km) of a
new vehicle, and that the first 500 miles (800 km) of towing be done
at no faster than 70 mph (113 km/h) with no full throttle starts.
•Vehicles with trailers should not be parked on a grade. If you must
park on a grade, place wheel chocks under the trailer’s wheels.
Tires, Wheels and Loading
172
2011 Crown Victoria(cro)
Owners Guide, 3rd Printing
USA(fus)
Page 177 of 333
You may experience a decrease in peak performance when the engine is
cold when operating on E
85ethanol.
Do not crank the engine for more than 10 seconds at a time as starter
damage may occur. If the engine fails to start, turn the key to off and
wait 30 seconds before trying again.
Do not use starting fluid such as ether in the air intake system. Such
fluid could cause immediate explosive damage to the engine and possible
personal injury.
If you should experience cold weather starting problems on E
85ethanol,
and neither an alternative brand of E
85ethanol nor an engine block
heater is available, the addition of unleaded gasoline to your tank will
improve cold starting performance. Your vehicle is designed to operate
on E
85ethanol alone, unleaded gasoline alone, or any mixture of the two.
SeeChoosing the right fuelin theMaintenance and Specifications
chapter for more information on ethanol.
If the engine fails to start using the preceding instructions (flexible
fuel vehicles only)
1. Press and hold down the accelerator 1/3 to 1/2 way to floor, then
crank the engine.
2. When the engine starts, release the key, then gradually release the
accelerator pedal as the engine speeds up. If the engine still fails to start,
repeat Step 1.
Guarding against exhaust fumes
Carbon monoxide is present in exhaust fumes. Take precautions to avoid
its dangerous effects.
WARNING:If you smell exhaust fumes inside your vehicle, have
your dealer inspect your vehicle immediately. Do not drive if you
smell exhaust fumes.
Important ventilating information
If the engine is idling while the vehicle is stopped for a long period of
time, open the windows at least 1 inch (2.5 cm) or adjust the heating or
air conditioning to bring in fresh air.
Driving
177
2011 Crown Victoria(cro)
Owners Guide, 3rd Printing
USA(fus)
Page 184 of 333
STEERING
To help prevent damage to the power steering system, never hold the
steering wheel at its furthest turning points (until it stops) for more than
a few seconds when the engine is running.
It is also important to maintain a proper power steering fluid level in the
power steering fluid reservoir:
•Do not operate the vehicle with a low power steering pump fluid level.
SeePower steering fluidin theMaintenance and Specifications
chapter.
•Some noise is normal during operation. If the noise is excessive, check
for low power steering pump fluid level before seeking service by your
authorized dealer.
•Heavy or uneven steering efforts may be caused by low power steering
pump fluid level. Check for low power steering pump fluid level before
seeking service by your authorized dealer.
•Do not fill the power steering pump reservoir above the maximum
level, as this may result in leaks from the reservoir. SeePower
steering fluidin theMaintenance and Specificationschapter.
If the power steering system breaks down (or if the engine is off), you
can steer the vehicle manually, but it takes more effort.
If the steering wanders or pulls, check for:
•an improperly inflated tire
•uneven tire wear
•loose or worn suspension components
•loose or worn steering components
•improper steering alignment
AIR SUSPENSION SYSTEM (IF EQUIPPED)
The air suspension system is designed to improve ride, handling and
general vehicle performance during:
•Certain road conditions
•Steering maneuvers
•Braking
•Accelerations
This system keeps the rear of your vehicle at a constant level by
automatically adding air or releasing air from the springs.
Driving
184
2011 Crown Victoria(cro)
Owners Guide, 3rd Printing
USA(fus)
Page 197 of 333
WARNING:Always disconnect the battery before servicing high
current fuses.
WARNING:To reduce risk of electrical shock, always replace
the cover to the power distribution box before reconnecting the
battery or refilling fluid reservoirs.
If the battery has been disconnected and reconnected, refer to the
Batterysection of theMaintenance and Specificationschapter.
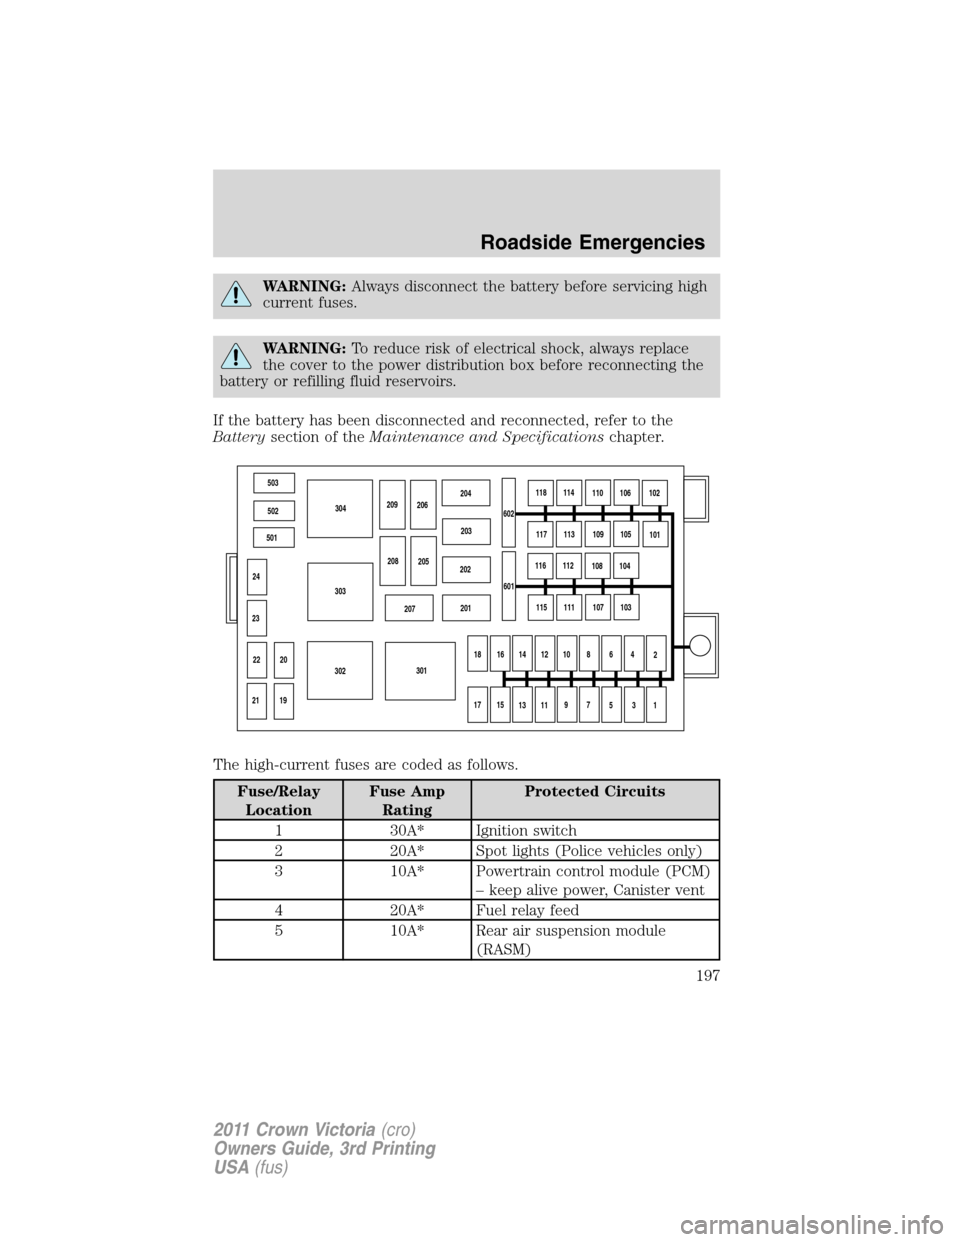
The high-current fuses are coded as follows.
Fuse/Relay
LocationFuse Amp
RatingProtected Circuits
1 30A* Ignition switch
2 20A* Spot lights (Police vehicles only)
3 10A* Powertrain control module (PCM)
– keep alive power, Canister vent
4 20A* Fuel relay feed
5 10A* Rear air suspension module
(RASM)
503
502
501
24
23
20
19 22
21302303304
301 207201 202203 204
209
206
208
205602118
114
110
106
102
117
113
109
105
101
116
112
108
104
115
111
107
103
18
16
14
1210
8
6
4
2
17
15
13
119
7
5
3
1 601
Roadside Emergencies
197
2011 Crown Victoria(cro)
Owners Guide, 3rd Printing
USA(fus)
Page 207 of 333
6. Lower the vehicle by turning the jack handle counterclockwise.
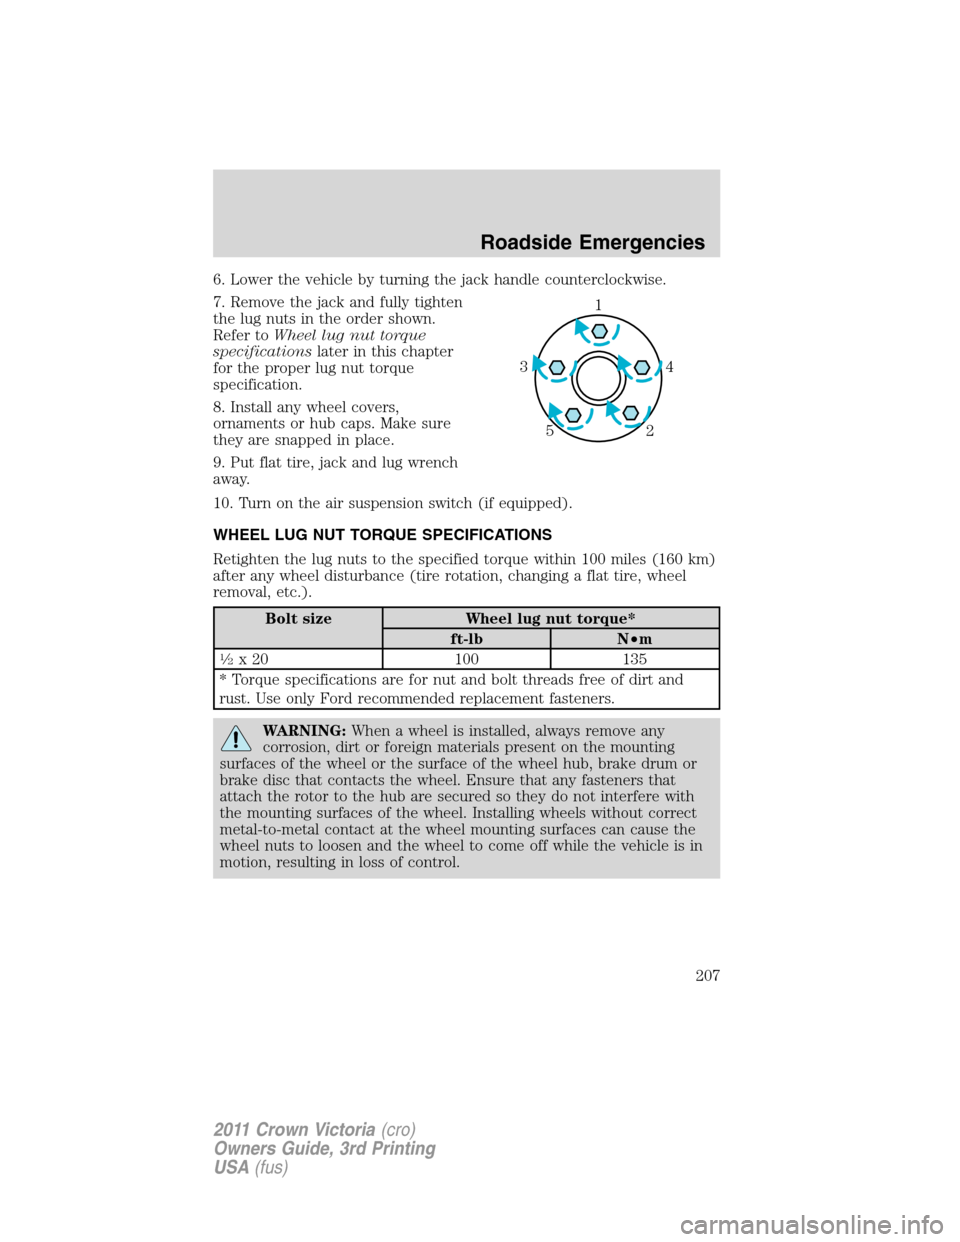
7. Remove the jack and fully tighten
the lug nuts in the order shown.
Refer toWheel lug nut torque
specificationslater in this chapter
for the proper lug nut torque
specification.
8. Install any wheel covers,
ornaments or hub caps. Make sure
they are snapped in place.
9. Put flat tire, jack and lug wrench
away.
10. Turn on the air suspension switch (if equipped).
WHEEL LUG NUT TORQUE SPECIFICATIONS
Retighten the lug nuts to the specified torque within 100 miles (160 km)
after any wheel disturbance (tire rotation, changing a flat tire, wheel
removal, etc.).
Bolt size Wheel lug nut torque*
ft-lb N•m
1�2x 20 100 135
* Torque specifications are for nut and bolt threads free of dirt and
rust. Use only Ford recommended replacement fasteners.
WARNING:When a wheel is installed, always remove any
corrosion, dirt or foreign materials present on the mounting
surfaces of the wheel or the surface of the wheel hub, brake drum or
brake disc that contacts the wheel. Ensure that any fasteners that
attach the rotor to the hub are secured so they do not interfere with
the mounting surfaces of the wheel. Installing wheels without correct
metal-to-metal contact at the wheel mounting surfaces can cause the
wheel nuts to loosen and the wheel to come off while the vehicle is in
motion, resulting in loss of control.
1
4 3
2 5
Roadside Emergencies
207
2011 Crown Victoria(cro)
Owners Guide, 3rd Printing
USA(fus)