2011 DODGE NITRO warning light
[x] Cancel search: warning lightPage 206 of 497

If brake failure is indicated, immediate repair is neces-
sary.
WARNING!
Driving a vehicle with the red brake light on is
dangerous. Part of the brake system may have failed.
It will take longer to stop the vehicle. You could have
a collision. Have the vehicle checked immediately.
Vehicles equipped with the Anti-Lock Brake System
(ABS), are also equipped with Electronic Brake Force
Distribution (EBD). In the event of an EBD failure, the
Brake Warning Light will turn on along with the ABS
Light. Immediate repair to the ABS system is required.
Operation of the Brake Warning Light can be checked by
turning the ignition switch from the OFF position to the
ON/RUN position. The light should illuminate for ap-
proximately two seconds. The light should then turn off unless the parking brake is applied or a brake fault is
detected. If the light does not illuminate, have the light
inspected by an authorized dealer.
The light also will turn on when the parking brake is
applied with the ignition switch in the ON/RUN posi-
tion.
NOTE:
This light shows only that the parking brake is
applied. It does not show the degree of brake application.
15. Electronic Throttle Control (ETC) Light This light informs you of a problem with the
Electronic Throttle Control (ETC) system. If a
problem is detected, the light will come on
while the engine is running. Cycle the ignition
key when the vehicle has completely stopped and the
shift lever is placed in the PARK position. The light
should turn off. If the light remains lit with the engine
running, your vehicle will usually be drivable; however,
see an authorized dealer for service as soon as possible. If
4
UNDERSTANDING YOUR INSTRUMENT PANEL 203
Page 208 of 497

19. Anti-Lock Brake (ABS) LightThis light monitors the Anti-Lock Brake System
(ABS). The light will turn on when the ignition
switch is turned to the ON/RUN position and
may stay on for as long as four seconds.
If the ABS light remains on or turns on while driving, it
indicates that the Anti-Lock portion of the brake system
is not functioning and that service is required. However,
the conventional brake system will continue to operate
normally if the BRAKE warning light is not on.
If the ABS light is on, the brake system should be serviced
as soon as possible to restore the benefits of Anti-Lock
brakes. If the ABS light does not turn on when the
ignition switch is turned to the ON/RUN position, have
the light inspected by an authorized dealer.
20. Front Fog Light Indicator — If Equipped This indicator will illuminate when the front fog
lights are On. 21. Oil Pressure Warning Light
This light indicates low engine oil pressure. The
light should turn on momentarily when the engine
is started. If the light turns on while driving, stop the
vehicle and shut off the engine as soon as possible. A chime
will sound for four minutes when this light turns on.
Do not operate the vehicle until the cause is corrected.
This light does not indicate how much oil is in the engine.
The engine oil level must be checked under the hood.
22. Air Bag Warning Light This light will turn on for four to eight seconds
as a bulb check when the ignition switch is first
turned to ON/RUN. If the light is either not on
during starting, stays on, or turns on while
driving, have the system inspected at an authorized
dealer as soon as possible. Refer to “Occupant Restraints”
in “Things To Know Before Starting Your Vehicle” for
further information.4
UNDERSTANDING YOUR INSTRUMENT PANEL 205
Page 214 of 497

WARNING!
A malfunctioning catalytic converter, as referenced
above, can reach higher temperatures than in normal
operating conditions. This can cause a fire if you
drive slowly or park over flammable substances such
as dry plants, wood, cardboard, etc. This could result
in death or serious injury to the driver, occupants or
others.
28. Cruise Indicator — If Equipped
This indicator lights when the electronic speed control
system is turned on. 29. Odometer / Trip Odometer / ECO
(Fuel Saver Indicator) Button
Changing the Display
Press this button to change the display from odometer to
either of the two trip odometer settings or the “ECO”
display. Trip A or Trip B will appear when in the trip
odometer mode. On vehicles equipped with a Base
Cluster, press and release it once again to display the
outside temperature. On vehicles equipped with a Mid
Line Cluster, press and release it once again to display the
outside temperature and compass heading in the screen
below the speedometer. Refer to “Compass/Trip Com-
puter” for details.
Resetting the Trip Odometer
Display the trip mileage that you want to reset, “Trip A”
or “Trip B.” Then push and hold the button (approxi-
mately two seconds) until the display resets to 0. The
odometer must be in Trip Mode to reset the trip odometer.
4
UNDERSTANDING YOUR INSTRUMENT PANEL 211
Page 312 of 497

If necessary, add fluid to restore to the proper indicated
level. With a clean cloth, wipe any spilled fluid from all
surfaces. Refer to “Fluids, Lubricants, and Genuine
Parts” in “Maintaining Your Vehicle” for further
information.
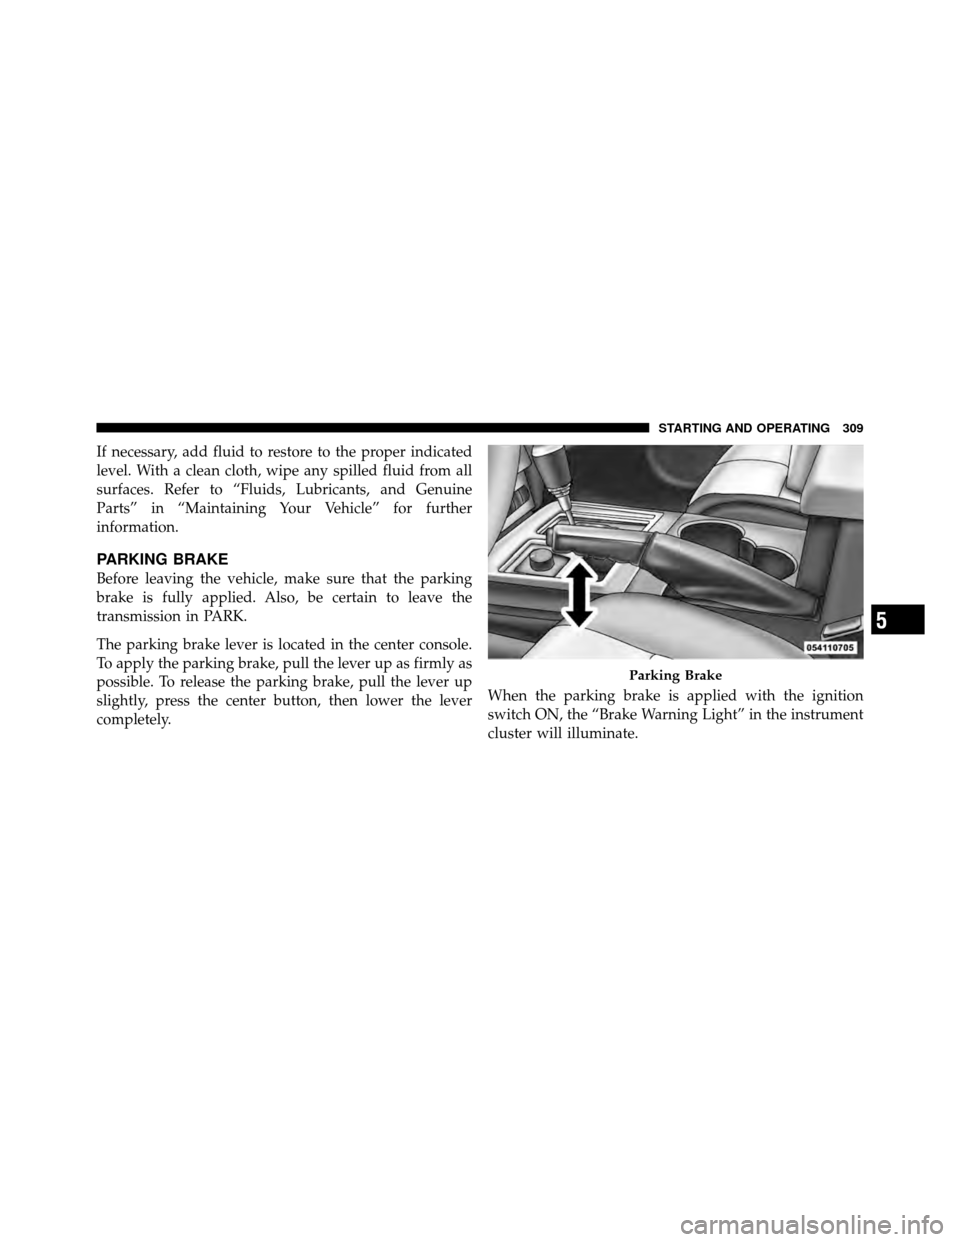
PARKING BRAKE
Before leaving the vehicle, make sure that the parking
brake is fully applied. Also, be certain to leave the
transmission in PARK.
The parking brake lever is located in the center console.
To apply the parking brake, pull the lever up as firmly as
possible. To release the parking brake, pull the lever up
slightly, press the center button, then lower the lever
completely.When the parking brake is applied with the ignition
switch ON, the “Brake Warning Light” in the instrument
cluster will illuminate.
Parking Brake
5
STARTING AND OPERATING 309
Page 313 of 497

NOTE:
•When the parking brake is applied and the transmis-
sion is placed in gear, the “Brake Warning Light” will
flash. If vehicle speed is detected, a chime will sound
to alert the driver. Fully release the parking brake
before attempting to move the vehicle.
•This light only shows that the parking brake is ap-
plied. It does not show the degree of brake application.
When parking on a hill, it is important to turn the front
wheels toward the curb on a downhill grade and away
from the curb on an uphill grade. Apply the parking
brake before placing the shift lever in PARK, otherwise
the load on the transmission locking mechanism may
make it difficult to move the shift lever out of PARK. The
parking brake should always be applied whenever the
driver is not in the vehicle.
WARNING!
•Never use the PARK position as a substitute for
the parking brake. Always apply the parking
brake fully when parked to guard against vehicle
movement and possible injury or damage.
•Never leave children alone in a vehicle. Leaving
unattended children in a vehicle is dangerous for a
number of reasons. A child or others could be
seriously or fatally injured.
•Do not leave the key in the ignition. A child could
operate power windows, other controls, or move
the vehicle.
•Be sure the parking brake is fully disengaged
before driving; failure to do so can lead to brake
failure and a collision. (Continued)
310 STARTING AND OPERATING
Page 314 of 497

WARNING! (Continued)
•Always fully apply the parking brake when leav-
ing your vehicle or it may roll and cause damage or
injury. Also, be certain to leave the transmission in
PARK. Failure to do so may cause the vehicle to
roll and cause damage or injury.
CAUTION!
If the “Brake Warning Light” remains on with the
parking brake released, a brake system malfunction
is indicated. Have the brake system serviced by an
authorized dealer immediately.
ANTI-LOCK BRAKE SYSTEM
The Anti-Lock Brake System (ABS) is designed to aid the
driver in maintaining vehicle control under adverse
braking conditions. The system operates with a separatecomputer to modulate hydraulic pressure, to prevent
wheel lock-up and help avoid skidding on slippery
surfaces.
All vehicle wheels and tires must be the same size and
type, and tires must be properly inflated, to produce
accurate signals for the computer.
WARNING!
Significant over or under-inflation of tires or mixing
sizes of tires or wheels on the vehicle can lead to loss
of braking effectiveness.
The ABS conducts a low-speed self-test at about 12 mph
(20 km/h). If you have your foot lightly on the brake
while this test is occurring, you may feel slight pedal
movement. The movement can be more apparent on ice
and snow. This is normal.5
STARTING AND OPERATING 311
Page 320 of 497

counteracting the oversteer or understeer condition. En-
gine power may also be reduced to help the vehicle
maintain the desired path.
ESC uses sensors in the vehicle to determine the vehicle
path intended by the driver and compares it to the actual
path of the vehicle. When the actual path does not match
the intended path, ESC applies the brake of the appro-
priate wheel to assist in counteracting the oversteer or
understeer condition.
•Oversteer - when the vehicle is turning more than
appropriate for the steering wheel position.
•Understeer - when the vehicle is turning less than
appropriate for the steering wheel position.
The “ESC Activation/Malfunction Indicator Light” lo-
cated in the instrument cluster will start to flash as soon
as the tires lose traction and the ESC system becomes
active. The “ESC Activation/Malfunction Indicator Light” also flashes when the TCS is active. If the “ESC
Activation/Malfunction Indicator Light” begins to flash
during acceleration, ease up on the accelerator and apply
as little throttle as possible. Be sure to adapt your speed
and driving to the prevailing road conditions.
WARNING!
The Electronic Stability Control (ESC) cannot pre-
vent the natural laws of physics from acting on the
vehicle, nor can it increase the traction afforded by
prevailing road conditions. ESC cannot prevent col-
lisions, including those resulting from excessive
speed in turns, driving on very slippery surfaces, or
hydroplaning. The capabilities of an ESC equipped
vehicle must never be exploited in a reckless or
dangerous manner which could jeopardize the user ’s
safety or the safety of others.
5
STARTING AND OPERATING 317
Page 345 of 497

off until the tire pressure is at or above the recommended
cold placard pressure. Once the low tire pressure warn-
ing (Tire Pressure Monitoring Telltale Light) illuminates,
you must increase the tire pressure to the recommended
cold placard pressure in order for the “Tire Pressure
Monitoring Telltale Light” to turn off. The system will
automatically update and the “Tire Pressure Monitoring
Telltale Light” will turn off once the system receives the
updated tire pressures. The vehicle may need to be
driven for up to 20 minutes above 15 mph (24 km/h) in
order for the TPMS to receive this information.
For example, your vehicle may have a recommended cold
(parked for more than three hours) placard pressure of
33 psi (227 kPa). If the ambient temperature is 68°F (20°C)
and the measured tire pressure is 28 psi (193 kPa), a
temperature drop to 20°F (-7°C) will decrease the tire
pressure to approximately 24 psi (165 kPa). This tire
pressure is low enough to turn ON the “Tire Pressure
Monitoring Telltale Light.” Driving the vehicle may causethe tire pressure to rise to approximately 28 psi (193 kPa),
but the “Tire Pressure Monitoring Telltale Light” will still
be on. In this situation, the “Tire Pressure Monitoring
Telltale Light” will turn off only after the tires are inflated
to the vehicle’s recommended cold placard pressure value.
CAUTION!
•The TPMS has been optimized for the original
equipment tires and wheels. TPMS pressures and
warning have been established for the tire size
equipped on your vehicle. Undesirable system
operation or sensor damage may result when using
replacement equipment that is not of the same size,
type, and/or style. Aftermarket wheels can cause
sensor damage. Do not use aftermarket tire seal-
ants or balance beads if your vehicle is equipped
with a TPMS, as damage to the sensors may result.
(Continued)
342 STARTING AND OPERATING