2011 DODGE JOURNEY manual radio set
[x] Cancel search: manual radio setPage 27 of 108
HEADLIGHT SWITCH
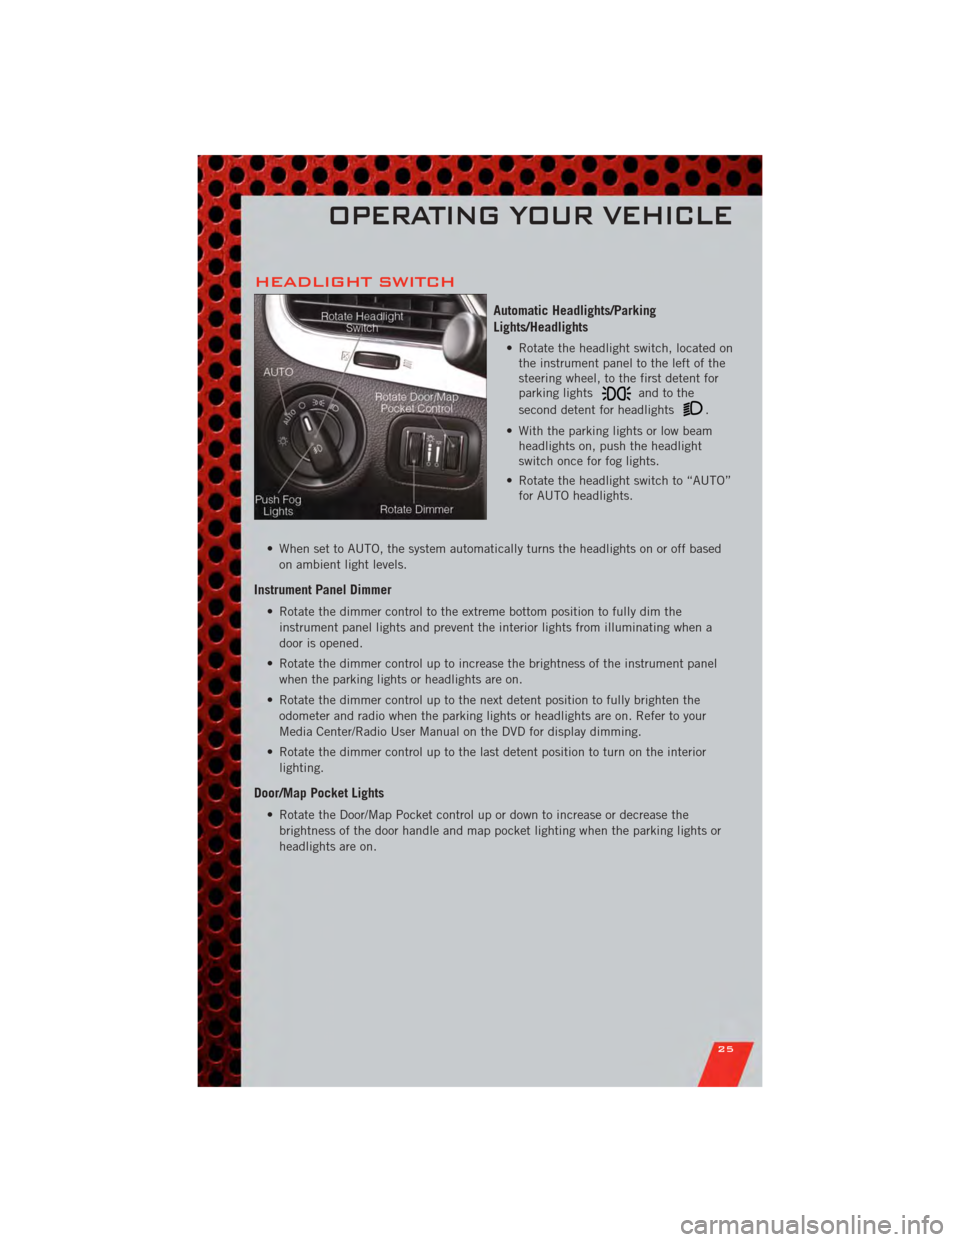
Automatic Headlights/Parking
Lights/Headlights
• Rotate the headlight switch, located onthe instrument panel to the left of the
steering wheel, to the first detent for
parking lights
andtothe
second detent for headlights
.
• With the parking lights or low beam headlights on, push the headlight
switch once for fog lights.
• Rotate the headlight switch to “AUTO” for AUTO headlights.
• When set to AUTO, the system automatically turns the headlights on or off based on ambient light levels.
Instrument Panel Dimmer
• Rotate the dimmer control to the extreme bottom position to fully dim theinstrument panel lights and prevent the interior lights from illuminating when a
door is opened.
• Rotate the dimmer control up to increase the brightness of the instrument panel when the parking lights or headlights are on.
• Rotate the dimmer control up to the next detent position to fully brighten the odometer and radio when the parking lights or headlights are on. Refer to your
Media Center/Radio User Manual on the DVD for display dimming.
• Rotate the dimmer control up to the last detent position to turn on the interior lighting.
Door/Map Pocket Lights
• Rotate the Door/Map Pocket control up or down to increase or decrease thebrightness of the door handle and map pocket lighting when the parking lights or
headlights are on.
OPERATING YOUR VEHICLE
25
Page 39 of 108
Setting the Time
• Model 8.4N synchronizes time automatically via GPS, so should not require anytime adjustment. If you do need to set the time manually, follow the instructions
below for Model 8.4.
• For Model 8.4, turn the unit on, then touch the time display at the top of the screen. Touch Yes.
• If the time is not displayed at the top of the screen, touch More soft-key and then Settings soft-key. In the Settings screen, touch the Clock soft-key, then check or
uncheck this option.
• Touch + or – next to Set Time Hours and Set Time Minutes to adjust the time.
• If these features are not available, uncheck the Sync with GPS box.
• Touch X to save your settings and exit out of the Clock Setting screen.
Audio Settings
• Touch of the Audio soft-key to activate the Audio settings screen to adjust Balance\Fade, Equalizer, And Speed Adjusted Volume.
• You can return to the Radio screen by touching the X located at the top right.
Balance/Fade • Touch the Balance/Fade soft-key to Balance audio between the front speakers or fade the audio between the rear and front speakers.
• Touching the Front, Rear, Left, or Right soft-keys or touch and drag the red Speaker Icon to adjust the Balance/Fade.
Equalizer • Touch the Equalizer soft-key to activate the Equalizer screen.
• Touch the + or - soft-keys, or by touching and dragging over the level bar for each of the equalizer bands. The level value, which spans between ±9, is displayed at
the bottom of each of the Bands.
Speed Adjusted Volume • Touch the Speed Adjusted Volume soft-key to activate the Speed Adjusted Volume screen. The Speed Adjusted Volume is adjusted by touching of the + and - buttons
or by touching, and dragging over the Level Bar This alters the automatic
adjustment of the audio volume with variation to vehicle speed.
ELECTRONICS
37
Page 52 of 108
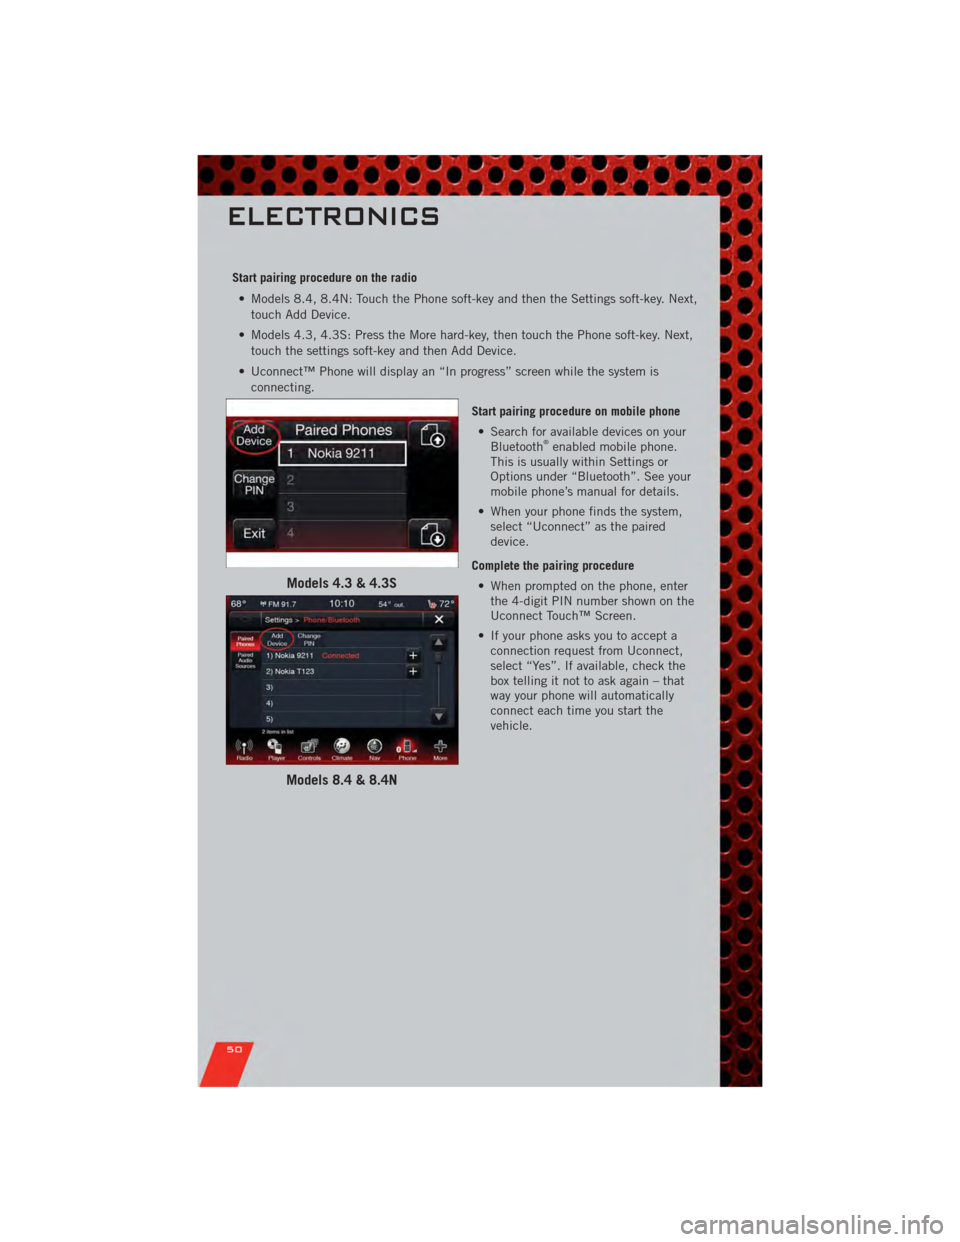
Start pairing procedure on the radio• Models 8.4, 8.4N: Touch the Phone soft-key and then the Settings soft-key. Next, touch Add Device.
• Models 4.3, 4.3S: Press the More hard-key, then touch the Phone soft-key. Next, touch the settings soft-key and then Add Device.
• Uconnect™ Phone will display an “In progress” screen while the system is connecting.
Start pairing procedure on mobile phone• Search for available devices on your Bluetooth
®enabled mobile phone.
This is usually within Settings or
Options under “Bluetooth”. See your
mobile phone’s manual for details.
• When your phone finds the system, select “Uconnect” as the paired
device.
Complete the pairing procedure • When prompted on the phone, enter the 4-digit PIN number shown on the
Uconnect Touch™ Screen.
• If your phone asks you to accept a connection request from Uconnect,
select “Yes”. If available, check the
box telling it not to ask again – that
way your phone will automatically
connect each time you start the
vehicle.
Models 4.3 & 4.3S
Models 8.4 & 8.4N
ELECTRONICS
50
Page 55 of 108
Making A Phone Call
• Press the Uconnect™ Phone button.
• (After the BEEP), say “dial” (or “call” to a name).
• (After the BEEP), say number (or name).
NOTE: You can also initiate a call by using the touch-screen on the Phone main screen.
Receiving A Call – Accept (And End)
• When an incoming call rings/is announced on Uconnect™, press the Phone
button
.
• To end a call, press the Phone button
.
Mute (Or Unmute) Microphone During Call
• During a call, touch the mute soft-key on the Phone main screen to mute and unmute the call.
Transfer Ongoing Call Between Handset And Vehicle
• During a call, touch the Transfer soft-key on the Phone main screen to transfer anon going call between handset and vehicle.
Common Phone Commands
Common Phone Commands (Examples)
“Call John Smith”
“Call John Smith mobile”
“Dial 1 248 555 1212”
“Call Emergency”
“Call Towing Assistance”
“Redial”
Phonebook
• Uconnect Touch™ radios will automatically download your phonebook from yourpaired phone, if this feature is supported by your phone. Entries are updated each
time that the phone is paired. If your phone book entries do not appear, check the
settings on your phone. Some phones require you to enable this feature manually.
• Your phone book can be browsed on your radio screen, but editing can only be done on your phone. To browse, touch the Phone soft-key, then the Phonebook
soft-key.
• Favorite phonebook entries can be saved as Favorites for quicker access. Favorites are shown at the top of your main phone screen (8.4 & 8.4N Only).
Voice Recognition Tips
• Use longer names that are less easily mistaken for others. For examples, say “CallJohn Doe” instead of “Call John”.
• You can “chain” commands together for faster results. Say “Call John Doe, mobile”, for example.
ELECTRONICS
53
Page 57 of 108
• Use the radio ON/OFF VOLUME rotary knob to adjust the volume to a comfortablelevel while the Voice Command system is speaking. The volume setting for Voice
Command is different than the audio system.
• Refer to the Understand The Features Of Your Vehicle section of your vehicle's Owner's Manual on the DVD for further details.
Common Voice Commands (Examples)
Switch Modes “AM”
“FM”
“Satellite”
Radio (FM, AM) “95.5”
“95.5 FM”
SIRIUS Satellite Radio “39”
“Tune to Satellite channel 39”
“Foxxhole”
SIRIUS Travel Link “Show fuel prices”
“Show movie listings”
“Show current weather”
“Show extended weather”
“Show Travel Link favorites”
“Show NFL headlines”
“Show NBA rankings”
“Show NFL schedules”
“Show NBA scores”
Navigation “Repeat guidance”
WARNING!
Any voice commanded system should be used only in safe driving conditions
following local laws and phone use. All attention should be kept on the roadway
ahead. Failure to do so may result in a collision causing you and others to be
severely injured or killed.
VIDEO ENTERTAINMENT SYSTEM (VES)™
System Operation
• The screen is located on the headliner behind the front seat. To lower the screen,
press the release button located in the rear of the overhead console.
• The system may be controlled by the front seat occupants using the touch-screen radio, or by the rear seat occupants using the remote control.
• The video screen displays information in a split-screen format. The left side of the screen is referred to as Channel 1 and the right side of the screen is referred to as
Channel 2. All modes except video modes are displayed in a split-screen format.
• To use the headphones, press the power button located on the right ear cup. Select the channel on the headphones (1 or 2) that corresponds to the channel selected
on the VES™ screen.
ELECTRONICS
55
Page 63 of 108
POWER INVERTER
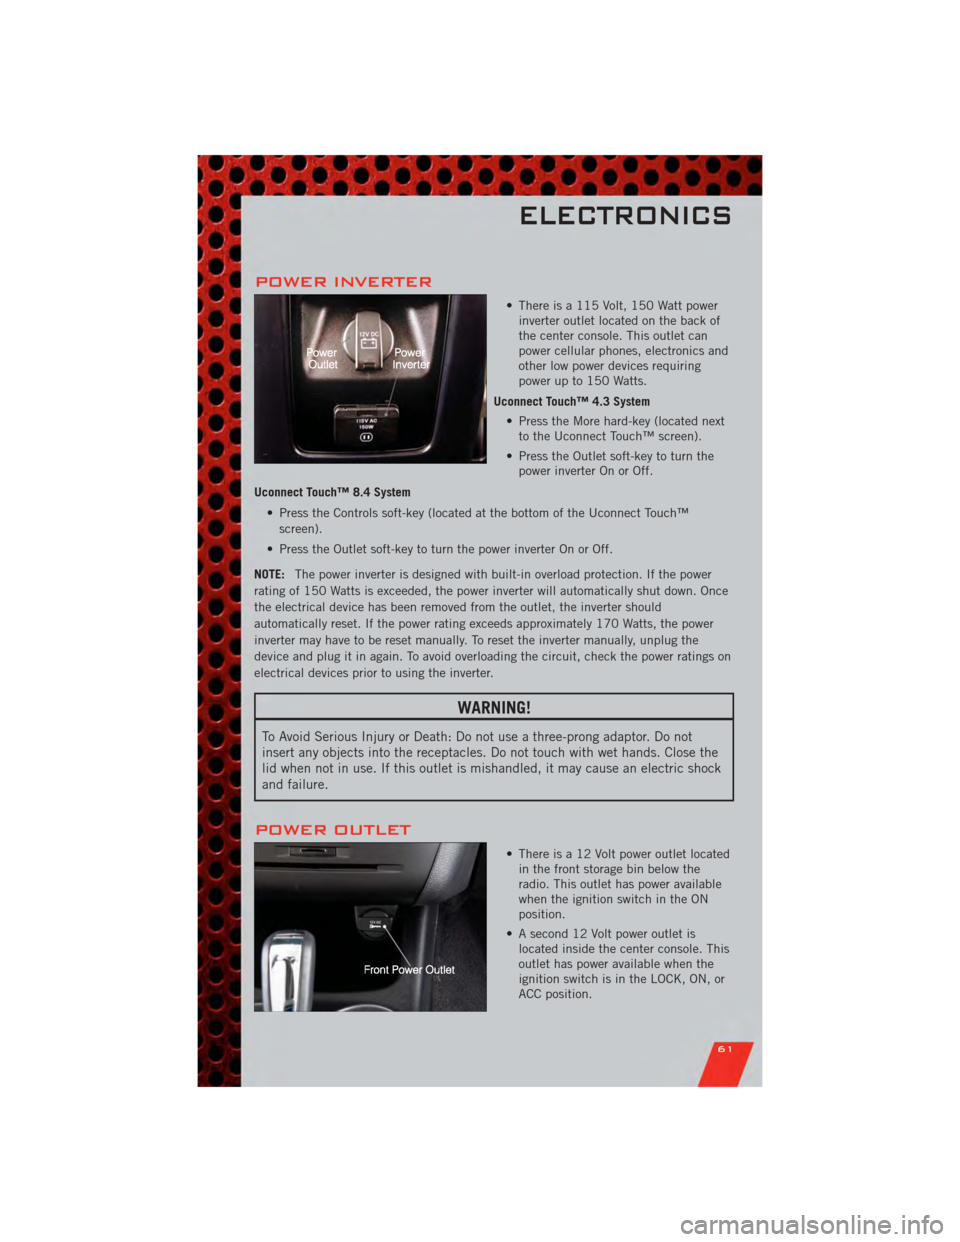
• There is a 115 Volt, 150 Watt powerinverter outlet located on the back of
the center console. This outlet can
power cellular phones, electronics and
other low power devices requiring
power up to 150 Watts.
Uconnect Touch™ 4.3 System • Press the More hard-key (located nextto the Uconnect Touch™ screen).
• Press the Outlet soft-key to turn the power inverter On or Off.
Uconnect Touch™ 8.4 System • Press the Controls soft-key (located at the bottom of the Uconnect Touch™screen).
• Press the Outlet soft-key to turn the power inverter On or Off.
NOTE: The power inverter is designed with built-in overload protection. If the power
rating of 150 Watts is exceeded, the power inverter will automatically shut down. Once
the electrical device has been removed from the outlet, the inverter should
automatically reset. If the power rating exceeds approximately 170 Watts, the power
inverter may have to be reset manually. To reset the inverter manually, unplug the
device and plug it in again. To avoid overloading the circuit, check the power ratings on
electrical devices prior to using the inverter.
WARNING!
To Avoid Serious Injury or Death: Do not use a three-prong adaptor. Do not
insert any objects into the receptacles. Do not touch with wet hands. Close the
lid when not in use. If this outlet is mishandled, it may cause an electric shock
and failure.
POWER OUTLET
• There is a 12 Volt power outlet located in the front storage bin below the
radio. This outlet has power available
when the ignition switch in the ON
position.
• A second 12 Volt power outlet is located inside the center console. This
outlet has power available when the
ignition switch is in the LOCK, ON, or
ACC position.
ELECTRONICS
61